Recent projects require the configuration of a four-node cluster of shared storage to enable the cluster to form a load balancing.
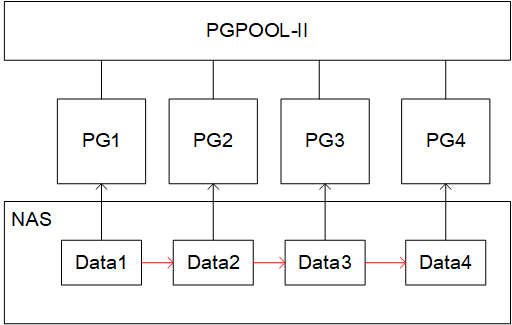
However, you know that PostgreSQL does not support the generation of multiple instances using the same data directory. When executing pg_ctl start, if an instance of the specified data directory is running, the instance will fail to down load the database.Therefore, we chose a strategy based on pgpool-II + repmgr to implement load balancing strategy based on NAS shared storage.The architecture is illustrated below:
There are many ways to implement shared disks. This paper mainly explains how to use repmgr:
(Zero) Preparations
In this example, four virtual machines are prepared with IP addresses:
192.168.100.1 node1

192.168.100.2 node2

192.168.100.3 node3

192.168.100.4 node4
In NAS storage, directories data1, data2, data3, and data4 are created and mounted on each data node.*Note that directory permissions must be 700
Install repmgr on all nodes.Of these, initdb is executed on only node1 nodes, while node2, node3, and node4 are not initialized.
Add the following configuration to postgresql.conf of the node1 node:
hot_standby = on
wal_level = 'replica'
max_wal_senders = 50
Create repmgr users and databases
[Harvest@node1 ~] createuser -s repmgr
[Harvest@node1 ~] createdb repmgr -O repmgr
Configure pg_hba.conf, adding the following rules:
local    replication     repmgr                                              trust
host     replication     repmgr                 127.0.0.1/32                 trust
host     replication     repmgr                 192.168.100.0/0              trust
local    repmgr          repmgr                                              trust
host     repmgr          repmgr                 127.0.0.1/32                 trust
host     repmgr          repmgr                 192.168.100.0/0              trust
Start the database and test whether you can connect to it through repmgr in node2 (or node3, node4)
[Harvest@node1 ~] pg_ctl start
[Harvest@node2 ~] psql 'host=node1 user=repmgr dbname=repmgr connect_timeout=2'
(1) Install repmgr
First, unzip the repmgr and install:
[Harvest@node1 opt]cd repmgr-x.x.x
[Harvest@node1 repmgr-x.x.x] ./configure && make && make install #Both sed and pg_config are required to execute the configure. Basically, the linux system will have sed and pg_config will have postgresql installed
(2) Configuring node1
Create the configuration file repmgr1.conf on node1:
node_id=1
 node_name=node1
 conninfo='host=node1 user=repmgr dbname=repmgr connect_timeout=2'
 data_directory='/opt/data/data1'
Next, register node1 as the master server:
[Harvest@node1 ~] repmgr -f repmgr1.conf primary register
If the following echoes on the screen, the registration is successful:
INFO: connecting to primary database...
NOTICE: attempting to install extension "repmgr"
NOTICE: "repmgr" extension successfully installed
NOTICE: primary node record (id: 1) registered
Verify cluster state
[Harvest@node1 ~]repmgr -f repmgr.conf cluster show
The echo is as follows:
ID | Name  | Role    | Status    | Upstream | Connection string
 ----+-------+---------+-----------+----------+--------------------------------------------------------
  1  | node1 | primary | * running |          | host=node1 dbname=repmgr user=repmgr connect_timeout=2
(2) adding node2
Configure repmgr2.conf as described above:
node_id=2
 node_name=node2
 conninfo='host=node2 user=repmgr dbname=repmgr connect_timeout=2'
 data_directory='/opt/data/data2'
Create a node2 backup, which uses the pg_basebackup command to back up the node1 node's data directory to the data2 directory
[Harvest@node2 ~] repmgr -h node1 -U repmgr -d repmgr -f repmgr.conf standby clone
The echo below indicates that the backup was successful
NOTICE: using configuration file "/etc/repmgr.conf"
 NOTICE: destination directory "/opt/data/data2" provided
 INFO: connecting to source node
 NOTICE: checking for available walsenders on source node (2 required)
 INFO: sufficient walsenders available on source node (2 required)
 INFO: creating directory "/opt/data/data2"...
 NOTICE: starting backup (using pg_basebackup)...
 HINT: this may take some time; consider using the -c/--fast-checkpoint option
 INFO: executing:
      pg_basebackup -l "repmgr base backup" -D /opt/data/data2 -h node1 -U repmgr -X stream
 NOTICE: standby clone (using pg_basebackup) complete
 NOTICE: you can now start your PostgreSQL server
 HINT: for example: pg_ctl -D /opt/data/data2 start
Register node2
[Harvest@node2 ~] repmgr -f repmgr.conf standby register
The echo is as follows:
NOTICE: standby node "node2" (ID: 2) successfully registered
Verify cluster state
[Harvest@node1 ~]repmgr -f repmgr.conf cluster show
     ID | Name  | Role    | Status    | Upstream | Location | Connection string
    ----+-------+---------+-----------+----------+----------+--------------------------------------
     1  | node1 | primary | * running |          | default  | host=node1 dbname=repmgr user=repmgr
     2  | node2 | standby |   running | node1    | default  | host=node2 dbname=repmgr user=repmgr
(3) Registering node3 and node4
Noe3 and Noe4 are configured the same as Noe2, except that the parameter'--upstream-node-id=2'is added, which specifies the source of the data flow:
[Harvest@node3 ~] repmgr -h node2 -U repmgr -d repmgr -f /etc/repmgr.conf standby clone --upstream-node-id=2
[Harvest@node3 ~] repmgr -f /etc/repmgr.conf standby register --upstream-node-id=2
Similarly, the data stream source for node4 is node3:
[Harvest@node4 ~] repmgr -h node3 -U repmgr -d repmgr -f /etc/repmgr.conf standby clone --upstream-node-id=3
[Harvest@node4 ~] repmgr -f /etc/repmgr.conf standby register --upstream-node-id=3
Above, the cascade replication configuration of repmgr is used.
Reference resources
1.repmgr Manual: https://repmgr.org/docs/current/index.html
2. Manual in Chinese: http://citusdb.cn/?p=1068