Introduction to mail system
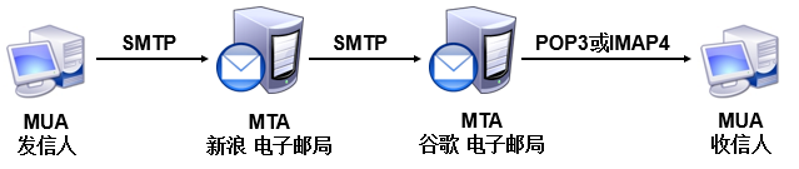
The e-mail system completes the transmission of e-mail based on the e-mail protocol. The common E-mail protocols are as follows
1. Simple Mail Transfer Protocol (SMTP): it is used to send and relay e-mail, occupying 25/TCP port of the server
2. Post office protocol version 3 (POP3): used to store e-mail to the local host, occupying 110/TCP port of the server
3.Internet Message Access Protocol version 4 (IMAP4): used to access mail on the local host, occupying 143/TCP port of the server
MUA (Mail User Agent): Mail User Agent, the server where users send and receive mail
MDA (Mail Delivery Agent): Mail Delivery Agent, the "mailbox" server that saves users' mail. Its job is to save mail from MTA (Mail Transfer Agent) Mail Transfer Agent to the local inbox
Considerations for deploying an enterprise e-mail system
Add anti spam and anti-virus module: it can effectively prevent spam or virus mail from interfering with enterprise mailbox
Encrypt the email: it can effectively protect the email content from being stolen and tampered by hackers
Add email monitoring and review module: it can effectively monitor whether there are sensitive words in the emails of all employees of the enterprise and whether there are violations such as disclosing enterprise information
Ensuring stability: the stability of the e-mail system is very important. The operation and maintenance personnel shall ensure the stable operation of the e-mail system and prepare for the prevention of Distributed Denial of Service (DDoS) attacks in time
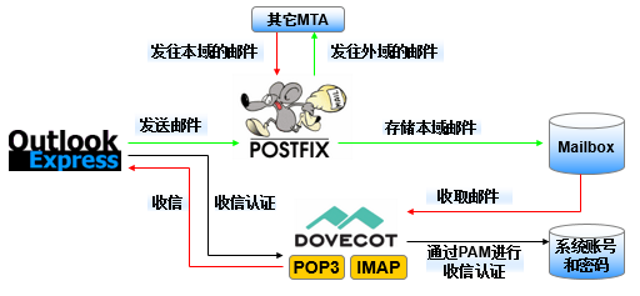
The most basic e-mail system: providing sending service and receiving service
Provide sending service function: Postfix service program based on SMTP protocol
Provide receiving service function: Dovecot service program based on POP3 protocol
Users can use client service programs such as Outlook Express or Foxmail to send and receive mail normally
In early Linux systems, the default sending service was provided by the Sendmail service program
Postfix service program in RHEL 8 system
Deployment premise
To verify the configuration effect of the e-mail system, first deploy the bind service program to provide DNS domain name resolution services for the e-mail server and client
Mailbox address format: user name @ host address (domain name)
The server
1. Configure host name
[root@xiudaochengxian ~]# vim /etc/hostname
  1 mail.xiuxian.com
[root@mail ~]# hostname
mail.xiuxian.com
2. Clear the firewall
[root@mail ~]# iptables -F
3. Install DNS Service
[root@mail ~]# yum -y install bind-chroot
Complete!
4. Edit DNS master profile
[root@mail ~]# vim /etc/named.conf
 13         listen-on port 53 { any; };
 14         listen-on-v6 port 53 { ::1; };
 15         directory       "/var/named";
 16         dump-file       "/var/named/data/cache_dump.db";
 17         statistics-file "/var/named/data/named_stats.txt";
 18         memstatistics-file "/var/named/data/named_mem_stats.txt";
 19         allow-query     { any; };
5. Edit DNS zone profile
[root@mail ~]# vim /etc/named.rfc1912.zones
  1 zone "xiuxian.com" IN {
  2 type master;
  3 file "xiuxian.com.zone";
  4 allow-update {none;};
  5 };
6. Edit forward parsing file
[root@mail ~]# cd /var/named/
[root@mail named]# ls
chroot  dynamic   named.empty      named.loopback
data    named.ca  named.localhost  slaves
[root@mail named]# cp -a named.localhost xiuxian.com.zone
[root@mail named]# vim xiuxian.com.zone
  1 $TTL 1D
  2 @       IN SOA  xiuxian.com. root.xiuxian.com. (
  3                                         0       ; serial
  4                                         1D      ; refresh
  5                                         1H      ; retry
  6                                         1W      ; expire
  7                                         3H )    ; minimum
  8         NS      ns.xiuxian.com.
  9 ns      IN A    192.168.43.23
 10 @       IN MX 10 mail.xiuxian.com.
 11 mail    IN A    192.168.43.23
7. Restart the DNS service and add the boot entry
[root@mail named]# systemctl restart named
[root@mail named]# systemctl enable named
Created symlink from /etc/systemd/system/multi-user.target.wants/named.service to /usr/lib/systemd/system/named.service.
8.ping the server (if you ping, the configuration is successful)
[root@mail named]# ping -c4 192.168.43.23
PING 192.168.43.23 (192.168.43.23) 56(84) bytes of data.
64 bytes from 192.168.43.23: icmp_seq=1 ttl=64 time=0.199 ms
64 bytes from 192.168.43.23: icmp_seq=2 ttl=64 time=0.106 ms
64 bytes from 192.168.43.23: icmp_seq=3 ttl=64 time=0.075 ms
64 bytes from 192.168.43.23: icmp_seq=4 ttl=64 time=0.077 ms

--- 192.168.43.23 ping statistics ---
4 packets transmitted, 4 received, 0% packet loss, time 3003ms
rtt min/avg/max/mdev = 0.075/0.114/0.199/0.051 ms
Mail system deployment - Postfix
1. Deploy Postfix service
Installed by default
[root@mail named]# yum -y install postfix
Loaded plugins: fastestmirror, langpacks
Loading mirror speeds from cached hostfile
Package 2:postfix-2.10.1-6.el7.x86_64 already installed and latest version
Nothing to do
2. Edit the postfix master configuration file
[root@mail named]# vim /etc/postfix/main.cf
 75 myhostname = mail.xiuxian.com		#host name
 83 mydomain = xiuxian.com				#domain name
 99 myorigin = $mydomain				#The domain name of the message sent from this computer
116 inet_interfaces = all				#Network card providing services (all)
164 mydestination = $myhostname, $mydomain	#The host name or domain name that can receive mail
3. Restart the postfix service and add the startup item
[root@mail named]# systemctl restart postfix
[root@mail named]# systemctl enable postfix
4. Create mail system login user
[root@mail named]# useradd shuaige
5. Set the password for the user
[root@mail named]# passwd shuaige
Changing password for user shuaige.
New password: 								#The password is set to 123456
BAD PASSWORD: The password is shorter than 8 characters
Retype new password:
passwd: all authentication tokens updated successfully.
Mail system deployment - Dovecot
1. Install Dovecot
[root@mail ~]# yum -y install dovecot
Complete!
2. Edit dovecot master profile
[root@mail ~]# vim /etc/dovecot/dovecot.conf
 23 # Protocols we want to be serving.
 24 protocols = imap pop3 lmtp	#Allowed agreements
 25 disable_plaintext_auth = no	#Allow users to use plaintext password authentication
 48 login_trusted_networks = 192.168.43.0/24	#Restrict users of a network segment from using the service. If it is allowed to be used by everyone, the parameters are not modified
3. Edit dovecot sub configuration file
[root@mail ~]# vim /etc/dovecot/conf.d/10-mail.conf
#Specify the location where the received mail is stored locally on the server. By default, the definition is completed
 25    mail_location = mbox:~/mail:INBOX=/var/mail/%u
4. Switch users
[root@mail ~]# su - shuaige
5. Create a new directory for saving mail (. imap is a hidden directory)
[shuaige@mail ~]$ mkdir -p mail/.imap/INBOX
[shuaige@mail ~]$ logout
6. Restart dovecot service and add startup item
[root@mail ~]# systemctl restart dovecot
[root@mail ~]# systemctl enable dovecot
Created symlink from /etc/systemd/system/multi-user.target.wants/dovecot.service to /usr/lib/systemd/system/dovecot.service.
7. Set firewall policy (release mail protocol)
[root@mail ~]# firewall-cmd --permanent --zone=public --add-service=imap
success
[root@mail ~]# firewall-cmd --permanent --zone=public --add-service=pop3
success
[root@mail ~]# firewall-cmd --permanent --zone=public --add-service=smtp
success
[root@mail ~]# firewall-cmd --reload
success
Alias of the message
1. Edit alias
[root@xiudaochengxian ~]# vim /etc/aliases
 10 # Basic system aliases -- these MUST be present.
 11 mailer-daemon:  postmaster
 12 postmaster:     root
 13 shuaige:        root
2. Save alias
[root@xiudaochengxian ~]# newaliases
3. Restart the postfix service
[root@xiudaochengxian ~]# systemctl restart postfix
4. Restart dovecot service
[root@xiudaochengxian ~]# systemctl restart dovecot
5. Check email
[root@xiudaochengxian ~]# mail
testing
client
window system
Using outlook
When you successfully send mail using Outlook software, you can view the new mail reminder on the e-mail server
The command to view mail in RHEL 8 system is mailx, which needs to be installed by itself (the output information is omitted)
To see the full contents of the message, simply enter the number in front of the recipient's name
[root@xiudaochengxian ~]# yum -y  install mailx
[root@xiudaochengxian ~]# mailx
Heirloom Mail version 12.5 7/5/10.  Type ? for help.
"/var/spool/mail/root": 1 message 1 new
linux system
There are dozens of optional mail clients under Linux system, such as Thunderbird, Evolution, Gear, Elementary Mail, KMail, Mailspring, Sylpheed, jaws mail, etc
Thunderbird is an e-mail client released by Mozilla foundation, the parent company of FireFox browser. It combines various advantages of FireFox browser, realizes cross platform support, and has various plug-ins and rich functions. Simple operation makes it easier for users to start
1. Install thunderbird
[root@xiudaochengxian ~]# yum -y install thunderbird
2. Run thunderbird
[root@xiudaochengxian ~]# thunderbird
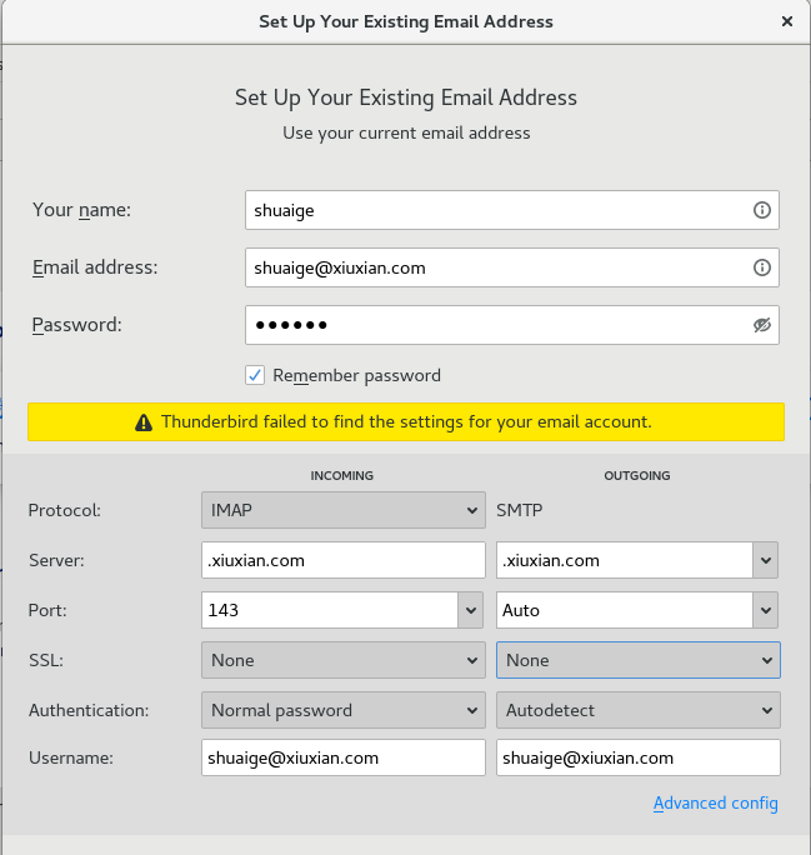
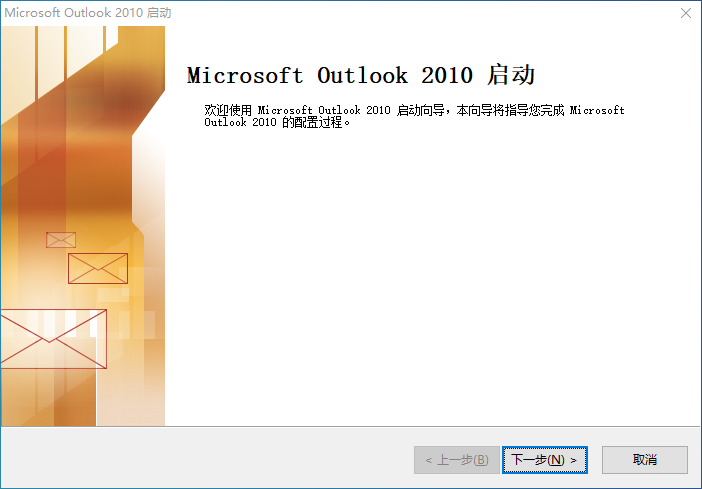
3. When entering the Thunderbird client interface for the first time, the user will be required to fill in the name, address and password of the email account
The account does not have to be the same as the account name in the system. It can be understood as the nickname of the mail sender, and the password is the password of the account in the system, and then click Continue
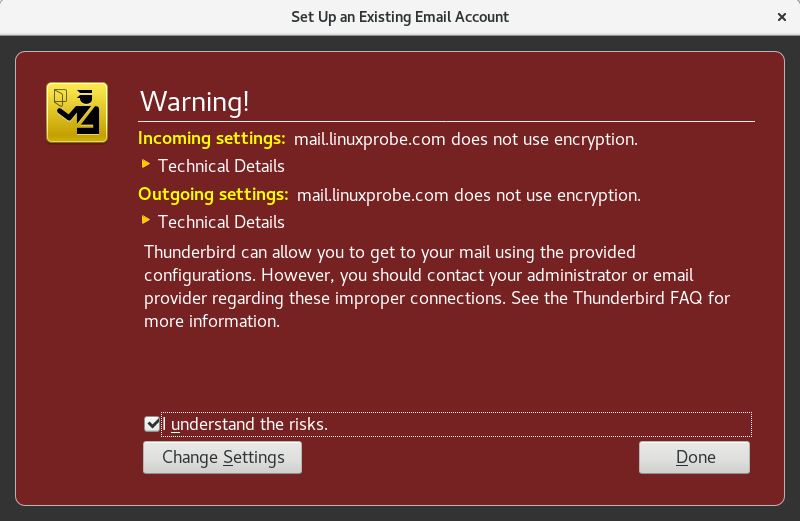
4. Since SSL post office encryption is not currently set, in the manual configuration mode, you need to change the SSL option to None and set Authentication to Normal password
5. For security reasons, the Thunderbird client will prompt a warning message. Select the understand the risks check box and click the Done button