11.5 song Leaderboard
The song leaderboard is accessed through the navigation link on the home page and displayed in descending order according to the number of songs played. From the design diagram of the leaderboard page, we can see that the web page has three functions: search at the top of the web page, song classification and filtering, and song information list. The description is as follows:
1. Search at the top of the web page: each web page has basic functions, and the implementation method and principle of each web page are the same.
2. Song classification filtering: filter songs according to song ﹣ type field of song information table and display them in song classification on the left side of the web page.
3. Song information list: display the top 10 song information on the web page.
The song leaderboard is implemented by the project application ranking of music. We create template folder templates in the ranking directory and place the template file ranking.html in the folder, as shown in the following figure:
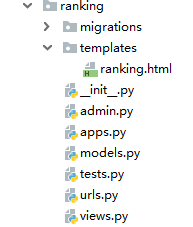
Song leaderboards are implemented by ranking's urls.py, views.py, and ranking.html. Set the URL address information of song leaderboard in urls.py of ranking, and write the corresponding URL processing function in views.py. The code is as follows:
#ranking/urls.py
from django.urls import path
from . import views
urlpatterns = [
    path('', views.rankingView, name='ranking'),
]

#ranking Of views.py
from django.shortcuts import render
from index.models import *
def rankingView(request):
    # Search for songs
    search_song = Dynamic.objects.select_related('song').order_by('-dynamic_search').all()[:4]
    # Song category list
    All_list = Song.objects.values('song_type').distinct()
    # Song list information
    song_type = request.GET.get('type', '')
    if song_type:
        song_info = Dynamic.objects.select_related('song').filter(song__song_type=song_type).order_by('-dynamic_plays').all()[:10]
    else:
        song_info = Dynamic.objects.select_related('song').order_by('-dynamic_plays').all()[:10]
    return render(request, 'ranking.html', locals())
The above code gives the response processing of the song leaderboard to the view function rankingView, and names the URL ranking. The view function rankingView performs a total of three data queries, which are described as follows:
1. Search [Song]: query in descending order by the search times of songs. The data query of Song and Dynamic models is realized by the built-in select [related] method of Django
2. All list: de duplicate query the Song type field of the model Song.
3. song_info: query data according to user's GET request parameters. If the request parameter is empty, all songs will be filtered to GET the songs with the top 10 playback times; if the request parameter is not empty, songs will be filtered according to the parameter content to GET the songs with the top 10 playback times.
According to the variables generated by the view function rankingView, we write the relevant template syntax in the template ranking.html. Because there are many codes in the template ranking.html, here refers to the list of relevant function codes. The complete template code can be viewed in the download resources. The function code of the template ranking.html is as follows:


#Function code of template index.html
#The search box of the leaderboard is implemented by the HTML form, {% url 'search' XXX%} is the address link of the search page
<form id="searchForm" action="{% url 'search' 1 %}" method="post" target="_blank">
        {% csrf_token %}
            <div class="search-keyword">
                <input name="kword" type="text" class="keyword" maxlength="120" placeholder="Music Festival" />
            </div>
            <input id="subSerch" type="submit" class="search-button" value="Search" />
        </form>

#The popular search song under the search box, {% url 'play' XXX%} is the address link of the play page
<div id="suggest" class="search-suggest"></div>
          <div class="search-hot-words">
            {% for song in search_song  %}
                <a target="play" href="{% url 'play' song.song.song_id %}" >{{ song.song.song_name }}</a>
            {% endfor  %}
          </div>

#Website navigation bar
<ul class="nav clearfix">
            <li><a href="/">home page</a></li>
            <li><a href="{% url 'ranking' %}" target="_blank">Song ranking</a></li>
            <li><a href="{% url 'home' 1 %}" target="_blank">User center</a></li>
        </ul>

#Song category list
<div class="side-nav">
            <div class="nav-head">
                <a href="{% url 'ranking' %}">All song categories</a>
            </div>
            <ul id="sideNav" class="cate-item">
            {% for item in All_list  %}
                <li class="computer">
                <div class="main-cate">
                    <a href="{% url 'ranking' %}?type={{ item.song_type }}" class="main-title">{{ item.song_type }}</a>
                </div>
                </li>
            {% endfor  %}
            </ul>
        </div>

#Song list information
<table class="rank-list-table">
            <tr>
                <th class="cell-1">ranking</th>
                <th class="cell-2">picture</th>
                <th class="cell-3">Song name</th>
                <th class="cell-4">Album</th>
                <th class="cell-5">Download volume</th>
                <th class="cell-6">Playback volume</th>
            </tr>
            {% for item in song_info  %}
                <tr>
                    {%if forloop.counter < 4  %}
                    <td><span class="n1">{{forloop.counter}}</span></td>
                    {%else %}
                    <td><span class="n2">{{forloop.counter}}</span></td>
                    {%endif %}
                    <td>
                    <a href="{% url 'play' item.song.song_id %}"  class="pic" target="play"><img src="{% static "songImg/" %}{{ item.song.song_img }}"  width="80" height="80"></a>
                    </td>
                    <td class="name-cell">
                    <h3><a href="{% url 'play' item.song.song_id %}" target="play" >{{item.song.song_name}}</a></h3>
                    <div class="desc">
                    <a href="javascript:;" target="_blank" class="type" >{{item.song.song_singer}}</a>
                    </div>
                    </td>
                    <td>
                    <div style="text-align:center;">{{item.song.song_album}}</div>
                    </td>
                    <td>
                    <div style="text-align:center;">{{item.dynamic_down}}</div>
                    </td>
                    <td class="num-cell">{{item.dynamic_plays}}</td>
                </tr>
            {% endfor  %}
        </table>
From the above code, we can see that the template traverses and outputs the variables passed by the view function to generate the corresponding HTML web page content. The template code writing logic is the same as the template of the home page. In order to check whether the web page is displayed normally, we look forward to launching the music project. Visit http://127.0.0.1:8000/ranking.html on the browser, and the operation results are as follows:
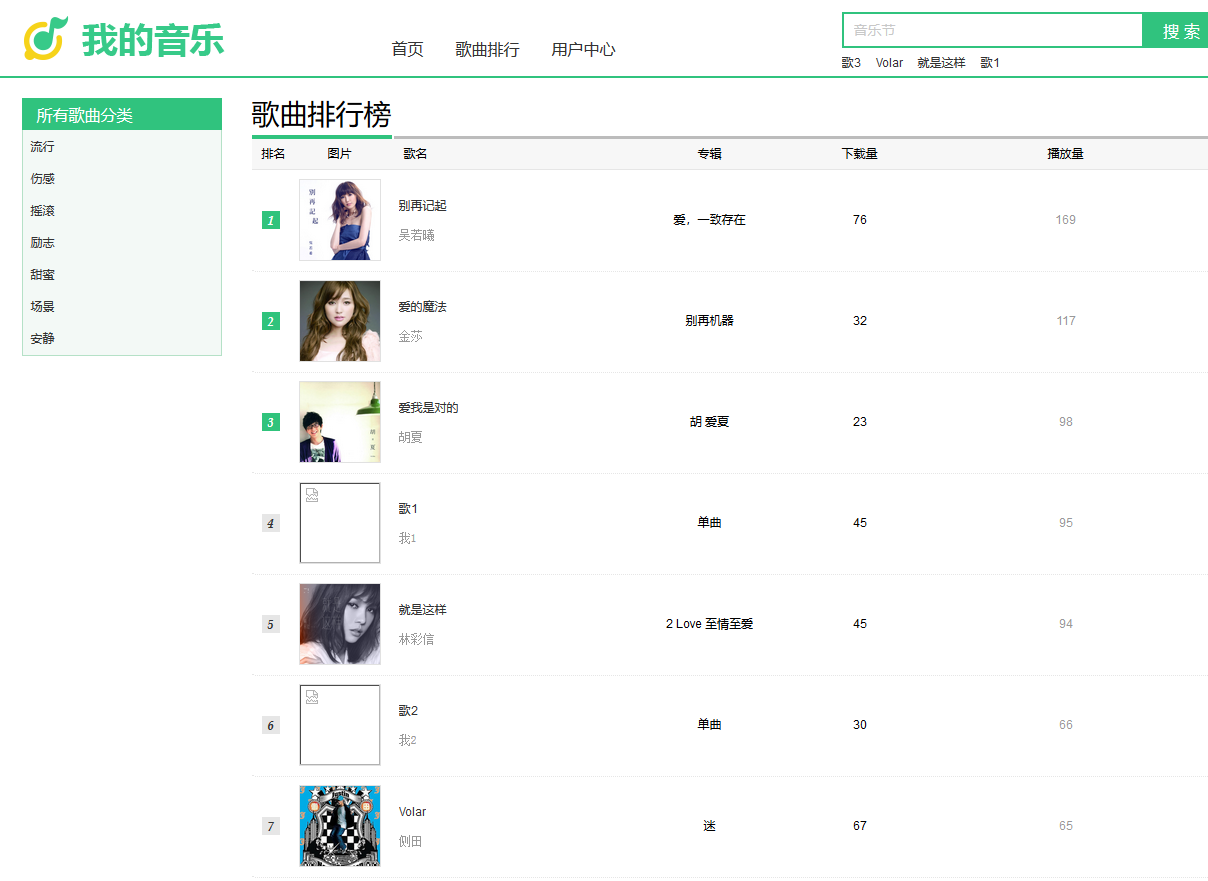
Song Leaderboard
In the above implementation process, the URL processing method is completed by the view function rankingView, and the view function rankingView mainly wants to query data and pass the query results to the template. Therefore, we can also use the general view to complete the URL processing. Using the general view to realize the function of view function rankingView, you only need to write the relevant code in urls.py and views.py of rankingView, the code is as follows:
#ranking/urls.py
from django.urls import path
from . import views
urlpatterns = [
    path('', views.rankingView, name='ranking'),
    # General view
    path('.list', views.RankingList.as_view(), name='rankingList'),
]

#ranking/views.py
# General view
from django.views.generic import ListView
class RankingList(ListView):
    # context_object_name Set up Html A variable name of the template
    context_object_name = 'song_info'
    # Set template file
    template_name = 'ranking.html'
    # Query variables song_info Data for
    def get_queryset(self):
        # Get request parameters
        song_type = self.request.GET.get('type', '')
        if song_type:
            song_info = Dynamic.objects.select_related('song').filter(song__song_type=song_type).order_by('-dynamic_plays').all()[:10]
        else:
            song_info = Dynamic.objects.select_related('song').order_by('-dynamic_plays').all()[:10]
        return song_info

    # Add other variables
    def get_context_data(self, **kwargs):
        context = super().get_context_data(**kwargs)
        # Search for songs
        context['search_song'] = Dynamic.objects.select_related('song').order_by('-dynamic_search').all()[:4]
        # All song categories
        context['All_list'] = Song.objects.values('song_type').distinct()
        return context
In the above code, we set the URL address information of the general view in urls.py of ranking, named rankinglist, and the URL processing is performed by rankinglist of views.py. The general view rankinglist also implements three times of data query. The data query is the same as the view function rankingView. Finally, the template rankingView.html processes variables and generates HTML pages. Restart the project and visit http://127.0.0.1:8000/ranking.html.list on the browser
11.6 song playing
In the previous chapter, the website shioh and song leaderboards are mainly based on data query. This section mainly realizes the function of online song audition and song download, which is also one of the core functions of the whole website. From the design diagram of the website, we can see that the main functions of the song playing page are: search at the top of the web page, basic information of songs, current playlist, song comment download and related song recommendation. The function description is as follows:
1. Search at the top of the web page: each web page has the basic functions, and the implementation method and principle of each web page are the same.
2. Basic information of Songs: display the basic information of the currently played songs, such as song name, singer, album, song cover and lyrics.
3. Current playlist: record the audio-visual records of the user, and switch the currently played songs.
4. Song comment Download: it mainly realizes the function of song comment and download. Song comment enters the song comment page through the address link, and song download is used to realize the file download function.
5. Recommendation of related songs: filter according to the type of songs currently played, and sort the filtering results according to the number of songs played to get the information of the first six songs, which is displayed at the bottom of the web page.
The play of songs is realized by the play of the project music. Create the template folder templates in the play directory and place the template file play.html in the folder, as shown below:
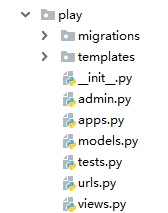
play directory structure
We write relevant function codes in the urls.py, views.py and play.html of play to realize the function of playing and downloading songs. First, set the URL address information of song playing and song downloading in urls.py, and write the corresponding URL processing function in views.py. The code is as follows:


#play/urls.py
from django.urls import path
from . import views
urlpatterns = [
    # Song playing page
    path('<int:song_id>.html', views.playView, name='play'),
    # Song download
    path('download/<int:song_id>.html',views.downloadView, name='download')
]

#play/views.py
from django.shortcuts import render
from django.http import StreamingHttpResponse
from index.models import *
# Song playing page
def playView(request, song_id):
    # Hot search songs
    search_song = Dynamic.objects.select_related('song').order_by('-dynamic_search').all()[:6]
    # Song information
    song_info = Song.objects.get(song_id=int(song_id))
    # playlist
    play_list = request.session.get('play_list', [])
    song_exist = False
    if play_list:
        for i in play_list:
            if int(song_id) == i['song_id']:
                song_exist = True
    if song_exist == False:
        play_list.append({'song_id': int(song_id), 'song_singer': song_info.song_singer, 'song_name': song_info.song_name, 'song_time': song_info.song_time})
    request.session['play_list'] = play_list
    # Lyric
    if song_info.song_lyrics != 'No lyrics yet':
        f = open('static/songLyric/' +song_info.song_lyrics, 'r', encoding='utf-8')
        song_lyrics = f.read()
        f.close()
    # Related songs
    song_type = Song.objects.values('song_type').get(song_id=song_id)['song_type']
    song_relevant = Dynamic.objects.select_related('song').filter(song__song_type=song_type).order_by('-dynamic_plays').all()[:6]
    # Add playback times
    # Extended functions: available session Add only one playback per day
    dynamic_info = Dynamic.objects.filter(song_id=int(song_id)).first()
    # To judge whether the dynamic information of songs exists, add 1 to the original one
    if dynamic_info:
        dynamic_info.dynamic_plays += 1
        dynamic_info.save()
    # Create new dynamic information when dynamic information does not exist
    else:
        dynamic_info = Dynamic(dynamic_plays=1, dynamic_search=0, dynamic_down=0, song_id=song_id)
        dynamic_info.save()
    return render(request, 'play.html', locals())

# Song download
def downloadView(request, song_id):
    # according to song_id Find song information
    song_info = Song.objects.get(song_id=int(song_id))
    # Add Downloads
    dynamic_info = Dynamic.objects.filter(song_id=int(song_id)).first()
    # To judge whether the dynamic information of songs exists, add 1 to the original one
    if dynamic_info:
        dynamic_info.dynamic_down += 1
        dynamic_info.save()
    # Create new dynamic information when dynamic information does not exist
    else:
        dynamic_info = Dynamic(dynamic_plays=0,dynamic_search=0,dynamic_down=1,song_id=song_id)
        dynamic_info.save()
    # Read file contents
    file = 'static/songFile/' + song_info.song_file
    def file_iterator(file, chunk_size=512):
        with open(file, 'rb') as f:
            while True:
                c = f.read(chunk_size)
                if c:
                    yield c
                else:
                    break
    # Write file contents to StreamingHttpResponse Object and return it to the user in byte stream mode to download the file
    filename = str(song_id) + '.mp3'
    response = StreamingHttpResponse(file_iterator(file))
    response['Content-Type'] = 'application/octet-stream'
    response['Content-Disposition'] = 'attachment; filename="%s"' %(filename)
    return response
From the above code, we can see that there are two URL addresses in the urls.py of play, named play and download respectively. The details are as follows:
1. The URL named play represents the address of the song playing page, and has the parameter Song [ID]. The parameter Song [ID] is the primary key of the current song in the song information table song, and the view function obtains the song information through the URL parameter.
2. The URL named download is used to download songs. In the song playing page, you can see the "download" button, which is a URL address link. When the user clicks the "download" button, the website triggers a GET request, which points to the URL named download, which is processed and responded by the view function downloadView.
Since urls.py has two URL addresses, the view functions corresponding to URLs are playView and downloadView respectively. First of all, the function of view function playView is described. The view function playView realizes the data query, the setting of playlist, the reading of lyrics and the accumulation of playing times.
1. Search [song]: get the song information of the popular search. The data query has been described in the previous chapter, and will not be repeated here.
2. Song Info: query the current song information in song information table according to the parameter song ID provided by URL.
3. Play list: obtain the play list information of the current Session. Play list represents the user's play record. Compare the parameter song ID of URL with that of Olay list. If the two match, the current song has been added to the play record. If the two match, the current song information will be added to the play list.
4. Song Fu lyrics: the content of the current song lyrics. First, judge whether there is a lyrics file for the current song. If there is one, read the contents of the lyrics file and assign it to the variable song ﹣ lyrics.
5. Song "relevant: query the current song type in song information table song according to the parameter song" id provided by URL, and then query the song information of the same type according to the song type, and sort by the number of songs played.
6. Dynamic Info: query the dynamic information of the current song in the song dynamic table dynamic according to the parameter song ID provided by the URL. If there is no song dynamic information, new dynamic information will be created and the number of plays will be accumulated by 1; if there is song dynamic information, the number of plays will be accumulated by 1
Then it analyzes the function of view function downloadView. The view function downloadView is used to download songs. Every time a song is downloaded, the download times of the song must be accumulated by 1. Therefore, the view function downloadView mainly implements two functions: the accumulation of song downloads and file downloads. The function description is as follows:
1. Dynamic Info: search the dynamic information of songs in the dynamic table of songs according to the parameter song ID provided by the URL. If there is no song dynamic information, new dynamic information will be created and the number of downloads will be accumulated by 1; if there is song dynamic information, the number of downloads will be accumulated by 1.
2. Response: the response object of the website is generated by instantiation of StreamingHttpResponse. First, read the content of the song file in the form of byte stream, then write the content of the file into the response object and set the response type to realize the download function of the file.
We analyze the response content of the view functions playView and downloadView. The view playView is to return relevant web pages on the browser, and the function downloadView is to directly return song files for users to download. Therefore, we code the template play.html used by the view function playView. Due to the large number of template codes, only the relevant function codes are listed here. The complete codes can be viewed in the source code provided in this book. The code description is as follows:


#Common tender code of template play.html
#The function of playing songs is realized by Javascript. Django only needs to provide song files to realize online audition
<div id="jquery_jplayer_1" class="jp-jplayer" data-url={% static "songFile/" %}{{ song_info.song_file }}></div>

#Song cover
<div class="jp_img layz_load pic_po" title="Click to play"><img data-src={% static "songImg/" %}{{ song_info.song_img }}></div>

#Lyric
<textarea id="lrc_content" style="display: none;">
                      {{ song_lyrics }}
                    </textarea>

#Song information
<div class="product-price">
                        <h1 id="currentSong" >{{ song_info.song_name }}</h1>
                        <div class="product-price-info">
                            <span>Singer:{{ song_info.song_singer }}</span>
                        </div>
                        <div class="product-price-info">
                            <span>Album:{{ song_info.song_album }}</span>
                            <span>languages:{{ song_info.song_languages }}</span>
                        </div>
                        <div class="product-price-info">
                            <span>schools:{{ song_info.song_type }}</span>
                            <span>Time of issue:{{ song_info.song_release }}</span>
                        </div>
                    </div>

#playlist
<ul class="playing-li" id="songlist">
                            <!--playlist-->
                            {% for list in play_list %}
                             #Style the current song
                            {%if list.song_id == song_info.song_id %}
                            <li data-id="{{list.song_id}}" class="current">
                            {%else %}
                            <li data-id="{{list.song_id}}">
                            {%endif %}
                            #Set the sequence number, song name and singer of the song list
                            <span class="num">{{forloop.counter}}</span>
                            <a class="name" href="{% url 'play' list.song_id %}" target="play" >{{list.song_name}}</a>
                            <a class="singer" href="javascript:;" target="_blank" >{{list.song_singer}}</a>
                            </li>
                            {%endfor %}
                        </ul>

#Related songs
<ul id="" class="parts-list clearfix f_s">
                                    {% for item in song_relevant %}
                                    <li>
                                        #Exclude the current song from display
                                        {% if item.song.song_id != song_info.song_id %}
                                        #Set up links for song covers and song playback
                                        <a class="pic layz_load pic_po" href="{% url 'play' item.song.song_id %}" target="play" >
                                            <img data-src="{% static "songImg/" %}{{ item.song.song_img }}">
                                        </a>
                                        #Set song name with play link
                                        <h4><a href="{% url 'play' item.song.song_id %}" target="play" >{{ item.song.song_name}}</a></h4>
                                        #Set up a singer
                                        <a href="javascript:;" class="J_MoreParts accessories-more">{{ item.song.song_singer }}</a>
                                        {% endif %}
                                    </li>
                                    {% endfor %}
                                </ul>
From the above code, we can see that the template play.html traverses and outputs the variables passed by the view function playView to generate the corresponding HTML web page content. Finally, we check whether the function works normally. We restart the music project and input: http://127.0.0.1:8000/play/6.html on the browser
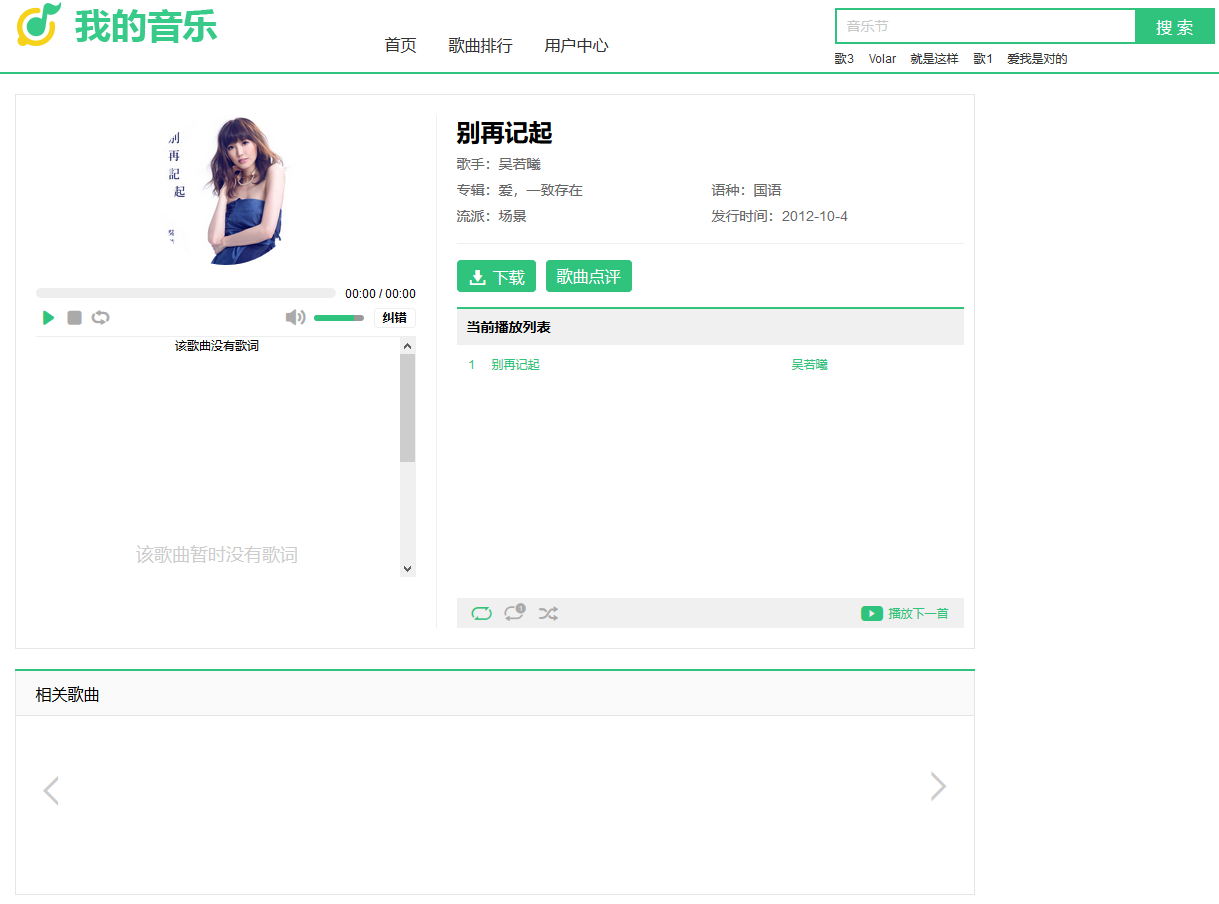
Song playing page
11.7 song comments
Song comment is a page entered through the Comment button of the song playing page. The whole website can only access the song comment page in this way. Song comment page mainly realizes two functions: Song comment and song comment information list. The function description is as follows:
1. Song comment: it mainly provides the function of song comment for users to submit data in the form of forms.
2. Song comment information list: search the related comment content of song comment table comment according to the URL parameter song · ID, and then display it on the web page in the form of data list.
In project music, song comment is implemented by comment. Before writing code, create key template folder templates in comment directory and place template file comment.html in the folder, as shown below:
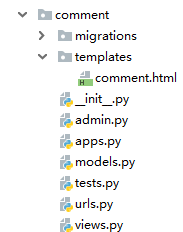
After adjusting the comment directory structure, we write the relevant function code in urls.py, views.py and comment.html of comment. First, set the URL address information of song comment in urls.py, and write the URL processing function in views.py. The code is as follows:
#comment/urls.py
from django.urls import path
from . import views
urlpatterns = [
    path('<int:song_id>.html', views.commentView, name='comment'),
]

#comment/views.py
from django.core.paginator import Paginator, EmptyPage, PageNotAnInteger
from django.shortcuts import render, redirect
from django.http import Http404
from index.models import *
import time
def commentView(request, song_id):
    # Hot search songs
    search_song = Dynamic.objects.select_related('song').order_by('-dynamic_search').all()[:6]
    # Comment submission processing
    if request.method == 'POST':
        comment_text = request.POST.get('comment','')
        comment_user = request.user.username if request.user.username else 'Anonymous user'
        if comment_text:
            comment = Comment()
            comment.comment_text = comment_text
            comment.comment_user = comment_user
            comment.comment_date = time.strftime('%Y-%m-%d', time.localtime(time.time()))
            comment.song_id = song_id
            comment.save()
        return redirect('/comment/%s.html' %(str(song_id)))
    else:
        song_info = Song.objects.filter(song_id=song_id).first()
        # No 404 exception thrown for the song
        if not song_info:
            raise Http404
        comment_all = Comment.objects.filter(song_id=song_id).order_by('comment_date')
        song_name = song_info.song_name
        page = int(request.GET.get('page', 1))
        paginator = Paginator(comment_all, 2)
        try:
            contacts = paginator.page(page)
        except PageNotAnInteger:
            contacts = paginator.page(1)
        except EmptyPage:
            contacts = paginator.page(paginator.num_pages)
        return render(request, 'comment.html', locals())
From the above code, we can see that the URL of urls.py has set the parameter song · ID, and the parameter value is set by the song playing page. We name the URL comment, and the corresponding processing is performed by the view function commentView. The view function commentView performs different response processing according to different request modes. The specific instructions are as follows:
When the user enters the song comment page from the song playing page, the URL of the browser accessing the song comment page is equivalent to sending a GET request to the website. The view function commentView performs the following processing:
1. Query the song information table song according to the URL parameter Song [ID] to determine whether the song exists. If the song does not exist, the site throws a 404 error message.
2. If the song exists, query all the comment information of the current song in the song comment table comment, and then obtain the request parameter page of GET request. The parameter page represents the page number of comment information. If the request parameter page does not exist, the default page number is 1. If it exists, convert the parameter value to Int type.
3. Paginate according to the comment information and page number of songs, and set each two comment information as one page.
If the user comments on the content of the song comment page and clicks the "publish" button, the browser sends a POST request to the website. The POST request is received and processed by the URL of the song comment page. The view function commentView performs the following processing:
1. First get the comment content in the form, named comment_text, and then get the current user name. If the current user does not log in to the website, the user is anonymous, and the user name is comment_user.
2. If comment "text is not empty, add a comment information in the song comment table comment, record the comment content, user name, comment date and the primary key of the current song in the song information table.
3. Finally, jump back to the song comment page in the way of redirection. The redirection of the website can prevent the form from being submitted multiple times and solve the problem of creating the same comment information repeatedly.
The next step is to write the corresponding function code in the template comment.html. The template comment.html implements five functions, namely, the search box of the web page, the navigation link of the website, the song comment box, the comment information list and the paging navigation of the list. Among them, the search box and website navigation link of the web page have been described in the previous chapter, and will not be repeated here. Because there are many codes in the template comment.html, this chapter only lists the implementation process of song comment box, comment information list and paging navigation of the list. The specific codes can be viewed in the source code of this book. The function code of template comment.html is as follows:
#Function code of comment.html
#Song comment box
<div class="comments-box">
                        <div class="comments-box-title">I want to comment<<{{ song_name }}>></div>
                        <div class="comments-default-score clearfix"></div>
                        <form action="" method="post" id="usrform">
                            {% csrf_token %}
                            <div class="writebox">
                                <textarea name="comment" form="usrform"></textarea>
                            </div>
                            <div class="comments-box-button clearfix">
                                <input type="submit" value="Release" class="_j_cc_post_entry cc-post-entry" id="scoreBtn">
                                <div data-role="user-login" class="_j_cc_post_login"></div>
                            </div>
                            <div id="scoreTips2" style="padding-top:10px;"></div>
                        </form>
                    </div>

#Display the current paged song comment information and generate the comment information list
<ul class="comment-list">
                    {% for item in contacts.object_list %}
                        <li class="comment-item ">
                            <div class="comments-user">
                <span class="face">
                <img src="{% static "image/user.jpg" %}" width="60" height="60">
                </span>
                            </div>
                            <div class="comments-list-content">
                                <div class="single-score clearfix">
                                    <span class="date">{{ item.comment_date }}</span>
                                    <div><span class="score">{{ item.comment_user }}</span></div>
                                </div>
                                <!--comments-content-->
                                <div class="comments-content">
                                    <div class="J_CommentContent comment-height-limit">
                                        <div class="content-inner">
                                            <div class="comments-words">
                                                <p>{{ item.comment_text }}</p>
                                            </div>
                                        </div>
                                    </div>
                                </div>
                            </div>
                        </li>
                    {% endfor %}
                </ul>

#Paged navigation
<div class="page-box">
                    <div class="pagebar" id="pageBar">
                        {% if contacts.has_previous %}
                            <a href="{% url 'comment' song_id %}?page={{ contacts.previous_page_number }}" class="prev"
                               target="_self"><i></i>previous page</a>
                        {% endif %}
                        {% for page in contacts.paginator.page_range %}
                            {% if contacts.number == page %}
                                <span class="sel">{{ page }}</span>
                            {% else %}
                                <a href="{% url 'comment' song_id %}?page={{ page }}" target="_self">{{ page }}</a>
                            {% endif %}
                        {% endfor %}
                        {% if contacts.has_next %}
                            <a href="{% url 'comment' song_id %}?page={{ contacts.next_page_number }}" class="next"
                               target="_self">next page<i></i></a>
                        {% endif %}
                    </div>
                </div>
From the above code, we can see that song comment box is a form form, which is realized by writing HTML code: comment information list and paging navigation are realized on the basis of paging object contacts. Restart music to visit http://127.0.0.1:8000/comment/6.html
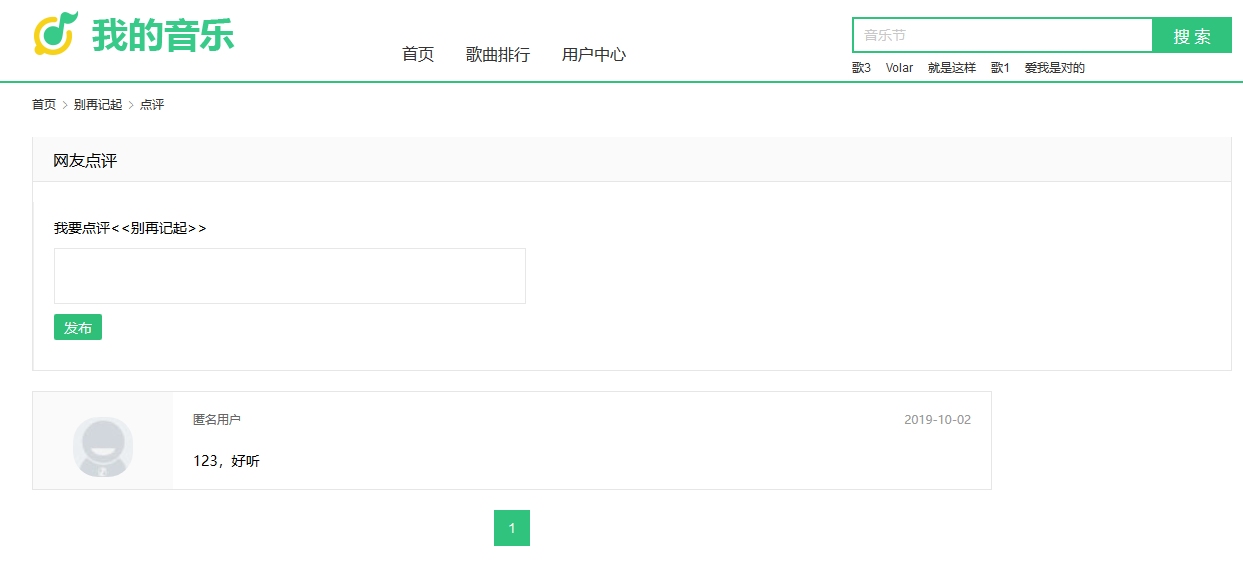
Song comment page
11.8 song search
Song search is also a web page generated by triggering the search box at the top of the web page. Users can input content to achieve song search, and the search results are displayed on the song search page. The search implementation of music, a song search project, creates template folder templates in the search directory, and places the template file search.html in the folder, as shown in the following figure:
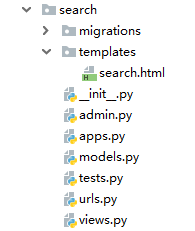
As you can see from the previous chapter, the search box at the top of the web page receives the user's search request from the URL of {% url 'search' 1%}, which is a POST request. Therefore, we write relevant function codes in urls.py and views.py of search, as follows:


#search Of urls.py
from django.urls import path
from . import views
urlpatterns = [
    path('<int:page>.html', views.searchView, name='search'),
]

#search Of views.py
from django.shortcuts import render, redirect
from django.core.paginator import Paginator, EmptyPage, PageNotAnInteger
from django.db.models import Q
from index.models import *

def searchView(request, page):
    if request.method == 'GET':
        # Search for songs
        search_song = Dynamic.objects.select_related('song').order_by('-dynamic_search').all()[:6]
        # Get search content if kword Empty to query all songs
        kword = request.session.get('kword', '')
        if kword:
            # Q yes SQL In the sentence or grammar
            song_info = Song.objects.values('song_id', 'song_name', 'song_singer', 'song_time').filter(Q(song_name__icontains=kword) | Q(song_singer=kword)).order_by('-song_release').all()
        else:
            song_info = Song.objects.values('song_id', 'song_name', 'song_singer', 'song_time').order_by('-song_release').all()[:50]
        # Paging function
        paginator = Paginator(song_info, 5)
        try:
            contacts = paginator.page(page)
        except PageNotAnInteger:
            contacts = paginator.page(1)
        except EmptyPage:
            contacts = paginator.page(paginator.num_pages)
        # Add song searches
        song_exist = Song.objects.filter(song_name=kword)
        if song_exist:
            song_id = song_exist[0].song_id
            dynamic_info = Dynamic.objects.filter(song_id=int(song_id)).first()
            # To judge whether the dynamic information of songs exists, add 1 to the original one
            if dynamic_info:
                dynamic_info.dynamic_search += 1
                dynamic_info.save()
            # Create new dynamic information when dynamic information does not exist
            else:
                dynamic = Dynamic(dynamic_plays=0, dynamic_search=1, dynamic_down=0, song_id=song_id)
                dynamic.save()
        return render(request, 'search.html', locals())
    else:
        # Handle POST Request and redirect the search page.
        request.session['kword'] = request.POST.get('kword', '')
        return redirect('/search/1.html')
From the above code, we can see that the URL of the song search page is named search, the response processing is performed by the view function searchView, and the URL sets the parameter page, which represents the page number of search results. Analyze the view function searchView in views.py to understand the implementation process of song search. The description is as follows:
1. When the user clicks the "search" button in the search box, the program sends a POST request according to the URL pointed to by the action of the form form. After the URL receives the request, the request information is handed over to the view function searchView for processing.
2. If the view function searchView receives a POST request, first write the request parameter kword to the user's Session for storage. The request parameter kword is the text input box of the search box, and then jump back to the URL of the song search page by redirection.
3. When the URL of the song search page is accessed in the way of redirection, it is equivalent to sending a GET request to the website. The view function searchView first obtains the user's Session data to determine whether the kword of the Session data exists.
4. If there is kword, take kword as the query condition, and make fuzzy query in song name and song singer in song information table, and sort the query results by song discovery time; if there is no kword, sort the song information table by song release time, and get the information of the first 50 songs.
5. Paginate the query results in the form of 5 songs per page. Where, the parameter page of the searchView function is the number of pages paged.
6. Search the exact matching song name according to the search content kword. Only if the match is successful, can we judge whether the dynamic information of the song exists. If the dynamic information exists, the search times of the song will be accumulated by 1. Otherwise, a new dynamic information will be created for the song, and the search times will be set to 1.
7. Finally, the paging object contacts are passed to the template search.html, which is parsed by the template engine and generates the corresponding HTML web page.
When the template search.html receives the page object contacts, the template engine will parse the template syntax and convert it into HTML pages. According to the paging object contacts, we write the relevant template syntax in the template search.html. The paging object contacts mainly implements the data list and paging navigation functions of the current paging. The template syntax is as follows:
#Template search Function code of
#Data list of the current page
<ul class="songlist__list">
            {%for list in contacts.object_list %}
            <li class="js_songlist__child">
                <div class="songlist__item">
                    <div class="songlist__songname">
                        <span class="songlist__songname_txt">
                            <a href="{% url 'play' list.song_id %}" class="js_song" target="play" >{{list.song_name}}</a>
                        </span>
                    </div>
                    <div class="songlist__artist">
                        <a href="javascript:;" class="singer_name" >{{list.song_singer}}</a>
                    </div>
                    <div class="songlist__time">{{list.song_time}}</div>
                </div>
            </li>
            {%endfor %}
        </ul>

#Paging navigation function
<div class="page-box">
            #List all pages button
            <div class="pagebar" id="pageBar">
                {% if contacts.has_previous %}
                <a href="{% url 'search' contacts.previous_page_number %}" class="prev" target="_self"><i></i>previous page</a>
                {% endif %}

                #List all pages button
                {% for page in contacts.paginator.page_range %}
                    {% if contacts.number == page %}
                        <span class="sel">{{ page }}</span>
                    {% else %}
                        <a href="{% url 'search' page %}" target="_self">{{ page }}</a>
                    {% endif %}
                {% endfor %}

                #Buttons on next page
                {% if contacts.has_next %}
                <a href="{% url 'search' contacts.next_page_number %}" class="next" target="_self">next page<i></i></a>
                {% endif %}
            </div>
        </div>
It can be seen from the above code that song search is mainly the application of Django paging function. In addition, it also involves the accumulation of song search times and the use of Session. Start the project music, and search twice in the search box. The first time is to search with search content, and the second time is to search directly without search content. The operation results are as follows:

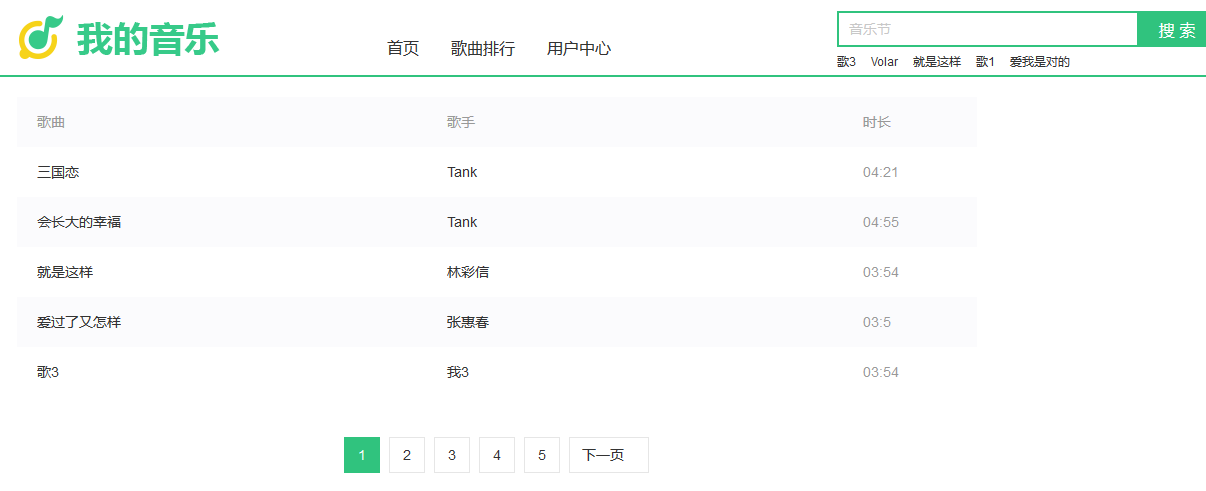
11.9 user registration and login
User registration and login is one of the necessary functions of user management. Without user registration and login, there is no user management. As long as the user functions are involved, we can use Django built-in Auth authentication system to achieve. User management is implemented by the user of the project music. The file form.py and template folder templates are created in the user directory, and the template files login.html and home.html are created in the folder templates.
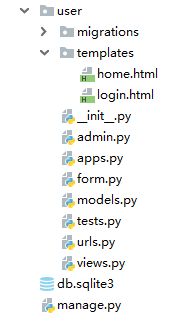
In the user directory, the new files include home.html, login.html and form.py. The new files implement the following functions respectively.
1. home.html: the template file of the user center, which displays the basic information of the current user and the song playing record of the user.
2. login.html: the template files for user registration and login, and the registration and login functions are all implemented by the same template.
3. form.py: create a form class registered by the user. The user registration function is implemented by the form class.
Because the user management of the project music is implemented on the basis of the built-in Auth authentication system of Django, we use the AbstractUser mode to expand the model user, and customize the user model MyUser in the user's models.py, the code is as follows:
#user/models.py
from django.db import models
from django.contrib.auth.models import AbstractUser

class MyUser(AbstractUser):
    qq = models.CharField('QQ number', max_length=20)
    weChat = models.CharField('Wechat account', max_length=20)
    mobile = models.CharField('phone number', max_length=11, unique=True)
    # Set return value
    def __str__(self):
        return self.username
After defining the model MyUser, you also need to set the configuration property auto User mode in the configuration file settings.py of the project. Otherwise, when performing data migration, Django still uses the built-in model User by default. The configuration properties are as follows:
#configuration file settings.py
#Configure custom user table MyUser
AUTH_USER_MODEL = 'user.MyUser'
Finally, the data migration instructions are input in the Terminal mode of PyCharm, and the corresponding data tables are created in the database. We open the database music DB to view the creation of the data table, as shown in the following figure:
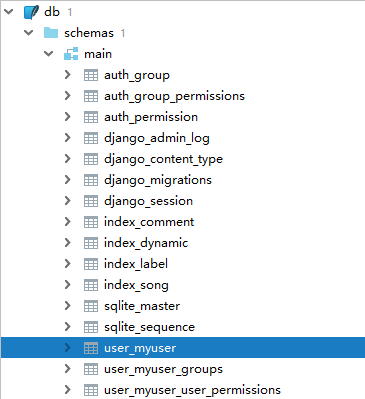
Before user registration and login, in addition to defining the user model MyUser, you need to define the form class for user registration. The form class registered by the user can be realized by rewriting the Django built-in form class UserCreationForm. We define the form class MyUserCreationForm in user's form.py, and the code is as follows:
#user/form.py
from django.contrib.auth.forms import UserCreationForm
from .models import MyUser
from django import forms

# Definition MyUser Data form for user registration
class MyUserCreationForm(UserCreationForm):
    # Override initialization function, set custom field password1 and password2 Styles and properties for
    def __init__(self, *args, **kwargs):
        super(MyUserCreationForm, self).__init__(*args, **kwargs)
        self.fields['password1'].widget = forms.PasswordInput(attrs={'class': 'txt tabInput', 'placeholder':'Password,4-16 Digit number/Letter/Special symbols(Except for spaces)'})
        self.fields['password2'].widget = forms.PasswordInput(attrs={'class': 'txt tabInput', 'placeholder':'Repeat password'})
    class Meta(UserCreationForm.Meta):
        model = MyUser
        # Add model fields in the registration interface: mobile number and password
        fields = UserCreationForm.Meta.fields +('mobile',)
        # Set the style and properties of model fields
        widgets = {
            'mobile': forms.widgets.TextInput(attrs={'class': 'txt tabInput', 'placeholder':'cell-phone number'}),
            'username': forms.widgets.TextInput(attrs={'class': 'txt tabInput', 'placeholder':'user name'}),
        }
The form class MyUserCreationForm implements two functions based on the parent class UserCreationForm: adding the fields registered by users and setting the CSS style of fields. The function description is as follows:
1. Add user registered field: set the fields property in the Meta class. The added field must be a model field and added in the form of tuple or list.
2. Set the CSS style of the field: set the attrs properties of the form fields mobile, username, password1 and password2. Among them, mobile and username are the fields of the model MyUser, so overriding the widgets attribute in the Meta class can be implemented; password1 and password2 are the form fields additionally defined by the parent class UserCreationForm, so overriding the initial function \init \.
Complete the definition of model MyUser, data migration and form class MyUserCreationForm, and then implement the user registration and login functions in urls.py, views.py and login.html of user. The function codes of urls.py and views.py are as follows:
#user/urls.py
from django.urls import path
from . import views
urlpatterns = [
    # User registration and login
    path('login.html', views.loginView, name='login'),
    # Exit user login
    path('logout.html', views.logoutView, name='logout'),
]

#user/views.py
from django.shortcuts import render, redirect
from index.models import *
from user.models import *
from .form import MyUserCreationForm
from django.db.models import Q
from django.contrib.auth import login, logout
from django.contrib.auth.hashers import check_password
from django.contrib.auth.decorators import login_required
from django.core.paginator import Paginator, EmptyPage, PageNotAnInteger

# User registration and login
def loginView(request):
    user = MyUserCreationForm()
    # Form submission
    if request.method == 'POST':
        # Determine whether the form submission is user login or user registration
        # User login
        if request.POST.get('loginUser', ''):
            loginUser = request.POST.get('loginUser', '')
            password = request.POST.get('password', '')
            if MyUser.objects.filter(Q(mobile=loginUser) | Q(username=loginUser)):
                user = MyUser.objects.filter(Q(mobile=loginUser) | Q(username=loginUser)).first()
                if check_password(password, user.password):
                    login(request, user)
                    return redirect('/user/home/1.html')
                else:
                    tips = 'Password error'
            else:
                tips = 'user does not exist'
        # User registration
        else:
            user = MyUserCreationForm(request.POST)
            if user.is_valid():
                user.save()
                tips = 'login was successful'
            else:
                if user.errors.get('username',''):
                    tips = user.errors.get('username','login has failed')
                else:
                    tips = user.errors.get('mobile', 'login has failed')
    return render(request, 'login.html', locals())

# Sign out
def logoutView(request):
    logout(request)
    return redirect('/')
The above code realizes the functions of user registration, login and logout. The logout function is implemented by the built-in function logout of Django. The implementation process of this function is relatively simple, which is not described here. We mainly analyze the implementation process of the user registration and login functions. Since both the registration and login use the template login.html, we put the two functions in the same view function loginView for processing. The implementation process of user registration and login is as follows:
1. First, the view function loginView judges the user's request mode. If it is a POST request, the request may be user registration or user login.
2. Because the names of the text input boxes for registration and login are different, it can be distinguished whether the current user performs user login or user registration by judging whether the content of the request parameter loginUser is empty. The request parameter loginUser represents the user's login account.
3. If the current request is to perform user login, the request parameters loginUser and password are obtained by using the parameter request, and then the relevant user information is found in the model MyUser and verified. If the verification is successful, the user center page will be returned, otherwise the corresponding error message will be prompted.
4. If the current request is for user registration, load the request parameters into the form class MyUserCreationForm, generate the user object user, and then verify the data of the user object user. If the validation is successful, the user information will be created in the model MyUser, otherwise the corresponding error message will be prompted.
According to the function code of view function loginView, the template function of user login and registration is implemented in template login.html. Because there are many codes in the template login.html, this chapter lists the function codes of user login and registration. The specific codes can be viewed in the source code of this book. The function code of the template login.html is as follows:


#Function code of template user/login.html
#User login
<div class="login-box switch_box" style="display:block;">
                <div class="title">User login</div>
                <form id="loginForm" class="formBox" action="" method="post">
                    {% csrf_token %}
                    <div class="itembox user-name">
                        <div class="item">
                            <input type="text" name="loginUser" placeholder="User name or mobile number" class="txt tabInput">
                        </div>
                    </div>
                    <div class="itembox user-pwd">
                        <div class="item">
                            <input type="password" name="password" placeholder="Login password" class="txt tabInput">
                        </div>
                    </div>
                    {% if tips %}
                        <div>Tips:<span>{{ tips }}</span></div>
                    {% endif %}
                    <div id="loginBtnBox" class="login-btn">
                        <input id="J_LoginButton" type="submit" value="Log in now" class="tabInput pass-btn" />
                    </div>
                    <div class="pass-reglink">Don't have my music account yet?<a class="switch" href="javascript:;">Free registration</a></div>
                </form>
            </div>

#User registration
<div class="regist-box switch_box" style="display:none;">
                <div class="title">User registration</div>
                <form id="registerForm" class="formBox" method="post" action="">
                    {% csrf_token %}
                    <div id="registForm" class="formBox">
                    #user name
                    <div class="itembox user-name">
                    <div class="item">
                        {{ user.username }}
                    </div>
                    </div>
                    #phone number
                    <div class="itembox user-name">
                    <div class="item">
                        {{ user.mobile }}
                    </div>
                    </div>
                    #User password
                    <div class="itembox user-pwd">
                    <div class="item">
                        {{ user.password1 }}
                    </div>
                    </div>
                    #Duplicate user password
                    <div class="itembox user-pwd">
                    <div class="item">
                        {{ user.password2 }}
                    </div>
                    </div>
                    #Information tips
                    {% if tips %}
                        <div>Tips:<span>{{ tips }}</span></div>
                    {% endif %}
                    #User registration agreement
                    <div class="member-pass clearfix">
                        <input id="agree" name="agree" checked="checked" type="checkbox" value="1"><label for="agree" class="autologon">Read and agree to the user registration agreement</label>
                    </div>
                        #Register button
                        <input type="submit" value="Free registration" id="J_RegButton" class="pass-btn tabInput"/>
                        #Switch login interface
                        <div class="pass-reglink">I already have my music account,<a class="switch" href="javascript:;">Sign in now</a></div>
                    </div>
                </form>
            </div>
From the code of the template login.html, you can see that user login and registration are implemented by different forms. Among them, the user login form is written by HTML code, so the view function loginView can only obtain the form data through the parameter request; the user registration form is generated by the form class MyUserCreationForm of Django, so the form data can be obtained by MyUserCreationForm.
The above examples list two different forms application methods, each with advantages and disadvantages. In daily development, we should choose the appropriate form application method according to the actual situation.
11.10 user center
The user center is another application page of the project application user, which mainly displays the basic information of the user and the record of the user's song playing after the user logs in. Therefore, when users access the user center, they must verify the login status of the current user. Since user center is implemented in user, add the following code to urls.py and views.py of user:


#urls/urls.py
from django.urls import path
from . import views
urlpatterns = [
    # User registration and login
    path('login.html', views.loginView, name='login'),
    # User center
    path('home/<int:page>.html', views.homeView, name='home'),
    # Exit user login
    path('logout.html', views.logoutView, name='logout'),
]

#user Of views.py
from django.contrib.auth.decorators import login_required
from django.core.paginator import Paginator, EmptyPage, PageNotAnInteger

# User center
# Set user login restrictions
@login_required(login_url='/user/login.html')
def homeView(request, page):
    # Hot search songs
    search_song = Dynamic.objects.select_related('song').order_by('-dynamic_search').all()[:4]
    # Paging function
    song_info = request.session.get('play_list', [])
    paginator = Paginator(song_info, 3)
    try:
        contacts = paginator.page(page)
    except PageNotAnInteger:
        contacts = paginator.page(1)
    except EmptyPage:
        contacts = paginator.page(paginator.num_pages)
    return render(request, 'home.html', locals())
From the above code, we can see that the URL of the user center is named home, the view function is homeView, and the parameter page of the URL represents the number of pages. The view function homeView implements paging processing of song playing records. The song playing records come from the play list of the current user, and are stored by the play list of the Session.
But in terms of the needs and design of the website, the user center mainly displays the basic information of the current user and the records of the user's song playing. The view function homeView only records the song playing, and the user information is automatically completed by Django. As you can see in section 9.6, in the configuration file settings.py, set the processor django.contrib.Auth.context'processors.Auth. When using Django built-in Auth to implement user login, Django automatically generates the variables user and perms and passes them into the template variable TemplateContext. Therefore, the function code of the template home.html is as follows:


#Function code of home.html
#User information
<div class="section_inner">
            #User profile
            <div class="profile__cover_link">
                <img src="{% static "image/user.jpg" %}" class="profile__cover">
            </div>
            #user name
            <h1 class="profile__tit">
                <span class="profile__name">{{ user.username }}</span>
            </h1>
                #Sign out
                <a href="{% url 'logout' %}" style="color:white;">Sign out</a>
        </div>

#Song list information
<ul class="songlist__list">
                            {% for item in contacts.object_list %}
                            <li>
                                <div class="songlist__item songlist__item--even">
                                <div class="songlist__songname">
                                    <a href="{% url 'play' item.song_id %}" class="js_song songlist__songname_txt" >{{ item.song_name }}</a>
                                </div>
                                <div class="songlist__artist">
                                    <a href="javascript:;" class="singer_name">{{ item.song_singer }}</a>
                                </div>
                                <div class="songlist__time">{{ item.song_time }}</div>
                                </div>
                            </li>
                            {% endfor %}
                        </ul>

#Paging navigation button
<div class="pagebar" id="pageBar">

                            #Previous button
                            {% if contacts.has_previous %}
                            <a href="{% url 'home' contacts.previous_page_number %}" class="prev" target="_self"><i></i>previous page</a>
                            {% endif %}

                             #List all pages button
                            {% for page in contacts.paginator.page_range %}
                                {% if contacts.number == page %}
                                    <span class="sel">{{ page }}</span>
                                {% else %}
                                    <a href="{% url 'home' page %}" target="_self">{{ page }}</a>
                                {% endif %}
                            {% endfor %}

                            #Buttons on next page
                            {% if contacts.has_next %}
                            <a href="{% url 'home' contacts.next_page_number %}" class="next" target="_self">next page<i></i></a>
                            {% endif %}

                        </div>
We visit http://127.0.0.1:8000/user/home/1.html on the browser to view the basic information and song playing records of the current user, as shown in the following figure:
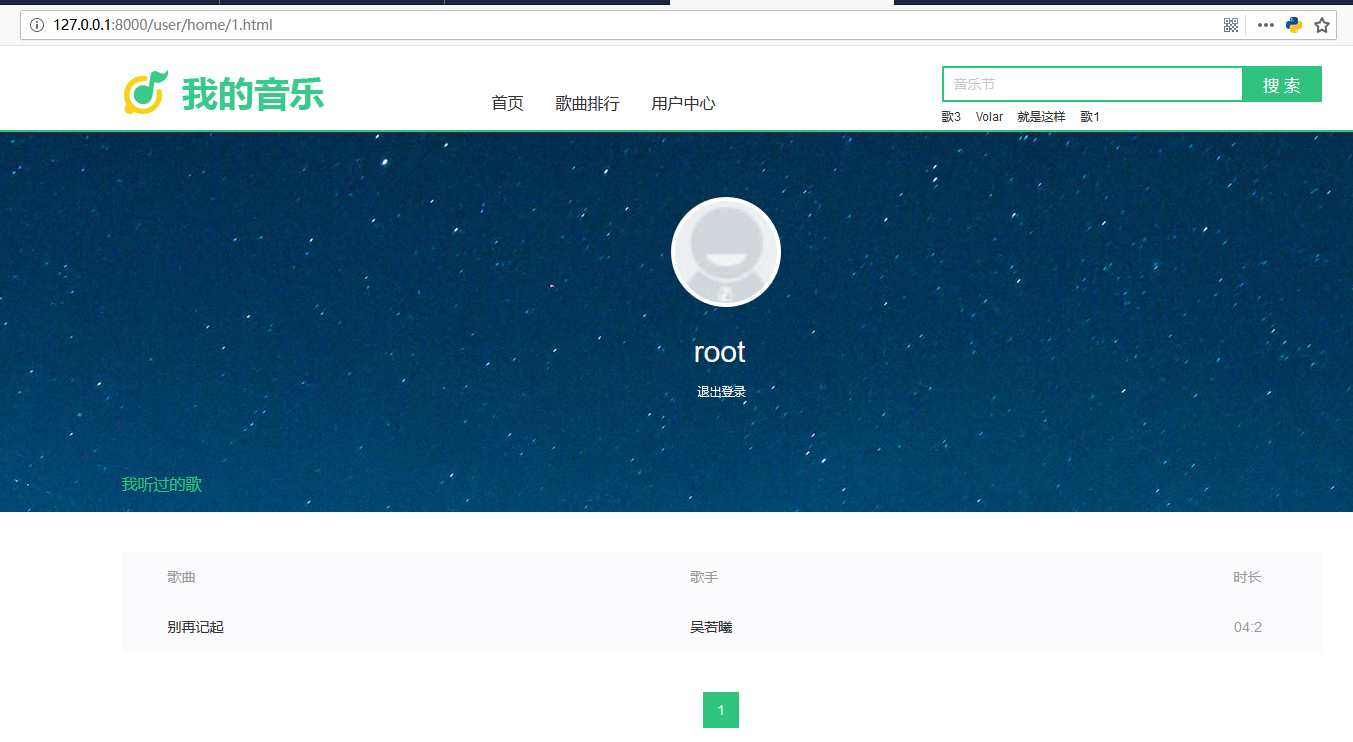
User center
11.11 Admin background system
In the previous chapters, we have completed the basic development of the website interface. Next, we will talk about the development of the website admin background system. Admin background system is mainly convenient for website administrators to manage website data and website users. The model Label, Song, Dynamic, Comment and MyUser are respectively defined in the index and user of the project music. Since index and user are two independent apps, they are distinguished from each other in the admin background system.
First, implement the function module of index in the Admin background system. Write the following code in "init. Py" and "admin.py" of index respectively:


#index Of__init__.py
#Name function modules
from django.apps import AppConfig
import os
# modify app stay Admin Background display name
# default_app_config Value from apps.py Class name of
default_app_config = 'index.IndexConfig'

# Get current app Naming of
def get_current_app_name(_file):
    return os.path.split(os.path.dirname(_file))[-1]

# Override class IndexConfig
class IndexConfig(AppConfig):
    name = get_current_app_name(__file__)
    verbose_name = 'Homepage'


#index Of admin.py
from django.contrib import admin
from .models import *
# modify title and header
admin.site.site_title = 'My music background management system'
admin.site.site_header = 'My music'

@admin.register(Label)
class LabelAdmin(admin.ModelAdmin):
    # Set model fields for Admin Header setting of background data
    list_display = ['label_id', 'label_name']
    # Set searchable fields and Admin Background data generates a search box. If there is a foreign key, double underscores should be used to connect the fields of the two models
    search_fields = ['label_name']
    # Set sorting method
    ordering = ['label_id']

@admin.register(Song)
class SongAdmin(admin.ModelAdmin):
    # Set model fields for Admin Header setting of background data
    list_display = ['song_id','song_name','song_singer','song_album','song_languages','song_release']
    # Set searchable fields and Admin Background data generates a search box. If there is a foreign key, double underscores should be used to connect the fields of the two models
    search_fields = ['song_name','song_singer','song_album','song_languages']
    # Set the filter to generate the navigation bar on the right side of the background data. If there is a foreign key, double underscores should be used to connect the fields of the two models
    list_filter = ['song_singer','song_album','song_languages']
    # Set sorting method
    ordering = ['song_id']

@admin.register(Dynamic)
class DynamicAdmin(admin.ModelAdmin):
    # Set model fields for Admin Header setting of background data
    list_display = ['dynamic_id','song','dynamic_plays','dynamic_search','dynamic_down']
    # Set searchable fields and Admin Background data generates a search box. If there is a foreign key, double underscores should be used to connect the fields of the two models
    search_fields = ['song']
    # Set the filter to generate the navigation bar on the right side of the background data. If there is a foreign key, double underscores should be used to connect the fields of the two models
    list_filter = ['dynamic_plays','dynamic_search','dynamic_down']
    # Set sorting method
    ordering = ['dynamic_id']

@admin.register(Comment)
class CommentAdmin(admin.ModelAdmin):
    # Set model fields for Admin Header setting of background data
    list_display = ['comment_id','comment_text','comment_user','song','comment_date']
    # Set searchable fields and Admin Background data generates a search box. If there is a foreign key, double underscores should be used to connect the fields of the two models
    search_fields = ['comment_user','song','comment_date']
    # Set the filter to generate the navigation bar on the right side of the background data. If there is a foreign key, double underscores should be used to connect the fields of the two models
    list_filter = ['song','comment_date']
    # Set sorting method
    ordering = ['comment_id']
From the above code, we can see that "init" of index is used to set the name of the function module, and "admin.py" registers the model Label, Song, Dynamic and Comment to the Admin background system respectively and sets the corresponding display mode. Access the Admin background system on the browser and log in with the super administrator account. You can see the function module of index on the homepage of Admin, as shown below:
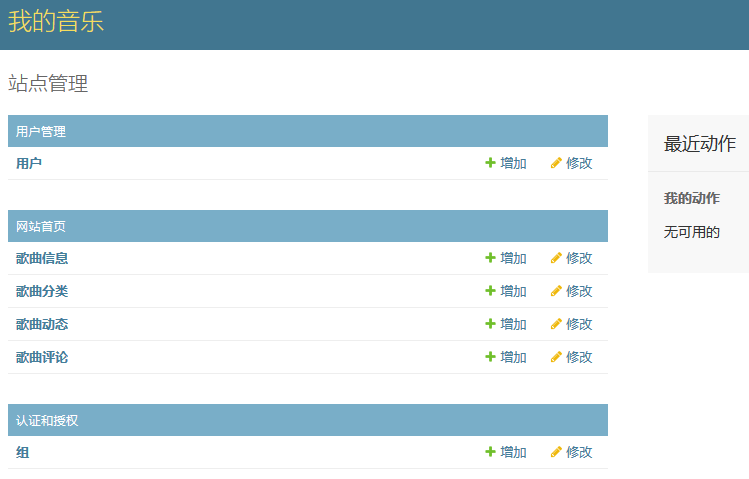
Admin background system
Finally, in user's init.py and admin.py, register the user-defined model MyUser to the Admin background system. The code is as follows:
#user/__init__.py
# Set up App(user)Chinese name of
from django.apps import AppConfig
import os
# modify app stay admin Background display name
# default_app_config Value from apps.py Class name of
default_app_config = 'user.IndexConfig'

# Get current app Naming of
def get_current_app_name(_file):
    return os.path.split(os.path.dirname(_file))[-1]

# Override class IndexConfig
class IndexConfig(AppConfig):
    name = get_current_app_name(__file__)
    verbose_name = 'user management '


#user/admin.py
from django.contrib import admin
from .models import MyUser
from django.contrib.auth.admin import UserAdmin
from django.utils.translation import gettext_lazy as _
@admin.register(MyUser)
class MyUserAdmin(UserAdmin):
    list_display = ['username','email','mobile','qq','weChat']
    # Add in user information modification interface'mobile','qq','weChat'Information input box for
    # The source code UserAdmin.fieldsets Convert to list format
    fieldsets = list(UserAdmin.fieldsets)
    # Rewrite UserAdmin Of fieldsets,Add to'mobile','qq','weChat'Information entry of
    fieldsets[1] = (_('Personal info'),
                    {'fields': ('first_name', 'last_name', 'email', 'mobile', 'qq', 'weChat')})
Since the model MyUser inherits the Django built-in model User, inheriting MyUserAdmin from UserAdmin can use the Admin background function interface of the built-in model User, and further adjust the Admin background function interface of the model User according to the definition of the model MyUser by rewriting. Visit the Admin background system on the browser, find the address link named "User" on the Admin home page and click visit to enter the User information list and modify the User information. You can see the information of the new field of personal information, as shown in the figure:

Admin background system
11.12 custom exception mechanism
Website exception is a common problem, the common exception is 404 or 500. The abnormal appearance is mainly caused by the data defect of the website itself or the unreasonable visit. For example, the website link is http://127.0.0.1:8000/play/6.html, where 6 in the link represents the primary key of the song information table. If the data does not exist in the song information table, the website should throw a 404 exception.
In order to improve the exception mechanism of the music website, we customized the 404 exception of the website. First, add the template error404.html to the templates in the root directory of the project music, as shown in the following figure:
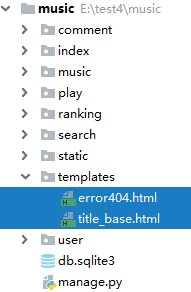
Directory structure of project music
Because the 404 exception of the website is applied to the whole website, the URL information of 404 is set in urls.py of the project music. The code is as follows:
#project music/urls.py
# Set 404 and 500 error status codes
from index import views
handler404 = views.page_not_found
handler500 = views.page_not_found
It can be seen that the 404 and 500 exception information of the website are handled by the view function page not found of index. So we write the view function page not found in views.py of index. The code is as follows:
#index Of views.py
# Customize error pages for 404 and 500
def page_not_found(request):
    pass
    return render(request, 'error404.html', status=404)
The above example is the website custom 404 exception information. The implementation is relatively simple. You only need to set the view function 404 or 500 in the urls.py of the project music. When there is an exception in the website, the exception handling will be handled by the view function page not found.
11.13 project online deployment
Since the customized abnormal functions can only be tested after the project is launched, we will change the project music from the development mode to the project online mode. First, in the configuration file settings.py, turn off debug mode, set domain name access rights and static resource path. The code is as follows:
Close debug Model
DEBUG = False
#Allow access to all domain names
ALLOWED_HOSTS = ['*']

# STATIC_ROOT Static resource file for project deployment Online
STATIC_ROOT = 'e:/music/static'
# STATICFILES_DIRS For collection admin Static resource files for
STATICFILES_DIRS = [os.path.join(BASE_DIR, 'static'),]
When the debug mode is turned on, Django itself provides static resource services, which is mainly convenient for developers to develop website functions. When the debug mode is turned off, the development mode changes to the project online mode, and Django no longer provides static resource services, which should be completed by the server.
In the above settings, both static root and staticfiles dir point to the static folder of the music root of the project. First, save the static resources in the Admin background in the static folder, and enter the following instructions under the Terminal of PyCharm:
#Admin Collection instructions for static resources
(py3_3) E:\test4\music>python manage.py collentstatic
After the command is executed, we open the static folder of the music root directory of the project, and add the admin folder under the directory, as shown in the following figure:
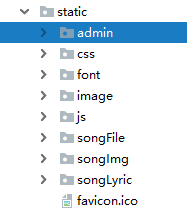
static directory structure
Then set the read path of static resources in urls.py of project music. Generally speaking, the static resources of the project online are determined by the configuration attribute static [root]. Therefore, the urls.py settings of the project music are as follows:
from django.contrib import admin
from django.urls import path, include
from django.conf.urls import url
from django.views import static
from django.conf import settings

urlpatterns = [
    path('admin/', admin.site.urls),
    path('', include('index.urls')),
    path('ranking.html', include('ranking.urls')),
    path('play/', include('play.urls')),
    path('comment/', include('comment.urls')),
    path('search/', include('search.urls')),
    path('user/', include('user.urls')),
    # Set the static resource path of the project online
    url('^static/(?P<path>.*)$', static.serve,
        {'document_root': settings.STATIC_ROOT}, name='static')
]
After the above configuration, we restart the project music and open play/666.html on the browser
11.14 summary of this chapter
The functions of music website are divided into: website homepage, song leaderboard, song play, song search, song comment and user management. The descriptions of each function are as follows:
1. The homepage of the website is the main interface of the whole website, which mainly displays the latest dynamic information of the website and the functional navigation of the website. The dynamic information of the website mainly focuses on the dynamic information of songs, such as popular downloads, popular searches and new song recommendations; the functional navigation of the website is to display the links of other pages on the home page for the convenience of users to visit and browse.
2. The song leaderboard is in descending order according to the number of songs played. Users can also customize the filtering according to the song type.
3. Song playing is to provide users with online audition function, as well as song download, song comment and related song recommendation.
4. Song comment is accessed through the song playing page, and each comment information includes user name, comment content and comment time.
5. Song search is based on the keywords provided by users for song or singer matching query, and the search results are displayed on the web page in a data list.
6. User management is divided into user registration, login and user center. The user center contains user information, login and logout, and song playing records.
The homepage of the website is mainly based on data query, and the API provided by Django's built-in ORM framework realizes data query. The query results are mainly output by template syntax for tag and if tag together and converted into corresponding HTML pages.
Song leaderboards filter songs with GET requests. If there is no request parameter, all songs will be sorted and displayed according to the amount of play. If there is a request parameter, songs will be filtered and sorted and displayed according to the amount of play. Song leaderboards can also be implemented by using Django's view.
Song playing mainly realizes file download, Session application and database operation. The streaming httpresponse object is used as the response mode to provide the file download function for users; the song playlist is implemented by Session, which mainly reads and writes the Session data; the data operation mainly adds or updates the dynamic table of songs.
Song reviews are mainly composed of forms and paging functions. The song comment box is implemented by the form written by HTML. The form data is obtained by the request parameter of the view function to realize the data storage processing. The paging function displays the current song comment information in pages.
User management is implemented on Django's Auth authentication system; user information is extended on the basis of built-in model user; user registration is implemented on the basis of built-in model form class usercreation form; user login is implemented by built-in function check UU password and login; user center uses filter login UU required to implement access restriction and processor context_processors.auth automatically generates user information, and finally uses Session and paging functions to display song playing records.
The website background mainly uses the basic settings of the Admin background, such as the naming method of App, the title setting of Admin, and the model registration and settings. The naming method of App is implemented by the initialization file "init". Py of App. The title setting and model registration and setting of Admin are implemented in admin.py of App.