1. Principle of panoramic stitching
1. Introduction of RANSAC algorithm
RANSAC, Random Sample Consensus, is an iterative method for finding the correct model to fit noisy data.Given a model, such as a homography matrix between point sets, the role of RANSAC is to find the correct data points without noise points.
2. Solving homography matrix using RANSAC algorithm
In image stitching, the first thing we need to solve is to find the matching points between images.Usually we use SIFT algorithm to achieve automatic matching of feature points. Refer to another blog of mine for the details of SIFT algorithm: https://blog.csdn.net/sinat_37751993/article/details/88578410 SIFT is a robust descriptor that produces fewer erroneous matches than Harris corner points associated with image blocks, but still has erroneous corresponding points.Therefore, it is necessary to use the RANSAC algorithm to remove mismatched points from the 128-dimensional feature descriptors generated by the SIFT algorithm.
From the knowledge points of a straight line, two points can determine a straight line, so you can randomly select two points in the data point set to determine a straight line.Then, by setting a given threshold value, the number of points, inliers, that meet the threshold range on both sides of a straight line is calculated.The line where the inliers most point set is located is the best line we want to select.
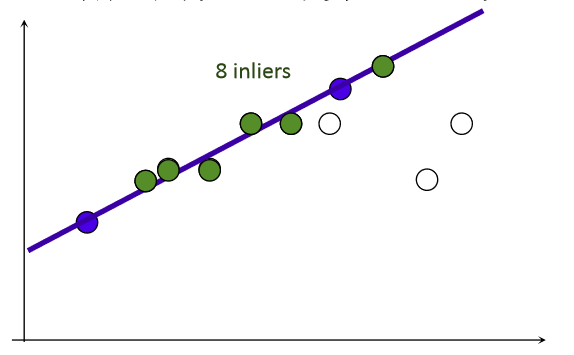
The RANSAC algorithm is an improvement based on this principle to eliminate the wrong matching points according to the threshold value.First, the transformation matrix is calculated by extracting several pairs of matching points from the pairs of matching points that have been found.Then, for all matching points, the mapping error is calculated.Then inliers are determined based on the error threshold.Finally, for the maximum inliers set, the homography matrix H is recalculated.
3. Stitching images
After estimating the image homography matrix, we need to skew all the images onto a common image plane.Usually we use the central image plane as the common plane and fill the left or right area of the central image with 0 to make room for the distorted image.
Source Code
1. Using SIFT feature detection to match corresponding points
Main function:
# -*- coding: cp936 -*-
from pylab import *
from numpy import *
from PIL import Image

# If you have PCV installed, these imports should work
from PCV.geometry import homography, warp
from PCV.localdescriptors import sift

"""
This is the panorama example from section 3.3.
"""

# set paths to data folder
featname = ['n'+str(i+1)+'.sift' for i in range(5)]
imname = ['n'+str(i+1)+'.jpg' for i in range(5)]

# extract features and match
l = {}
d = {}
for i in range(5):
    sift.process_image(imname[i],featname[i])
    l[i],d[i] = sift.read_features_from_file(featname[i])

matches = {}
for i in range(4):
    matches[i] = sift.match(d[i+1],d[i])

# visualize the matches (Figure 3-11 in the book)
for i in range(4):
    im1 = array(Image.open(imname[i]))
    im2 = array(Image.open(imname[i+1]))
    figure()
    sift.plot_matches(im2,im1,l[i+1],l[i],matches[i],show_below=True)
Call the corresponding function in sift.py
def process_image(imagename,resultname,params="--edge-thresh 10 --peak-thresh 5"):
    """ process an image and save the results in a file"""
    if imagename[-3:] != 'pgm':
	    #create a pgm file
		 im = Image.open(imagename).convert('L')
		 im.save('tmp.pgm')
		 imagename = 'tmp.pgm'
    cmmd = str("F:\win64vlfeat\sift.exe "+imagename+" --output="+resultname+
				" "+params)
    os.system(cmmd)
    print 'processed', imagename, 'to', resultname


def read_features_from_file(filename):
	""" read feature properties and return in matrix form"""
	f = loadtxt(filename)
	return f[:,:4],f[:,4:] # feature locations, descriptors

def match(desc1,desc2):
	""" for each descriptor in the first image,
		select its match in the second image.
		input: desc1 (descriptors for the first image),
		desc2 (same for second image). """

	desc1 = array([d/linalg.norm(d) for d in desc1])
	desc2 = array([d/linalg.norm(d) for d in desc2])

	dist_ratio = 0.6
	desc1_size = desc1.shape

	matchscores = zeros((desc1_size[0],1))
	desc2t = desc2.T #precompute matrix transpose
	for i in range(desc1_size[0]):
		dotprods = dot(desc1[i,:],desc2t) #vector of dot products
		dotprods = 0.9999*dotprods
		#inverse cosine and sort, return index for features in second image
		indx = argsort(arccos(dotprods))

		#check if nearest neighbor has angle less than dist_ratio times 2nd
		if arccos(dotprods)[indx[0]] < dist_ratio * arccos(dotprods)[indx[1]]:
			matchscores[i] = int(indx[0])

	return matchscores

def plot_matches(im1,im2,locs1,locs2,matchscores,show_below=True):
	""" show a figure with lines joining the accepted matches
		input: im1,im2 (images as arrays), locs1,locs2 (location of features),
		matchscores (as output from 'match'), show_below (if images should be shown below). """

	im3 = appendimages(im1,im2)
	if show_below:
		im3 = vstack((im3,im3))

	# show image
	imshow(im3)

	# draw lines for matches
	cols1 = im1.shape[1]
	for i in range(len(matchscores)):
		if matchscores[i] > 0:
			plot([locs1[i,0], locs2[matchscores[i,0],0]+cols1], [locs1[i,1], locs2[matchscores[i,0],1]], 'c')
	axis('off')
2. Solving homography matrix using RANSAC algorithm
Main function:
# Functions to convert matches to homogeneous coordinate points
def convert_points(j):
ndx = matches[j].nonzero()[0]
fp = homography.make_homog(l[j+1][ndx,:2].T)
ndx2 = [int(matches[j][i]) for i in ndx]
tp = homography.make_homog(l[j][ndx2,:2].T)
# switch x and y - TODO this should move elsewhere
fp = vstack([fp[1],fp[0],fp[2]])
tp = vstack([tp[1],tp[0],tp[2]])
return fp,tp
# Estimated homography matrix
model = homography.RansacModel()
fp,tp = convert_points(1)
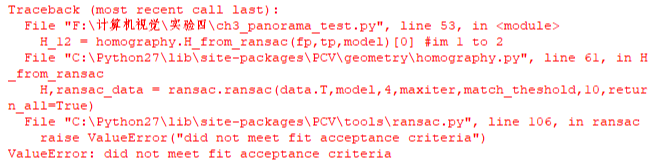
H_12 = homography.H_from_ransac(fp,tp,model)[0] #im 1 to 2
fp,tp = convert_points(0)
H_01 = homography.H_from_ransac(fp,tp,model)[0] #im 0 to 1
tp,fp = convert_points(2) #Note: Points are in reverse order
H_32 = homography.H_from_ransac(fp,tp,model)[0] #im 3 to 2
tp,fp = convert_points(3) #Note: Points are in reverse order
H_43 = homography.H_from_ransac(fp,tp,model)[0] #im 4 to 3 Call the corresponding function in homegraphy.py
from numpy import *
from scipy import ndimage


class RansacModel(object):
    """ Class for testing homography fit with ransac.py from
        http://www.scipy.org/Cookbook/RANSAC"""

    def __init__(self,debug=False):
        self.debug = debug

    def fit(self, data):
        """ Compute the selected four homography matrices. """

        # Transpose it to call H_from_points() to calculate the homography matrix
        data = data.T

        # Starting point of mapping
        fp = data[:3,:4]
        # Mapped Target Point
        tp = data[3:,:4]

        # Calculates the homography matrix and returns
        return H_from_points(fp,tp)

    def get_error( self, data, H):
        """ For all correspondence matrices, then for each transformed point, the corresponding error is returned"""

        data = data.T

        # Starting point of mapping
        fp = data[:3]
        # Mapped Target Point
        tp = data[3:]

        # Transform fp
        fp_transformed = dot(H,fp)

        # Normalized Homogeneous Coordinates
        fp_transformed = normalize(fp_transformed)

        # Returns the error at each point
        return sqrt( sum((tp-fp_transformed)**2,axis=0) )
The fit() method only accepts four pairs of corresponding points selected by ransac.py and fits an correspondence matrix.Four of these point pairs are the minimum number required to calculate the homography matrix.
The get_error() method uses the homography matrix for each pair of corresponding points, and then returns the sum of the corresponding square distances to determine which points are correct and which are wrong by calculating their errors.
def H_from_ransac(fp,tp,model,maxiter=1000,match_theshold=10):
    """ Use RANSAC Homography Matrix Between Robust Estimated Point Correspondences H (ransac.py from
        http://www.scipy.org/Cookbook/RANSAC).

        input: fp,tp (3*n arrays) points in hom. coordinates. """

    from PCV.tools import ransac

    # Corresponding Point Group
    data = vstack((fp,tp))

    # Calculate H and return
    H,ransac_data = ransac.ransac(data.T,model,4,maxiter,match_theshold,10,return_all=True)
    return H,ransac_data['inliers']
In practice, we need to use a threshold on distance to determine which haplotype matrices are reasonable.This function provides the number of point pairs for the threshold and minimum expected value, and also the maximum number of iterations.The number of iterations plays a very important role in the process of solving. If the number of iterations is too small and the program exits too early, the correct solution may not be found. If the number of iterations is too large, the running time is too long and the efficiency is reduced.The result returned by this function is the correspondence matrix and the correct pair of points for the corresponding correspondence matrix.
3. Twist Image
Main function:
# Twist Image
delta = 2000 # For Fill and Shift

im1 = array(Image.open(imname[1]), "uint8")
im2 = array(Image.open(imname[2]), "uint8")
im_12 = warp.panorama(H_12,im1,im2,delta,delta)

im1 = array(Image.open(imname[0]), "f")
im_02 = warp.panorama(dot(H_12,H_01),im1,im_12,delta,delta)

im1 = array(Image.open(imname[3]), "f")
im_32 = warp.panorama(H_32,im1,im_02,delta,delta)

im1 = array(Image.open(imname[4]), "f")
im_42 = warp.panorama(dot(H_32,H_43),im1,im_32,delta,2*delta)


figure()
imshow(array(im_42, "uint8"))
axis('off')
show()
Call the corresponding function in warp.py
def panorama(H,fromim,toim,padding=2400,delta=2400):
    """ Use homography matrix H(Use RANSAC Robustness estimate), coordinate the two images to create a horizontal panoramic image.
//The result is an image with the same height as toim.Padding specifies the number of padding pixels and delta specifies an additional amount of shift''.

    # Check if the image is grayscale or color?
    is_color = len(fromim.shape) == 3

    # Allergic transformation for geometric_transform()
    def transf(p):
        p2 = dot(H,[p[0],p[1],1])
        return (p2[0]/p2[2],p2[1]/p2[2])

    if H[1,2]<0: # fromim on the right
        print 'warp - right'
        # Transform fromim
        if is_color:
            # Fill 0 to the right of the target image
            toim_t = hstack((toim,zeros((toim.shape[0],padding,3))))
            fromim_t = zeros((toim.shape[0],toim.shape[1]+padding,toim.shape[2]))
            for col in range(3):
                fromim_t[:,:,col] = ndimage.geometric_transform(fromim[:,:,col],
                                        transf,(toim.shape[0],toim.shape[1]+padding))
        else:
            # Fill 0 to the right of the target image
            toim_t = hstack((toim,zeros((toim.shape[0],padding))))
            fromim_t = ndimage.geometric_transform(fromim,transf,
                                    (toim.shape[0],toim.shape[1]+padding))
    else:
        print 'warp - left'
        # To compensate for the filling effect, add a shift to the left
        H_delta = array([[1,0,0],[0,1,-delta],[0,0,1]])
        H = dot(H,H_delta)
        # Transform fromim
        if is_color:
            # Fill 0 to the left of the target image
            toim_t = hstack((zeros((toim.shape[0],padding,3)),toim))
            fromim_t = zeros((toim.shape[0],toim.shape[1]+padding,toim.shape[2]))
            for col in range(3):
                fromim_t[:,:,col] = ndimage.geometric_transform(fromim[:,:,col],
                                            transf,(toim.shape[0],toim.shape[1]+padding))
        else:
            # Fill 0 to the left of the target image
            toim_t = hstack((zeros((toim.shape[0],padding)),toim))
            fromim_t = ndimage.geometric_transform(fromim,
                                    transf,(toim.shape[0],toim.shape[1]+padding))

    # Return after reconciliation (place fromin on tomi)
    if is_color:
        # So non-black color pixels
        alpha = ((fromim_t[:,:,0] * fromim_t[:,:,1] * fromim_t[:,:,2] ) > 0)
        for col in range(3):
            toim_t[:,:,col] = fromim_t[:,:,col]*alpha + toim_t[:,:,col]*(1-alpha)
    else:
        alpha = (fromim_t > 0)
        toim_t = fromim_t*alpha + toim_t*(1-alpha)

    return toim_t
The transf() function maps pixels by multiplying them by H and normalizing them by aligning the secondary coordinates.Determine if the image fills to the left or right by looking at the shift in H.When the image is filled to the left, the coordinates of the center point in the target image also change, so in the left case, a shift needs to be added to the homography matrix.
3. Panoramic stitching for different scenes (test pictures were taken from Jimei University)
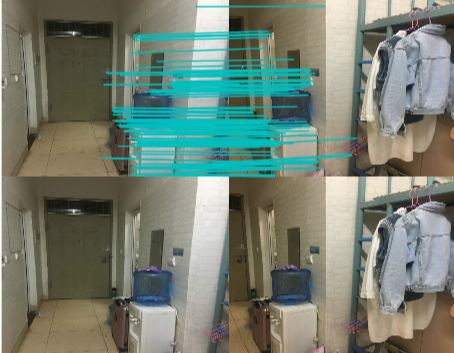
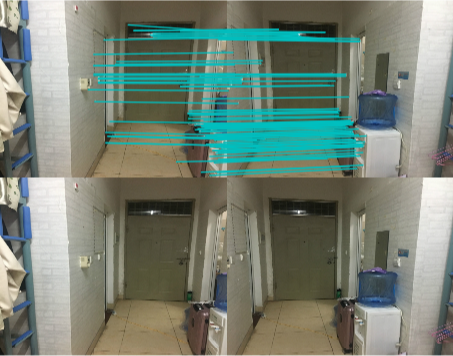
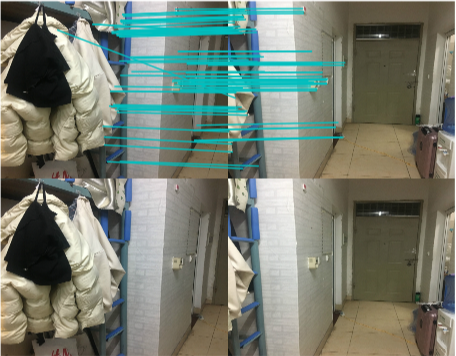
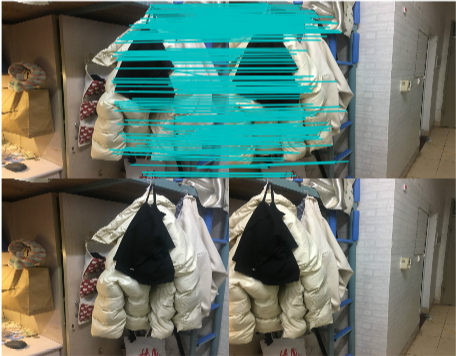
1. Indoor scenes

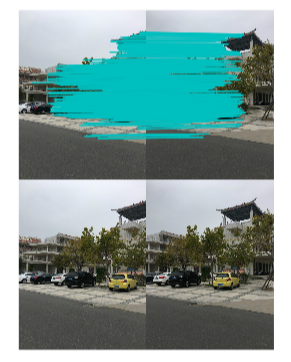
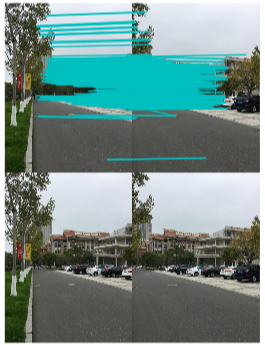
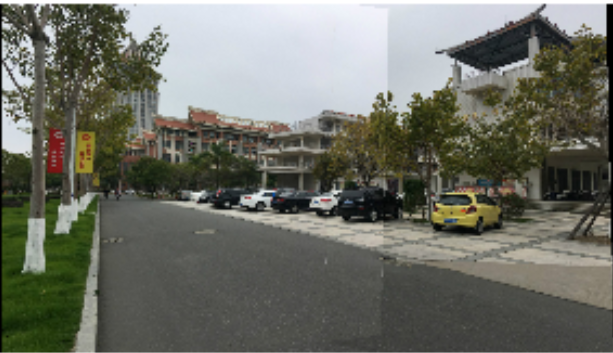
2. Scenes with small drop in outdoor field depth
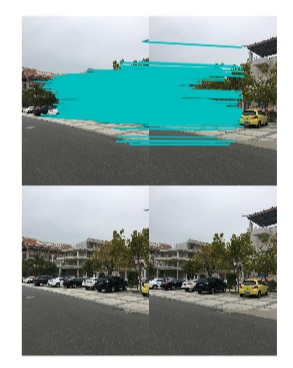
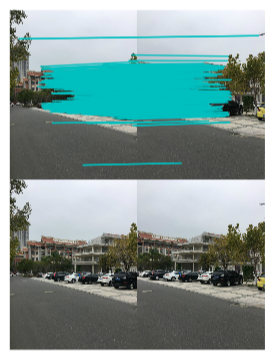
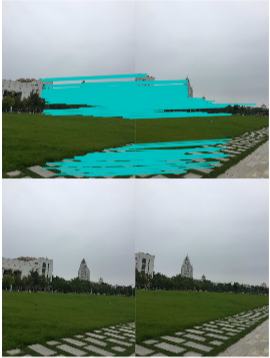
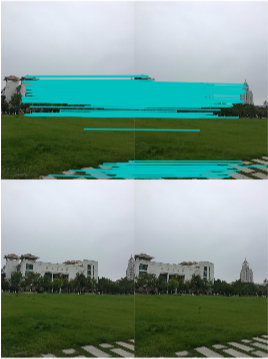
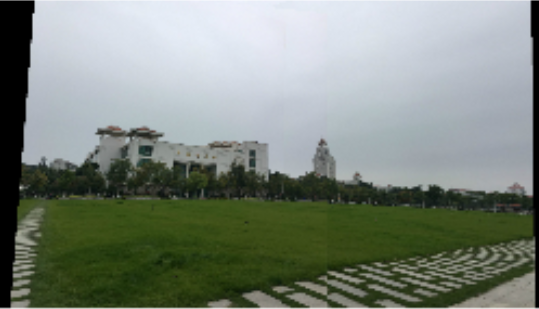
3. Scenes with large drop in outdoor field depth

4. Analysis of Experimental Results
By testing in three different scenarios, you can see that:
Indoor scenes are mosaically stitched, but the overall stitched image is somewhat visually distorted, and the details on the right are not handled well enough, and the distortions are more severe.
For scenes with small drop in outdoor field depth, the stitching effect is ideal, but due to the difference of image exposure, edge effect and color difference are obvious on the image boundary, which is also the need to improve the algorithm.
The outdoor scene with a large drop in depth is more complete in the distant Kageng Library stitching, but the drawback is that the stone steps on the nearby lawn are distorted.
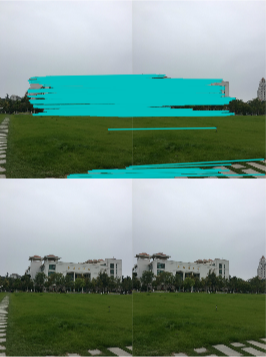
Here's a supplement to the points you should pay attention to when you take a test image: In order to stitch a good image, make sure that you have the same matching points and take the image as often as possible.And be sure to stand at the same point, shooting horizontally on your mobile phone, just like taking a panorama.If a person's shooting position is moved, the algorithm may fail to find the correct point pair.As follows:
It is also best not to photograph symmetrical buildings with nearly the same length of feature points on either side.This will result in a mismatch in the algorithm.
Finally, when testing image numbers, remember to number them from right to left, because our algorithm matches are calculated from the rightmost image, and one step in the code is to reverse the order so that it warps from the left image.