catalogue
4, Steps to build DNS domain name resolution server
Domain name resolution using virtual machine win10
1, DNS - domain name system
- DNS definition: DNS is the English abbreviation of "domain name system". As a distributed database that maps domain names and IP addresses to each other, it can make it easier for people to access the Internet.
- DNS port: the DNS service uses TCP and UDP port 53. TCP port 53 is used to connect to the DNS server, and UDP port 53 is used to resolve DNS.
- DNS domain name length limit: the length limit of each level of domain name is 63 characters, and the total length of the domain name cannot exceed 253 characters
- DNS function: forward resolution: find the corresponding IP address according to the domain name; Reverse resolution: find the corresponding domain name according to the IP address
2, DNS domain name structure
● the structure of DNS system is distributed data structure
- Root domain: located at the top of the tree structure, represented by "."
- Top level domain: generally represents a type of organization or country region; For example,. Net (network provider),. Com (industrial and commercial enterprise),. org (group organization),. edu (educational structure),. Gov (government department),. cn (Chinese national domain name)
- Secondary domain: used to indicate a specific organization in the top-level domain. The secondary domain name under the national top-level domain is uniformly managed by the national department
- Sub domain: all levels of domains created under the secondary domain are collectively referred to as sub domains. Each organization or user can freely apply for registration of their own domain name
- Host: the host is located at the bottom of the domain name space, which is a specific computer
There is a many to one relationship between domain names and IP addresses. An IP address does not necessarily correspond to only one domain name, and a domain name can only correspond to one IP address
3, DNS server type
1. Main domain name server: it is responsible for maintaining all domain name information in a region. It is the authoritative information source of all specific information, and the data can be modified. When building the primary domain name server, you need to create the address data file of the responsible region.
2. Slave domain name server: when the master domain name server fails, shuts down or is overloaded, the slave domain name server provides domain name resolution services as a backup service. The resolution results provided from the domain name server are not determined by themselves, but from the main domain name server. When building a slave domain name server, you need to specify the location of the master domain name server so that the server can automatically synchronize the address database of the region.
3. Caching domain name server: it only provides the caching function of domain name resolution results to improve query speed and efficiency, but there is no domain name database.
It obtains the result of each domain name server query from a remote server, puts it in the cache, and responds with it when querying the same information in the future. The cached domain name server is not an authoritative server because all the information provided is indirect. When building a cached domain name server, you must set the root domain or specify another DNS server as the resolution source.
4. Forwarding domain name server: responsible for local query of all non local domain names. After receiving the query request, the forwarding domain name server looks it up in its cache. If it cannot be found, it forwards the request to the specified domain name server in turn until the search result is found. Otherwise, it returns unmapped results.
4, Steps to build DNS domain name resolution server
1. Install bind package
yum -y install bind

Configure forward resolution
1. First view the path of the configuration file to be modified
rpm -qc bind                   #Query the path of bind software configuration file
/etc/named.conf                #Master profile
/etc/named/rfc1912.zonrs       #Zone profile
/var/named/named.localhost     #Area data profile
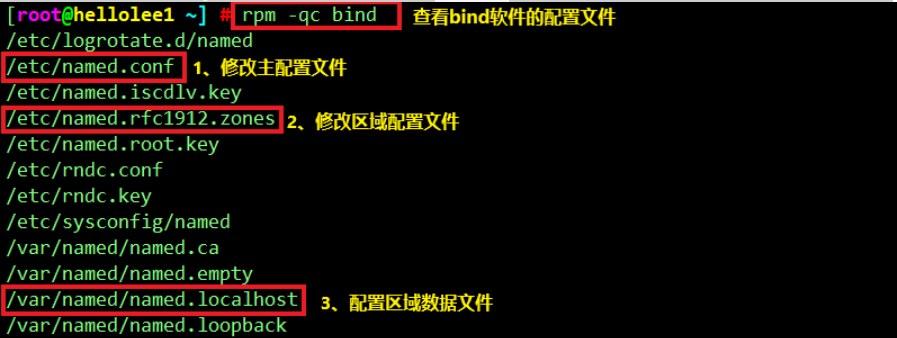
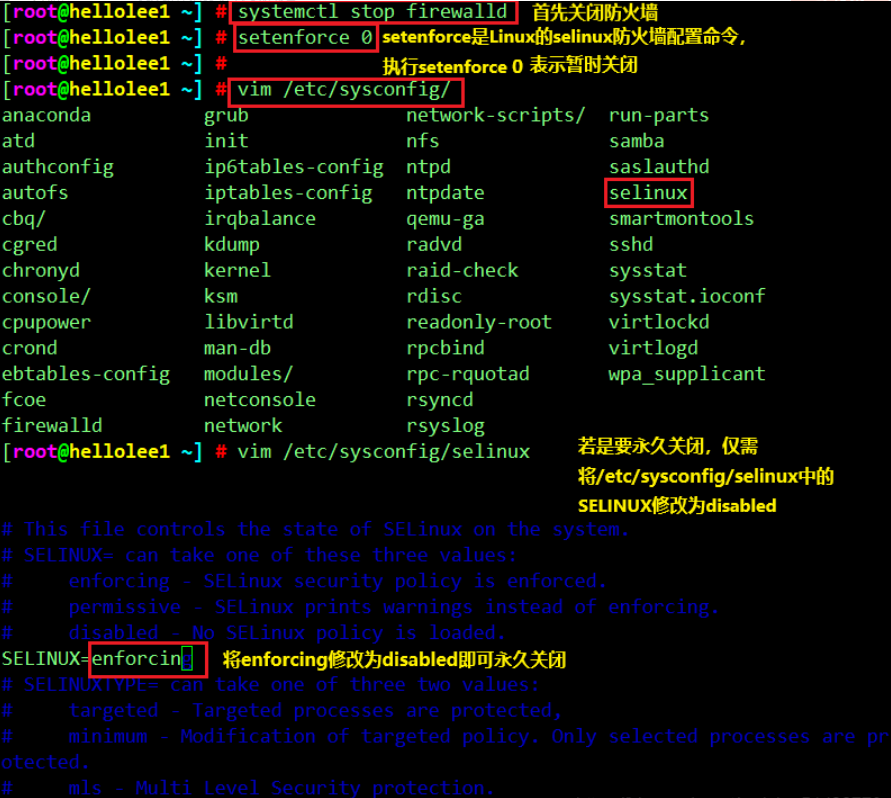
Modification completed: wq save and exit
2. Modify the master configuration file
vim /etc/named.conf
options {
  listen-on-v6 poet 53 { 192.168.184.10; };              #Listen to port 53. The IP address uses the local IP that provides the service, or any can represent all users
#   listen-on-v6 port 53 { : :1; };                      #ipv6 lines can be commented out or deleted if they are not used
  directory       "/var/named";                          #Default storage location of area data files
  dump- file      "/var/ named/data/cache_ dump . db";   #The location of the domain name cache database file
  statistics-file "/var/named/data/named stats.txt";     #Location of the status statistics file
  memstatistics-file "/var/named/data/named_ mem_ stats. txt";    #Location of memory statistics file
  allow-query
{ any; };                                                #The network segments allowed to use this DNS resolution service can also be represented by any

zone "." IN {                                            #Forward parsing ". Root region
        type hint;                                       #Type is root area
        file "named.ca";                                 #The regional data file is named.ca, which records the domain names and IP addresses of 13 root domain servers
};
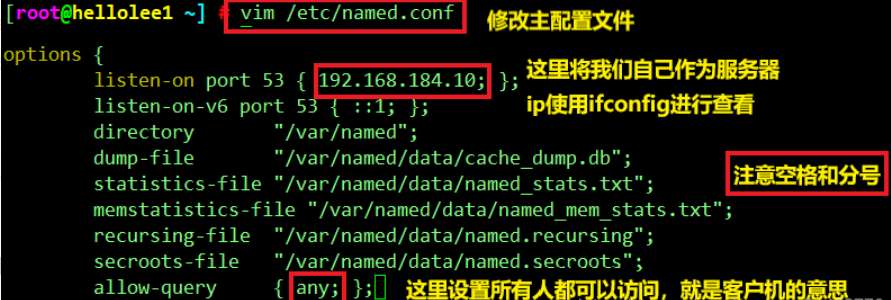
Modification completed: wq save and exit
include "/etc/ named. rfc1912. zones"; #Contains all configurations in the zone configuration file
3. Modify the area configuration file and add the forward area configuration
vim /etc/ named. rfc1912. zone                           #There can be templates in the file, which can be modified after copying and pasting
zone "lic. com" IN {                                     #Forward parsing "lic.com" region
type master;                                             #Type primary area
 file "lic. com. zone";                                  ●The specified area data file is lic. com. zone
allow-update { none; };
};
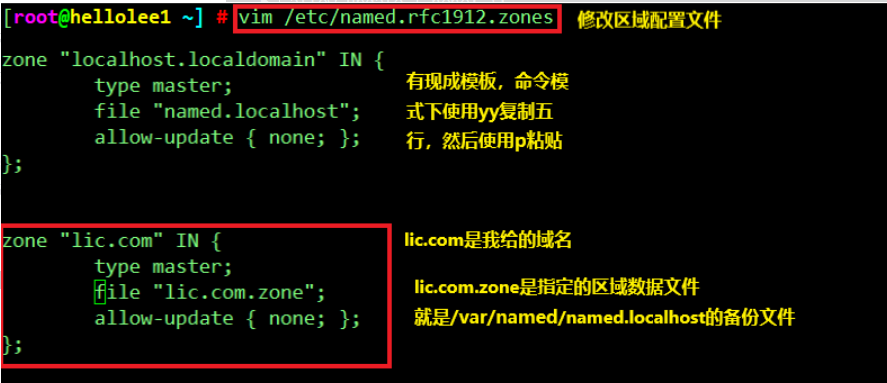
Modification completed: wq save and exit
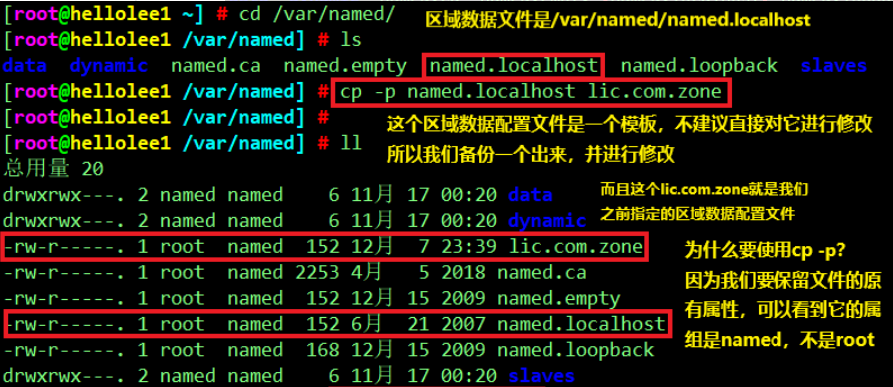
Configure forward zone data file
cd /var/named/
cp -p named.localhost lic.com.zone                      #Keep the permissions of the source file and the copy properties of the owner
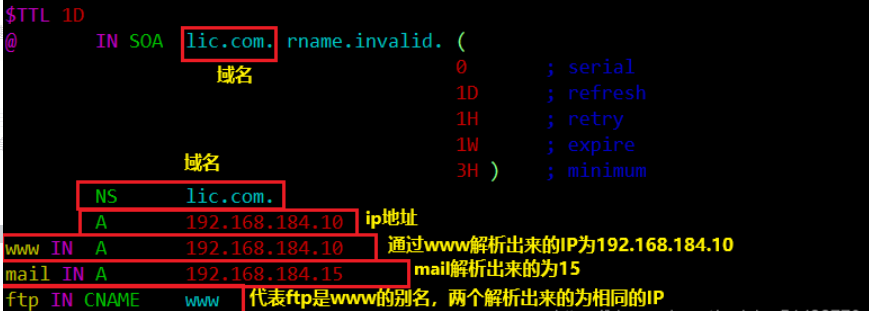
vim /var/named/lic.com.zone
$TTL 1D                                                  #Set the effective time for caching parsing results
@       IN SOA lic.com. admin.lic.com. (
                                           0; serial .
                                           1D; refresh
                                           1H; retry
                                           1W; expire
                                           3H ) ; minimum
         NS    lic.com.                                  #Records the name of the DNS server for the current zone
         A     192.168.184.10                            #Record host IP address
IN   MX  10    mail.lic.com.                             #MX is a mail exchange record. The higher the number, the lower the priority
www  IN  A     192.168.184.10                            #Record the IP corresponding to forward resolution www.benet.com
mail IN  A     192.168.184.11
ftp  IN CNAME  www                                       #CNAME uses an alias, and ftp is the alias of www
*    IN   A    192.168.184.100                           #Pan domain name resolution, "*" represents any host name
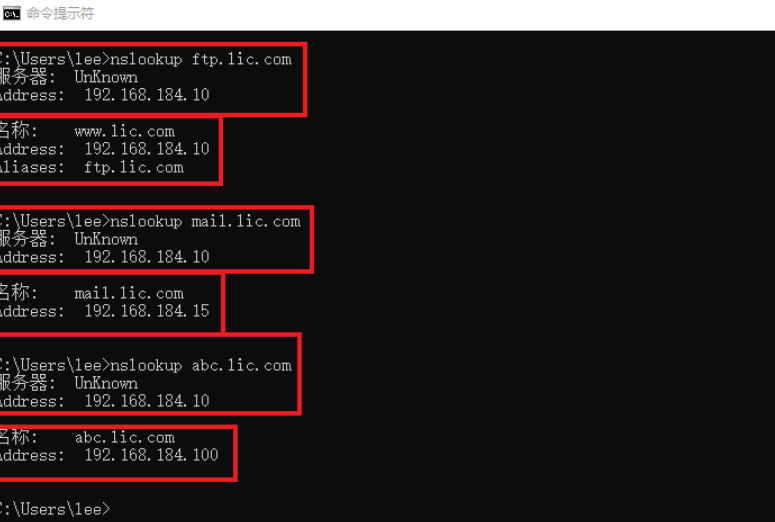
I modify it here as: please see the following figure for analysis
Modification completed: wq save and exit
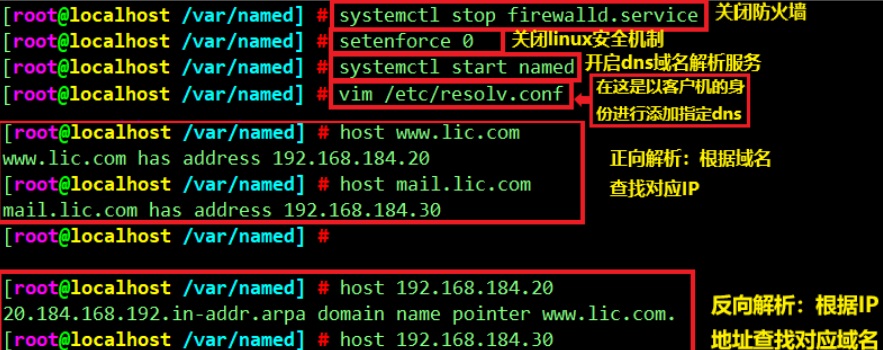
5 start the service and turn off the firewall
systemctl start named
systemctl stop firewalld
setenforce 0
tail -f /var/log/ messages                               #If the service fails to start, you can check the log file to troubleshoot the error

rndc-confgen -r /dev/urandom -a #If the service starts stuck, you can execute this command to solve it
6 add the DNS server address in the domain name resolution configuration file of the client
vi /etc/resolv.conf                                      #The modification will take effect immediately
nameserver 192.168.184.10


vi /etc/ sysconfig/network- scripts/ ifcfg-ens33         #The network card needs to be restarted after modification
DNS1=192.168.80.10
systemctl restart network
7 test DNS resolution
host www.lic.com
nslookup www.lic.com
Domain name resolution using virtual machine win10
1. Open the virtual machine win10 and remember that the virtual machine win10 and CentOS7 need to be in the same network

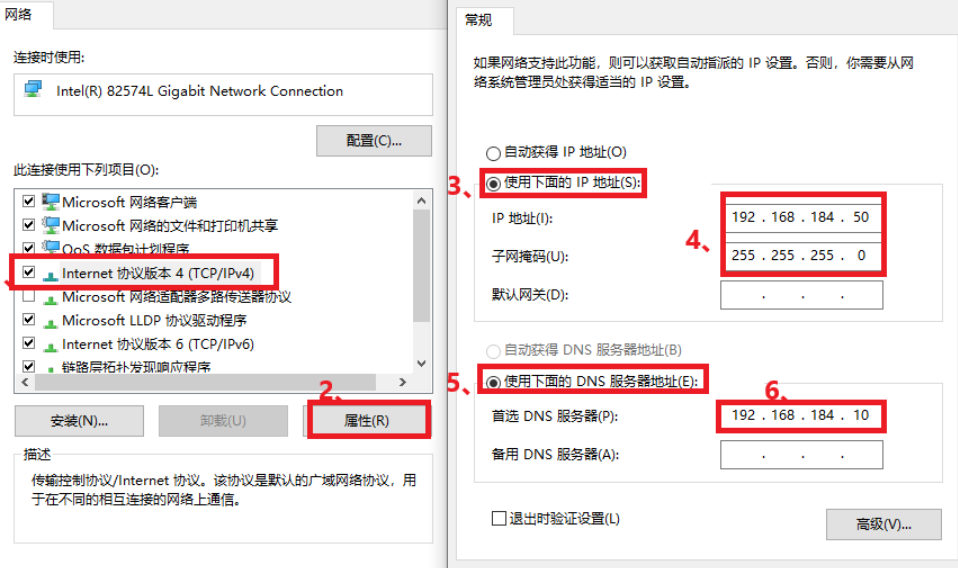
2. Change the network settings of virtual machine win10

3. After entering, find Eehernet0, right-click to select the attribute, and then operate according to the following figure
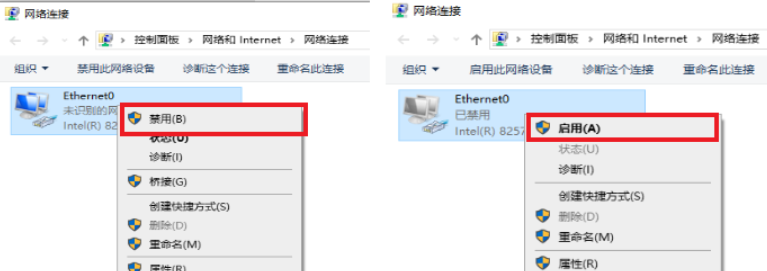
4. After setting, click disable, and then click enable to prevent the network adapter from not refreshing
5. Open cmd command prompt for domain name access
