A few days ago, when my department colleagues were working on the project, the customer asked to migrate the single instance + ASM database to RAC+ASM. After that, the God sorted out some ideas and operation details and published them on the company's public number. I saw itching in the future, so I planned to do an experiment and write a complete step to improve my skills and summarize the ideas in the process of migration. At the same time, pay tribute to the great god!
My virtual machine environment is configured as follows:
Single instance + ASM:
IP address: 192.168.29.60 Memory 1g Host name mtxdb
RAC+ASM
IP address: 192.168.29.61 Memory 1g hostname qianyi1 instance name mtxdb1
IP address: 192.168.29.62 Memory 1g hostname qianyi2 instance name mtxdb2
Shared storage is a bare device that I add 6 pieces (3 G each) of shared disks to the virtual machine, without partitions, directly through the raw command, and then bind UDEV. The configuration is as follows:
ll /dev/raw*
total 0
crw-rw---- 1 grid asmadmin 162, 1 Jun 12 21:38 raw1
crw-rw---- 1 grid asmadmin 162, 2 Jun 12 21:38 raw2
crw-rw---- 1 grid asmadmin 162, 3 Jun 12 22:06 raw3
crw-rw---- 1 grid asmadmin 162, 4 Jun 12 21:38 raw4
crw-rw---- 1 grid asmadmin 162, 5 Jun 12 21:38 raw5
crw-rw---- 1 grid asmadmin 162, 6 Jun 12 21:38 raw6

more /etc/udev/rules.d/60-raw.rules

ACTION=="add", KERNEL=="/dev/sdb", PROGRAM=="/sbin/scsi_id --whitelisted --replace-whitespace --device=/dev/$name", RESULT=="1ATA_VBOX_HARDDISK_VBd7206812-68689e75", RUN+="/bin/raw /dev/raw/raw1 %N"
ACTION=="add", KERNEL=="/dev/sdc", PROGRAM=="/sbin/scsi_id --whitelisted --replace-whitespace --device=/dev/$name", RESULT=="1ATA_VBOX_HARDDISK_VBde4d5bfc-6d91bbfd", RUN+="/bin/raw /dev/raw/raw2 %N"
ACTION=="add", KERNEL=="/dev/sdd", PROGRAM=="/sbin/scsi_id --whitelisted --replace-whitespace --device=/dev/$name", RESULT=="1ATA_VBOX_HARDDISK_VB1f49a410-5771ec25", RUN+="/bin/raw /dev/raw/raw3 %N"
ACTION=="add", KERNEL=="/dev/sde", PROGRAM=="/sbin/scsi_id --whitelisted --replace-whitespace --device=/dev/$name", RESULT=="1ATA_VBOX_HARDDISK_VB37be5bc0-b9a407ef", RUN+="/bin/raw /dev/raw/raw4 %N"
ACTION=="add", KERNEL=="/dev/sdf", PROGRAM=="/sbin/scsi_id --whitelisted --replace-whitespace --device=/dev/$name", RESULT=="1ATA_VBOX_HARDDISK_VB61fe4de3-5a9178bf", RUN+="/bin/raw /dev/raw/raw5 %N"
ACTION=="add", KERNEL=="/dev/sdg", PROGRAM=="/sbin/scsi_id --whitelisted --replace-whitespace --device=/dev/$name", RESULT=="1ATA_VBOX_HARDDISK_VB363c90c6-23361f67", RUN+="/bin/raw /dev/raw/raw6 %N"
KERNEL=="raw[1-6]", OWNER=="grid", GROUP="asmadmin", MODE="660"
Single instance + ASM uses raw1 and raw2 as data disks, RAC uses raw3 as OCR and votedisk
This experiment mainly focuses on the process and thinking of migration, so the construction process of this environment is omitted.
Now that my single instance database is in open state, only GI software is installed on the RAC side, the next step is to start the migration phase.
1. Attention should be paid to modifying the ownership and privileges of RAC-side shared storage (gird:asmadmin, 660)
2. Collect information about the source disk group:
SQL> set lines 200
SQL> col name for a10
SQL> col path for a15
SQL> col failgroup for a10
SQL> select name,total_mb,free_mb,group_number,disk_number,path,failgroup,mount_status,header_status,name
  2  from v$asm_disk order by failgroup;

NAME         TOTAL_MB    FREE_MB GROUP_NUMBER DISK_NUMBER PATH            FAILGROUP  MOUNT_STAT HEADER_STA NAME
---------- ---------- ---------- ------------ ----------- --------------- ---------- ---------- ---------- ----------
DATA_0000        3072       2253            1           0 /dev/raw/raw1   DATA_0000  CACHED     MEMBER     DATA_0000
DATA_0001        3072       2255            1           1 /dev/raw/raw2   DATA_0001  CACHED     MEMBER     DATA_0001
                    0          0            0           1 /dev/raw/raw5              CLOSED     FORMER
                    0          0            0           2 /dev/raw/raw4              CLOSED     FORMER
                    0          0            0           0 /dev/raw/raw6              CLOSED     FORMER
                    0          0            0           3 /dev/raw/raw3              CLOSED     MEMBER
3. Backup disk header information
[grid@mtxdb ~]$ kfed read /dev/raw/raw1 text=raw1.txt
[grid@mtxdb ~]$ kfed read /dev/raw/raw2 text=raw2.txt
4. Closing the database and GI on the single instance side
[oracle@mtxdb ~]$ srvctl stop database -d mtxdb
[root@mtxdb ~]# /u01/app/grid/product/11.2.0/grid/bin/crsctl stop has -f
CRS-2791: Starting shutdown of Oracle High Availability Services-managed resources on 'mtxdb'
CRS-2673: Attempting to stop 'ora.DATA.dg' on 'mtxdb'
CRS-2673: Attempting to stop 'ora.LISTENER.lsnr' on 'mtxdb'
CRS-2677: Stop of 'ora.DATA.dg' on 'mtxdb' succeeded
CRS-2673: Attempting to stop 'ora.asm' on 'mtxdb'
CRS-2677: Stop of 'ora.LISTENER.lsnr' on 'mtxdb' succeeded
CRS-2677: Stop of 'ora.asm' on 'mtxdb' succeeded
CRS-2673: Attempting to stop 'ora.cssd' on 'mtxdb'
CRS-2677: Stop of 'ora.cssd' on 'mtxdb' succeeded
CRS-2673: Attempting to stop 'ora.evmd' on 'mtxdb'
CRS-2677: Stop of 'ora.evmd' on 'mtxdb' succeeded
CRS-2793: Shutdown of Oracle High Availability Services-managed resources on 'mtxdb' has completed
CRS-4133: Oracle High Availability Services has been stopped.
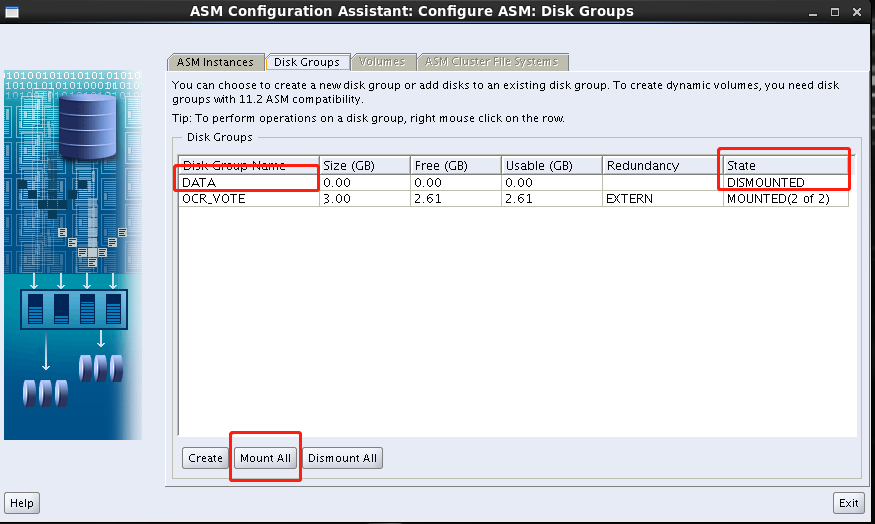
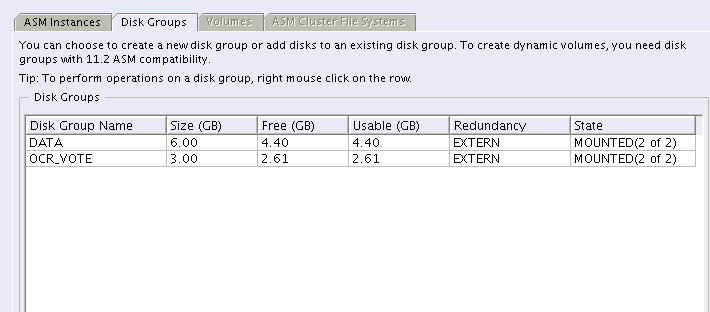
5.RAC side uses the asmca command to mount the disk group asmca command to scan the relevant disks automatically and list the available disk groups. After clicking mount all, the disk group will be mounted (the related disk group resources will be automatically loaded into the cluster resources).


6. Install the database software (just install it) directly under the database path. / Run Installer, the process is brief
7. Setting Oracle parameter file
The source creates the pfile and scp the pfile and password file to the target
[oracle@mtxdb dbs]$ sqlplus / as sysdba

SQL*Plus: Release 11.2.0.4.0 Production on Wed Jun 13 00:41:48 2018

Copyright (c) 1982, 2013, Oracle.  All rights reserved.

Connected to an idle instance.

SQL> create pfile='/home/oracle/initmtxdb.ora' from spfile;

File created.
[oracle@mtxdb ~]$ scp initmtxdb.ora 192.168.29.61:/u01/app/oracle/product/11.2.0/db/dbs/spfilemtxdb1.ora
[oracle@mtxdb ~]$ scp initmtxdb.ora 192.168.29.62:/u01/app/oracle/product/11.2.0/db/dbs/spfilemtxdb2.ora[oracle@mtxdb dbs]$ scp orapwmtxdb 192.168.29.61:/u01/app/oracle/product/11.2.0/db/dbs/orapwmtxdb1
oracle@192.168.29.61's password:
orapwmtxdb 100% 1536 1.5KB/s 00:00
[oracle@mtxdb dbs]$ scp orapwmtxdb 192.168.29.62:/u01/app/oracle/product/11.2.0/db/dbs/orapwmtxdb2
oracle@192.168.29.62's password:
orapwmtxdb 100% 1536 1.5KB/s 00:008. The target side modifies the corresponding parameters in the pfile and adds the following parameters (note that db_name cannot be modified because the database name is unchanged, which is always a set of databases):
I only changed the parameter file on one of the nodes on the target end. In RAC, SPFILE is placed in the ASM disk group. Two nodes share a parameter file.
*.cluster_database=true
*.REMOTE_LISTENER='qianyi-scan:1521'
mtxdb1.instance_name=mtxdb1
mtxdb2.instance_name=mtxdb2
mtxdb1.instance_number=1
mtxdb2.instance_number=2
mtxdb1.undo_tablespace='UNDOTBS1'
mtxdb2.undo_tablespace='UNDOTBS2'
mtxdb1.thread=1
mtxdb2.thread=2
9. Create spfile and store the spfile file in ASM, configure the pfile of two nodes at the same time
SQL> create spfile='+DATA/mtxdb/spfilemtxdb.ora' from pfile;

File created.

SQL> exit

[oracle@qianyi1 dbs]$ vi initmtxdb1.ora
spfile='+DATA/mtxdb/spfilemtxdb.ora'
10. Create the required directories on both target ends
mkdir -p /u01/app/oracle/admin/mtxdb/adump11. Register databases and instances in a cluster environment
[oracle@qianyi1 dbs]$ srvctl add database -d mtxdb -o /u01/app/oracle/product/11.2.0/db
[oracle@qianyi1 dbs]$ srvctl add instance -d mtxdb -i mtxdb1 -n qianyi1
[oracle@qianyi1 dbs]$ srvctl add instance -d mtxdb -i mtxdb2 -n qianyi2
[oracle@qianyi1 dbs]$ srvctl config database -d mtxdb
Database unique name: mtxdb
Database name:
Oracle home: /u01/app/oracle/product/11.2.0/db
Oracle user: oracle
Spfile:
Domain:
Start options: open
Stop options: immediate
Database role: PRIMARY
Management policy: AUTOMATIC
Server pools: mtxdb
Database instances: mtxdb1,mtxdb2
Disk Groups:
Mount point paths:
Services:
Type: RAC

Database is administrator managed
12. Modify Oracle permissions (both nodes need to execute)
[grid@qianyi1 ~]$ cd $ORACLE_HOME/bin

setasmgidwrap -o /u01/app/oracle/product/11.2.0/db/bin/oracle
13. Start the Oracle instance and open the database
[oracle@qianyi1 dbs]$ srvctl start instance -d mtxdb -i mtxdb114. Add redolog and undotbs2 table spaces for instance 2
SQL> select * from v$logfile;

    GROUP# STATUS  TYPE    MEMBER                                                       IS_
---------- ------- ------- ------------------------------------------------------------ ---
         3         ONLINE  +DATA/mtxdb/onlinelog/group_3.263.978538691                  NO
         2         ONLINE  +DATA/mtxdb/onlinelog/group_2.262.978538689                  NO
         1         ONLINE  +DATA/mtxdb/onlinelog/group_1.261.978538687                  NO

    GROUP#    THREAD#  SEQUENCE#      BYTES  BLOCKSIZE    MEMBERS ARC STATUS           FIRST_CHANGE# FIRST_TIM NEXT_CHANGE# NEXT_TIME
---------- ---------- ---------- ---------- ---------- ---------- --- ---------------- ------------- --------- ------------ ---------
         1          1          4   52428800        512          1 NO  INACTIVE                949926 11-JUN-18       963133 11-JUN-18
         2          1          5   52428800        512          1 NO  INACTIVE                963133 11-JUN-18       974146 12-JUN-18
         3          1          6   52428800        512          1 NO  CURRENT                 974146 12-JUN-18   2.8147E+14

SQL> alter database add logfile thread 2 group 4 '+DATA' size 50m reuse;

Database altered.

SQL> alter database add logfile thread 2 group 5 '+DATA' size 50m reuse;

Database altered.

SQL> alter database add logfile thread 2 group 6 '+DATA' size 50m reuse;

Database altered.

SQL> create undo tablespace UNDOTBS2 datafile '+DATA' size 1G;

Tablespace created.
15. Start cluster thread 2
SQL> alter database enable public thread 2;

Database altered.

SQL> select thread#,status,enabled from v$thread;

   THREAD# STATUS ENABLED
---------- ------ --------
         1 OPEN   PUBLIC
         2 CLOSED PUBLIC
Note: If thread2 is private, you can modify it in the following way
Close instance mtxdb2 and restart to nomount state. Operate on an existing instance ORCL1:
alter database disable thread 2;
alter database enable public thread 2;
Open mtxdb2 again
16. Create cluster-related views
SQL> @$ORACLE_HOME/rdbms/admin/catclust.sql

Package created.

Package body created.

PL/SQL procedure successfully completed.

View created.

Synonym created.

Grant succeeded.

View created.

Grant succeeded.

Synonym created.

View created.

Grant succeeded.

Synonym created.

View created.

Grant succeeded.

Synonym created.

View created.

Grant succeeded.

Synonym created.

View created.

Grant succeeded.

Synonym created.

View created.

Grant succeeded.

Synonym created.

View created.

Grant succeeded.

Synonym created.

View created.

Grant succeeded.

View created.

Grant succeeded.

Synonym created.

Synonym created.

Synonym created.

Synonym created.

Synonym created.

Synonym created.

Synonym created.

Synonym created.

Synonym created.

Synonym created.

Synonym created.

Synonym created.

View created.

Grant succeeded.

Synonym created.

View created.

Grant succeeded.

Synonym created.

PL/SQL procedure successfully completed.
17. Start instance 2 and verify it
srvctl start instance -d mtxdb -i mtxdb2

SQL> select instance_name,status from gv$instance;


INSTANCE_NAME    STATUS
---------------- ------------
mtxdb1           OPEN
mtxdb2           OPEN