DNFS is a new feature introduced by Oracle 11g to improve the IO performance of the system with NFS. Compared with system level NFS, DNFS reduces the consumption of network and IO transmission. The reasons for the low IO capacity of normal NFS are:
1. Low efficiency data transmission, multi link implementation is difficult;
2. The system's RPC stack IO is implemented in the form of queue, which limits the data sent to the TCP layer.
3. The IO transfer from Oracle instance to nfs client is inefficient.
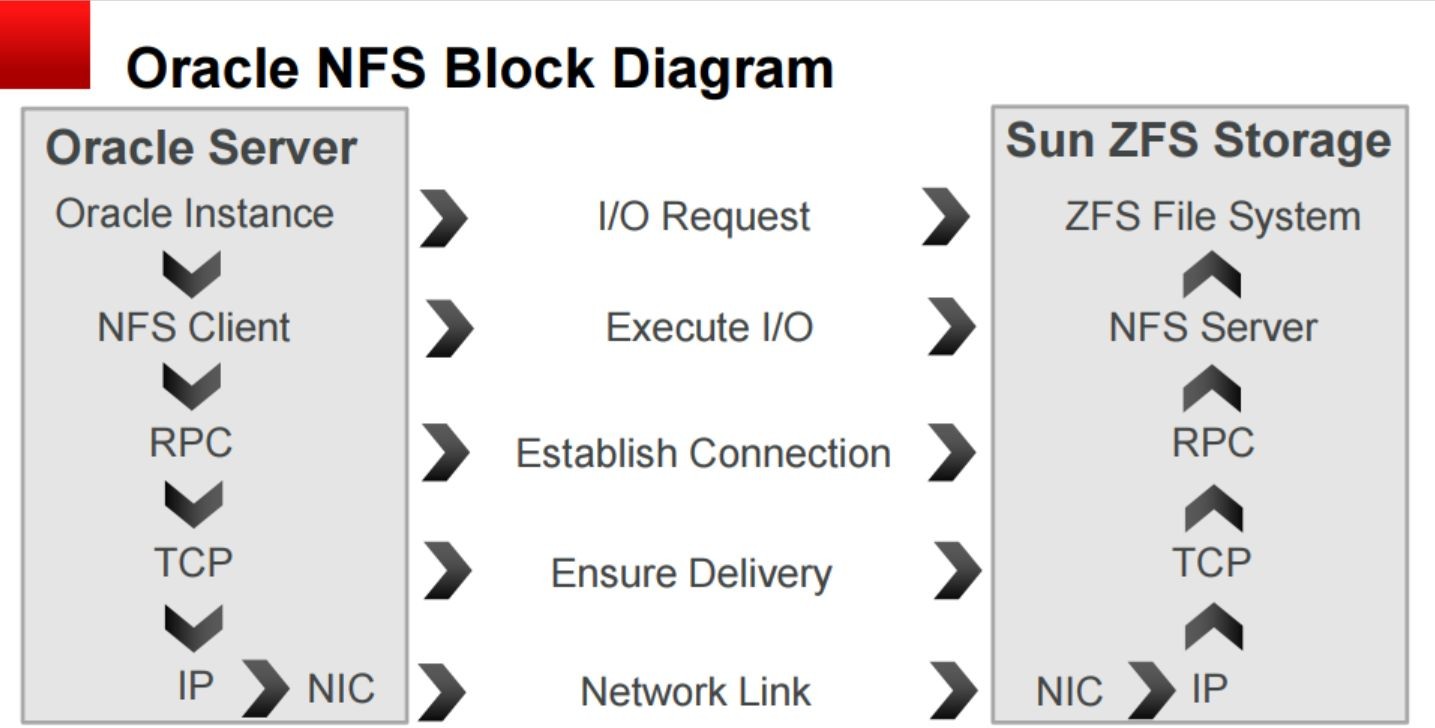
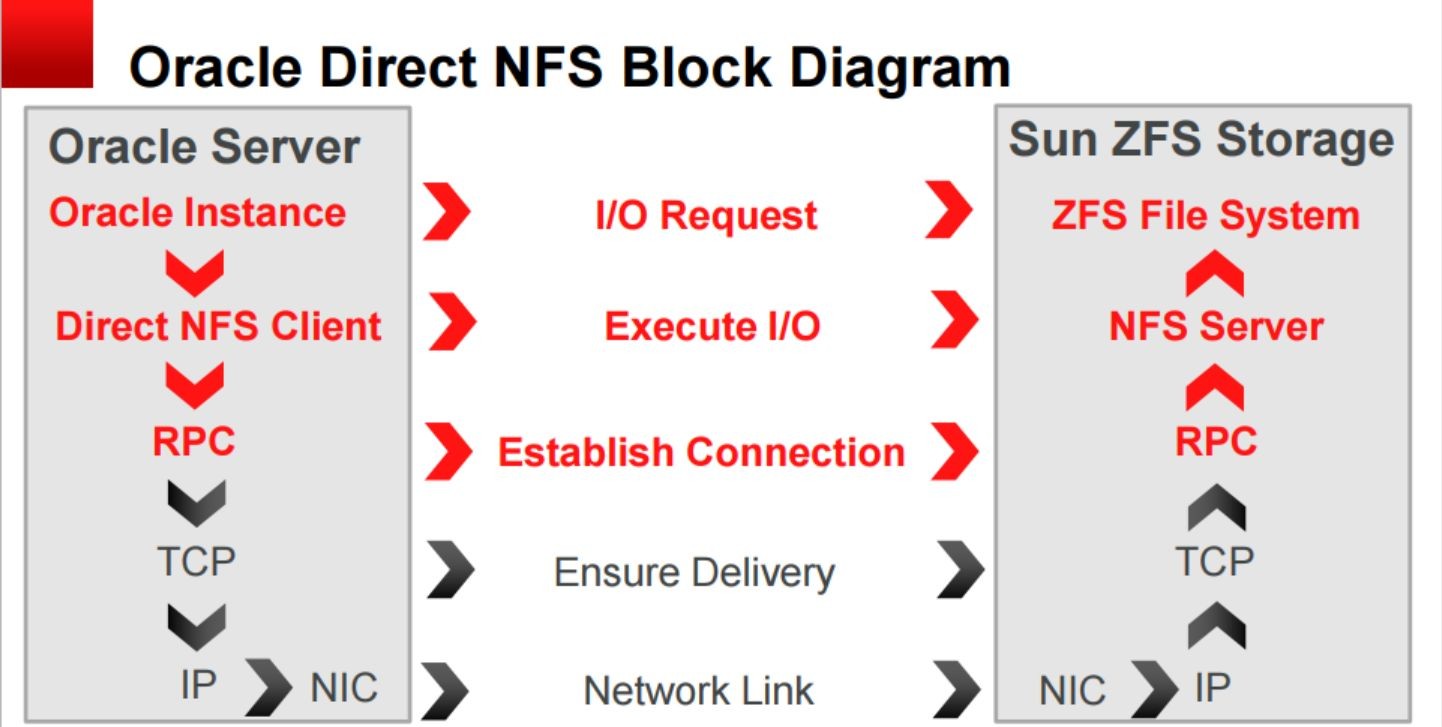
Path for NFS and DNFS data transfer:
Ordinary NFS:
DNFS
It can be seen that dnfs is less than nfs in the data transmission stage of TCP - > IP, and it connects directly through RPC.
Installation process:
Environmental Science
NFS SERVER: 172.10.10.10 PROD2
NFS CLIENT: 172.10.10.20 PROD1
nfs Please refer to: https://docs.oracle.com/cd/E37670_01/E37355/html/ol_setupnfssvr_btrfs.html
1. Install software
PROD2#yum install nfs-utils -y
2. Configure SERVER
1)PROD2 Create shared directory on
PROD2#mkdir -p /u01/nfs_torage
PROD2#vi /etc/exports
2)modify exports
PROD2#cat /etc/exports
/u01/nfs_torage *(rw,sync,no_wdelay,insecure,insecure_locks,no_root_squash)
Mount options:
a.https://docs.oracle.com/cd/E11882_01/install.112/e47689/post_inst_task.htm#LADBI1297
b.Mount Options for Oracle files for RAC databases and Clusterware when used with NFS on NAS devices (Doc ID 359515.1)
3)Startup service
PROD2# service rpcbind start
PROD2# service nfs start
PROD2# service nfslock start
PROD2# chkconfig rpcbind on
PROD2# chkconfig nfs on
PROD2# chkconfig nfslock on
4)Check configuration
PROD2# exportfs -rv
PROD2# showmount -e localhost
3. Configure client
1)Create mount path
PROD1# mkdir -p /vol/nfs_oradta
PROD1# chown -R oracle:oinstall /vol/nfs_oradata
PROD1# chmod -R 755 /vol/nfs_oradata
2)Startup service
PROD1# service rpcbind status
PROD1# chkconfig rpcbind on
PROD1# service restart rpcbind
3)View server information
PROD1#showmount -e PROD2
4)Manual mount
//Format: Mount - t NFS < nfs-server-ip >: < export-location > < local-mount-location >
PROD1#mount -t nfs PROD2:/u01/nfs_storage /vol/nfs_oradata
5)Configure auto mount
PROD1#cat /etc/fstab
PROD2:/u01/nfs_storage /vol/nfs_oradata nfs rw,bg,hard,nointr,tcp,vers=3,timeo=300,rsize=32768,wsize=32768,actimeo=0 0 0
//perhaps
PROD1#vi /etc/rc.local
mount -o rw,bg,hard,nointr,rsize=32768,wsize=32768,tcp,vers=3,timeo=600,actimeo=0,suid PROD2:/u01/nfs_storage /vol/nfs_oradata
4. configure DNFS
1)DNFS configuration file
 When mounting, dnfs determines the mount point information by looking up the following files:
$ORCLE_HOME/dbs/oranfstab
/etc/orafnstab
/etc/mtab
 The content format is as follows:
Server:NFS server name
 Path:NFS server IP or host name
 Export: path to export from NFS server
 Mount: local mount point for NFS

$vi /etc/oranfstab
server:PROD2
path:172.10.10.10
export:/u01/nfs_storage
mount:/vol/nfs_oradata
2)modify odm library
$sqlplus / as sysdba
sql>shutdown immediate;
$cd $ORACLE_HOME/rdbms/lib
$make -f ins_rdbms.mk dnfs_on
sql>startup
3)Create tablespace
sql>create tablespace testnfs datfile '/u01/nfs_oradta/PROD1/testnfs01.dbf' size 100m;
4)inspect dnfs Is it effective?
$grep NFS /u01/ap/oracle/diag/rdbms/prod1/PROD1/trace/alert_PROD1.log
5. Views related to dsnfs
v$dnfs_servers;
v$dnfs_files;
v$dnfs_chanels;
v$dnfs_tas;
6. disable dnfs
1).Delete tablespace, stop Library
drop tablespace testnfs including contents andatfiles;
shutdown imediate

2).Prohibit dnfs:
cd $ORACLE_HOME/rdbms/lib
make -f ins_rdbms.mk dnfs_of

3).Start database
startup

4).Delete related nfs To configure
Reference resources:
Step by Step - Configure Direct NFS Client (DNFS) on Linux (Doc ID 762374.1)