Article directory
- 1 Preparations
- 2 See information about this guide
- 3 Check Hardware Requirements
- 4. Check software requirements
- 5 Create the required operating system groups and users
- 6 Configure Kernel Parameters
- 7 Create the necessary directories
- 8 Configure Oracle User Environment
- 9 Install Oracle database
- 10 Install database
| operating system | Edition |
|---|---|
| Linux | Oracle Linux 64bit |
1 Preparations
1.1 Delete Oracle software before installation
[root@yr app]# ll
total 8
drwxrwxr-x 5 oracle oinstall 4096 Jan 18 19:54 oracle
drwxrwx--- 5 oracle oinstall 4096 Jan 18 19:54 oraInventory
[root@yr app]# pwd
/u01/app
[root@yr app]# rm -rf *
[root@yr app]# ll
total 0
1.2 Create directories
Create a directory / u01/soft:
[root@yr /]#mkdir u01
[root@yr /]#cd u01
[root@yr /u01]#mkdir soft
[root@yr /u01]#cd soft
[root@yr /u01/soft]#pwd
/u01/soft
1.3 Connect SFTP tabs in CRT
- Look at the current path of the machine and use the # lpwd command
sftp> pwd
/root
sftp> lpwd
C:/Users/Administrator/Documents
sftp> cd /u01/soft
sftp> pwd
/u01/soft
sftp> lls
desktop.ini           My Music              My Pictures
My Videos             QQPCMgr               Tencent Files
WeChat Files
- Put p13390677_112040_Linux-x86-64_1 of 7.zip and p13390677_112040_Linux-x86-64_2 of 7.zip in the C:/Users/Administrator/Documents directory:
sftp> lls
desktop.ini           My Music              My Pictures
My Videos             p13390677_112040_Linux-x86-64_1of7.zip
p13390677_112040_Linux-x86-64_2of7.zip      QQPCMgr
Tencent Files         WeChat Files
- Check to see if the save is successful:
[root@yr /u01/soft]#ll
total 2489640
-rw-r--r-- 1 root root 1395582860 Dec 19  2013 p13390677_112040_Linux-x86-64_1of7.zip
-rw-r--r-- 1 root root 1151304589 Dec 19  2013 p13390677_112040_Linux-x86-64_2of7.zip
[root@yr /u01/soft]#pwd
/u01/soft
- Open the sftp tab and upload the two files through the # put command:
sftp> put p13390677_112040_Linux-x86-64_*
Uploading p13390677_112040_Linux-x86-64_1of7.zip to /u01/soft/p13390677_112040_Linux-x86-64_1of7.zip
 100% 1362873KB  14346KB/s 00:01:35
C:/Users/Administrator/Documents/p13390677_112040_Linux-x86-64_1of7.zip: 1395582860 bytes transferred in 95 seconds (14346 KB/s)
Uploading p13390677_112040_Linux-x86-64_2of7.zip to /u01/soft/p13390677_112040_Linux-x86-64_2of7.zip
 100% 1124320KB  17567KB/s 00:01:04
C:/Users/Administrator/Documents/p13390677_112040_Linux-x86-64_2of7.zip: 1151304589 bytes transferred in 64 seconds (17567 KB/s)
sftp> ls
database              p13390677_112040_Linux-x86-64_1of7.zip
p13390677_112040_Linux-x86-64_2of7.zip
- Unzip the two compressed package files:
[root@yr /u01/soft]#unzip p*
Archive:  p13390677_112040_Linux-x86-64_1of7.zip
caution: filename not matched:  p13390677_112040_Linux-x86-64_2of7.zip
[root@yr /u01/soft]#
[root@yr /u01/soft]#unzip p13390677_112040_Linux-x86-64_1of7.zip
Archive:  p13390677_112040_Linux-x86-64_1of7.zip
[root@yr /u01/soft]#unzip p13390677_112040_Linux-x86-64_2of7.zip
- Unzip successfully, view memory:
[root@yr /u01/soft]#ls
database  p13390677_112040_Linux-x86-64_1of7.zip  p13390677_112040_Linux-x86-64_2of7.zip
[root@yr /u01/soft]#du -sh *
2.5G    database
1.4G    p13390677_112040_Linux-x86-64_1of7.zip
1.1G    p13390677_112040_Linux-x86-64_2of7.zip
2 See information about this guide
This guide describes how to install Oracle database using default installation options.
1. Tasks described in this guide
The procedures in this guide describe how:
- Configure the system to support Oracle database
- Install Oracle database on local file system using typical installation options
- Configure a general Oracle database installation that stores database files using a local file system.
2. Successful installation results
After successful installation of Oracle database: - The database you created and the default Oracle Net listener process running on the system.
- Oracle Enterprise Manager database control runs on the system and can be accessed by Web browser.
3 Check Hardware Requirements
The system must meet the following minimum hardware requirements:
3.1 Memory Requirements
The following is the memory required to install Oracle database version 2 (11.2):
Minimum: 1GB of memory
Recommendation: 2GB or more memory
- To determine the RAM size, enter the following commands:
# grep MemTotal /proc/meminfo
If the RAM size is smaller than the required size, more memory must be installed before continuing.
| Available RAM | Required swap space |
|---|---|
| Between 1GB and 2GB | 1.5 times the size of memory |
| Between 2GB and 16GB | Equal to RAM size |
| More than 16 GB | 16 GB |
[root@yr /u01/soft]#grep MemTotal /proc/meminfo
MemTotal:        2035792 kB
- To determine whether the system architecture can run the software, enter the following commands:
# uname -m
[root@yr soft]# uname –m
x86_64
- To determine the size of the configured swap space, enter the following commands:
# grep SwapTotal /proc/meminfo
[root@yr soft]# grep SwapTotal /proc/meminfo
SwapTotal:       4095992 kB
- To determine the available RAM and swap space, enter the following commands:
# free
[root@yr /u01/soft]#free –m
             total       used         free       shared     buffers     cached
Mem:        1988       1934         53          0         43        1627
-/+ buffers/cache:          263         1724
Swap:         3999       0          3999
or
[root@yr /u01/soft]#cat /proc/meminfo
- Automatic memory management
Starting with Oracle database 11g, automatic memory management requires more shared memory (/ dev/shm) and file descriptors. The size of shared memory should be at least MEMORY_MAX_TARGET and MEMORY_TARGET for each Oracle instance on the computer.
To determine the amount of shared memory available, enter the following commands:
# df -h /dev/shm/
[root@yr ~]#mount /dev/sr0 /mnt/cdrom
mount: block device /dev/sr0 is write-protected, mounting read-only
[root@yr soft]# df -h /dev/shm
Filesystem            Size  Used Avail Use% Mounted on
tmpfs                 995M     0  995M   0% /dev/shm
3.2 System Architecture
To determine whether the system architecture can run the software, enter the following commands:
# uname -m
3.3 Disk space required
Following is the disk space required to install Oracle database version 2 (11.2):
- / At least 1GB of disk space in tmp. View / tmp directory
The size of available disk space. / In the tmp directory, enter the following commands:
# df -h /tmp
[root@yr /u01/soft]#df -h /tmp
Filesystem            Size  Used Avail Use% Mounted on
/dev/mapper/VolGroup00-LogVol00
                       35G  7.4G   26G  23% /
- To determine the amount of disk space available on the system, enter the following commands:
# df –h
[root@yr soft]# df –h
Filesystem            Size  Used Avail Use% Mounted on
/dev/mapper/VolGroup00-LogVol00
                       35G  7.5G   26G  23% /
/dev/sda1              99M   23M   71M  25% /boot
tmpfs                 995M     0  995M   0% /dev/shm
/dev/sr0              3.6G  3.6G     0 100% /media/OL5.7 x86_64 dvd 20110728
/dev/sr0              3.6G  3.6G     0 100% /mnt/cdrom
- The following table describes the disk space requirements for software and data files for each installation type on Linux x86-64:
| Installation type | Requirements for Software Documents (GB) |
|---|---|
| Enterprise Edition | 4.35 |
| Standard Edition | 4.22 |
| Installation type | Requirements for data files (GB) |
|---|---|
| Enterprise Edition | 1.7 |
| Standard Edition | 1.5 |
4. Check software requirements
Verify that the following software is installed on the system according to the product to be installed.
4.1 Operating System Requirements
Oracle Database 11g version 2 (11.2) requires the following or higher versions of the operating system:
Oracle Linux 5 Update 5
To determine the distribution and version of installed Linux, enter the following commands:
# cat /proc/version
[root@yr /u01/soft]#cat /proc/version
Linux version 2.6.32-200.13.1.el5uek (mockbuild@ca-build9.us.oracle.com) (gcc version 4.1.2 20080704 (Red Hat 4.1.2-50)) #1 SMP Wed Jul 27 21:02:33 ED
4.2 Kernel Requirements
Oracle Linux 5 Update 5
2.6.32-100.0.19 or later
To determine whether the required kernel is installed, enter the following command:
# uname -r
[root@yr /u01/soft]#uname –r
2.6.32-200.13.1.el5uek
5 Create the required operating system groups and users
If you want to install Oracle database, you need the following local operating system groups and users:
- Oracle Inventory Group (usually oinstall)
- OSDBA group (usually, dba)
- Oracle software owner (usually oracle)
- To determine whether these groups and users exist and create them if necessary, perform the following steps:
To determine the existence of oinstall group, enter the following command:
# more /etc/oraInst.loc
[root@yr /u01/soft]#more /etc/oraInst.loc
/etc/oraInst.loc: No such file or directory

[root@yr /u01/soft]#groupadd oinstall
[root@yr /u01/soft]#groupadd dba
- If there is no oracle user, this command creates oracle users and specifies oinstall as the main group dba as the second group:
# /usr/sbin/useradd -g oinstall -G dba oracle
[root@yr /u01/soft]#useradd -g oinstall -G dba oracle
-
To determine that the oracle user exists and belongs to the correct group, enter the following command:
# id oracle -
If an oracle user exists, this command displays information about the group to which the user belongs. The output should be similar to the following, indicating that oinstall is the main group dba is the second group:
uid=440(oracle) gid=200(oinstall) groups=201(dba)
[root@yr /u01/soft]#id oracle
uid=515(oracle) gid=5003(oinstall) groups=5003(oinstall),5004(dba)
- Enter the following commands to set up the oracle user:
# passwd oracle
[root@yr /u01/soft]#passwd oracle
Changing password for user oracle.
New UNIX password:
BAD PASSWORD: it is based on a dictionary word
Retype new UNIX password:
passwd: all authentication tokens updated successfully.
6 Configure Kernel Parameters
Verify that the kernel parameters shown in the table below are set to values greater than or equal to the minimum shown. The process behind the table describes how to validate and set values.
If the value of any kernel parameter is different from the recommended value, complete the following steps:
1. Use any text editor to create or edit the / etc/sysctl.conf file and add or edit lines similar to the following:
[root@yr /u01/soft]#vi /etc/sysctl.conf
# Kernel sysctl configuration file for Oracle Enterprise Linux
#
# For binary values, 0 is disabled, 1 is enabled.  See sysctl(8) and
# sysctl.conf(5) for more details.
# Controls IP packet forwarding
net.ipv4.ip_forward = 0
# Controls source route verification
# See /usr/share/doc/kernel-doc-*/Documentation/networking/ip-sysctl.txt
net.ipv4.conf.default.rp_filter = 2
# Do not accept source routing
net.ipv4.conf.default.accept_source_route = 0
# Controls the System Request debugging functionality of the kernel
kernel.sysrq = 0
# Controls whether core dumps will append the PID to the core filename
# Useful for debugging multi-threaded applications
kernel.core_uses_pid = 1
# Controls the use of TCP syncookies
net.ipv4.tcp_syncookies = 1
# Controls the maximum size of a message, in bytes
kernel.msgmnb = 65536

# Controls the default maxmimum size of a mesage queue
kernel.msgmax = 65536
# Controls the maximum shared segment size, in bytes
kernel.shmmax = 68719476736
# Controls the maximum number of shared memory segments, in pages
kernel.shmall = 4294967296
kernel.shmall = 4294967296
fs.aio-max-nr = 1048576
fs.file-max = 6815744
kernel.shmall = 2097152
kernel.shmmax = 536870912
kernel.shmmni = 4096
kernel.sem = 250 32000 100 128
net.ipv4.ip_local_port_range = 9000 65500
net.core.rmem_default = 262144
net.core.rmem_max = 4194304
net.core.wmem_default = 262144
net.core.wmem_max = 1048576
"/etc/sysctl.conf" 48L, 1388C written
By specifying the / etc/sysctl.conf files, they persist when the system is restarted.
2. Enter the following command to change the current value of the kernel parameters:
# /sbin/sysctl -p
Check the output of this command to verify that the value is correct. If the value is incorrect, edit the / etc/sysctl.conf file and type this command again.
[root@yr /u01/soft]#/sbin/sysctl –p
net.ipv4.ip_forward = 0
net.ipv4.conf.default.rp_filter = 2
net.ipv4.conf.default.accept_source_route = 0
kernel.sysrq = 0
kernel.core_uses_pid = 1
net.ipv4.tcp_syncookies = 1
kernel.msgmnb = 65536
kernel.msgmax = 65536
kernel.shmmax = 68719476736
kernel.shmall = 4294967296
fs.aio-max-nr = 1048576
fs.file-max = 6815744
kernel.shmall = 2097152
kernel.shmmax = 536870912
kernel.shmmni = 4096
kernel.sem = 250 32000 100 128
net.ipv4.ip_local_port_range = 9000 65500
net.core.rmem_default = 262144
net.core.rmem_max = 4194304
net.core.wmem_default = 262144
net.core.wmem_max = 1048576
3. Enter the command / SBIN / sysctl-a. To confirm that the value is set correctly, do the following.
[root@yr soft]# /sbin/sysctl –a
4. Updating the values of the kernel parameters, the / etc/sysctl.conf file either restarts the computer or runs commands. Sysctl-p To use files in / etc/sysctl.conf in active kernel memory.
[root@yr soft]# sysctl –p
Check Oracle Software Installation Users'Resource Limitations
If necessary, update the / etc/security/limits.conf installation owner's configuration file. For example, add the following lines to the / etc/security/limits.conf file: (soft is the warning value, hard is the upper limit value)
oracle soft nproc 2047
oracle hard nproc 16384
oracle soft nofile 1024
oracle hard nofile 65536
oracle soft stack 10240
[root@yr ~]#vi /etc/security/limits.conf
# Add it later
oracle         soft    nproc   2047
oracle         hard   nproc   16384                                               oracle         soft    nofile  1024
oracle         hard   nofile  65536
oracle         soft    stack   10240
7 Create the necessary directories
Create directories with names similar to the following and specify the correct owners, groups, and permissions for them:
- Oracle base directory
- An optional Oracle data file directory
If you choose not to create a separate Oracle data file directory, the Oracle base directory must have 3 GB of free disk space or 4 GB of free disk space.
Enter a command similar to the following to create a recommended subdirectory in the identified mount point directory and set the appropriate owner, group, and permission:
# mkdir -p /mount_point/app/
# chown -R oracle:oinstall /mount_point/app/
# chmod -R 775 /mount_point/app/
[root@yr /u01]#mkdir -p /u01/soft
[root@yr /u01]#mkdir -p /u01/app/oracle/product/11204/db_1
[root@yr ~]#chown -R oracle:oinstall /u01
[root@yr ~]#chmod -R 775 /u01/app/
8 Configure Oracle User Environment
Enter commands:
[root@yr ~]#xclock
Display clocks:
[root@yr ~]#su – oracle
[oracle@yr ~]# xclock
X connection to localhost:10.0 broken (explicit kill or server shutdown).
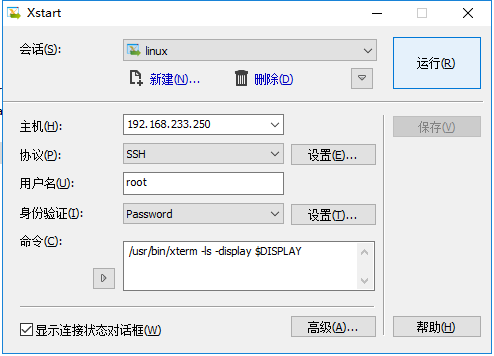
If you do not install software on a local computer, run the following commands on a remote computer to set the DISPLAY variable:
$ export DISPLAY=local_host:0.0
[oracle@yr ~]# su -
Password:
[root@yr ~]#xhost +
access control disabled, clients can connect from any host
[root@yr ~]#su – oracle
[oracle@yr ~]# export DISPLAY=192.168.233.1:0.0
If the DISPLAY variable is set correctly, then you can see xclock on your computer screen.
$ xclock
[oracle@yr ~]# xclock

Enter commands similar to the following commands to set TMP and TMPDIR environment variables:
$ TMP=/mount_point/tmp
$ TMPDIR=/mount_point/tmp
$ export TMP TMPDIR
Enter commands similar to the following to set the ORACLE_BASE and ORACLE_SID environment variables:
$ ORACLE_BASE=/u01/app/oracle
$ ORACLE_SID=sales
$ export ORACLE_BASE ORACLE_SID
9 Install Oracle database
After configuring the Oracle user environment, start the Oracle General Installer and install the Oracle database as follows:
To start the Oracle Universal Installer, enter the following commands:
$ /mount_point/db/runInstaller
Under the xstart program
[oracle@yr ~]# cd /u01/soft/database
[oracle@yr database]# ls –l
total 60
drwxr-xr-x  4 oracle oinstall  4096 Jan 19 15:17 install
-rw-r--r--  1 oracle oinstall 30016 Aug 27  2013 readme.html
drwxr-xr-x  2 oracle oinstall  4096 Jan 19 15:16 response
drwxr-xr-x  2 oracle oinstall  4096 Jan 19 15:16 rpm
-rwxr-xr-x  1 oracle oinstall  3267 Aug 27  2013 runInstaller
drwxr-xr-x  2 oracle oinstall  4096 Jan 19 15:16 sshsetup
drwxr-xr-x 14 oracle oinstall  4096 Jan 19 15:17 stage
-rw-r--r--  1 oracle oinstall   500 Aug 27  2013 welcome.html
[oracle@yr database]# ./runInstaller
Step 1: Keep your mailbox and don't want to receive mail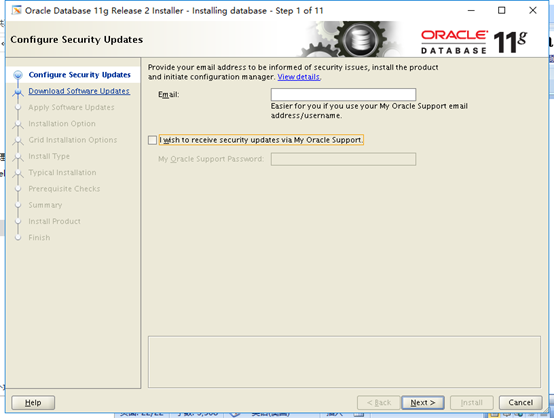
Step 2: Skip software updates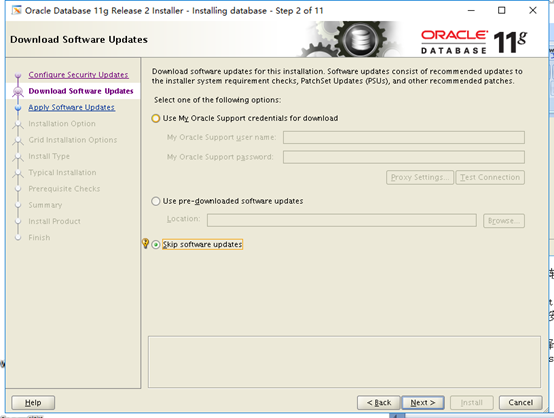
Step 3: install database software only install database software, not configure database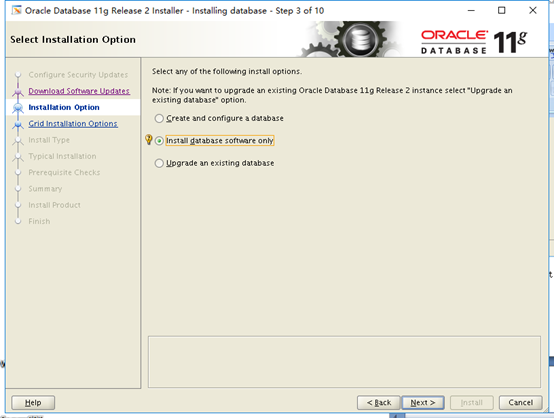
Step 4: Select the type of database installed: Select the first single database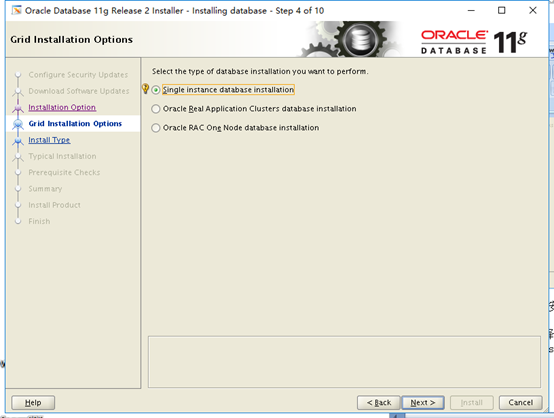
Step 5: Product Language: eng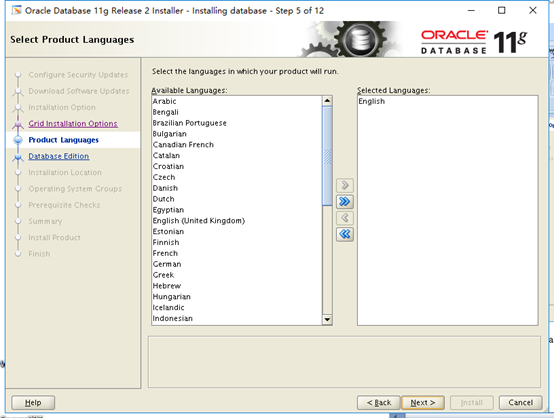
Step 6: Database Edition
Type: Select the default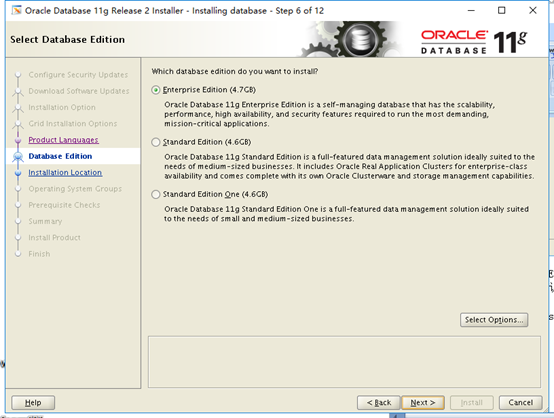
Step 7: oracle base: Because it reads in the environment variable, it can be displayed.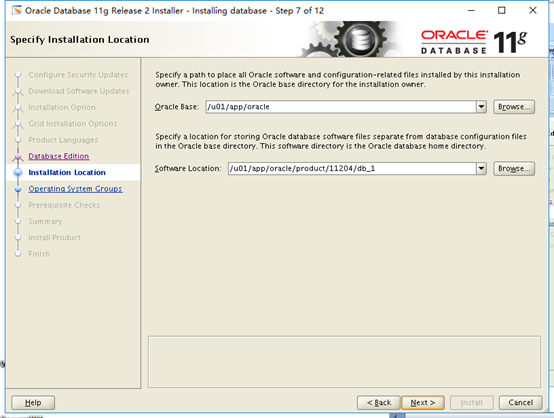
The directories that will be used for future upgrades of the database, by default
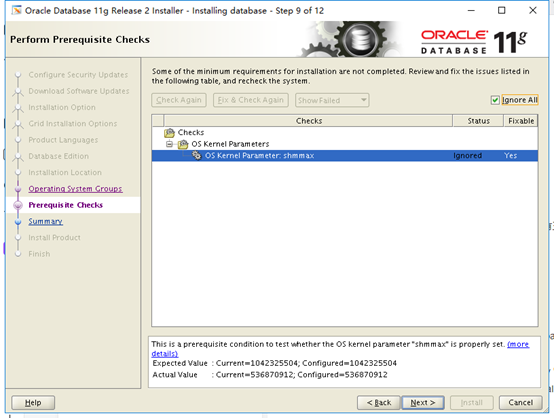
Step 9: Prerequisite Checks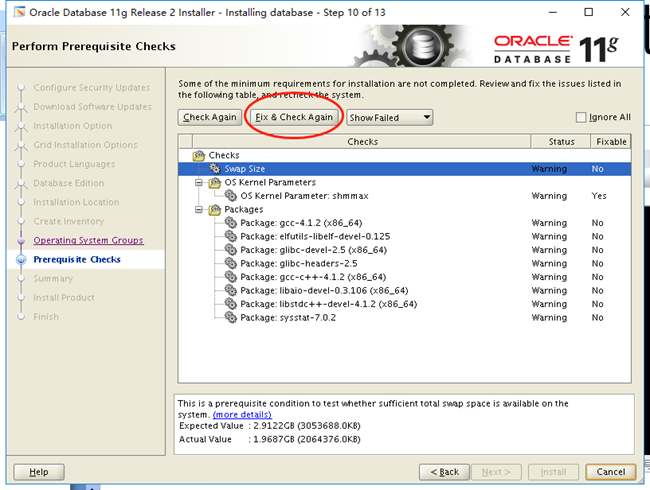
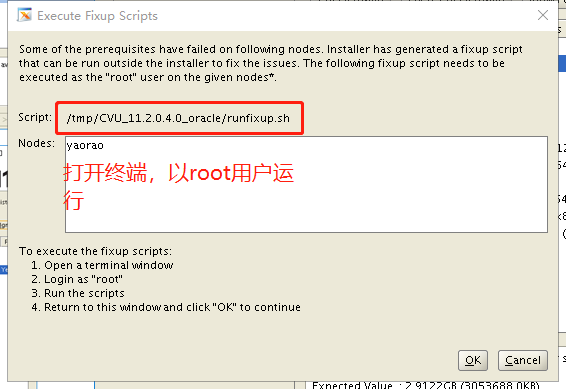
Then install the following files under root user with yum install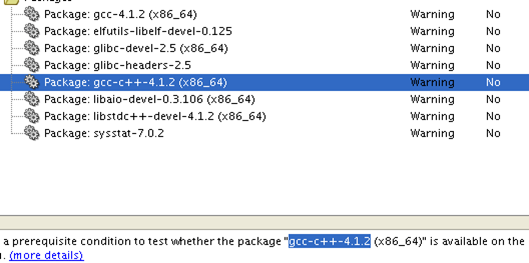
Step 11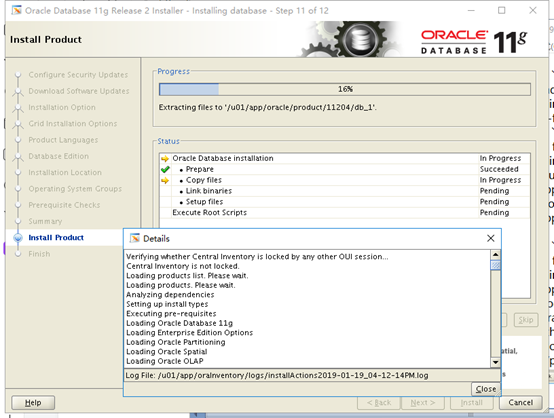
Look at the process through detail:
[root@yr /u01/app]#tail -f /u01/app/oraInventory/logs/installActions2019-01-18_01-28-25PM.log
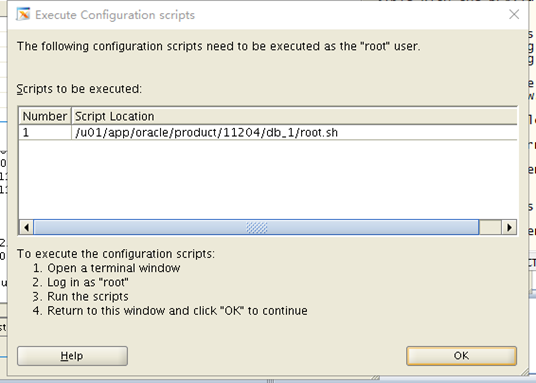
[root@yr ~]#/u01/app/oracle/product/11204/db_1/root.sh
Finish: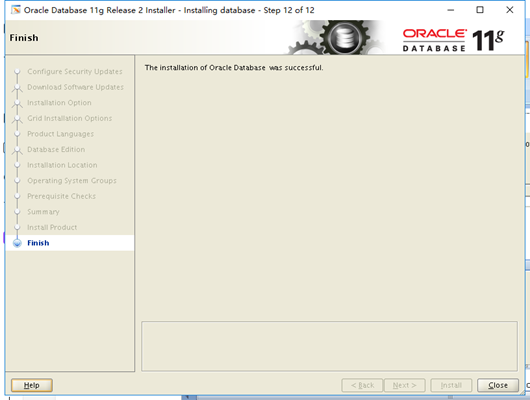
10 Install database
10.1 View configuration information
- Use script commands to see if the required files are installed successfully:
[root@yr ~]#rpm -q --qf '%{NAME}-%{VERSION}-%{RELEASE} (%{ARCH})\n' \binutils elfutils-libelf elfutils-libelf-devel gcc gcc-c++ glibc glibc-common glibc-devel glibc-headers libaio libgcc libstdc++ make sysstat
binutils-2.17.50.0.6-14.el5 (x86_64)
elfutils-libelf-0.137-3.el5 (x86_64)
elfutils-libelf-0.137-3.el5 (i386)
elfutils-libelf-devel-0.137-3.el5 (i386)
elfutils-libelf-devel-0.137-3.el5 (x86_64)
gcc-4.1.2-51.el5 (x86_64)
gcc-c++-4.1.2-51.el5 (x86_64)
glibc-2.5-65 (x86_64)
glibc-2.5-65 (i686)
glibc-common-2.5-65 (x86_64)
glibc-devel-2.5-65 (x86_64)
glibc-headers-2.5-65 (x86_64)
libaio-0.3.106-5 (x86_64)
libaio-0.3.106-5 (i386)
libgcc-4.1.2-51.el5 (x86_64)
libgcc-4.1.2-51.el5 (i386)
libstdc++-4.1.2-51.el5 (x86_64)
libstdc++-4.1.2-51.el5 (i386)
make-3.81-3.el5 (x86_64)
sysstat-7.0.2-11.el5 (x86_64)
- Check to see if the environment variable is configured, because $ORACLE_HOME is an environment variable, so if you want to enter this directory, you can enter it directly through the following commands:
# cd $ORACLE_HOME
[oracle@yr ~]# echo $ORACLE_HOME
/u01/app/oracle/product/11204/db_1
[oracle@yr ~]# cd $ORACLE_HOME
[oracle@yr db_1]# pwd
/u01/app/oracle/product/11204/db_1
- To verify that Oracle software has been successfully installed, you can check it with the following commands:
# ./sqlplus / as sysdba
[oracle@yr bin]# ./sqlplus / as sysdba

SQL*Plus: Release 11.2.0.4.0 Production on Mon Jan 21 14:01:47 2019

Copyright (c) 1982, 2013, Oracle.  All rights reserved.

Connected to an idle instance.
The above information shows that the installation was successful and successfully entered the database. Currently sysdba is a default password.
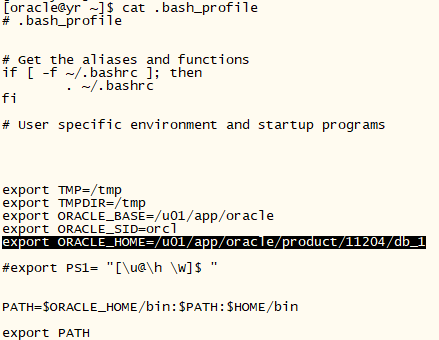
- For ease of use, you can set environment variables without going into the $ORACLE_HOME directory.
[oracle@yr ~]# vi .bash_profile
PATH=$ORACLE_HOME/bin:$PATH:$HOME/bin
After configuring the environment variables, you can execute sqlplus directly without entering the $ORACLE_HOME directory:
[oracle@yr ~]# sqlplus / as sysdba

SQL*Plus: Release 11.2.0.4.0 Production

Copyright (c) 1982, 2013, Oracle.  All rights reserved.

Connected to an idle instance.
Note that invoking an executable file requires. / plus an executable file name.
4. To check whether the environment variables are configured properly, the following commands can be executed under the X file:
[oracle@yr ~]# echo $ORACLE_HOME
/u01/app/oracle/product/11204/db_1
[oracle@yr ~]# echo  $PATH
/bin:/usr/kerberos/bin:/usr/local/bin:/bin:/usr/bin:/home/oracle/bin
[oracle@yr ~]# source .bash_profile
10.2 Installation of database
- Start xstart, switch to Oracle user after all configurations are completed, and enter the #dbca command:
[oracle@yr ~]# dbca
Step 1: Pop-up Welcome interface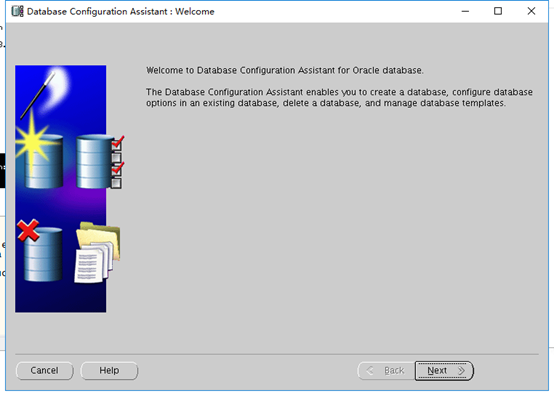
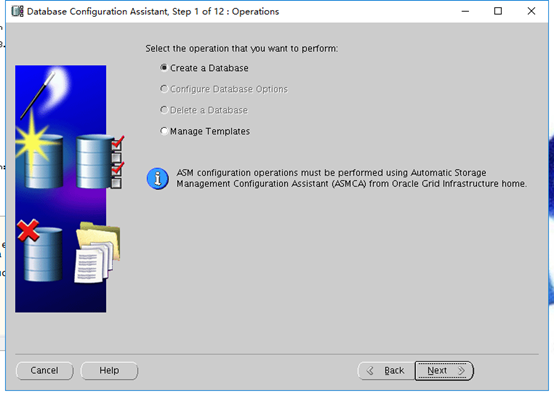
Step 2: Create a database
Step 3: Custom Installation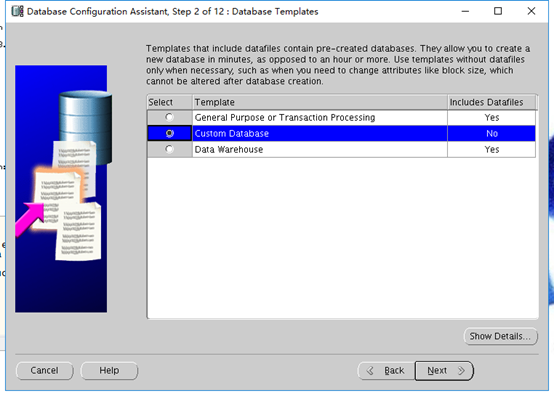
Step 4: Set the Database Name to orcl (unlike the SID previously set in the environment variable, it will not connect)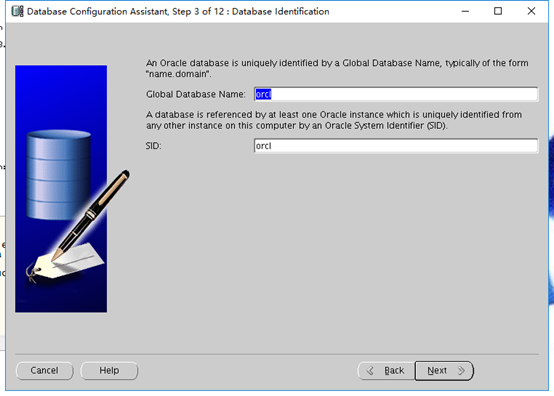
Step 5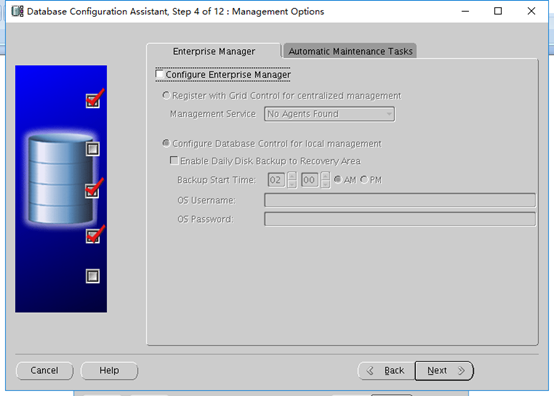
Step 6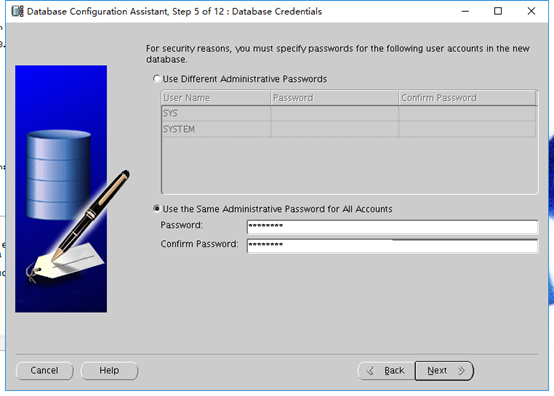
Step 7

Step 8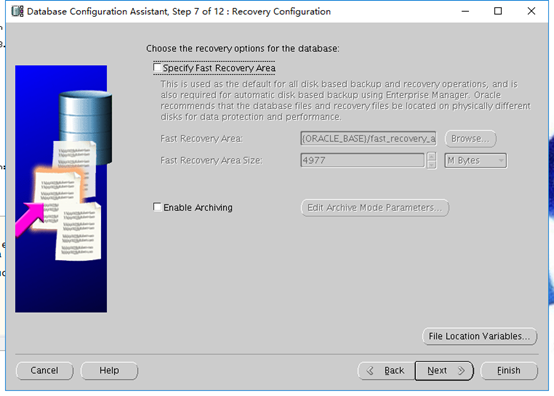
Step 9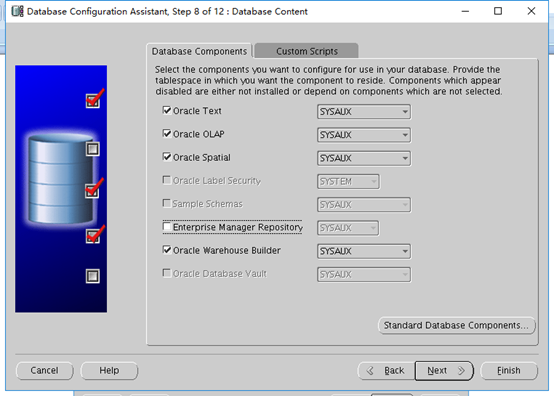
Step 10:
40% of the default 2G memory
The block size of the default 8K supports the maximum process of 150.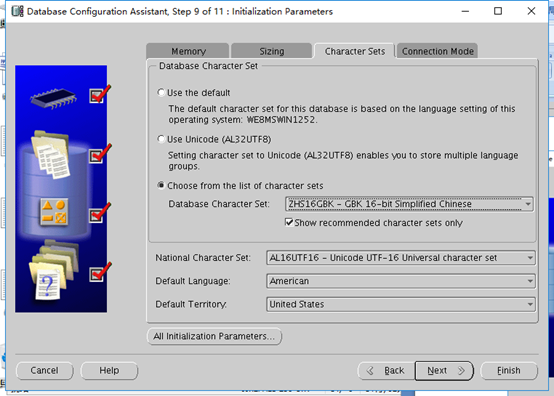
Link mode: default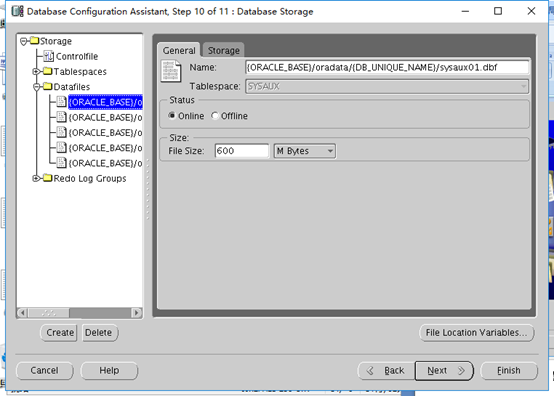
Step 11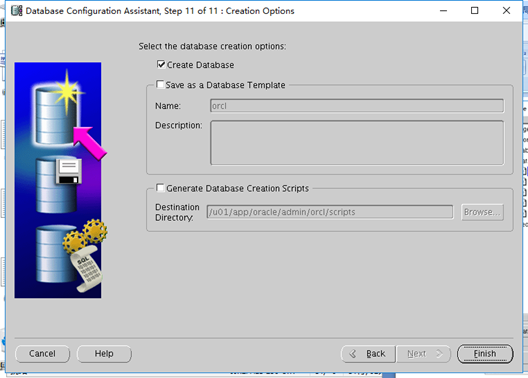
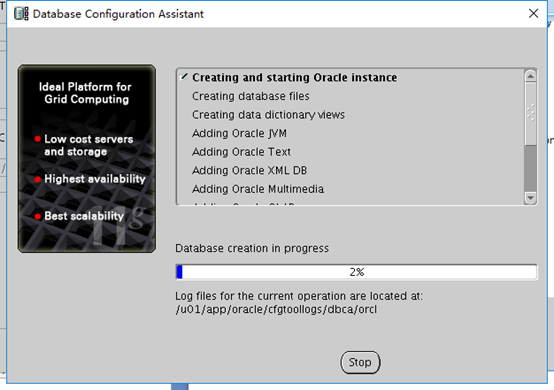
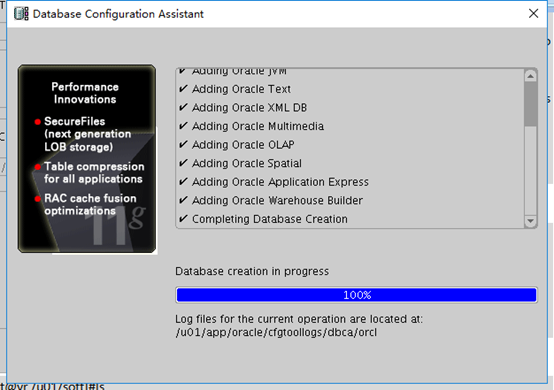
You can see how the configuration went: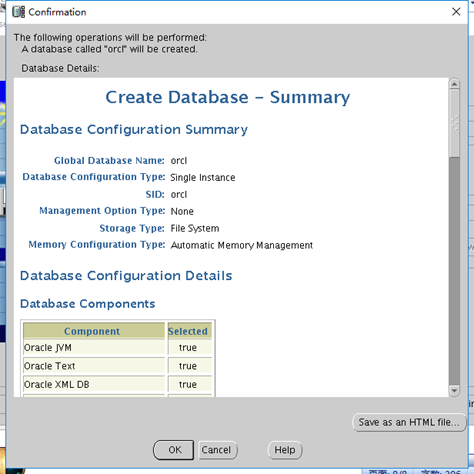
Enter the progress bar for installation:
Installation complete, exit exit exit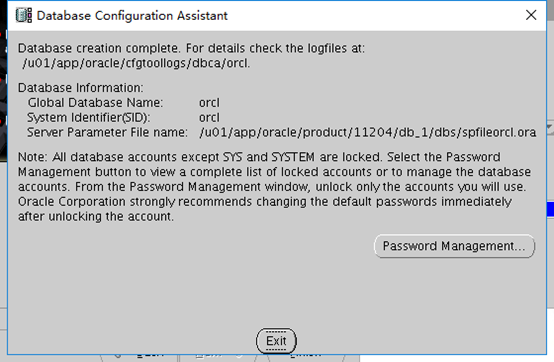
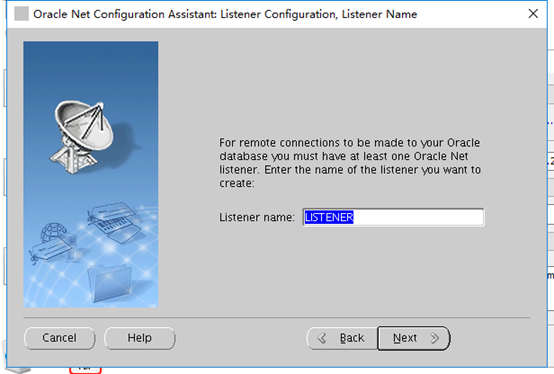
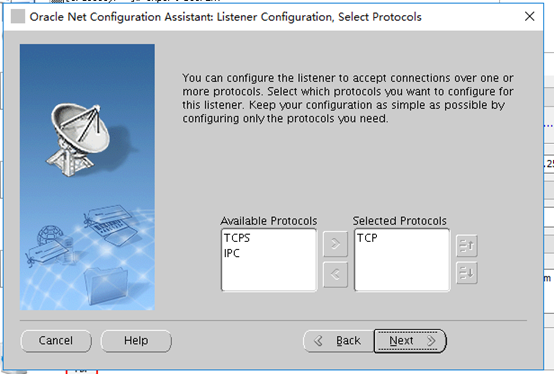
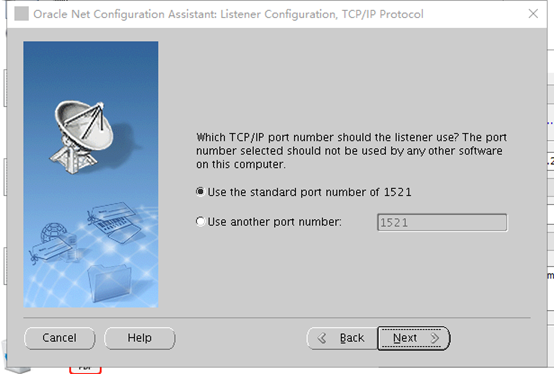
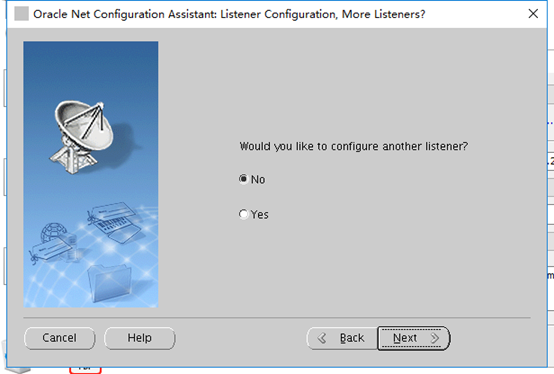
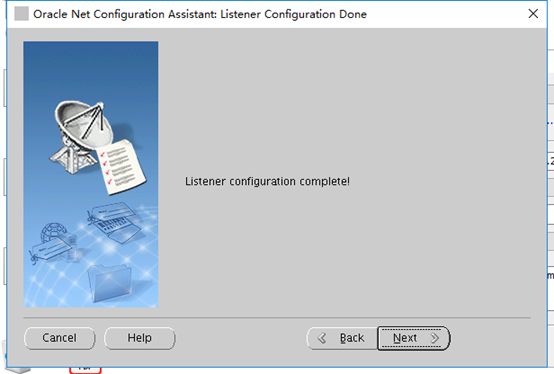
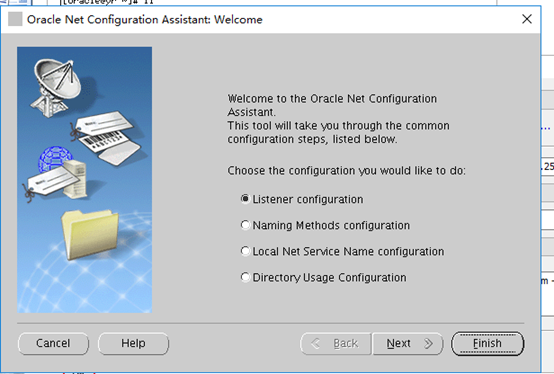
- Start xstart, switch to Oracle user after all configurations are completed, and enter #netca command:
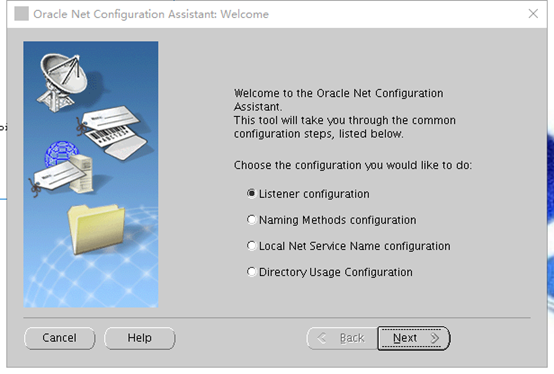
Listener: Monitor (imagine a launch tower)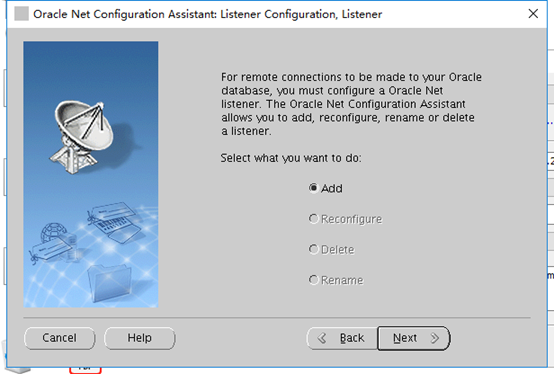
- If you want to delete a database, use the # dbca command:

10.3 Solutions to different name settings just now
In the environment variable, change the name of ORACLE_SID to orcl, which is consistent with setting up the database.
Run the # sqlplus / as sysdba command:
[oracle@yr ~]$ sqlplus / as sysdba

SQL*Plus: Release 11.2.0.4.0 Production on Mon Jan 21 17:03:47 2019

Copyright (c) 1982, 2013, Oracle.  All rights reserved.


Connected to:
Oracle Database 11g Enterprise Edition Release 11.2.0.4.0 - 64bit Production
With the Partitioning, OLAP, Data Mining and Real Application Testing options
This result shows that the connection is successful.