Summary: One of the load balancing methods mentioned in previous blogs is lvs. The configuration of LVS is simple, which reduces the probability of errors. Moreover, the software is in the fourth layer of the tcp/ip protocol stack. It can provide various web application services. However, because it does not support regular expression processing, it can not do static and dynamic separation. So today's haproxy has the advantage of supporting virtual machine hosts, and realizing the functions needed by large websites such as dynamic and static separation, url redirection and so on.
System environment: Red Hat Enterprise Linux Server release 6.5 (Santiago)
Kernel version: 2.6.32-431.el6.x86_64
1. Happroxy Load Balancing for http Services
Topology diagram: 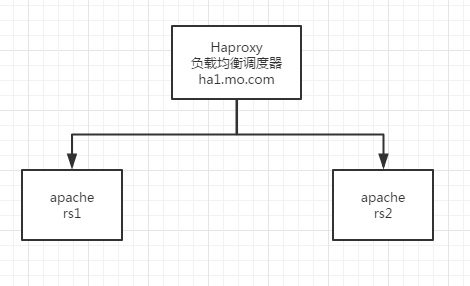
1 install haproxy directly through yum
[root@ha1 ~]# yum install haproxy -y
2 Configuration file modification/etc/haproxy/haproxy.cfg
listen mo *:80 #Define the port of haproxy
    balance     roundrobin   #scheduling algorithm
    server      static 172.25.3.102 check #Define real server 1
    server      static 172.25.3.103 check #Define real server 2
3 Start haproxy, and realserver services
[root@ha1 ~]# /etc/init.d/haproxy start
Starting haproxy:                                          [  OK  ]
4 Observation Phenomena
In order to make the phenomenon obvious, it is better to modify the index.html file on the two real server s / var/www/html to be different, so that we can see the scheduling on the two machines.
[root@foundation3 ~]# curl 172.25.3.100
rserver1
[root@foundation3 ~]# curl 172.25.3.100
rserver2
[root@foundation3 ~]# curl 172.25.3.100
rserver1
[root@foundation3 ~]# curl 172.25.3.100
rserver2
Second, add haproxy monitoring interface
The configuration file was modified as follows:
listen stats_auth *:8000
        stats enable
        stats uri /status
        stats auth admin:momo  #Define the login account and password
        stats refresh 5s       #Define the time of each refresh of monitoring data
Effect: 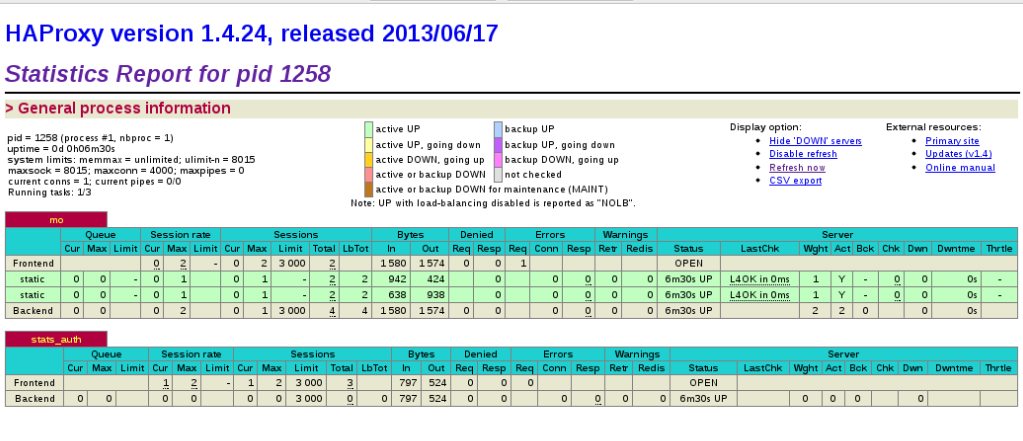
Three definitions of haproxy logs
First, look at the global configuration just omitted:
global
    log         127.0.0.1 local2 #ip sent by the log and the level of the log

    chroot      /var/lib/haproxy #The root directory of haproxy runtime
    pidfile     /var/run/haproxy.pid
    maxconn     4000             #maximum connection
    user        haproxy
    group       haproxy
    daemon                       #Background operation
The log local2 defined here
Based on this, we modify the configuration file of rsyslg service to define the level of log in a log file.
/ etc/rsyslog.conf Add the following line
local2.* /var/log/haproxy.logBecause udp is used for log sending, the following two options are also turned on
$ModLoad imudp
$UDPServerRun 514
Restart the log service, and then restart haproxy to see if / var/log/haproxy has content, and if there is content, the log orientation is successful.
[root@ha1 ~]# cat /var/log/haproxy.log
Mar 18 22:08:15 localhost haproxy[1394]: Proxy mo started.
Mar 18 22:08:15 localhost haproxy[1394]: Proxy stats_auth started.
Four Access Restrictions
Access restriction is that access to an ip is directed to an error interface, so that the ip can not access normal services.
frontend  mo *:80
        acl invalid_src src 172.25.3.250/24
        block if invalid_src
        default_backend             app

backend app
    balance     roundrobin
    server      static 172.25.3.102:80 check

#listen mo *:80
#   balance     roundrobin
#  server      static 172.25.3.102 check
#    server      static 172.25.3.103 check
The most important thing in the above configuration is acl. Through acl, we define an illegal source ip, which can be either a host address or a network address. When this IP is accessed, we block.
The haproxy section is not yet complete...
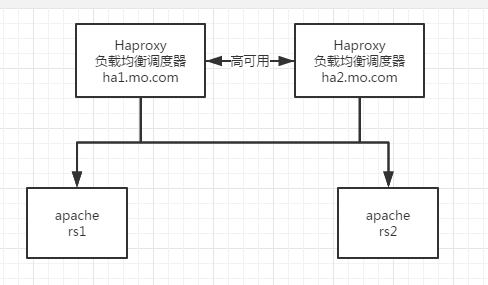
5. pacemaker+haproxy
To configure cluster services, we must first stop haproxy, and we must stop it clean.
2. Parts needed to install the pacemaker cluster Operations Note 31 (Summary of Pacemaker High Availability Cluster Buildings) Here is the detailed configuration of pacemaker.
3. Testing
[root@ha1 ~]# yum install pacemaker corosync -yInstall corosycn heartbeat component, pacemaker cluster resource manager
```
[root@ha1 ~]# rpm -ivh crmsh-1.2.6-0.rc2.2.1.x86_64.rpm pssh-2.3.1-2.1.x86_64.rpm
Installing crm shell management can facilitate the distribution of cluster configuration and configuration.
bindnetaddr: 172.25.3.0     #Line 10
service {                   #Line 34
        name:pacemaker
        ver:0
}
corosync's configuration file has an example, we will remove the example and rename it, as long as we modify the above three parts.
[root@ha1 ~]# scp /etc/corosync/corosync.conf ha2.mo.com:/etc/corosync/

[root@ha1 ~]# /etc/init.d/corosync start
Starting Corosync Cluster Engine (corosync):               [  OK  ] #ha2 also needs to be opened

[root@ha1 ~]# crm
crm(live)#
Copy the file to another node. Open the corsync service.
Enter the crm configuration cluster.
crm(live)configure# show
node ha1.mo.com
node ha2.mo.com
node localhost.localdomain
property $id="cib-bootstrap-options" \
    dc-version="1.1.10-14.el6-368c726" \
    cluster-infrastructure="classic openais (with plugin)" \
    expected-quorum-votes="2" \
    stonith-enabled="false"
The initial configuration of the cluster is as follows.
crm(live)resource# primitive vip ocf:heartbeat:IPaddr2 params ip=172.25.3.200 cidr_netmask=24 op monitor interval=30s
crm(live)resource# primitive proxy lsb:haproxy op monitor interval=30s
crm(live)configure# group LB vip proxy
First add vip resources, then proxy resources, and finally combine the two resources into a group, open the service group, and observe the service status.
Online: [ ha1.mo.com ha2.mo.com ]
OFFLINE: [ localhost.localdomain ]

 Resource Group: LB
     vip        (ocf::heartbeat:IPaddr2):   Started ha1.mo.com
     proxy  (lsb:haproxy):  Started ha1.mo.com
The service is normal.
Six keepalived+haproxy
Now stop corosync and kill all the processes associated with it. Use keepalived as a high availability cluster for haproxy. Because keepalived is not like heartbeat,corosync has a wealth of service scripts, so first consider how keepalived starts and closes the service. Keepalived is a software similar to layer3, 4 & 5 switching mechanism, which is what we usually call Layer 3, Layer 4 and Layer 5 switching. Keepalived's function is to detect the status of the web server. If a web server crashes or fails, Keepalived will detect and remove the faulty web server from the system. When the web server works properly, Keepalived will automatically add the web server to the server group. All of these tasks are self-contained. Active completion, no manual interference, only need to do manual repair of the failure of the web server.
In summary, what we need to solve is to get a script that can detect health and shut down services.
The script is as follows:
#!/bin/bash
/etc/init.d/haproxy status &> /dev/null || /etc/init.d/haproxy restart &> /dev/null
if [ $? -ne 0 ];then
/etc/init.d/keepalived stop &> /dev/null
fi