1. Introduction to the working mode of rabbitmq
The working mode of RabbitMQ refers to the process implemented in the actual caching of messages.
RabbitQM official website provides six working modes:
https://www.rabbitmq.com/getstarted.html
1. Hello Word simple working mode
2. Work queues work queue mode
3. Publish/Subscribe publish and subscribe mode
4. Routing mode
5. Topics topic mode
6. RPC remote call mode

Due to RPC remote call, it is not considered MQ; There will be no introduction here
2. Related concepts in rabbitmq working mode
For the readers of RabbitMQ, the related concepts of RabbitMQ may be obscure and difficult to understand. If you want to fully understand it, you can understand it by combining the code in the detailed explanation of the working mode and the RabbitMQ infrastructure diagram.
RabbitMQ infrastructure is as follows:
 Related concepts in RabbitMQ:
1. A messenger message is not specific. It consists of a message header and a message body. The message body is opaque, while the message header consists of a series of optional attributes, including routing key, priority (priority relative to other messages), delivery mode (indicating that the message may need persistent storage), etc.
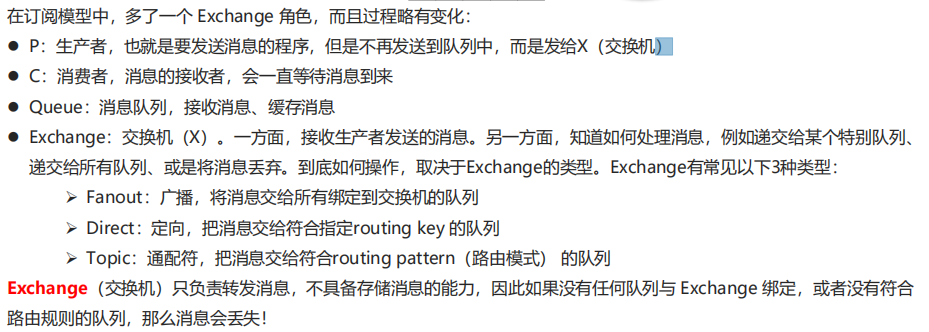
2. Publisher is the producer of messages and a client application that publishes messages to the exchange.
3. Exchang e switch, which is used to receive messages sent by producers and route these messages to queues in the server.
4. Bindin g is used for the association between message queues and switches. A binding is a routing rule that connects the switch and message queue based on the routing key, so the switch can be understood as a routing table composed of binding.
5. Queu e message queue, which is used to save messages until they are sent to consumers. It is the container of messages and the destination of messages. A message can be put into one or more queues. The message is always in the queue, waiting for the consumer to connect to the queue and take it away.
6. Connection network connection, such as a TCP connection.
7. Channe l, an independent bidirectional data flow channel in a multiplexed connection. The channel is a virtual connection established in the real TCP connection. AMQP commands are sent through the channel. Whether publishing messages, subscribing to queues or receiving messages, these actions are completed through the channel. Because it is very expensive for the operating system to establish and destroy TC, the concept of channel is introduced to reuse a TCP connection.
8. The consumer of the Consume message, which represents a client application that gets messages from the message queue.
9. Virtual Ho virtual host, which represents a batch of switches, message queues and related objects. A virtual host is a separate server domain that shares the same authentication and encryption environment. Each vhost is essentially a RabbitMQ server with its own queue, switch, binding and permission mechanism. vhost is the basis of AMQ concept and must be specified during connection. The default vhost of rabbit m is /.
10. A Broker represents a message queuing server entity
After introducing the basic concepts, let's go to the code below. Let's have a deeper understanding of the working mode of RabbitMQ according to the code
Hello Word simple working mode
1. Create two Maven projects (consumers and producers) under the relevant folders
Producer: producer, equivalent to the party sending the message
Consumer: consumer, equivalent to the party receiving the message

2. Import the jar of spring integration RabbitMQ in pom.xml
<!--    rabbit Client dependency-->
    <dependencies>
        <dependency>
            <groupId>com.rabbitmq</groupId>
            <artifactId>amqp-client</artifactId>
            <version>5.6.0</version>
        </dependency>
    </dependencies>
3. Write producer side code to send messages
Create producer under the com.xxx.rabbitMQ package under the producer project_ HelloWorld class
/**
 * Simple mode: send message
 * 1.Create connection factory
 * 2.Set parameters
 * 3.Create Connection
 * 4.Create Channel
 * 5.Create Queue
 * 6.send message
 */
public class Producer_HelloWorld {
    public static void main(String[] args) throws IOException, TimeoutException {
        //1. Create a connection factory
        ConnectionFactory factory = new ConnectionFactory();
        //2. Set parameters
        factory.setHost("RubbitMQ Installed host ip address");//ip default value localhost
        factory.setPort(5672); //Port default 5672
        factory.setVirtualHost("/");//Virtual machine defaults/
        factory.setUsername("guest");//User name: default guest
        factory.setPassword("guest");//Password default guest
        //3. Create a Connection
        Connection connection = factory.newConnection();
        //4. Create a Channel
        Channel channel = connection.createChannel();
        //5. Create Queue
        /*
        queueDeclare(String queue, boolean durable, boolean exclusive, boolean autoDelete, Map<String, Object> arguments)
        Parameters:
            1. queue: Queue name
            2. durable:Whether to persist or not, after mq is restarted, is still in use
            3. exclusive:
                * Exclusive. Only one consumer can listen to this queue
                * Delete queue when Connection is closed
                *
            4. autoDelete:Whether to delete automatically. When there is no Consumer, it will be deleted automatically
            5. arguments: Parameters.
         */
        //If there is no one named Hello_ If there is a queue in the world, the queue will be created. If there is, it will not be created
        channel.queueDeclare("hello_world",true,false,false,null);
        /*
        basicPublish(String exchange, String routingKey, BasicProperties props, byte[] body)
        Parameters:
            1. exchange: Switch name. Exchange opportunities in simple mode use the default ''
            2. routingKey: Route name
            3. props: configuration information
            4. body: Send message data
         */
        String body = "hello rabbitmq~~~";
        //6. Send message
        channel.basicPublish("","hello_world",null,body.getBytes());
        //7. Release resources
      channel.close();
      connection.close();

    }
}
4. Compile the consumer side code to send the message
Create consumerr under the com.xxx.rabbitMQ package under the consumer project_ HelloWorld class
public class Consumer_HelloWorld {
    public static void main(String[] args) throws IOException, TimeoutException {
        //1. Create a connection factory
        ConnectionFactory factory = new ConnectionFactory();
        //2. Set parameters
        factory.setHost("192.168.43.137");//ip default value localhost
        factory.setPort(5672); //Port default 5672
        factory.setVirtualHost("/");//Virtual machine defaults/
        factory.setUsername("guest");//User name: default guest
        factory.setPassword("guest");//Password default guest
        //3. Create a Connection
        Connection connection = factory.newConnection();
        //4. Create a Channel
        Channel channel = connection.createChannel();
        //5. Create Queue
        /*
        queueDeclare(String queue, boolean durable, boolean exclusive, boolean autoDelete, Map<String, Object> arguments)
        Parameters:
            1. queue: Queue name
            2. durable:Whether to persist or not, after mq is restarted, is still in use
            3. exclusive:
                * Exclusive. Only one consumer can listen to this queue
                * Delete queue when Connection is closed
                *
            4. autoDelete:Whether to delete automatically. When there is no Consumer, it will be deleted automatically
            5. arguments: Parameters.
         */
        //If there is no one named Hello_ If there is a queue in the world, the queue will be created. If there is, it will not be created
        channel.queueDeclare("hello_world",true,false,false,null);
        /*
        basicConsume(String queue, boolean autoAck, Consumer callback)
        Parameters:
            1. queue: Queue name
            2. autoAck: Auto confirm
            3. callback: callback object
         */
        // Receive message anonymous inner class
        Consumer consumer = new DefaultConsumer(channel){
            /*
            Callback method, which will be executed automatically after receiving the message
                1. consumerTag: identification
                2. envelope: Get some information, switch, routing key
                3. properties:configuration information
                4. body: data
             */
            @Override
            public void handleDelivery(String consumerTag, Envelope envelope, AMQP.BasicProperties properties, byte[] body) throws IOException {
                System.out.println("consumerTag: "+consumerTag);
                System.out.println("Exchange: "+envelope.getExchange());
                System.out.println("RoutingKey: "+envelope.getRoutingKey());
                System.out.println("properties: "+properties);
                System.out.println("body: "+new String(body));
            }
        };
        //receive messages
        channel.basicConsume("hello_world",true,consumer);
        //Close resource? No
    }
}
5. Start the service and observe the print results
Start your own installed RibbitMQ service, and then run the relevant classes of producer and Consumer to send and receive messages respectively. You can see the corresponding services and messages printed on the idea console in the RibbiMQ management interface
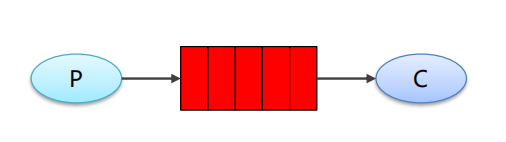
Work queues work queue mode
Work queues does not automatically declare the switch, but it will call the default switch. The working mode is to create multiple queue queues on the producer side, and then the producer side will store the message in each queue. Come to the consumer side. The consumer side creates a connection, then binds the queue created by the producer and receives the messages in the corresponding queue.
 ⚫ Work Queues: compared with the simple mode of the entry program, there are one or more consumers, and multiple consumers consume messages in the same queue together.
⚫ Application scenario: when tasks are too heavy or there are many tasks, using work queue can improve the speed of task processing.
1. Create two Maven projects (consumers and producers) under the relevant folders
Producer: producer, equivalent to the party sending the message
Consumer: consumer, equivalent to the party receiving the message
2. Import the jar of spring integration RabbitMQ in pom.xml
<!--    rabbit Client dependency-->
    <dependencies>
        <dependency>
            <groupId>com.rabbitmq</groupId>
            <artifactId>amqp-client</artifactId>
            <version>5.6.0</version>
        </dependency>
    </dependencies>
3. Write producer side code to send messages
Create producer under the com.xxx.rabbitMQ package under the producer project_ Workqueues class
/**
 * Working mode: send message
 */
public class Producer_WorkQueues {
    public static void main(String[] args) throws IOException, TimeoutException {

        //1. Create a connection factory
        ConnectionFactory factory = new ConnectionFactory();
        //2. Set parameters
        factory.setHost("192.168.43.137");//ip default value localhost
        factory.setPort(5672); //Port default 5672
        factory.setVirtualHost("/");//Virtual machine defaults/
        factory.setUsername("guest");//User name: default guest
        factory.setPassword("guest");//Password default guest
        //3. Create a Connection
        Connection connection = factory.newConnection();
        //4. Create a Channel
        Channel channel = connection.createChannel();
        //5. Create Queue
        /*
        queueDeclare(String queue, boolean durable, boolean exclusive, boolean autoDelete, Map<String, Object> arguments)
        Parameters:
            1. queue: Queue name
            2. durable:Whether to persist or not, after mq is restarted, is still in use
            3. exclusive:
                * Exclusive. Only one consumer can listen to this queue
                * Delete queue when Connection is closed
                *
            4. autoDelete:Whether to delete automatically. When there is no Consumer, it will be deleted automatically
            5. arguments: Parameters.

         */
        //If there is no one named Hello_ If there is a queue in the world, the queue will be created. If there is, it will not be created
        channel.queueDeclare("work_queues",true,false,false,null);
        /*
        basicPublish(String exchange, String routingKey, BasicProperties props, byte[] body)
        Parameters:
            1. exchange: Switch name. Exchange opportunities in simple mode use the default ''
            2. routingKey: Route name
            3. props: configuration information
            4. body: Send message data

         */
        for (int i = 1; i <= 10; i++) {
            String body = i+"hello rabbitmq~~~";
            //6. Send message
            channel.basicPublish("","work_queues",null,body.getBytes());
        }
        //7. Release resources
      channel.close();
      connection.close();

    }
}
4. Compile the consumer side code to send the message
Create a consumer under the com.xxx.rabbitMQ package under the consumer project_ Workqueues1 class and Consumer_WorkQueues2 class
public class Consumer_WorkQueues1 {
    public static void main(String[] args) throws IOException, TimeoutException {
        //1. Create a connection factory
        ConnectionFactory factory = new ConnectionFactory();
        //2. Set parameters
        factory.setHost("192.168.43.137");//ip default value localhost
        factory.setPort(5672); //Port default 5672
        factory.setVirtualHost("/");//Virtual machine defaults/
        factory.setUsername("guest");//User name: default guest
        factory.setPassword("guest");//Password default guest
        //3. Create a Connection
        Connection connection = factory.newConnection();
        //4. Create a Channel
        Channel channel = connection.createChannel();
        //5. Create Queue
        /*
        queueDeclare(String queue, boolean durable, boolean exclusive, boolean autoDelete, Map<String, Object> arguments)
        Parameters:
            1. queue: Queue name
            2. durable:Whether to persist or not, after mq is restarted, is still in use
            3. exclusive:
                * Exclusive. Only one consumer can listen to this queue
                * Delete queue when Connection is closed
            4. autoDelete:Whether to delete automatically. When there is no Consumer, it will be deleted automatically
            5. arguments: Parameters.
         */
        //If there is no one named Hello_ If there is a queue in the world, the queue will be created. If there is, it will not be created
        channel.queueDeclare("work_queues",true,false,false,null);
        /*
        basicConsume(String queue, boolean autoAck, Consumer callback)
        Parameters:
            1. queue: Queue name
            2. autoAck: Auto confirm
            3. callback: callback object
         */
        // receive messages
        Consumer consumer = new DefaultConsumer(channel){
            /*
                Callback method, which will be executed automatically after receiving the message
                1. consumerTag: identification
                2. envelope: Get some information, switch, routing key
                3. properties:configuration information
                4. body: data
             */
            @Override
            public void handleDelivery(String consumerTag, Envelope envelope, AMQP.BasicProperties properties, byte[] body) throws IOException {
              /*  System.out.println("consumerTag: "+consumerTag);
                System.out.println("Exchange: "+envelope.getExchange());
                System.out.println("RoutingKey: "+envelope.getRoutingKey());
                System.out.println("properties: "+properties);*/
                System.out.println("body: "+new String(body));
            }
        };
        channel.basicConsume("work_queues",true,consumer);
        //Close resource? No

    }
}
public class Consumer_WorkQueues2 {
    public static void main(String[] args) throws IOException, TimeoutException {

        //1. Create a connection factory
        ConnectionFactory factory = new ConnectionFactory();
        //2. Set parameters
        factory.setHost("192.168.43.137");//ip default value localhost
        factory.setPort(5672); //Port default 5672
        factory.setVirtualHost("/");//Virtual machine defaults/
        factory.setUsername("guest");//User name: default guest
        factory.setPassword("guest");//Password default guest
        //3. Create a Connection
        Connection connection = factory.newConnection();
        //4. Create a Channel
        Channel channel = connection.createChannel();
        //5. Create Queue
        /*
        queueDeclare(String queue, boolean durable, boolean exclusive, boolean autoDelete, Map<String, Object> arguments)
        Parameters:
            1. queue: Queue name
            2. durable:Whether to persist or not, after mq is restarted, is still in use
            3. exclusive:
                * Exclusive. Only one consumer can listen to this queue
                * Delete queue when Connection is closed
                *
            4. autoDelete:Whether to delete automatically. When there is no Consumer, it will be deleted automatically
            5. arguments: Parameters.

         */
        //If there is no one named Hello_ If there is a queue in the world, the queue will be created. If there is, it will not be created
        channel.queueDeclare("work_queues",true,false,false,null);

        /*
        basicConsume(String queue, boolean autoAck, Consumer callback)
        Parameters:
            1. queue: Queue name
            2. autoAck: Auto confirm
            3. callback: callback object

         */
        // receive messages
        Consumer consumer = new DefaultConsumer(channel){
            /*
                Callback method, which will be executed automatically after receiving the message
                1. consumerTag: identification
                2. envelope: Get some information, switch, routing key
                3. properties:configuration information
                4. body: data
             */
            @Override
            public void handleDelivery(String consumerTag, Envelope envelope, AMQP.BasicProperties properties, byte[] body) throws IOException {
              /*  System.out.println("consumerTag: "+consumerTag);
                System.out.println("Exchange: "+envelope.getExchange());
                System.out.println("RoutingKey: "+envelope.getRoutingKey());
                System.out.println("properties: "+properties);*/
                System.out.println("body: "+new String(body));
            }
        };
        channel.basicConsume("work_queues",true,consumer);
        //Close resource? No
    }
}
5. Start the service and observe the print results
Start your own installed RibbitMQ service, and then run the relevant classes of producer and Consumer to send and receive messages respectively. You can see the corresponding services and messages printed on the idea console in the RibbiMQ management interface
Publish/Subscribe publish and subscribe mode

Publish and subscribe work modes require you to manually create switches, but there are four different types of switches, respectively
DIRECT("direct"): direct, sending messages to a specified queue
FANOUT("fanout"): broadcast, sending messages to each queue
TOPIC("topic"): send the message to the matching queue by wildcard
HEADERS("headers"): parameter matching
Because the first three switches are commonly used, here are the first three types of switches.
Because the switch type corresponding to the publish and subscribe modes is FANOUT broadcast mode, the switch needs to be defined as FANOUT type when declaring the switch.
 The publish and subscribe mode actually loads the messages to be sent to each queue through the FANOUT mode of the switch, so each queue sends all the messages, and the messages of each queue are the same. Unlike the work queues mode, the information is distributed to the queues respectively, and the messages in all queues are all combined, Then, the consumer binds the corresponding queue by creating a connection and introduces all messages in the queue.
1. Create two Maven projects (consumers and producers) under the relevant folders
Producer: producer, equivalent to the party sending the message
Consumer: consumer, equivalent to the party receiving the message
2. Import the jar of spring integration RabbitMQ in pom.xml
<!--    rabbit Client dependency-->
    <dependencies>
        <dependency>
            <groupId>com.rabbitmq</groupId>
            <artifactId>amqp-client</artifactId>
            <version>5.6.0</version>
        </dependency>
    </dependencies>
3. Write producer side code to send messages
Create producer under the com.xxx.rabbitMQ package under the producer project_ PubSub class
/**
* Working mode: send message
*/
/**
* send message
*/
public class Producer_PubSub {
public static void main(String[] args) throws IOException, TimeoutException {
//1. Create a connection factory
ConnectionFactory factory = new ConnectionFactory();
//2. Set parameters
factory.setHost("192.168.43.137");//ip default value localhost
factory.setPort(5672); //Port default 5672
factory.setVirtualHost("/");//Virtual machine defaults/
factory.setUsername("guest");//User name: default guest
factory.setPassword("guest");//Password default guest
//3. Create a Connection
Connection connection = factory.newConnection();
//4. Create a Channel
Channel channel = connection.createChannel();
/*
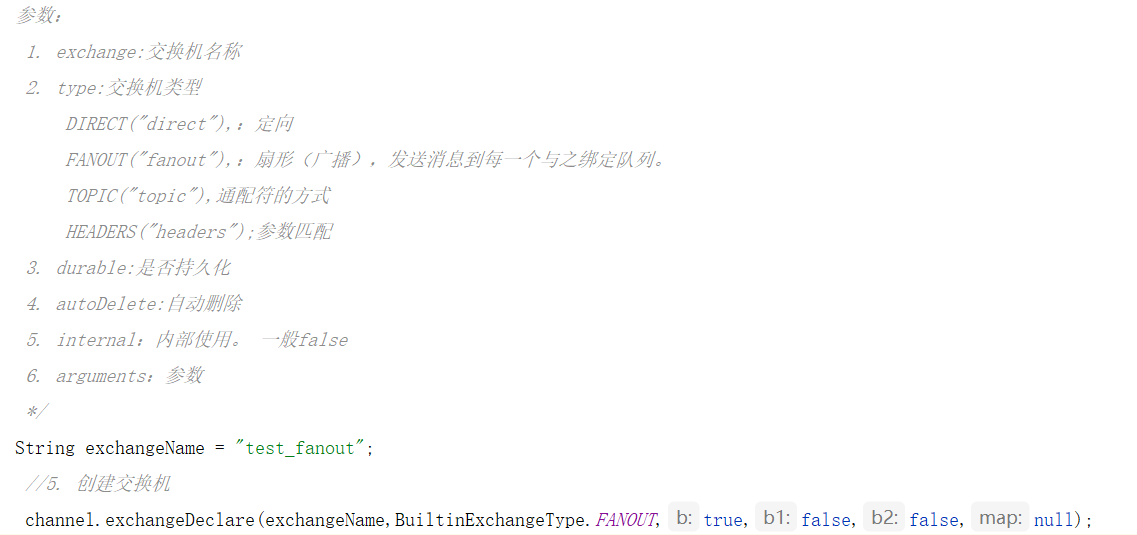
exchangeDeclare(String exchange, BuiltinExchangeType type, boolean durable, boolean autoDelete, boolean internal, Map<String, Object> arguments)
Parameters:
1. exchange:Switch name
2. type:Switch Type
DIRECT("direct"),: directional
FANOUT("fanout"),: Fan (broadcast), sending messages to each queue bound to it.
TOPIC("topic"),Wildcard mode
HEADERS("headers");Parameter matching
3. durable:Persistent
4. autoDelete:Auto delete
5. internal: Internal use. General false
6. arguments: parameter
*/
String exchangeName = "test_fanout";
//5. Create a switch
channel.exchangeDeclare(exchangeName,BuiltinExchangeType.FANOUT,true,false,false,null);
//6. Create queue
String queue1Name = "test_fanout_queue1";
String queue2Name = "test_fanout_queue2";
channel.queueDeclare(queue1Name,true,false,false,null);
channel.queueDeclare(queue2Name,true,false,false,null);
//7. Bind queue and switch
/*
queueBind(String queue, String exchange, String routingKey)
Parameters:
1. queue: Queue name
2. exchange: Switch name
3. routingKey: Routing keys, binding rules
If the switch type is fanout, routingKey is set to ""
*/
channel.queueBind(queue1Name,exchangeName,"");
channel.queueBind(queue2Name,exchangeName,"");
String body = "Log information: Zhang San called findAll method...Log level: info...";
//8. Send message
channel.basicPublish(exchangeName,"",null,body.getBytes());
//9. Release resources
channel.close();
connection.close();
}
}
4. Compile the consumer side code to send the message
Create a consumer under the com.xxx.rabbitMQ package under the consumer project_ Pubsub1 class and Consumer_PubSub2 class
public class Consumer_PubSub1 {
    public static void main(String[] args) throws IOException, TimeoutException {

        //1. Create a connection factory
        ConnectionFactory factory = new ConnectionFactory();
        //2. Set parameters
        factory.setHost("192.168.43.137");//ip default value localhost
        factory.setPort(5672); //Port default 5672
        factory.setVirtualHost("/");//Virtual machine defaults/
        factory.setUsername("guest");//User name: default guest
        factory.setPassword("guest");//Password default guest
        //3. Create a Connection
        Connection connection = factory.newConnection();
        //4. Create a Channel
        Channel channel = connection.createChannel();
        String queue1Name = "test_fanout_queue1";
        String queue2Name = "test_fanout_queue2";
        /*
        basicConsume(String queue, boolean autoAck, Consumer callback)
        Parameters:
            1. queue: Queue name
            2. autoAck: Auto confirm
            3. callback: callback object
         */
        // receive messages
        Consumer consumer = new DefaultConsumer(channel){
            /*
                Callback method, which will be executed automatically after receiving the message
                1. consumerTag: identification
                2. envelope: Get some information, switch, routing key
                3. properties:configuration information
                4. body: data
             */
            @Override
            public void handleDelivery(String consumerTag, Envelope envelope, AMQP.BasicProperties properties, byte[] body) throws IOException {
              /*  System.out.println("consumerTag: "+consumerTag);
                System.out.println("Exchange: "+envelope.getExchange());
                System.out.println("RoutingKey: "+envelope.getRoutingKey());
                System.out.println("properties: "+properties);*/
                System.out.println("body: "+new String(body));
                System.out.println("Print log information to the console.....");
            }
        };
        channel.basicConsume(queue1Name,true,consumer);
        //Close resource? No
    }
}
public class Consumer_PubSub2 {
    public static void main(String[] args) throws IOException, TimeoutException {

        //1. Create a connection factory
        ConnectionFactory factory = new ConnectionFactory();
        //2. Set parameters
        factory.setHost("192.168.43.137");//ip default value localhost
        factory.setPort(5672); //Port default 5672
        factory.setVirtualHost("/");//Virtual machine defaults/
        factory.setUsername("guest");//User name: default guest
        factory.setPassword("guest");//Password default guest
        //3. Create a Connection
        Connection connection = factory.newConnection();
        //4. Create a Channel
        Channel channel = connection.createChannel();


        String queue1Name = "test_fanout_queue1";
        String queue2Name = "test_fanout_queue2";


        /*
        basicConsume(String queue, boolean autoAck, Consumer callback)
        Parameters:
            1. queue: Queue name
            2. autoAck: Auto confirm
            3. callback: callback object

         */
        // receive messages
        Consumer consumer = new DefaultConsumer(channel){
            /*
                Callback method, which will be executed automatically after receiving the message

                1. consumerTag: identification
                2. envelope: Get some information, switch, routing key
                3. properties:configuration information
                4. body: data

             */
            @Override
            public void handleDelivery(String consumerTag, Envelope envelope, AMQP.BasicProperties properties, byte[] body) throws IOException {
              /*  System.out.println("consumerTag: "+consumerTag);
                System.out.println("Exchange: "+envelope.getExchange());
                System.out.println("RoutingKey: "+envelope.getRoutingKey());
                System.out.println("properties: "+properties);*/
                System.out.println("body: "+new String(body));
                System.out.println("Save log information to database.....");
            }
        };
        channel.basicConsume(queue2Name,true,consumer);


        //Close resource? No

    }
}
5. Start the service and observe the print results
Start your own installed RibbitMQ service, and then run the relevant classes of producer and Consumer to send and receive messages respectively. You can see the corresponding services and messages printed on the idea console in the RibbiMQ management interface
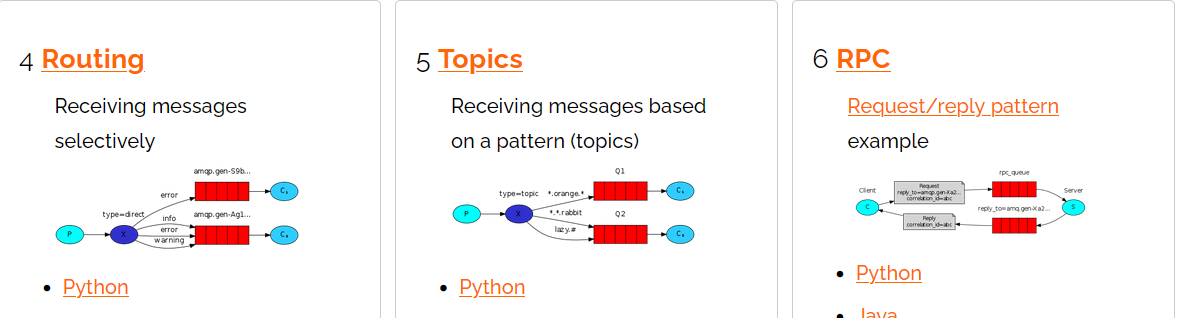
Routing mode
⚫ The binding between the queue and the switch cannot be arbitrary, but a routing key should be specified
⚫ When sending a message to Exchange, the sender of the message must also specify the RoutingKey of the message
⚫ Exchange will no longer hand over messages to each bound queue, but will judge according to the Routing Key of the message, only the Routing Key of the queue
Only when the Routingkey is completely consistent with the Routing key of the message will the message be received
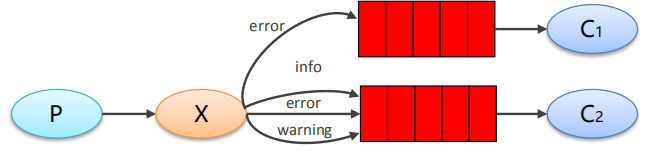 ⚫ P: The producer sends messages to Exchange. When sending messages, a routing key will be specified
⚫ 10: Exchange (exchange) receives the producer's message, and then submits the message to the queue that exactly matches the routing key
⚫ C1: consumer, whose queue specifies the message whose routing key is error
⚫ C2: consumer, whose queue specifies the messages whose routing key needs to be info, error and warning
In fact, the Routing mode is to set the switch to DIRECT mode, then set a routing key for each queue when creating a queue, and then set a routing key for each message sent. Only when the routing key in the message sent by the message sending producer is the same as the routing key set in the queue, This message can be put into the specified queue.


1. Create two Maven projects (consumers and producers) under the relevant folders
Producer: producer, equivalent to the party sending the message
Consumer: consumer, equivalent to the party receiving the message
2. Import the jar of spring integration RabbitMQ in pom.xml
<!--    rabbit Client dependency-->
    <dependencies>
        <dependency>
            <groupId>com.rabbitmq</groupId>
            <artifactId>amqp-client</artifactId>
            <version>5.6.0</version>
        </dependency>
    </dependencies>
3. Write producer side code to send messages
Create producer under the com.xxx.rabbitMQ package under the producer project_ Routing class
/**
 * send message
 */
public class Producer_Routing {
    public static void main(String[] args) throws IOException, TimeoutException {

        //1. Create a connection factory
        ConnectionFactory factory = new ConnectionFactory();
        //2. Set parameters
        factory.setHost("192.168.43.137");//ip default value localhost
        factory.setPort(5672); //Port default 5672
        factory.setVirtualHost("/");//Virtual machine defaults/
        factory.setUsername("guest");//User name: default guest
        factory.setPassword("guest");//Password default guest
        //3. Create a Connection
        Connection connection = factory.newConnection();
        //4. Create a Channel
        Channel channel = connection.createChannel();
       /*
       exchangeDeclare(String exchange, BuiltinExchangeType type, boolean durable, boolean autoDelete, boolean internal, Map<String, Object> arguments)
       Parameters:
        1. exchange:Switch name
        2. type:Switch Type
            DIRECT("direct"),: directional
            FANOUT("fanout"),: Fan (broadcast), sending messages to each queue bound to it.
            TOPIC("topic"),Wildcard mode
            HEADERS("headers");Parameter matching
        3. durable:Persistent
        4. autoDelete:Auto delete
        5. internal: Internal use. General false
        6. arguments: parameter
        */

       String exchangeName = "test_direct";
        //5. Create a switch
        channel.exchangeDeclare(exchangeName, BuiltinExchangeType.DIRECT,true,false,false,null);
        //6. Create queue
        String queue1Name = "test_direct_queue1";
        String queue2Name = "test_direct_queue2";
        channel.queueDeclare(queue1Name,true,false,false,null);
        channel.queueDeclare(queue2Name,true,false,false,null);
        //7. Bind queue and switch
        /*
        queueBind(String queue, String exchange, String routingKey)
        Parameters:
            1. queue: Queue name
            2. exchange: Switch name
            3. routingKey: Routing keys, binding rules
                If the switch type is fanout, routingKey is set to ""
         */
        //Queue 1 binding error
        channel.queueBind(queue1Name,exchangeName,"error");
        //Queue 2 binding info error warning
        channel.queueBind(queue2Name,exchangeName,"info");
        channel.queueBind(queue2Name,exchangeName,"error");
        channel.queueBind(queue2Name,exchangeName,"warning");

        String body = "Log information: Zhang San called delete method...Something went wrong... Log level: error...";
        //8. Send message
            /*
        basicPublish(String exchange, String routingKey, BasicProperties props, byte[] body)
        Parameters:
            1. exchange: Switch name. Exchange opportunities in simple mode use the default ''
            2. routingKey: Route name
            3. props: configuration information
            4. body: Send message data
         */
        //The following code indicates that this message will be sent to the routingKey queue, and other queues that are not the routingKey of the warning will not receive the message
        channel.basicPublish(exchangeName,"warning",null,body.getBytes());

        //9. Release resources
        channel.close();
        connection.close();

    }
}
4. Compile the consumer side code to send the message
Create a consumer under the com.xxx.rabbitMQ package under the consumer project_ Routing1 class and Consumer_Routing2 class
public class Consumer_Routing1 {
    public static void main(String[] args) throws IOException, TimeoutException {
        //1. Create a connection factory
        ConnectionFactory factory = new ConnectionFactory();
        //2. Set parameters
        factory.setHost("192.168.43.137");//ip default value localhost
        factory.setPort(5672); //Port default 5672
        factory.setVirtualHost("/");//Virtual machine defaults/
        factory.setUsername("guest");//User name: default guest
        factory.setPassword("guest");//Password default guest
        //3. Create a Connection
        Connection connection = factory.newConnection();
        //4. Create a Channel
        Channel channel = connection.createChannel();
        String queue1Name = "test_direct_queue1";
        String queue2Name = "test_direct_queue2";
        /*
        basicConsume(String queue, boolean autoAck, Consumer callback)
        Parameters:
            1. queue: Queue name
            2. autoAck: Auto confirm
            3. callback: callback object
         */
        // receive messages
        Consumer consumer = new DefaultConsumer(channel){
            /*
                Callback method, which will be executed automatically after receiving the message
                1. consumerTag: identification
                2. envelope: Get some information, switch, routing key
                3. properties:configuration information
                4. body: data
             */
            @Override
            public void handleDelivery(String consumerTag, Envelope envelope, AMQP.BasicProperties properties, byte[] body) throws IOException {
              /*  System.out.println("consumerTag: "+consumerTag);
                System.out.println("Exchange: "+envelope.getExchange());
                System.out.println("RoutingKey: "+envelope.getRoutingKey());
                System.out.println("properties: "+properties);*/
                System.out.println("body: "+new String(body));
                System.out.println("Print log information to the console.....");
            }
        };
        channel.basicConsume(queue2Name,true,consumer);
        //Close resource? No
    }
}
public class Consumer_Routing2 {
    public static void main(String[] args) throws IOException, TimeoutException {

        //1. Create a connection factory
        ConnectionFactory factory = new ConnectionFactory();
        //2. Set parameters
        factory.setHost("192.168.43.137");//ip default value localhost
        factory.setPort(5672); //Port default 5672
        factory.setVirtualHost("/");//Virtual machine defaults/
        factory.setUsername("guest");//User name: default guest
        factory.setPassword("guest");//Password default guest
        //3. Create a Connection
        Connection connection = factory.newConnection();
        //4. Create a Channel
        Channel channel = connection.createChannel();


        String queue1Name = "test_direct_queue1";
        String queue2Name = "test_direct_queue2";


        /*
        basicConsume(String queue, boolean autoAck, Consumer callback)
        Parameters:
            1. queue: Queue name
            2. autoAck: Auto confirm
            3. callback: callback object

         */
        // receive messages
        Consumer consumer = new DefaultConsumer(channel){
            /*
                Callback method, which will be executed automatically after receiving the message

                1. consumerTag: identification
                2. envelope: Get some information, switch, routing key
                3. properties:configuration information
                4. body: data

             */
            @Override
            public void handleDelivery(String consumerTag, Envelope envelope, AMQP.BasicProperties properties, byte[] body) throws IOException {
              /*  System.out.println("consumerTag: "+consumerTag);
                System.out.println("Exchange: "+envelope.getExchange());
                System.out.println("RoutingKey: "+envelope.getRoutingKey());
                System.out.println("properties: "+properties);*/
                System.out.println("body: "+new String(body));
                System.out.println("Store log information to the database.....");
            }
        };
        channel.basicConsume(queue1Name,true,consumer);


        //Close resource? No

    }
}
5. Start the service and observe the print results
Start your own installed RibbitMQ service, and then run the relevant classes of producer and Consumer to send and receive messages respectively. You can see the corresponding services and messages printed on the idea console in the RibbiMQ management interface
Topics topic mode
⚫ Compared with Direct, Topic can route messages to different queues according to RoutingKey. However, the Topic class allows the Exchange queue to use wildcards when binding the Routing key!
⚫ Routingkey s are generally composed of one or more words, which are separated by "." for example: xiaoyang.insert
⚫ Wildcard rule: # match one or more words, * match exactly one word, for example, Xiaoyang. # can match xiaoyang.insert.abc
Or xiaoyang.insert, but * can only match xiaoyang.insert
1. Create two Maven projects (consumers and producers) under the relevant folders
Producer: producer, equivalent to the party sending the message
Consumer: consumer, equivalent to the party receiving the message
2. Import the jar of spring integration RabbitMQ in pom.xml
<!--    rabbit Client dependency-->
    <dependencies>
        <dependency>
            <groupId>com.rabbitmq</groupId>
            <artifactId>amqp-client</artifactId>
            <version>5.6.0</version>
        </dependency>
    </dependencies>
3. Write producer side code to send messages
Create producer under the com.xxx.rabbitMQ package under the producer project_ Topics class
/**
 * send message
 */
**
 * send message
 */
public class Producer_Topics {
    public static void main(String[] args) throws IOException, TimeoutException {

        //1. Create a connection factory
        ConnectionFactory factory = new ConnectionFactory();
        //2. Set parameters
        factory.setHost("192.168.43.137");//ip default value localhost
        factory.setPort(5672); //Port default 5672
        factory.setVirtualHost("/");//Virtual machine defaults/
        factory.setUsername("guest");//User name: default guest
        factory.setPassword("guest");//Password default guest
        //3. Create a Connection
        Connection connection = factory.newConnection();
        //4. Create a Channel
        Channel channel = connection.createChannel();
       /*

       exchangeDeclare(String exchange, BuiltinExchangeType type, boolean durable, boolean autoDelete, boolean internal, Map<String, Object> arguments)
       Parameters:
        1. exchange:Switch name
        2. type:Switch Type
            DIRECT("direct"),: directional
            FANOUT("fanout"),: Fan (broadcast), sending messages to each queue bound to it.
            TOPIC("topic"),Wildcard mode
            HEADERS("headers");Parameter matching
        3. durable:Persistent
        4. autoDelete:Auto delete
        5. internal: Internal use. General false
        6. arguments: parameter
        */

       String exchangeName = "test_topic";
        //5. Create a switch
        channel.exchangeDeclare(exchangeName, BuiltinExchangeType.TOPIC,true,false,false,null);
        //6. Create queue
        String queue1Name = "test_topic_queue1";
        String queue2Name = "test_topic_queue2";
        channel.queueDeclare(queue1Name,true,false,false,null);
        channel.queueDeclare(queue2Name,true,false,false,null);
        //7. Bind queue and switch
        /*
        queueBind(String queue, String exchange, String routingKey)
        Parameters:
            1. queue: Queue name
            2. exchange: Switch name
            3. routingKey: Routing keys, binding rules
                If the switch type is fanout, routingKey is set to ""
         */

        // routing key system name. Log level.
        //=Requirements: all error level logs are stored in the database, and all order system logs are stored in the database
        channel.queueBind(queue1Name,exchangeName,"#.error");
        channel.queueBind(queue1Name,exchangeName,"order.*");
        channel.queueBind(queue2Name,exchangeName,"*.*");

        String body = "Log information: Zhang San called findAll method...Log level: info...";
        //8. Send message
        channel.basicPublish(exchangeName,"goods.error",null,body.getBytes());

        //9. Release resources
        channel.close();
        connection.close();

    }
}
4. Compile the consumer side code to send the message
Create a consumer under the com.xxx.rabbitMQ package under the consumer project_ Topic1 class and Consumer_Topic2 class
public class Consumer_Topic1 {
    public static void main(String[] args) throws IOException, TimeoutException {

        //1. Create a connection factory
        ConnectionFactory factory = new ConnectionFactory();
        //2. Set parameters
        factory.setHost("192.168.43.137");//ip default value localhost
        factory.setPort(5672); //Port default 5672
        factory.setVirtualHost("/");//Virtual machine defaults/
        factory.setUsername("guest");//User name: default guest
        factory.setPassword("guest");//Password default guest
        //3. Create a Connection
        Connection connection = factory.newConnection();
        //4. Create a Channel
        Channel channel = connection.createChannel();


        String queue1Name = "test_topic_queue1";
        String queue2Name = "test_topic_queue2";


        /*
        basicConsume(String queue, boolean autoAck, Consumer callback)
        Parameters:
            1. queue: Queue name
            2. autoAck: Auto confirm
            3. callback: callback object

         */
        // receive messages
        Consumer consumer = new DefaultConsumer(channel){
            /*
                Callback method, which will be executed automatically after receiving the message

                1. consumerTag: identification
                2. envelope: Get some information, switch, routing key
                3. properties:configuration information
                4. body: data

             */
            @Override
            public void handleDelivery(String consumerTag, Envelope envelope, AMQP.BasicProperties properties, byte[] body) throws IOException {
              /*  System.out.println("consumerTag: "+consumerTag);
                System.out.println("Exchange: "+envelope.getExchange());
                System.out.println("RoutingKey: "+envelope.getRoutingKey());
                System.out.println("properties: "+properties);*/
                System.out.println("body: "+new String(body));
                System.out.println("Store log information in database.......");
            }
        };
        channel.basicConsume(queue1Name,true,consumer);


        //Close resource? No

    }
}
public class Consumer_Topic2 {
    public static void main(String[] args) throws IOException, TimeoutException {

        //1. Create a connection factory
        ConnectionFactory factory = new ConnectionFactory();
        //2. Set parameters
        factory.setHost("192.168.43.137");//ip default value localhost
        factory.setPort(5672); //Port default 5672
        factory.setVirtualHost("/");//Virtual machine defaults/
        factory.setUsername("guest");//User name: default guest
        factory.setPassword("guest");//Password default guest
        //3. Create a Connection
        Connection connection = factory.newConnection();
        //4. Create a Channel
        Channel channel = connection.createChannel();


        String queue1Name = "test_topic_queue1";
        String queue2Name = "test_topic_queue2";


        /*
        basicConsume(String queue, boolean autoAck, Consumer callback)
        Parameters:
            1. queue: Queue name
            2. autoAck: Auto confirm
            3. callback: callback object

         */
        // receive messages
        Consumer consumer = new DefaultConsumer(channel){
            /*
                Callback method, which will be executed automatically after receiving the message

                1. consumerTag: identification
                2. envelope: Get some information, switch, routing key
                3. properties:configuration information
                4. body: data

             */
            @Override
            public void handleDelivery(String consumerTag, Envelope envelope, AMQP.BasicProperties properties, byte[] body) throws IOException {
              /*  System.out.println("consumerTag: "+consumerTag);
                System.out.println("Exchange: "+envelope.getExchange());
                System.out.println("RoutingKey: "+envelope.getRoutingKey());
                System.out.println("properties: "+properties);*/
                System.out.println("body: "+new String(body));
                System.out.println("Print log information to console.......");
            }
        };
        channel.basicConsume(queue2Name,true,consumer);


        //Close resource? No

    }
}
5. Start the service and observe the print results
Start your own installed RibbitMQ service, and then run the relevant classes of producer and Consumer to send and receive messages respectively. You can see the corresponding services and messages printed on the idea console in the RibbiMQ management interface