1. Environmental information:
Three CentOS 7.6 virtual machines are built by using VMware Workstation in this environment
Node architecture: 1 controller node, 1 compute node, 1 cinder block storage node.
The hardware configuration information is as follows:
Node name ----------- CPU ----- memory ----- operating system ----- disk
controller node - 4C - 4GB - centos7.6 - 40Gb
compute node - 4C - 4GB - centos7.6 - 40Gb
cinder node ------ 4C ------ 4GB ------ centos7.6 ----- 40Gb system disk, 20GB storage disk
2. Network planning Description:
The control node, computing node and storage node are all configured with two network cards.
Special attention should be paid here. The first network card of the compute node and the cinder node is used to connect to the Internet, install and deploy the Oenstack dependency software package. If you have set up the yum source of openstack locally, this network card does not need to be configured.
The management network is configured in the host only mode. According to the official explanation, if there is an internal yum source, the management network does not need to access the Internet. It is also possible to configure it in the hostonly mode. Here my management network is multiplexed with the local network (external network).
The tunnel network is configured as host only mode, because the tunnel network does not need to access the Internet, only to carry the network traffic of the internal tenants of openstack.
The external network is configured as NAT mode. The external network of the control node is mainly to realize the access of openstack tenant network to the external network. In addition, the deployment and installation of openstack software package are also based on this network, where the external network and management network are reused.
Specific node network planning:

Description of these three types of networks:
(1) management/API network:
The network provides system management function, which is used for internal communication between components and access to database services. All nodes in the cluster need to be connected to the management network, which simultaneously carries the traffic of API network. Openstack components provide API services to users through API network.
(2) Tunnel network (tunnel network or self service network):
This network provides a tenant virtual network (VXLAN or GRE). The tunnel network adopts point-to-point communication protocol. In openstack, the tunnel is used by the virtual machine for network data traffic.
(3) External network (external network or provider network):
The openstack network must include at least one external network, which can access the network outside the openstack installation environment, and the devices in the non openstack environment can access a certain IP of the openstack external network. In addition, the external network provides floating IP for the virtual machine in openstack environment to realize the access of the external network of openstack to the internal virtual machine instance.
Diagram of network architecture (object storage swift is not configured this time, there is multiplexing in the network, please configure according to the actual situation)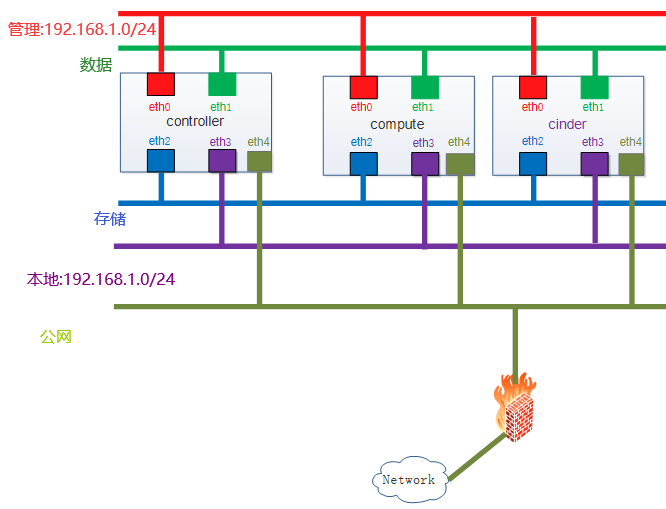
Note: unless otherwise specified, the instruction needs to be operated at all nodes
3. Building the basic environment
3.1 turn off firewalld
[root@ ~]# systemctl stop firewalld && systemctl disable firewalld
3.2 modify selinux
[root@ ~]# setenforce 0
[root@ ~]# sed -i 's/enforcing/disabled/g' /etc/selinux/config
3.3 shut down NetworkManager
[root@ ~]# systemctl stop NetworkManager && systemctl disable NetworkManager
3.4 change / etc/hosts
[root@ ~]# vim /etc/hosts
192.168.1.83 controller
192.168.1.85 compute
192.168.1.84 cinder
3.5 install ntp service
Control node:
[root@controller ~]# yum -y install chrony
[root@controller ~]# vim /etc/chrony.conf
allow 192.168.1.0/24
[root@controller ~]# systemctl enable chronyd.service && systemctl restart chronyd.service
compute Node usage and host name controller Configure time synchronization:
[root@compute ~]# yum -y install chrony
[root@compute ~]# vim /etc/chrony.conf
#server 0.centos.pool.ntp.org iburst
#server 1.centos.pool.ntp.org iburst
#server 2.centos.pool.ntp.org iburst
#server 3.centos.pool.ntp.org iburst
server controller iburst
[root@compute ~]# systemctl enable chronyd.service  && systemctl restart chronyd.service
cinder Node usage and host name controller Configure time synchronization:
[root@cinder ~]# yum -y install chrony
[root@cinder ~]# vim /etc/chrony.conf
#server 0.centos.pool.ntp.org iburst
#server 1.centos.pool.ntp.org iburst
#server 2.centos.pool.ntp.org iburst
#server 3.centos.pool.ntp.org iburst
server controller iburst
[root@cinder ~]# systemctl enable chronyd.service  && systemctl restart chronyd.service
Verification:
Control node:
[root@controller ~]# chronyc sources
210 Number of sources = 4
MS Name/IP address         Stratum Poll Reach LastRx Last sample
^+ ntp1.ams1.nl.leaseweb.net  2  6  25  2  -29ms[ -29ms] +/-  192ms
^* a.chl.la                    2  6  33  3  -321us[ +18ms] +/-  135ms
^- time.cloudflare.com      3  6  15  2  -4129us[-4129us] +/-  120ms
^- ntp6.flashdance.cx          2  6  35  2  -20ms[ -20ms] +/-  185ms
Calculation node:
[root@compute ~]# chronyc sources
210 Number of sources = 1
MS Name/IP address         Stratum Poll Reach LastRx Last sample
^* controller                 3  6  17  5  -112us[-1230us] +/-  137ms
Storage nodes:
[root@cinder ~]# chronyc sources
210 Number of sources = 1
MS Name/IP address         Stratum Poll Reach LastRx Last sample
^* controller                 4  5  11  8  -119us[-1350us] +/-  140ms
3.6 configure openstack source
[root@ ~]# yum -y install  epel-release
//Change to domestic epel source
[root@ ~]# cat /etc/yum.repos.d/epel.repo
[epel]
name=Extra Packages for Enterprise Linux 7 - $basearch
baseurl=https://mirrors.tuna.tsinghua.edu.cn/epel/7/$basearch
#mirrorlist=https://mirrors.fedoraproject.org/metalink?repo=epel-7&arch=$basearch
failovermethod=priority
enabled=1
gpgcheck=1
gpgkey=file:///etc/pki/rpm-gpg/RPM-GPG-KEY-EPEL-7

[epel-debuginfo]
name=Extra Packages for Enterprise Linux 7 - $basearch - Debug
baseurl=https://mirrors.tuna.tsinghua.edu.cn/epel/7/$basearch/debug
#mirrorlist=https://mirrors.fedoraproject.org/metalink?repo=epel-debug-7&arch=$basearch
failovermethod=priority
enabled=0
gpgkey=file:///etc/pki/rpm-gpg/RPM-GPG-KEY-EPEL-7
gpgcheck=1

[epel-source]
name=Extra Packages for Enterprise Linux 7 - $basearch - Source
baseurl=https://mirrors.tuna.tsinghua.edu.cn/epel/7/SRPMS
#mirrorlist=https://mirrors.fedoraproject.org/metalink?repo=epel-source-7&arch=$basearch
failovermethod=priority
enabled=0
gpgkey=file:///etc/pki/rpm-gpg/RPM-GPG-KEY-EPEL-7
gpgcheck=1
[root@ ~]## yum mackcache fast
install queens edition yum source
[root@ ~]## yum -y install centos-release-openstack-queens
[root@ ~]## vim /etc/yum.repos.d/CentOS-OpenStack-queens.repo
//Replace with domestic source
[centos-openstack-queens]
name=CentOS-7 - OpenStack queens
baseurl=https://mirrors.tuna.tsinghua.edu.cn/centos/7/cloud/x86_64/openstack-queens/
gpgcheck=1
enabled=1
gpgkey=file:///etc/pki/rpm-gpg/RPM-GPG-KEY-CentOS-SIG-Cloud
exclude=sip,PyQt4
install ceph Source and replace with domestic source
[root@ ~]## vim /etc/yum.repos.d/CentOS-Ceph-Luminous.repo
[centos-ceph-luminous]
name=CentOS-$releasever - Ceph Luminous
baseurl=https://mirrors.tuna.tsinghua.edu.cn/ceph/rpm-luminous/el7/x86_64/
gpgcheck=1
enabled=1
gpgkey=file:///etc/pki/rpm-gpg/RPM-GPG-KEY-CentOS-SIG-Storage
Reload build cache
[root@ ~]# yum makecache fast
[root@ ~]# yum -y install openstack-selinux
[root@ ~]# yum -y install python-openstackclient
3.7 installing SQL database
Control node:
[root@controller ~]# yum -y install mariadb mariadb-server python2-PyMySQL
To modify a profile:
[root@controller ~]# vim /etc/my.cnf.d/openstack.cnf
[mysqld]
bind-address = 192.168.1.83
default-storage-engine = innodb
innodb_file_per_table = on
max_connections = 8192
collation-server = utf8_general_ci
character-set-server = utf8
[root@controller ~]# egrep -v "^#|^$" /etc/my.cnf.d/openstack.cnf
Service start and join start start:
[root@controller ~]# systemctl enable mariadb.service  && systemctl start mariadb.service
Initialization mysql Set up
[root@controller ~]# mysql_secure_installation
NOTE: RUNNING ALL PARTS OF THIS SCRIPT IS RECOMMENDED FOR ALL MariaDB
      SERVERS IN PRODUCTION USE!  PLEASE READ EACH STEP CAREFULLY!
In order to log into MariaDB to secure it, we'll need the current
password for the root user.  If you've just installed MariaDB, and
you haven't set the root password yet, the password will be blank,
so you should just press enter here.
Enter current password for root (enter for none): Enter
Enter current password for root (enter for none): Enter
OK, successfully used password, moving on...
Setting the root password ensures that nobody can log into the MariaDB
root user without the proper authorisation.
Set root password? [Y/n] y
New password: openstack
Re-enter new password: openstack
Password updated successfully!
Reloading privilege tables..
 ... Success!
By default, a MariaDB installation has an anonymous user, allowing anyone
to log into MariaDB without having to have a user account created for
them.  This is intended only for testing, and to make the installation
go a bit smoother.  You should remove them before moving into a
production environment.
Remove anonymous users? [Y/n] y
 ... Success!
Normally, root should only be allowed to connect from 'localhost'.  This
ensures that someone cannot guess at the root password from the network.
Disallow root login remotely? [Y/n] y
 ... Success!
By default, MariaDB comes with a database named 'test' that anyone can
access.  This is also intended only for testing, and should be removed
before moving into a production environment.
Remove test database and access to it? [Y/n] y
 - Dropping test database...
 ... Success!
 - Removing privileges on test database...
 ... Success!
Reloading the privilege tables will ensure that all changes made so far
will take effect immediately.
Reload privilege tables now? [Y/n] y
 ... Success!
Cleaning up...
All done!  If you've completed all of the above steps, your MariaDB
installation should now be secure.
Thanks for using MariaDB!
3.8 install message queuing
Control node:
[root@controller ~]# yum -y install rabbitmq-server
Service start and join start start:
[root@controller ~]# systemctl enable rabbitmq-server.service  &&  systemctl start rabbitmq-server.service
install rabbitmq Plug-in unit
[root@controller ~]# rabbitmq-plugins enable rabbitmq_management
//Add openstack user:
[root@controller ~]# rabbitmqctl add_user openstack openstack
//Add read and write permissions for openstack users:
[root@controller ~]# rabbitmqctl set_permissions openstack ".*" ".*" ".*"
[root@controller ~]# rabbitmqctl set_user_tags openstack administrator
[root@controller ~]# ss -tunl | grep 5672
Browser access, authentication service
http://192.168.1.83:15672
3.9 install memcached
Control node:
[root@controller ~]# yum -y install memcached python-memcached
//Edit profile:
[root@controller ~]# vim /etc/sysconfig/memcached
PORT="11211"
USER="memcached"
MAXCONN="1024"
CACHESIZE="64"
OPTIONS="-l 127.0.0.1,::1,controller"
[root@controller ~]# egrep -v "^#|^$" /etc/sysconfig/memcached
//Service startup and set startup
[root@controller ~]# systemctl enable memcached.service  && systemctl start memcached.service
3.10 install etcd service
Control node:
[root@controller ~]# yum -y install etcd
//To modify a profile:
[root@controller ~]# vim /etc/etcd/etcd.conf
#[Member]
ETCD_DATA_DIR="/var/lib/etcd/default.etcd"
ETCD_LISTEN_PEER_URLS="http://192.168.1.83:2380" ETCD_LISTEN_CLIENT_URLS="http://192.168.1.83:2379"
ETCD_NAME="controller"
#[Clustering]
ETCD_INITIAL_ADVERTISE_PEER_URLS="http://192.168.1.83:2380" ETCD_ADVERTISE_CLIENT_URLS="http://192.168.1.83:2379" ETCD_INITIAL_CLUSTER="controller=http://192.168.1.83:2380" ETCD_INITIAL_CLUSTER_TOKEN="etcd-cluster-01" ETCD_INITIAL_CLUSTER_STATE="new"
[root@controller ~]# egrep -v "^#|^$" /etc/etcd/etcd.conf
//Service startup and set startup
[root@controller ~]# systemctl enable etcd && systemctl start etcd
The basic environment is installed here, and keystone will be installed in the next chapter