openstack to learn more
Introduction to OpenStack Cloud Computing
(1) Service types of cloud computing
IAAS: Infrastructure as a service, such as cloud hosts;
PAAS: Platform as a Service, e.g. docker;
SAAS: Software as a Service, e.g., Purchase Enterprise Mailbox, CDN;
| Traditional IT | IAAS | PAAS | SAAS |
|---|---|---|---|
| 1 Application | You manage | You manage | Service Management |
| 2 Data | You manage | You manage | Service Management |
| 3 Runtime | You manage | Service Management | Service Management |
| 4 Middleware | You manage | Service Management | Service Management |
| 5 Operating System | Service Management | Service Management | Service Management |
| 6 Virtualization | Service Management | Service Management | Service Management |
| 7 Servers | Service Management | Service Management | Service Management |
| 8 Storage | Service Management | Service Management | Service Management |
| 9 Network | Service Management | Service Management | Service Management |
(2) openstack definition and components
Is an open source cloud computing management platform project that provides infrastructure as a service (IAAS) solutions through a variety of complementary services, each providing an API for integration.
Each major version series of OpenStack is named in alphabetical order (A~Z) and is numbered by year and year. From the first version of A ustin (2010.1) to the latest stable version of Rocky (2018.8), there are 18 major versions, and the 19th version of Stein is still under development.Version Publishing Policy: Publish a new version of openstack almost every six months at https://docs.openstack.org, the official document address
1. Architecture diagram of OpenStack:
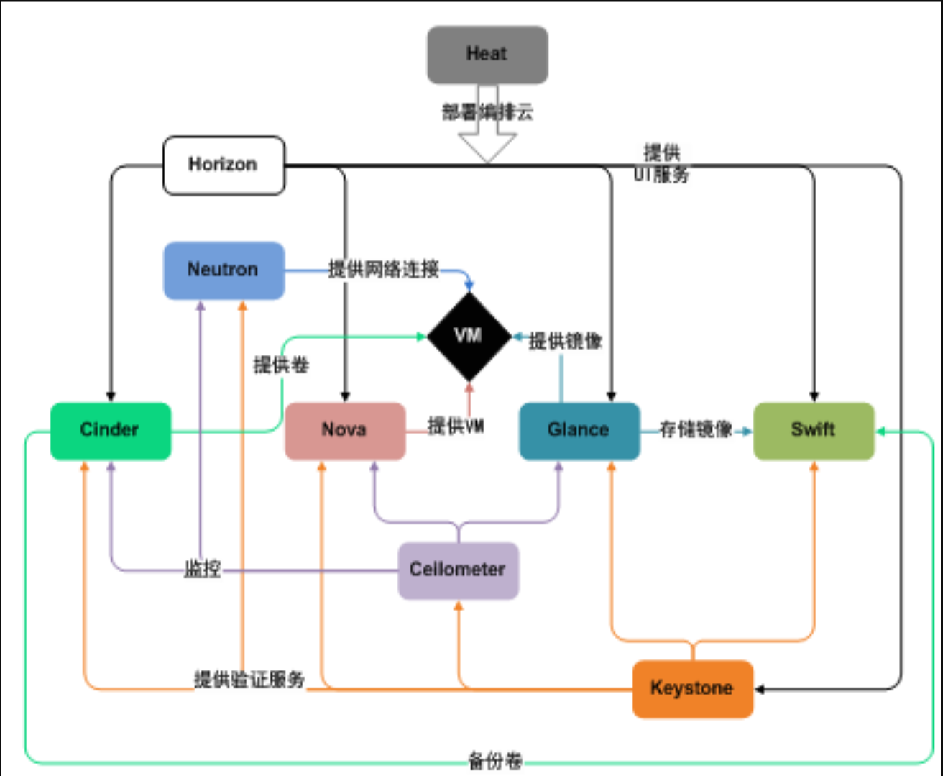
openstack schema module Chinese meaning:
horizon: UI interface; Neutron: network; clinder: hard disk; nova: calculation; Glance: mirror; VM: virtual machine; keystone: authorization; cellometer: monitoring; swift: verification; heat: orchestration
2. openst Core Components Meaning and Role:
(1) Calculation: Nova
A set of controllers that manage the entire life cycle of virtual machine instances for a single user or group, responsible for virtual machine creation, power on, shutdown, suspend, pause, adjust, migrate, restart, destruction, and so on.
(2) Mirror service: Glance
A set of virtual machine image lookup and retrieval, supports multiple virtual machine image formats (AKI,AMI,ARI,ISO,QCOW2,RAW,VMDK), and has the functions of creating upload mirrors, deleting mirrors, editing basic information of mirrors.
(3) Identity service: keystone
Provides authentication, service rules, and service token capabilities for other openstack services, manages Domains,Projects,Users,Groups,Roles.
(4) Network & Address Management: Neutron
Provides Network virtualization technology for cloud computing and Network connectivity services for other OpenStack services.Provides an interface for users, defines a Network, Subnet, Router, configures DHCP, DNS, load balancing, L3 services, and supports GRE, VLAN.
Block storage: Cinder
Provides a stable data block storage service for running instances. Its plug-in driver architecture facilitates the creation and management of block devices, such as creating and deleting volumes, mounting and uninstalling volumes on instances.
UI interface: Horizon
Web management portal for various services in OpenStack to simplify user actions on services, such as starting an instance, assigning an IP address, configuring access control, and so on.
3. Introduction to soa Architecture
Tens of millions of users access soa simultaneously.Each web page is a cluster.
Home page www.jd.com/index.html (5 sheets, nginx+php+mysql)
Seconds miaosha.jd.com/index.html (15 sheets, nginx+php+mysql)
Volume juan.jd.com/index.html (15, nginx+php+mysql)
Member plus.jd.com/index.html (15, nginx+php+mysql)
login.jd.com/index.html (15, nginx+php+mysql)
2. Installation of OpenStack Basic Services
(1) Configuration of hosts files
Control and calculation nodes
[root@computer1 /]# cat /etc/hosts
10.0.0.11 controller
10.0.0.31 computer1
10.0.0.32 computer2
[root@computer1 /]#
(2) yum source configuration
Control and calculation nodes:
[root@computer1 etc]# mount /dev/cdrom /mnt/
[root@computer1 etc]# cat /etc/rc.local
mount /dev/cdrom /mnt/
[root@computer1 etc]# chom +x /etc/rc.local
//Upload the open stack rpm from the package to/opt and unzip it
[root@computer1 opt]# cat /etc/yum.repos.d/local.repo
[local]
name=local
baseurl=file:///mnt
gpgcheck=0
[openstack]
name=openstack
baseurl=file:///opt/repo
gpgcheck=0
[root@controller /]# yum makecache
(3) installation time synchronization (chrony)
Control node:
[root@controller /]# yum install chrony -y
[root@controller /]# vim /etc/chrony.conf
allow 10.0.0.0/24
//Computing node:
[root@computer1 /]# yum install chrony -y
[root@computer1 /]# vim /etc/chrony.conf
server 10.0.0.11 iburst

//Control and calculation nodes:
[root@computer1 /]# systemctl restart chronyd.service
(4) Install openstack client and selinux
Control and calculation nodes
[root@computer1 /]# yum install python-openstackclient.noarch openstack-selinux.noarch
(5) Install and configure mariadb
Only control nodes
[root@controller /]# yum install mariadb mariadb-server.x86_64 python2-PyMySQL.noarch
[root@controller /]# cat >> /etc/my.cnf.d/openstack.cnf << EOF
> [mysqld]
> bind-address = 10.0.0.11
> default-storage-engine = innodb
> innodb_file_per_table
> max_connections = 4096
> collation-server = utf8_general_ci
> character-set-server = utf8
> EOF
[root@controller /]#
[root@controller /]# systemctl start mariadb.service
[root@controller /]# systemctl status mariadb.service
[root@controller /]# systemctl enable mariadb
mysql Optimize configuration:
[root@controller /]# mysql_secure_installation
(6) Install rabbitmq and create users
(Only control nodes)
[root@controller /]# yum install rabbitmq-server.noarch -y
[root@controller /]# systemctl start rabbitmq-server.service
[root@controller /]# systemctl status rabbitmq-server.service
[root@controller /]# systemctl enable rabbitmq-server.service
[root@controller /]# rabbitmq-plugins enable rabbitmq_management
[root@controller /]# rabbitmqctl add_user openstack RABBIT_PASS
Creating user "openstack" ...
[root@controller /]# rabbitmqctl set_permissions openstack ".*" ".*" ".*"
Setting permissions for user "openstack" in vhost "/" ...
[root@controller /]# rabbitmq-plugins enable rabbitmq_management
(7) Install cache memcached
(Only control nodes:
[root@controller /]# yum install memcached.x86_64 python-memcached.noarch -y
[root@controller /]# vim /etc/sysconfig/memcached
PORT="11211"
USER="memcached"
MAXCONN="1024"
CACHESIZE="64"
OPTIONS="-l 10.0.0.11,::1"
[root@controller /]# systemctl start memcached.service
[root@controller /]# systemctl enable memcached.service
3. Install openstack certification service (keystone)
(1) Kestone concept
Key stone's main functions are: certification management, authorization management, and service directory.
Authentication: also known as account management, all users of openstack are registered on keystone.
(2) Authorization: Other services such as glance,nova,neutron,cinder use keystone's account management in a unified way, just as many websites now support qq login.
(3) Services directory: For each additional service, registration on keystone is required. Users can know which services are available through keystone, so what is the url address of the service, and then users can access these services directly.
(2) Configuration of keystone certification service
1. Creating warehouse authorization
Database authorization command format:
grant Jurisdiction on Database Objects to user
grant Jurisdiction on Database Objects to user identified by 'Password'

[root@controller ~]# mysql
MariaDB [(none)]> CREATE DATABASE keystone;
Query OK, 1 row affected (0.00 sec)
MariaDB [(none)]> GRANT ALL PRIVILEGES ON keystone.* TO 'keystone'@'localhost' \
    ->   IDENTIFIED BY 'KEYSTONE_DBPASS';
Query OK, 0 rows affected (0.00 sec)
MariaDB [(none)]> GRANT ALL PRIVILEGES ON keystone.* TO 'keystone'@'%' \
    ->   IDENTIFIED BY 'KEYSTONE_DBPASS';
Query OK, 0 rows affected (0.00 sec)
MariaDB [(none)]>
2. Install keystone-related packages
Php, nginx +fastcgi --->php #Use the fastcgi plug-in to enable nginx to connect to php.
Python, httpd +wsgi--->python #Use the WSGI plug-in to enable httpd to connect to pyhon.
[root@controller ~]# yum install openstack-keystone httpd mod_wsgi -y
3. Modify the configuration file
[root@controller ~]# \cp /etc/keystone/keystone.conf{,.bak}
[root@controller ~]# grep -Ev '^$|#' /etc/keystone/keystone.conf.bak >/etc/keystone/keystone.conf
[root@controller ~]# vim  /etc/keystone/keystone.conf
//Method 1: Open configuration file to add data configuration
//Define the value of the initial management token
[DEFAULT]
admin_token = ADMIN_TOKEN
//Configure database access
[database]
connection = mysql+pymysql://keystone:KEYSTONE_DBPASS@controller/keystone
//Configure the provider of the Fernet UUID token
[token]
provider = fernet #Provide a temporary random key (token)

//Method 2:
[root@controller keystone]# yum install openstack-utils -y
openstack-config --set /etc/keystone/keystone.conf DEFAULT admin_token  ADMIN_TOKEN
openstack-config --set /etc/keystone/keystone.conf database connection  mysql+pymysql://keystone:KEYSTONE_DBPASS@controller/keystone
openstack-config --set /etc/keystone/keystone.conf token provider  fernet
4. Synchronize Database
Su-s/bin/sh-c "keystone-manage db_sync" keystone #su to the keystone user, use/bin/sh to execute the command.
-s: Represents the interpreter
 -c:Indicates the command to be executed
 keystone: is the database user name
[root@controller keystone]# su -s /bin/sh -c "keystone-manage db_sync" keystone
 Check table: Check if a table has been spawned (results of synchronizing databases)
[root@controller keystone]# mysql keystone -e "show tables"
View the synchronization log:
[root@controller keystone]# vim /var/log/keystone/keystone.log
5. Initialize fernet
[root@controller keystone]# keystone-manage fernet_setup --keystone-user keystone --keystone-group keystone
[root@controller keystone]# ll /etc/keystone/
drwx------ 2 keystone keystone    24 Jan  4 22:32 fernet-keys(Post-Initialization Differential Token File)
6. Configure httpd(apachd)
Optimize startup speed:
[root@controller keystone]# echo "ServerName controller" >>/etc/httpd/conf/httpd.conf
//The following files do not exist by default:
[root@controller keystone]# vim /etc/httpd/conf.d/wsgi-keystone.conf
#Listen on two ports
Listen 5000
Listen 35357
#Configure two virtual host sites:
<VirtualHost *:5000>
    WSGIDaemonProcess keystone-public processes=5 threads=1 user=keystone group=keystone display-name=%{GROUP}
    WSGIProcessGroup keystone-public
    WSGIScriptAlias / /usr/bin/keystone-wsgi-public
    WSGIApplicationGroup %{GLOBAL}
    WSGIPassAuthorization On
    ErrorLogFormat "%{cu}t %M"
    ErrorLog /var/log/httpd/keystone-error.log
    CustomLog /var/log/httpd/keystone-access.log combined

    <Directory /usr/bin>
        Require all granted
    </Directory>
</VirtualHost>

<VirtualHost *:35357>
    WSGIDaemonProcess keystone-admin processes=5 threads=1 user=keystone group=keystone display-name=%{GROUP}
    WSGIProcessGroup keystone-admin
    WSGIScriptAlias / /usr/bin/keystone-wsgi-admin
    WSGIApplicationGroup %{GLOBAL}
    WSGIPassAuthorization On
    ErrorLogFormat "%{cu}t %M"
    ErrorLog /var/log/httpd/keystone-error.log
    CustomLog /var/log/httpd/keystone-access.log combined

    <Directory /usr/bin>
        Require all granted
    </Directory>
</VirtualHost>
[root@controller keystone]#
//Inspection:
[root@controller keystone]# md5sum /etc/httpd/conf.d/wsgi-keystone.conf
8f051eb53577f67356ed03e4550315c2  /etc/httpd/conf.d/wsgi-keystone.conf
7. Start httpd
[root@controller keystone]# systemctl start httpd.service
[root@controller keystone]# systemctl enable httpd.service
netstat -lntp #See if you are listening on ports 5000 and 353557
8. Create services and register api
Configuring on keystone, keystone is not perfect enough to register services and api for itself and other services.Register the service and api using the administrator token initial method.
Declare environment variables
[root@controller ~]# export OS_TOKEN=ADMIN_TOKEN
[root@controller ~]# export OS_URL=http://controller:35357/v3
[root@controller ~]# export OS_IDENTITY_API_VERSION=3
env|grep OS
//Create a certification service:
[root@controller ~]# openstack service create \
>   --name keystone --description "OpenStack Identity" identity

+-------------+----------------------------------+
| Field       | Value                            |
+-------------+----------------------------------+
| description | OpenStack Identity               |
| enabled     | True                             |
| id          | b251b397df344ed58b77879709a82340 |
| name        | keystone                         |
| type        | identity                         |
+-------------+----------------------------------+
//Registration API:
[root@controller ~]# openstack endpoint create --region RegionOne \
>   identity public http://controller:5000/v3 #public url
tp://controller:35357/v3
+--------------+----------------------------------+
| Field        | Value                            |
+--------------+----------------------------------+
| enabled      | True                             |
| id           | 034a286a309c4d998c2918cb9ad6f161 |
| interface    | public                           |
| region       | RegionOne                        |
| region_id    | RegionOne                        |
| service_id   | b251b397df344ed58b77879709a82340 |
| service_name | keystone                         |
| service_type | identity                         |
| url          | http://controller:5000/v3        |
+--------------+----------------------------------+
[root@controller ~]#
[root@controller ~]# openstack endpoint create --region RegionOne \
>   identity internal http://controller:5000/v3 #url used by internal components
+--------------+----------------------------------+
| Field        | Value                            |
+--------------+----------------------------------+
| enabled      | True                             |
| id           | dedefe5fe8424132b9ced6c0ead9291c |
| interface    | internal                         |
| region       | RegionOne                        |
| region_id    | RegionOne                        |
| service_id   | b251b397df344ed58b77879709a82340 |
| service_name | keystone                         |
| service_type | identity                         |
| url          | http://controller:5000/v3        |
+--------------+----------------------------------+
[root@controller ~]#
[root@controller ~]# openstack endpoint create --region RegionOne \
>   identity admin http://Controller:357/v3 #url used by administrators
+--------------+----------------------------------+
| Field        | Value                            |
+--------------+----------------------------------+
| enabled      | True                             |
| id           | 64af2fb03db945d79d77e3c4b67b75ab |
| interface    | admin                            |
| region       | RegionOne                        |
| region_id    | RegionOne                        |
| service_id   | b251b397df344ed58b77879709a82340 |
| service_name | keystone                         |
| service_type | identity                         |
| url          | http://controller:35357/v3       |
+--------------+----------------------------------+
[root@controller ~]#
9. Create domains, projects, users, roles
[root@controller ~]# openstack domain create --description "Default Domain" default
+-------------+----------------------------------+
| Field       | Value                            |
+-------------+----------------------------------+
| description | Default Domain                   |
| enabled     | True                             |
| id          | 30c30c794d4a4e92ae4474320e75bf47 |
| name        | default                          |
+-------------+----------------------------------+
[root@controller ~]#
[root@controller ~]# openstack project create --domain default \
>   --description "Admin Project" admin
+-------------+----------------------------------+
| Field       | Value                            |
+-------------+----------------------------------+
| description | Admin Project                    |
| domain_id   | 30c30c794d4a4e92ae4474320e75bf47 |
| enabled     | True                             |
| id          | 17b0da567cc341c7b33205572bd0470b |
| is_domain   | False                            |
| name        | admin                            |
| parent_id   | 30c30c794d4a4e92ae4474320e75bf47 |
+-------------+----------------------------------+
[root@controller ~]#
[root@controller ~]# openstack user create --domain default \
>   --password ADMIN_PASS admin #Specify the user's password through--password, which is different from the official website.
+-----------+----------------------------------+
| Field     | Value                            |
+-----------+----------------------------------+
| domain_id | 30c30c794d4a4e92ae4474320e75bf47 |
| enabled   | True                             |
| id        | a7b53c25b6c94a78a6efe00bc9150c33 |
| name      | admin                            |
+-----------+----------------------------------+
[root@controller ~]#
[root@controller ~]# openstack role create admin
+-----------+----------------------------------+
| Field     | Value                            |
+-----------+----------------------------------+
| domain_id | None                             |
| id        | 043b3090d03f436eab223f9f1cedf815 |
| name      | admin                            |
+-----------+----------------------------------+
#Associated Projects, Users, Roles
[root@controller ~]# openstack role add --project admin --user admin admin
#On admin projects, assign admin users the admin role
[root@controller ~]# openstack project create --domain default \
>   --description "Service Project" service
+-------------+----------------------------------+
| Field       | Value                            |
+-------------+----------------------------------+
| description | Service Project                  |
| domain_id   | 30c30c794d4a4e92ae4474320e75bf47 |
| enabled     | True                             |
| id          | 317c63946e484b518dc0d99774ff6772 |
| is_domain   | False                            |
| name        | service                          |
| parent_id   | 30c30c794d4a4e92ae4474320e75bf47 |
+-------------+----------------------------------+
10. Test Authorization
[root@controller ~]# unset OS_TOKEN OS_URL #Cancel environment variables
#Configure without environmental change:
[root@controller ~]# openstack --os-auth-url http://controller:35357/v3 \
>   --os-project-domain-name default --os-user-domain-name default \
>   --os-project-name admin --os-username admin --os-password ADMIN_PASS token issue
[root@controller ~]# openstack --os-auth-url http://controller:35357/v3 \
>   --os-project-domain-name default --os-user-domain-name default \
>   --os-project-name admin --os-username admin --os-password ADMIN_PASS user list
(3) Creating scripts for environment variables
[root@controller ~]# vim admin-openrc #It's all capitalized here and lowercase on the command line. It works the same way.
export OS_PROJECT_DOMAIN_NAME=default
export OS_USER_DOMAIN_NAME=default
export OS_PROJECT_NAME=admin
export OS_USERNAME=admin
export OS_PASSWORD=ADMIN_PASS
export OS_AUTH_URL=http://controller:35357/v3
export OS_IDENTITY_API_VERSION=3
export OS_IMAGE_API_VERSION=2
[root@controller ~]# source  admin-openrc
[root@controller ~]# openstack user list
[root@controller ~]# openstack token issue #Check if token can be separated
4. Mirror service glance
(1) Introduction of mirror services
1. Concepts
The mirroring service (glance) allows users to query, upload, and download virtual machine images.
Component: glance-api
Receives calls to mirror API s, such as mirror discovery, recovery, storage.
Component: glance-registry
Stores, processes, and restores mirrored metadata, including items such as size and type.
(2) Mirror configuration
1. openstack common steps
a: database creation authorization
b: Create a system user association role in keystone
c: Create a service on keystone, register the api
d: Install corresponding service packages
e: Modify the configuration file for the corresponding service f: Synchronize the database
g: Start the service
2. Mirror Configuration Steps
1. Authorization to create a database
[root@controller ~]# mysql
MariaDB [(none)]> CREATE DATABASE glance;
Query OK, 1 row affected (0.00 sec)
MariaDB [(none)]> GRANT ALL PRIVILEGES ON glance.* TO 'glance'@'localhost' \
    ->   IDENTIFIED BY 'GLANCE_DBPASS';
Query OK, 0 rows affected (0.00 sec)
MariaDB [(none)]> GRANT ALL PRIVILEGES ON glance.* TO 'glance'@'%' \
    ->   IDENTIFIED BY 'GLANCE_DBPASS';
Query OK, 0 rows affected (0.00 sec)
(2) Create glance user association roles in keystone
[root@controller ~]# openstack user create --domain default --password GLANCE_PASS glance
+-----------+----------------------------------+
| Field     | Value                            |
+-----------+----------------------------------+
| domain_id | 30c30c794d4a4e92ae4474320e75bf47 |
| enabled   | True                             |
| id        | dc68fd42c718411085a1cbc1379a662e |
| name      | glance                           |
+-----------+----------------------------------+
[root@controller ~]# openstack role add --project service --user glance admin
(3) Create services and register api on keystone
[root@controller ~]# openstack service create --name glance \
>   --description "OpenStack Image" image
nstack endpoint create --region RegionOne \
  image admin http://controller:9292
+-------------+----------------------------------+
| Field       | Value                            |
+-------------+----------------------------------+
| description | OpenStack Image                  |
| enabled     | True                             |
| id          | 7f258ec0b235433188c5664c9e710d7c |
| name        | glance                           |
| type        | image                            |
+-------------+----------------------------------+
[root@controller ~]# openstack endpoint create --region RegionOne \
>   image public http://controller:9292

+--------------+----------------------------------+
| Field        | Value                            |
+--------------+----------------------------------+
| enabled      | True                             |
| id           | 2b8484d91ec94bd8a5aafd56ea7a1cfe |
| interface    | public                           |
| region       | RegionOne                        |
| region_id    | RegionOne                        |
| service_id   | 7f258ec0b235433188c5664c9e710d7c |
| service_name | glance                           |
| service_type | image                            |
| url          | http://controller:9292           |
+--------------+----------------------------------+
[root@controller ~]# openstack endpoint create --region RegionOne \
>   image internal http://controller:9292
+--------------+----------------------------------+
| Field        | Value                            |
+--------------+----------------------------------+
| enabled      | True                             |
| id           | aec16a57566a4bccae96f9c63885c0b5 |
| interface    | internal                         |
| region       | RegionOne                        |
| region_id    | RegionOne                        |
| service_id   | 7f258ec0b235433188c5664c9e710d7c |
| service_name | glance                           |
| service_type | image                            |
| url          | http://controller:9292           |
+--------------+----------------------------------+
[root@controller ~]# openstack endpoint create --region RegionOne \
>   image admin http://controller:9292
+--------------+----------------------------------+
| Field        | Value                            |
+--------------+----------------------------------+
| enabled      | True                             |
| id           | ceba791635b341d79c1c47182c22c4df |
| interface    | admin                            |
| region       | RegionOne                        |
| region_id    | RegionOne                        |
| service_id   | 7f258ec0b235433188c5664c9e710d7c |
| service_name | glance                           |
| service_type | image                            |
| url          | http://controller:9292           |
+--------------+----------------------------------+
[root@controller ~]#
(4) Install corresponding software packages for services
[root@controller ~]# yum install openstack-glance -y
Modify the configuration file for the corresponding service
[root@controller ~]# cp /etc/glance/glance-api.conf{,.bak}
[root@controller ~]# grep '^[a-Z\[]' /etc/glance/glance-api.conf.bak >/etc/glance/glance-api.conf
//Configure api profile:
openstack-config --set /etc/glance/glance-api.conf  database  connection  mysql+pymysql://glance:GLANCE_DBPASS@controller/glance
openstack-config --set /etc/glance/glance-api.conf  glance_store stores  file,http
openstack-config --set /etc/glance/glance-api.conf  glance_store default_store  file
openstack-config --set /etc/glance/glance-api.conf  glance_store filesystem_store_datadir  /var/lib/glance/images/
openstack-config --set /etc/glance/glance-api.conf  keystone_authtoken auth_uri  http://controller:5000
openstack-config --set /etc/glance/glance-api.conf  keystone_authtoken auth_url  http://controller:35357
openstack-config --set /etc/glance/glance-api.conf  keystone_authtoken memcached_servers  controller:11211
openstack-config --set /etc/glance/glance-api.conf  keystone_authtoken auth_type  password
openstack-config --set /etc/glance/glance-api.conf  keystone_authtoken project_domain_name  default
openstack-config --set /etc/glance/glance-api.conf  keystone_authtoken user_domain_name  default
openstack-config --set /etc/glance/glance-api.conf  keystone_authtoken project_name  service
openstack-config --set /etc/glance/glance-api.conf  keystone_authtoken username  glance
openstack-config --set /etc/glance/glance-api.conf  keystone_authtoken password  GLANCE_PASS
openstack-config --set /etc/glance/glance-api.conf  paste_deploy flavor  keystone
//Configure registration profile:
cp /etc/glance/glance-registry.conf{,.bak}
grep '^[a-Z\[]' /etc/glance/glance-registry.conf.bak > /etc/glance/glance-registry.conf
openstack-config --set /etc/glance/glance-registry.conf  database  connection  mysql+pymysql://glance:GLANCE_DBPASS@controller/glance
openstack-config --set /etc/glance/glance-registry.conf  keystone_authtoken auth_uri  http://controller:5000
openstack-config --set /etc/glance/glance-registry.conf  keystone_authtoken auth_url  http://controller:35357
openstack-config --set /etc/glance/glance-registry.conf  keystone_authtoken memcached_servers  controller:11211
openstack-config --set /etc/glance/glance-registry.conf  keystone_authtoken auth_type  password
openstack-config --set /etc/glance/glance-registry.conf  keystone_authtoken project_domain_name  default
openstack-config --set /etc/glance/glance-registry.conf  keystone_authtoken user_domain_name  default
openstack-config --set /etc/glance/glance-registry.conf  keystone_authtoken project_name  service
openstack-config --set /etc/glance/glance-registry.conf  keystone_authtoken username  glance
openstack-config --set /etc/glance/glance-registry.conf  keystone_authtoken password  GLANCE_PASS
openstack-config --set /etc/glance/glance-registry.conf  paste_deploy flavor  keystone
Synchronize databases
[root@controller ~]# su -s /bin/sh -c "glance-manage db_sync" glance
[root@controller ~]# mysql glance -e "show tables"
Start the service
[root@controller ~]# systemctl start openstack-glance-scrubber.service openstack-glance-api.service
[root@controller ~]# systemctl enable  openstack-glance-scrubber.service openstack-glance-api.service
[root@controller ~]# systemctl status  openstack-glance-scrubber.service openstack-glance-api.service
Verification
Upload the mirror (cirros-0.3.4-x86_64-disk.img) to the root directory
 Verify mirror upload:
openstack image create "cirros" \
  --file cirros-0.3.4-x86_64-disk.img \
  --disk-format qcow2--container-format bare \ (can also be mirrored as a container)
  --public
  View mirror uploaded successfully:
[root@controller images]# pwd
/var/lib/glance/images
[root@controller images]# ll
total 12980
-rw-r----- 1 glance glance 13287936 Jan  4 23:29 456d7600-3bd1-4fb5-aa84-144a61c0eb07
[root@controller images]#
V. Computing service nova
(1) Introduction to nova
The nova service is the core service in openstack cloud computing.Common components are:
nova-api: Accept and respond to all requests for computing services and manage the life cycle of virtual machines (cloud hosts)
nova-compute (multiple): truly manage the lifecycle of a virtual machine
nova-scheduler:nova scheduler (pick the most appropriate nova-compute to create a virtual machine)
nova-conductor: Helps the nova-compute agent modify the state of virtual machines in the database
nova-network: earlier openstack versions manage the network of virtual machines (deprecated, neutron)
nova-consoleauth: Provides access tokens for the web version of vnc
tokennovncproxy: web version vnc client
nova-api-metadata: accepts metadata requests from virtual machines
(2) nova configuration
1. openstack Universal Configuration Process
a: database creation authorization
 b: Create a system user association role in keystone
 c: Create a service on keystone, register api
 d: Install corresponding service packages
 e: Modify the configuration file for the corresponding service
 f: Synchronize databases
 g: Start the service
2. nova control node configuration steps
1. Authorization to create a database
[root@controller ~]# mysql
CREATE DATABASE nova_api;
CREATE DATABASE nova;
GRANT ALL PRIVILEGES ON nova_api.* TO 'nova'@'localhost' \
  IDENTIFIED BY 'NOVA_DBPASS';
GRANT ALL PRIVILEGES ON nova_api.* TO 'nova'@'%' \
  IDENTIFIED BY 'NOVA_DBPASS';
GRANT ALL PRIVILEGES ON nova.* TO 'nova'@'localhost' \
  IDENTIFIED BY 'NOVA_DBPASS';
GRANT ALL PRIVILEGES ON nova.* TO 'nova'@'%' \
  IDENTIFIED BY 'NOVA_DBPASS';
(2) Create system user (glance,nova,neutron) Association roles in keystone
openstack user create --domain default \
  --password NOVA_PASS nova
openstack role add --project service --user nova admin
(3) Create services and register api on keystone
openstack service create --name nova \
  --description "OpenStack Compute" compute
openstack endpoint create --region RegionOne \
  compute public http://controller:8774/v2.1/%\(tenant_id\)s
openstack endpoint create --region RegionOne \
  compute internal http://controller:8774/v2.1/%\(tenant_id\)s
openstack endpoint create --region RegionOne \
  compute admin http://controller:8774/v2.1/%\(tenant_id\)s
(4) Install corresponding software packages for services
yum install openstack-nova-api openstack-nova-conductor \
  openstack-nova-console openstack-nova-novncproxy \
  openstack-nova-scheduler -y
Modify the configuration file for the corresponding service
cp /etc/nova/nova.conf{,.bak}
grep '^[a-Z\[]' /etc/nova/nova.conf.bak >/etc/nova/nova.conf
openstack-config --set /etc/nova/nova.conf  DEFAULT enabled_apis  osapi_compute,metadata
openstack-config --set /etc/nova/nova.conf  DEFAULT rpc_backend  rabbit
openstack-config --set /etc/nova/nova.conf  DEFAULT auth_strategy  keystone
openstack-config --set /etc/nova/nova.conf  DEFAULT my_ip  10.0.0.11
openstack-config --set /etc/nova/nova.conf  DEFAULT use_neutron  True
openstack-config --set /etc/nova/nova.conf  DEFAULT firewall_driver  nova.virt.firewall.NoopFirewallDriver
openstack-config --set /etc/nova/nova.conf  api_database connection  mysql+pymysql://nova:NOVA_DBPASS@controller/nova_api
openstack-config --set /etc/nova/nova.conf  database  connection  mysql+pymysql://nova:NOVA_DBPASS@controller/nova
openstack-config --set /etc/nova/nova.conf  glance api_servers  http://controller:9292
openstack-config --set /etc/nova/nova.conf  keystone_authtoken  auth_uri  http://controller:5000
openstack-config --set /etc/nova/nova.conf  keystone_authtoken  auth_url  http://controller:35357
openstack-config --set /etc/nova/nova.conf  keystone_authtoken  memcached_servers  controller:11211
openstack-config --set /etc/nova/nova.conf  keystone_authtoken  auth_type  password
openstack-config --set /etc/nova/nova.conf  keystone_authtoken  project_domain_name  default
openstack-config --set /etc/nova/nova.conf  keystone_authtoken  user_domain_name  default
openstack-config --set /etc/nova/nova.conf  keystone_authtoken  project_name  service
openstack-config --set /etc/nova/nova.conf  keystone_authtoken  username  nova
openstack-config --set /etc/nova/nova.conf  keystone_authtoken  password  NOVA_PASS
openstack-config --set /etc/nova/nova.conf  oslo_concurrency lock_path  /var/lib/nova/tmp
openstack-config --set /etc/nova/nova.conf  oslo_messaging_rabbit   rabbit_host  controller
openstack-config --set /etc/nova/nova.conf  oslo_messaging_rabbit   rabbit_userid  openstack
openstack-config --set /etc/nova/nova.conf  oslo_messaging_rabbit   rabbit_password  RABBIT_PASS
openstack-config --set /etc/nova/nova.conf  vnc vncserver_listen  '$my_ip'
openstack-config --set /etc/nova/nova.conf  vnc vncserver_proxyclient_address  '$my_ip'

//Verification
[root@controller ~]# md5sum /etc/nova/nova.conf
47ded61fdd1a79ab91bdb37ce59ef192  /etc/nova/nova.conf
Synchronize databases
[root@controller ~]# su -s /bin/sh -c "nova-manage api_db sync" nova

[root@controller ~]# su -s /bin/sh -c "nova-manage db sync" nova
Start the service
systemctl enable openstack-nova-api.service \
openstack-nova-consoleauth.service openstack-nova-scheduler.service \
openstack-nova-conductor.service openstack-nova-novncproxy.service
systemctl start openstack-nova-api.service \
openstack-nova-consoleauth.service openstack-nova-scheduler.service \
openstack-nova-conductor.service openstack-nova-novncproxy.service
//See:
[root@controller ~]# openstack compute service list
nova service-list
glance image-list
openstack image list
openstack compute service list
3. nova Computing Node Configuration Steps
(1) nova-compute calls libvirtd to create a virtual machine
Install related software:
yum install openstack-nova-compute -y
yum install openstack-utils.noarch -y
Configuration
[root@computer1 ~]# cp /etc/nova/nova.conf{,.bak}
[root@computer1 ~]# grep '^[a-Z\[]' /etc/nova/nova.conf.bak >/etc/nova/nova.conf

openstack-config --set /etc/nova/nova.conf  DEFAULT enabled_apis  osapi_compute,metadata
openstack-config --set /etc/nova/nova.conf  DEFAULT rpc_backend  rabbit
openstack-config --set /etc/nova/nova.conf  DEFAULT auth_strategy  keystone
openstack-config --set /etc/nova/nova.conf  DEFAULT my_ip  10.0.0.31
openstack-config --set /etc/nova/nova.conf  DEFAULT use_neutron  True
openstack-config --set /etc/nova/nova.conf  DEFAULT firewall_driver  nova.virt.firewall.NoopFirewallDriver
openstack-config --set /etc/nova/nova.conf  glance api_servers  http://controller:9292
openstack-config --set /etc/nova/nova.conf  keystone_authtoken  auth_uri  http://controller:5000
openstack-config --set /etc/nova/nova.conf  keystone_authtoken  auth_url  http://controller:35357
openstack-config --set /etc/nova/nova.conf  keystone_authtoken  memcached_servers  controller:11211
openstack-config --set /etc/nova/nova.conf  keystone_authtoken  auth_type  password
openstack-config --set /etc/nova/nova.conf  keystone_authtoken  project_domain_name  default
openstack-config --set /etc/nova/nova.conf  keystone_authtoken  user_domain_name  default
openstack-config --set /etc/nova/nova.conf  keystone_authtoken  project_name  service
openstack-config --set /etc/nova/nova.conf  keystone_authtoken  username  nova
openstack-config --set /etc/nova/nova.conf  keystone_authtoken  password  NOVA_PASS
openstack-config --set /etc/nova/nova.conf  oslo_concurrency lock_path  /var/lib/nova/tmp
openstack-config --set /etc/nova/nova.conf  oslo_messaging_rabbit   rabbit_host  controller
openstack-config --set /etc/nova/nova.conf  oslo_messaging_rabbit   rabbit_userid  openstack
openstack-config --set /etc/nova/nova.conf  oslo_messaging_rabbit   rabbit_password  RABBIT_PASS
openstack-config --set /etc/nova/nova.conf  vnc enabled  True
openstack-config --set /etc/nova/nova.conf  vnc vncserver_listen  0.0.0.0
openstack-config --set /etc/nova/nova.conf  vnc vncserver_proxyclient_address  '$my_ip'
openstack-config --set /etc/nova/nova.conf  vnc novncproxy_base_url  http://controller:6080/vnc_auto.html
//Verification
[root@computer1 ~]# md5sum /etc/nova/nova.conf
45cab6030a9ab82761e9f697d6d79e14  /etc/nova/nova.conf
(3) Start services
systemctl enable libvirtd.service openstack-nova-compute.service
systemctl start libvirtd.service openstack-nova-compute.service
(4) Validation (global variables need to be effective)
Control Node
[root@controller ~]# openstack compute service list
6. Network Service neutron
(1) Introduction of concepts
OpenStack Networking (neutron) allows you to create and attach network card devices that are managed by other OpenStack services.Plug-in implementations accommodate different network devices and software, providing flexibility in OpenStack architecture and deployment.
Common components are:
neutron-server: Accept and respond to external network management requests
neutron-linuxbridge-agent: responsible for creating bridged network cards
neutron-dhcp-agent: responsible for assigning IP
neutron-metadata-agent: Cooperate with nova-metadata-api to customize virtual machines
L3-agent: Implement a three-tier network vxlan
(2) configuration of neutron components
1. Control Node Configuration
1. Database Authorization
[root@controller ~]# mysql
CREATE DATABASE neutron;
GRANT ALL PRIVILEGES ON neutron.* TO 'neutron'@'localhost' \
  IDENTIFIED BY 'NEUTRON_DBPASS';
GRANT ALL PRIVILEGES ON neutron.* TO 'neutron'@'%' \
  IDENTIFIED BY 'NEUTRON_DBPASS';
(2) Create system user (glance,nova,neutron) Association roles in keystone
openstack user create --domain default --password NEUTRON_PASS neutron
openstack role add --project service --user neutron admin
(3) Create services and register api on keystone
openstack service create --name neutron \
  --description "OpenStack Networking" network
openstack endpoint create --region RegionOne \
  network public http://controller:9696
openstack endpoint create --region RegionOne \
  network internal http://controller:9696
openstack endpoint create --region RegionOne \
  network admin http://controller:9696
(4) Install corresponding software packages for services
yum install openstack-neutron openstack-neutron-ml2 \
  openstack-neutron-linuxbridge ebtables -y
Modify the configuration file for the corresponding service
Files:/etc/neutron/neutron.conf
cp /etc/neutron/neutron.conf{,.bak}
grep '^[a-Z\[]' /etc/neutron/neutron.conf.bak >/etc/neutron/neutron.conf
openstack-config --set /etc/neutron/neutron.conf  DEFAULT core_plugin  ml2
openstack-config --set /etc/neutron/neutron.conf  DEFAULT service_plugins
openstack-config --set /etc/neutron/neutron.conf  DEFAULT rpc_backend  rabbit
openstack-config --set /etc/neutron/neutron.conf  DEFAULT auth_strategy  keystone
openstack-config --set /etc/neutron/neutron.conf  DEFAULT notify_nova_on_port_status_changes  True
openstack-config --set /etc/neutron/neutron.conf  DEFAULT notify_nova_on_port_data_changes  True
openstack-config --set /etc/neutron/neutron.conf  database connection  mysql+pymysql://neutron:NEUTRON_DBPASS@controller/neutron
openstack-config --set /etc/neutron/neutron.conf  keystone_authtoken auth_uri  http://controller:5000
openstack-config --set /etc/neutron/neutron.conf  keystone_authtoken auth_url  http://controller:35357
openstack-config --set /etc/neutron/neutron.conf  keystone_authtoken memcached_servers  controller:11211
openstack-config --set /etc/neutron/neutron.conf  keystone_authtoken auth_type  password
openstack-config --set /etc/neutron/neutron.conf  keystone_authtoken project_domain_name  default
openstack-config --set /etc/neutron/neutron.conf  keystone_authtoken user_domain_name  default
openstack-config --set /etc/neutron/neutron.conf  keystone_authtoken project_name  service
openstack-config --set /etc/neutron/neutron.conf  keystone_authtoken username  neutron
openstack-config --set /etc/neutron/neutron.conf  keystone_authtoken password  NEUTRON_PASS
openstack-config --set /etc/neutron/neutron.conf  nova auth_url  http://controller:35357
openstack-config --set /etc/neutron/neutron.conf  nova auth_type  password
openstack-config --set /etc/neutron/neutron.conf  nova project_domain_name  default
openstack-config --set /etc/neutron/neutron.conf  nova user_domain_name  default
openstack-config --set /etc/neutron/neutron.conf  nova region_name  RegionOne
openstack-config --set /etc/neutron/neutron.conf  nova project_name  service
openstack-config --set /etc/neutron/neutron.conf  nova username  nova
openstack-config --set /etc/neutron/neutron.conf  nova password  NOVA_PASS
openstack-config --set /etc/neutron/neutron.conf  oslo_concurrency lock_path  /var/lib/neutron/tmp
openstack-config --set /etc/neutron/neutron.conf  oslo_messaging_rabbit rabbit_host  controller
openstack-config --set /etc/neutron/neutron.conf  oslo_messaging_rabbit rabbit_userid  openstack
openstack-config --set /etc/neutron/neutron.conf  oslo_messaging_rabbit rabbit_password  RABBIT_PASS
//Verification
[root@controller ~]# md5sum /etc/neutron/neutron.conf
e399b7958cd22f47becc6d8fd6d3521a  /etc/neutron/neutron.conf
//File: /etc/neutron/plugins/ml2/ml2_conf.ini
cp /etc/neutron/plugins/ml2/ml2_conf.ini{,.bak}
grep '^[a-Z\[]' /etc/neutron/plugins/ml2/ml2_conf.ini.bak >/etc/neutron/plugins/ml2/ml2_conf.ini
openstack-config --set /etc/neutron/plugins/ml2/ml2_conf.ini  ml2 type_drivers  flat,vlan
openstack-config --set /etc/neutron/plugins/ml2/ml2_conf.ini  ml2 tenant_network_types
openstack-config --set /etc/neutron/plugins/ml2/ml2_conf.ini  ml2 mechanism_drivers  linuxbridge
openstack-config --set /etc/neutron/plugins/ml2/ml2_conf.ini  ml2 extension_drivers  port_security
openstack-config --set /etc/neutron/plugins/ml2/ml2_conf.ini  ml2_type_flat flat_networks  provider
openstack-config --set /etc/neutron/plugins/ml2/ml2_conf.ini  securitygroup enable_ipset  True
//Verification:
[root@controller ~]# md5sum /etc/neutron/plugins/ml2/ml2_conf.ini
2640b5de519fafcd675b30e1bcd3c7d5  /etc/neutron/plugins/ml2/ml2_conf.ini
//File: /etc/neutron/plugins/ml2/linuxbridge_agent.ini
cp /etc/neutron/plugins/ml2/linuxbridge_agent.ini{,.bak}

grep '^[a-Z\[]' /etc/neutron/plugins/ml2/linuxbridge_agent.ini.bak >/etc/neutron/plugins/ml2/linuxbridge_agent.ini
openstack-config --set /etc/neutron/plugins/ml2/linuxbridge_agent.ini  linux_bridge physical_interface_mappings  provider:eth0
openstack-config --set /etc/neutron/plugins/ml2/linuxbridge_agent.ini  securitygroup enable_security_group  True
openstack-config --set /etc/neutron/plugins/ml2/linuxbridge_agent.ini  securitygroup firewall_driver  neutron.agent.linux.iptables_firewall.IptablesFirewallDriver
openstack-config --set /etc/neutron/plugins/ml2/linuxbridge_agent.ini  vxlan enable_vxlan  False
//Verification:
[root@controller ~]# md5sum /etc/neutron/plugins/ml2/linuxbridge_agent.ini
3f474907a7f438b34563e4d3f3c29538  /etc/neutron/plugins/ml2/linuxbridge_agent.ini
//File: /etc/neutron/dhcp_agent.ini
cp /etc/neutron/dhcp_agent.ini{,.bak}
grep -Ev '^$|#' /etc/neutron/dhcp_agent.ini.bak >/etc/neutron/dhcp_agent.ini
openstack-config --set  /etc/neutron/dhcp_agent.ini  DEFAULT  interface_driver  neutron.agent.linux.interface.BridgeInterfaceDriver
openstack-config --set  /etc/neutron/dhcp_agent.ini  DEFAULT dhcp_driver  neutron.agent.linux.dhcp.Dnsmasq
openstack-config --set  /etc/neutron/dhcp_agent.ini  DEFAULT enable_isolated_metadata  True

//Verification:
[root@controller ~]# md5sum /etc/neutron/dhcp_agent.ini
d39579607b2f7d92e88f8910f9213520  /etc/neutron/dhcp_agent.ini
//File: /etc/neutron/metadata_agent.ini
cp /etc/neutron/metadata_agent.ini{,.bak}
grep -Ev '^$|#' /etc/neutron/metadata_agent.ini.bak >/etc/neutron/metadata_agent.ini
openstack-config --set /etc/neutron/metadata_agent.ini DEFAULT  nova_metadata_ip  controller
openstack-config --set /etc/neutron/metadata_agent.ini DEFAULT  metadata_proxy_shared_secret  METADATA_SECRET

//Verification:
[root@controller ~]# md5sum /etc/neutron/metadata_agent.ini
e1166b0dfcbcf4507d50860d124335d6  /etc/neutron/metadata_agent.ini
//File: Modify/etc/nova/nova.conf
openstack-config --set /etc/nova/nova.conf  neutron url  http://controller:9696
openstack-config --set /etc/nova/nova.conf  neutron auth_url  http://controller:35357
openstack-config --set /etc/nova/nova.conf  neutron auth_type  password
openstack-config --set /etc/nova/nova.conf  neutron project_domain_name  default
openstack-config --set /etc/nova/nova.conf  neutron user_domain_name  default
openstack-config --set /etc/nova/nova.conf  neutron region_name  RegionOne
openstack-config --set /etc/nova/nova.conf  neutron project_name  service
openstack-config --set /etc/nova/nova.conf  neutron username  neutron
openstack-config --set /etc/nova/nova.conf  neutron password  NEUTRON_PASS
openstack-config --set /etc/nova/nova.conf  neutron service_metadata_proxy  True
openstack-config --set /etc/nova/nova.conf  neutron metadata_proxy_shared_secret  METADATA_SECRET
//Verification:
[root@controller ~]# md5sum /etc/nova/nova.conf
6334f359655efdbcf083b812ab94efc1  /etc/nova/nova.conf
Synchronize databases
ln -s /etc/neutron/plugins/ml2/ml2_conf.ini /etc/neutron/plugin.ini
su -s /bin/sh -c "neutron-db-manage --config-file /etc/neutron/neutron.conf \
  --config-file /etc/neutron/plugins/ml2/ml2_conf.ini upgrade head" neutron
Start the service
systemctl restart openstack-nova-api.service
systemctl enable neutron-server.service \
  neutron-linuxbridge-agent.service neutron-dhcp-agent.service \
  neutron-metadata-agent.service
systemctl start neutron-server.service \
  neutron-linuxbridge-agent.service neutron-dhcp-agent.service \
  neutron-metadata-agent.service
2. Compute Node Configuration
1. Install related software
yum install openstack-neutron-linuxbridge ebtables ipset -y
Configuration
cp /etc/neutron/neutron.conf{,.bak}
grep '^[a-Z\[]' /etc/neutron/neutron.conf.bak >/etc/neutron/neutron.conf
openstack-config --set /etc/neutron/neutron.conf  DEFAULT rpc_backend  rabbit
openstack-config --set /etc/neutron/neutron.conf  DEFAULT auth_strategy  keystone
openstack-config --set /etc/neutron/neutron.conf  keystone_authtoken auth_uri  http://controller:5000
openstack-config --set /etc/neutron/neutron.conf  keystone_authtoken auth_url  http://controller:35357
openstack-config --set /etc/neutron/neutron.conf  keystone_authtoken memcached_servers  controller:11211
openstack-config --set /etc/neutron/neutron.conf  keystone_authtoken auth_type  password
openstack-config --set /etc/neutron/neutron.conf  keystone_authtoken project_domain_name  default
openstack-config --set /etc/neutron/neutron.conf  keystone_authtoken user_domain_name  default
openstack-config --set /etc/neutron/neutron.conf  keystone_authtoken project_name  service
openstack-config --set /etc/neutron/neutron.conf  keystone_authtoken username  neutron
openstack-config --set /etc/neutron/neutron.conf  keystone_authtoken password  NEUTRON_PASS
openstack-config --set /etc/neutron/neutron.conf  oslo_concurrency lock_path  /var/lib/neutron/tmp
openstack-config --set /etc/neutron/neutron.conf  oslo_messaging_rabbit rabbit_host  controller
openstack-config --set /etc/neutron/neutron.conf  oslo_messaging_rabbit rabbit_userid  openstack
openstack-config --set /etc/neutron/neutron.conf  oslo_messaging_rabbit rabbit_password  RABBIT_PASS
//Verification:
[root@computer1 ~]# md5sum /etc/neutron/neutron.conf
77ffab503797be5063c06e8b956d6ed0  /etc/neutron/neutron.conf

//File: /etc/neutron/plugins/ml2/linuxbridge_agent.ini
cp /etc/neutron/plugins/ml2/linuxbridge_agent.ini{,.bak}
grep '^[a-Z\[]' /etc/neutron/plugins/ml2/linuxbridge_agent.ini.bak >/etc/neutron/plugins/ml2/linuxbridge_agent.ini
openstack-config --set /etc/neutron/plugins/ml2/linuxbridge_agent.ini  linux_bridge physical_interface_mappings  provider:eth0
openstack-config --set /etc/neutron/plugins/ml2/linuxbridge_agent.ini  securitygroup enable_security_group  True
openstack-config --set /etc/neutron/plugins/ml2/linuxbridge_agent.ini  securitygroup firewall_driver  neutron.agent.linux.iptables_firewall.IptablesFirewallDriver
openstack-config --set /etc/neutron/plugins/ml2/linuxbridge_agent.ini  vxlan enable_vxlan  False
//Verification:
[root@computer1 ~]# md5sum /etc/neutron/plugins/ml2/linuxbridge_agent.ini
3f474907a7f438b34563e4d3f3c29538  /etc/neutron/plugins/ml2/linuxbridge_agent.ini
[root@computer1 ~]#
//File: Configure/etc/nova/nova.conf

openstack-config --set /etc/nova/nova.conf  neutron url  http://controller:9696
openstack-config --set /etc/nova/nova.conf  neutron auth_url  http://controller:35357
openstack-config --set /etc/nova/nova.conf  neutron auth_type  password
openstack-config --set /etc/nova/nova.conf  neutron project_domain_name  default
openstack-config --set /etc/nova/nova.conf  neutron user_domain_name  default
openstack-config --set /etc/nova/nova.conf  neutron region_name  RegionOne
openstack-config --set /etc/nova/nova.conf  neutron project_name  service
openstack-config --set /etc/nova/nova.conf  neutron username  neutron
openstack-config --set /etc/nova/nova.conf  neutron password  NEUTRON_PASS
//Verification:
[root@computer1 ~]# md5sum /etc/nova/nova.conf
328cd5f0745e26a420e828b0dfc2934e  /etc/nova/nova.conf
View on the control node:
[root@controller ~]# neutron agent-list
(3) Component startup
systemctl restart openstack-nova-compute.service
systemctl enable neutron-linuxbridge-agent.service
systemctl start neutron-linuxbridge-agent.service
7. Dashboard service horizon
(1) Introduction of concepts
Dashboard(horizon) is a web interface that allows cloud platform administrators and users to manage different Openstack resources and services.It was developed using the python django framework, it does not have its own database, web pages are displayed, and it relies entirely on the api that invokes other services.Dashboard services are installed on computing nodes (official documents are installed on control nodes)
(2) Component installation and configuration
1. Install related software
yum install openstack-dashboard python-memcached -y
Configuration
The configuration file (local-setting) prepared in the openstack package imports the configuration file:
[root@computer1 ~]# cat local_settings >/etc/openstack-dashboard/local_settings
Configure Components
[root@computer1 ~]# grep -Ev '^$|#' local_settings
import os
from django.utils.translation import ugettext_lazy as _
from openstack_dashboard import exceptions
from openstack_dashboard.settings import HORIZON_CONFIG
DEBUG = False
TEMPLATE_DEBUG = DEBUG
WEBROOT = '/dashboard/'
ALLOWED_HOSTS = ['*', ]
OPENSTACK_API_VERSIONS = {
    "identity": 3,
    "image": 2,
    "volume": 2,
    "compute": 2,
}
OPENSTACK_KEYSTONE_MULTIDOMAIN_SUPPORT = True
OPENSTACK_KEYSTONE_DEFAULT_DOMAIN = 'default'
LOCAL_PATH = '/tmp'
SECRET_KEY='65941f1393ea1c265ad7'
SESSION_ENGINE = 'django.contrib.sessions.backends.cache'
CACHES = {
    'default': {
        'BACKEND': 'django.core.cache.backends.memcached.MemcachedCache',
        'LOCATION': 'controller:11211',
    },
}
EMAIL_BACKEND = 'django.core.mail.backends.console.EmailBackend'
OPENSTACK_HOST = "controller"
OPENSTACK_KEYSTONE_URL = "http://%s:5000/v3" % OPENSTACK_HOST
OPENSTACK_KEYSTONE_DEFAULT_ROLE = "user"
OPENSTACK_KEYSTONE_BACKEND = {
    'name': 'native',
    'can_edit_user': True,
    'can_edit_group': True,
    'can_edit_project': True,
    'can_edit_domain': True,
    'can_edit_role': True,
}
OPENSTACK_HYPERVISOR_FEATURES = {
    'can_set_mount_point': False,
    'can_set_password': False,
    'requires_keypair': False,
}
OPENSTACK_CINDER_FEATURES = {
    'enable_backup': False,
}
OPENSTACK_NEUTRON_NETWORK = {
    'enable_router': False,
    'enable_quotas': False,
    'enable_ipv6': False,
    'enable_distributed_router': False,
    'enable_ha_router': False,
    'enable_lb': False,
    'enable_firewall': False,
    'enable_vpn': False,
    'enable_fip_topology_check': False,
    'default_ipv4_subnet_pool_label': None,
    'default_ipv6_subnet_pool_label': None,
    'profile_support': None,
    'supported_provider_types': ['*'],
    'supported_vnic_types': ['*'],
}
OPENSTACK_HEAT_STACK = {
    'enable_user_pass': True,
}
IMAGE_CUSTOM_PROPERTY_TITLES = {
    "architecture": _("Architecture"),
    "kernel_id": _("Kernel ID"),
    "ramdisk_id": _("Ramdisk ID"),
    "image_state": _("Euca2ools state"),
    "project_id": _("Project ID"),
    "image_type": _("Image Type"),
}
IMAGE_RESERVED_CUSTOM_PROPERTIES = []
API_RESULT_LIMIT = 1000
API_RESULT_PAGE_SIZE = 20
SWIFT_FILE_TRANSFER_CHUNK_SIZE = 512 * 1024
DROPDOWN_MAX_ITEMS = 30
TIME_ZONE = "Asia/Shanghai"
POLICY_FILES_PATH = '/etc/openstack-dashboard'
LOGGING = {
    'version': 1,
    'disable_existing_loggers': False,
    'handlers': {
        'null': {
            'level': 'DEBUG',
            'class': 'logging.NullHandler',
        },
        'console': {
            'level': 'INFO',
            'class': 'logging.StreamHandler',
        },
    },
    'loggers': {
        'django.db.backends': {
            'handlers': ['null'],
            'propagate': False,
        },
        'requests': {
            'handlers': ['null'],
            'propagate': False,
        },
        'horizon': {
            'handlers': ['console'],
            'level': 'DEBUG',
            'propagate': False,
        },
        'openstack_dashboard': {
            'handlers': ['console'],
            'level': 'DEBUG',
            'propagate': False,
        },
        'novaclient': {
            'handlers': ['console'],
            'level': 'DEBUG',
            'propagate': False,
        },
        'cinderclient': {
            'handlers': ['console'],
            'level': 'DEBUG',
            'propagate': False,
        },
        'keystoneclient': {
            'handlers': ['console'],
            'level': 'DEBUG',
            'propagate': False,
        },
        'glanceclient': {
            'handlers': ['console'],
            'level': 'DEBUG',
            'propagate': False,
        },
        'neutronclient': {
            'handlers': ['console'],
            'level': 'DEBUG',
            'propagate': False,
        },
        'heatclient': {
            'handlers': ['console'],
            'level': 'DEBUG',
            'propagate': False,
        },
        'ceilometerclient': {
            'handlers': ['console'],
            'level': 'DEBUG',
            'propagate': False,
        },
        'swiftclient': {
            'handlers': ['console'],
            'level': 'DEBUG',
            'propagate': False,
        },
        'openstack_auth': {
            'handlers': ['console'],
            'level': 'DEBUG',
            'propagate': False,
        },
        'nose.plugins.manager': {
            'handlers': ['console'],
            'level': 'DEBUG',
            'propagate': False,
        },
        'django': {
            'handlers': ['console'],
            'level': 'DEBUG',
            'propagate': False,
        },
        'iso8601': {
            'handlers': ['null'],
            'propagate': False,
        },
        'scss': {
            'handlers': ['null'],
            'propagate': False,
        },
    },
}
SECURITY_GROUP_RULES = {
    'all_tcp': {
        'name': _('All TCP'),
        'ip_protocol': 'tcp',
        'from_port': '1',
        'to_port': '65535',
    },
    'all_udp': {
        'name': _('All UDP'),
        'ip_protocol': 'udp',
        'from_port': '1',
        'to_port': '65535',
    },
    'all_icmp': {
        'name': _('All ICMP'),
        'ip_protocol': 'icmp',
        'from_port': '-1',
        'to_port': '-1',
    },
    'ssh': {
        'name': 'SSH',
        'ip_protocol': 'tcp',
        'from_port': '22',
        'to_port': '22',
    },
    'smtp': {
        'name': 'SMTP',
        'ip_protocol': 'tcp',
        'from_port': '25',
        'to_port': '25',
    },
    'dns': {
        'name': 'DNS',
        'ip_protocol': 'tcp',
        'from_port': '53',
        'to_port': '53',
    },
    'http': {
        'name': 'HTTP',
        'ip_protocol': 'tcp',
        'from_port': '80',
        'to_port': '80',
    },
    'pop3': {
        'name': 'POP3',
        'ip_protocol': 'tcp',
        'from_port': '110',
        'to_port': '110',
    },
    'imap': {
        'name': 'IMAP',
        'ip_protocol': 'tcp',
        'from_port': '143',
        'to_port': '143',
    },
    'ldap': {
        'name': 'LDAP',
        'ip_protocol': 'tcp',
        'from_port': '389',
        'to_port': '389',
    },
    'https': {
        'name': 'HTTPS',
        'ip_protocol': 'tcp',
        'from_port': '443',
        'to_port': '443',
    },
    'smtps': {
        'name': 'SMTPS',
        'ip_protocol': 'tcp',
        'from_port': '465',
        'to_port': '465',
    },
    'imaps': {
        'name': 'IMAPS',
        'ip_protocol': 'tcp',
        'from_port': '993',
        'to_port': '993',
    },
    'pop3s': {
        'name': 'POP3S',
        'ip_protocol': 'tcp',
        'from_port': '995',
        'to_port': '995',
    },
    'ms_sql': {
        'name': 'MS SQL',
        'ip_protocol': 'tcp',
        'from_port': '1433',
        'to_port': '1433',
    },
    'mysql': {
        'name': 'MYSQL',
        'ip_protocol': 'tcp',
        'from_port': '3306',
        'to_port': '3306',
    },
    'rdp': {
        'name': 'RDP',
        'ip_protocol': 'tcp',
        'from_port': '3389',
        'to_port': '3389',
    },
}
REST_API_REQUIRED_SETTINGS = ['OPENSTACK_HYPERVISOR_FEATURES',
                              'LAUNCH_INSTANCE_DEFAULTS']
(3) Start services
[root@computer1 ~]# systemctl start httpd.service
(4) Use the browserHttp://10.0.0.31/dashboard,
If Internal Server Error appears
Solution:
[root@computer1 ~]# vim /etc/httpd/conf.d/openstack-dashboard.conf
//Add one line after WSGISocketPrefix run/wsgi:
WSGIApplicationGroup %{GLOBAL}
[root@computer1 ~]# systemctl restart httpd.service
Log in to dashboard
Domain: default

User name: admin

Password: ADMIN_PASS
8. Start an instance
(1) Start instance steps
Starting an instance for the first time requires steps:
1: Create an openstack network
2: Hardware configuration for instance creation
3: Create a key pair (Control Node Secret-Free Key Logon)
4: Create security group rules
5: Start an instance (create an instance from the command line, or start an instance from a web page)
(2) Create an instance from the command line
1. Create a network
neutron net-create --shared --provider:physical_network provider \
  --provider:network_type flat oldboy
#  physical_network provider, which has the same name as:
#[root@controller ~]# cat /etc/neutron/plugins/ml2/ml2_conf.ini | grep flat_networks
#flat_networks = provider
//Create subnets:
neutron subnet-create --name oldgirl \
  --allocation-pool start=10.0.0.101,end=10.0.0.250 \
  --dns-nameserver 223.5.5.5 --gateway 10.0.0.254 \
  oldboy 10.0.0.0/24
(2) Configure hardware configuration scheme:
View the existing configuration (hardware):
[root@controller ~]# openstack flavor list
 Create scenarios:
[root@controller ~]# openstack flavor create --id 0 --vcpus 1 --ram 64 --disk 1 m1.nano
(3) Create a key pair
Create a key pair and upload to OpenStack Top:
[root@controller ~]# ssh-keygen -q -N "" -f ~/.ssh/id_rsa
[root@controller ~]# openstack keypair create --public-key ~/.ssh/id_rsa.pub mykey
(4) Create security group rules
openstack security group rule create --proto icmp default
openstack security group rule create --proto tcp --dst-port 22 default
#Two open protocols, icmp, tcp protocol port 22
Start an instance (command line):
View existing mirrors:
[root@controller ~]# openstack image list
View network id:
[root@controller ~]# neutron net-list

dd7500f9-1cb1-42df-8025-a232ef90d54c
create mirror
openstack server create --flavor m1.nano --image cirros \
  --nic net-id=dd7500f9-1cb1-42df-8025-a232ef90d54c --security-group default \
  --key-name mykey oldboy

  #The name of the instance is oldboy, and the key pair has the same name as above:mykey
Check:
[root@controller images]# openstack server list

[root@controller images]# nova list
 Install plug-ins to view the list of virtual machines:
yum install libvirt -y
 virsh list #View list of virtual machines
 Netstat-lntp #Monitor port 5900
Matters needing attention:
(1) Controller cannot be parsed, add in the computer hosts file: 10.0.0.11 controller
(2) If the instance is stuck in the gurb interface
Computing Node Modification Configuration:

vim /etc/nova/nova.conf
[libvirt]
cpu_mode = none
virt_type = qemu

[root@computer1 ~]# systemctl restart openstack-nova-compute
(3) Instance steps for web page creation
1 Click Calculate
(2) Click on Instances
(3) Click Enable Instances in the upper right corner
(4) Details: instance name: instance name, count: Select the number of instances to create
Select the mirror source, click the plus sign
flavor: Instance hardware configuration, select click back-end plus sign (hardware configuration scheme)
Network selection has been created, default
The following are the default configurations
Add: 10.0.0.11 controller # (to avoid errors) to windows host file
Create an instance: the console can enter the virtual machine;
When you tap the console to enter the virtual machine:
Tip error: booting from hard disk grub:

Solution:

Computing node: nova profile:

vim /etc/nova/nova.conf

[libvirt]

cpu_mode=none

virt_type=qemu

systemctl restart openstack-nova-compute

Hard restart instance.
9. Add a computing node
(1) Steps to increase computing nodes
1: Configure yum source
2: Time Synchronization
3: Install the openstack base package
4: Install nova-compute
5: Install neutron-linuxbridge-agent
6: Start services nova-compute and linuxbridge-agent
7: Verification
(2) Installing yum
mount /dev/cdrom /mnt
rz upload openstack_rpm.tar.gz reach/opt,And decompression
//Generate repo configuration file
echo '[local]
name=local
baseurl=file:///mnt
gpgcheck=0
[openstack]
name=openstack
baseurl=file:///opt/repo
gpgcheck=0' >/etc/yum.repos.d/local.repo

yum makecache
echo 'mount /dev/cdrom /mnt' >>/etc/rc.local
chmod +x /etc/rc.d/rc.local
(3) Time Synchronization and openstack Base Package
Time synchronization:
vim /etc/chrony.conf
 Modify Behavior 3
server 10.0.0.11 iburst
systemctl restart chronyd
 Install the openstack client and openstack-selinux
yum install python-openstackclient.noarch  openstack-selinux.noarch -y
(4) Install nova-compute and network
yum install openstack-nova-compute -y
yum install openstack-utils.noarch -y
\cp /etc/nova/nova.conf{,.bak}
grep -Ev '^$|#' /etc/nova/nova.conf.bak >/etc/nova/nova.conf
openstack-config --set /etc/nova/nova.conf  DEFAULT rpc_backend  rabbit
openstack-config --set /etc/nova/nova.conf  DEFAULT auth_strategy  keystone
openstack-config --set /etc/nova/nova.conf  DEFAULT my_ip  10.0.0.32
openstack-config --set /etc/nova/nova.conf  DEFAULT use_neutron  True
openstack-config --set /etc/nova/nova.conf  DEFAULT firewall_driver  nova.virt.firewall.NoopFirewallDriver
openstack-config --set /etc/nova/nova.conf  glance api_servers  http://controller:9292
openstack-config --set /etc/nova/nova.conf  keystone_authtoken  auth_uri  http://controller:5000
openstack-config --set /etc/nova/nova.conf  keystone_authtoken  auth_url  http://controller:35357
openstack-config --set /etc/nova/nova.conf  keystone_authtoken  memcached_servers  controller:11211
openstack-config --set /etc/nova/nova.conf  keystone_authtoken  auth_type  password
openstack-config --set /etc/nova/nova.conf  keystone_authtoken  project_domain_name  default
openstack-config --set /etc/nova/nova.conf  keystone_authtoken  user_domain_name  default
openstack-config --set /etc/nova/nova.conf  keystone_authtoken  project_name  service
openstack-config --set /etc/nova/nova.conf  keystone_authtoken  username  nova
openstack-config --set /etc/nova/nova.conf  keystone_authtoken  password  NOVA_PASS
openstack-config --set /etc/nova/nova.conf  oslo_concurrency lock_path  /var/lib/nova/tmp
openstack-config --set /etc/nova/nova.conf  oslo_messaging_rabbit   rabbit_host  controller
openstack-config --set /etc/nova/nova.conf  oslo_messaging_rabbit   rabbit_userid  openstack
openstack-config --set /etc/nova/nova.conf  oslo_messaging_rabbit   rabbit_password  RABBIT_PASS
openstack-config --set /etc/nova/nova.conf  vnc enabled  True
openstack-config --set /etc/nova/nova.conf  vnc vncserver_listen  0.0.0.0
openstack-config --set /etc/nova/nova.conf  vnc vncserver_proxyclient_address  '$my_ip'
openstack-config --set /etc/nova/nova.conf  vnc novncproxy_base_url  http://controller:6080/vnc_auto.html
openstack-config --set /etc/nova/nova.conf  neutron url  http://controller:9696
openstack-config --set /etc/nova/nova.conf  neutron auth_url  http://controller:35357
openstack-config --set /etc/nova/nova.conf  neutron auth_type  password
openstack-config --set /etc/nova/nova.conf  neutron project_domain_name  default
openstack-config --set /etc/nova/nova.conf  neutron user_domain_name  default
openstack-config --set /etc/nova/nova.conf  neutron region_name  RegionOne
openstack-config --set /etc/nova/nova.conf  neutron project_name  service
openstack-config --set /etc/nova/nova.conf  neutron username  neutron
openstack-config --set /etc/nova/nova.conf  neutron password  NEUTRON_PASS

//Install neutron-linuxbridge-agent
yum install openstack-neutron-linuxbridge ebtables ipset -y
\cp /etc/neutron/neutron.conf{,.bak}
grep -Ev '^$|#' /etc/neutron/neutron.conf.bak >/etc/neutron/neutron.conf
openstack-config --set /etc/neutron/neutron.conf  DEFAULT rpc_backend  rabbit
openstack-config --set /etc/neutron/neutron.conf  DEFAULT auth_strategy  keystone
openstack-config --set /etc/neutron/neutron.conf  keystone_authtoken auth_uri  http://controller:5000
openstack-config --set /etc/neutron/neutron.conf  keystone_authtoken auth_url  http://controller:35357
openstack-config --set /etc/neutron/neutron.conf  keystone_authtoken memcached_servers  controller:11211
openstack-config --set /etc/neutron/neutron.conf  keystone_authtoken auth_type  password
openstack-config --set /etc/neutron/neutron.conf  keystone_authtoken project_domain_name  default
openstack-config --set /etc/neutron/neutron.conf  keystone_authtoken user_domain_name  default
openstack-config --set /etc/neutron/neutron.conf  keystone_authtoken project_name  service
openstack-config --set /etc/neutron/neutron.conf  keystone_authtoken username  neutron
openstack-config --set /etc/neutron/neutron.conf  keystone_authtoken password  NEUTRON_PASS
openstack-config --set /etc/neutron/neutron.conf  oslo_concurrency lock_path  /var/lib/neutron/tmp
openstack-config --set /etc/neutron/neutron.conf  oslo_messaging_rabbit rabbit_host  controller
openstack-config --set /etc/neutron/neutron.conf  oslo_messaging_rabbit rabbit_userid  openstack
openstack-config --set /etc/neutron/neutron.conf  oslo_messaging_rabbit rabbit_password  RABBIT_PASS

####
#vim /etc/neutron/plugins/ml2/linuxbridge_agent.ini
\cp /etc/neutron/plugins/ml2/linuxbridge_agent.ini{,.bak}
grep '^[a-Z\[]' /etc/neutron/plugins/ml2/linuxbridge_agent.ini.bak >/etc/neutron/plugins/ml2/linuxbridge_agent.ini
openstack-config --set /etc/neutron/plugins/ml2/linuxbridge_agent.ini  linux_bridge physical_interface_mappings  provider:eth0
openstack-config --set /etc/neutron/plugins/ml2/linuxbridge_agent.ini  securitygroup enable_security_group  True
openstack-config --set /etc/neutron/plugins/ml2/linuxbridge_agent.ini  securitygroup firewall_driver  neutron.agent.linux.iptables_firewall.IptablesFirewallDriver
openstack-config --set /etc/neutron/plugins/ml2/linuxbridge_agent.ini  vxlan enable_vxlan  False
(5) Start services
[root@computer2 /]# systemctl start  libvirtd openstack-nova-compute neutron-linuxbridge-agent
[root@computer2 /]# systemctl status  libvirtd openstack-nova-compute neutron-linuxbridge-agent
 Detect on the control node:
nova service-list
neutron agent-list
(6) Check calculation nodes
Create a virtual machine to check if the new calculation node is available:
(1) Create Host Cluster: Administrator-Host Cluster-Create Host Cluster-Host Cluster Information (Name, Domain: oldboyboy) -Manage Host within Cluster (Comp2) - Create #Group nova-compute.
(2) Create Host: Project-Instance-Start Instance-Details (Select the oldobyboy you just created from the available zone, Host Aggregation Name) -Source-flavor-Network-Port-Security Group-Key Pair-Configuration-Metadata-Create#You can see under the Administrator Directory which host the instance belongs.
Note: If the instance is stuck in the gurb interface
vim /etc/nova/nova.conf
[libvirt]
cpu_mode = none
virt_type = qemu
systemctl restart openstack-nova-compute
10. openstack user projects and role relationships
(1) Diagram of project user role
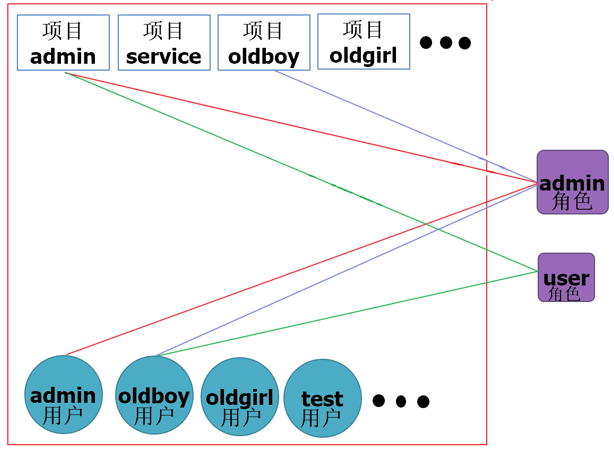
1. Create Domain
openstack domain create --description "Default Domain" default
2. Create Project
openstack project create --domain default --description "Admin Project" admin
3. Create Users
openstack user create --domain default --password ADMIN_PASS admin
4. Create roles
openstack role create admin
5. Associated Roles, Authorization
openstack role add --project admin --user admin admin
(2) role creation in identity management (admin, user)
1. Create roles first
(2) Creating projects
Adjust quotas, adjust in projects.
(3) Creating users
No Administrator Directory for Normal Users
admin role: all project administrators
user role: user of a single project
Only administrators can see all instances.
(3) Project quota management
Administrator-Project-Management Member-Project Quota: Configure the corresponding quota.
11. Migrating glance mirror services
(1) Background
As more and more computing nodes are managed by openstack, the pressure on the control node increases, and since all services are installed on the control node, there is a risk that the openstack services on the control node will collapse at any time.
openstack is based on the soa architecture, we have achieved the migration of horizon. Next, we have implemented the migration of glance mirror service, after which other services can be migrated, leaving only one keystone service for the control node, which is the best practice for the soa architecture.
This time, we will migrate the glance mirror service from the control node to compute2.
(2) Major steps for migration of glance mirror services
1: Stop the glance service on the control node
2: Backup migration glance database
3: Install configuration glance on new nodes
4: Migrate existing glass image files
5: Modify the api address of glance in keystone
6: Modify the api address of glance in the nova profile for all nodes
7: Test, upload a mirror, create an instance
(3) Operation process
(1) Shut down related services on the control node:
[root@controller ~]# systemctl stop openstack-glance-api.service openstack-glance-registry.service
[root@controller ~]# systemctl disable openstack-glance-api.service openstack-glance-registry.service
(2) Back up the library on the control node:
[root@controller ~]# mysqldump -uroot -B glance >glance.sql
[root@controller ~]# scp glance.sql 10.0.0.32:/root
(4) Database Migration
stay compute2 Top:
yum install mariadb-server.x86_64 python2-PyMySQL -y
systemctl start mariadb
systemctl enable mariadb
mysql_secure_installation
//Import the glance database backed up from the control node
mysql < glance.sql
[root@computer2 ~]# mysql
mysql>
show databases;
GRANT ALL PRIVILEGES ON glance.* TO 'glance'@'localhost' \
  IDENTIFIED BY 'GLANCE_DBPASS';
GRANT ALL PRIVILEGES ON glance.* TO 'glance'@'%' \
  IDENTIFIED BY 'GLANCE_DBPASS';
(5) Installing glance services
Install on compute2:
yum install openstack-glance -y
 Send the configuration file to compute2 on the control node:
[root@controller ~]# scp /etc/glance/glance-api.conf 10.0.0.32:/etc/glance/
[root@controller ~]# scp /etc/glance/glance-registry.conf 10.0.0.32:/etc/glance/
Modify:
connection = mysql+pymysql://glance:GLANCE_DBPASS@10.0.0.32/glance
 Copy the previous content, note: the ip address of the modified database is 10.0.0.32
systemctl start openstack-glance-api.service openstack-glance-registry.service
systemctl enable openstack-glance-api.service openstack-glance-registry.service
(6) Migration mirror
[root@computer2 glance]# scp -rp 10.0.0.11:/var/lib/glance/images/* /var/lib/glance/images/
[root@computer2 images]# chown -R glance:glance /var/lib/glance/images/
//On the control node, check:
source admin-openrc
openstack endpoint list | grep image
//Still a mirror of the past
(7) Modify the api address of glance on keystone
On the control node:
View related databases:
msyql keystone:
select * from endpoint
[root@controller ~]# mysqldump -uroot keystone endpoint >endpoint.sql
[root@controller ~]# cp endpoint.sql /opt/
Modify the database configuration file:
[root@controller ~]# sed -i 's#http://controller:9292#http://10.0.0.32:9292#g' endpoint.sql
 Import the modified database file:
[root@controller ~]# mysql keystone < endpoint.sql
View glance interface address:
[root@controller ~]# openstack endpoint list|grep image
[root@controller ~]# openstack image list
(8) Modify all Node nova profiles
sed -i 's#http://controller:9292#http://10.0.0.32:9292#g' /etc/nova/nova.conf
grep '9292'  /etc/nova/nova.conf
systemctl restart openstack-nova-api.service openstack-nova-compute.service
//Control Node Restart: openstack-nova-api.service
//Calculation Node Restart: openstack-nova-compute.service
//Control node:
[root@controller ~]# nova service-list
+----+------------------+------------+-----------+---------+-------+----------------------------+-----------------+
| Id | Binary           | Host       | Zone      | Status  | State | Updated_at                 | Disabled Reason |
+----+------------------+------------+-----------+---------+-------+----------------------------+-----------------+
| 1  | nova-conductor   | controller | internal  | enabled | up    | 2020-01-05T16:53:07.000000 | -               |
| 2  | nova-consoleauth | controller | internal  | enabled | up    | 2020-01-05T16:53:10.000000 | -               |
| 3  | nova-scheduler   | controller | internal  | enabled | up    | 2020-01-05T16:53:10.000000 | -               |
| 6  | nova-compute     | computer1  | nova      | enabled | up    | 2020-01-05T16:53:08.000000 | -               |
| 7  | nova-compute     | computer2  | oldboyboy | enabled | up    | 2020-01-05T16:53:08.000000 | -               |
+----+------------------+------------+-----------+---------+-------+----------------------------+-----------------+
(9) Testing, uploading mirrors, creating instances
1. Upload mirror:
Project-Mirror-Create Mirror (centos-cloud)
Mirror storage location: /var/lib/glance/image
View mirror information: qemu-image info /var/lib/glance/image/...
2. Create an instance:
Project-Instance-Enable Instance
web pages; mirrors can be uploaded in projects
qemu-img info. #View mirror information
View the information in nova during instance startup: download the mirror from glance and convert the format.Download location:
/var/lib/nova/instance/_base/
12. Block Storage Service cinder
(1) Install cinder block service
1. Introduction of block storage service cinder
Add disks for cloud hosts.The block storage service (cinder) provides block storage for instances.The allocation and consumption of storage is determined by either the block storage drive or the drive with multiple backends.There are many other drivers available: NAS/SAN, NFS, LVM, Ceph, etc.Common components:
cinder-api: Receive and respond to external requests for block storage
cinder-volume: provides storage
cinder-scheduler: A scheduler that determines which cinder-volume will provide the space to be allocated.
cinder-backup: backup volume
2. General installation steps for openstack service
a: database creation authorization
b: Create a system user association role in keystone
c: Create a service on keystone, register the api
d: Install corresponding service packages
e: Modify the configuration file for the corresponding service
f: Synchronize databases
g: Start the service
(2) Installation of Block Storage Service Section
1. cinder block storage service control node
1. Authorization to create a database
[root@controller ~]# mysql
CREATE DATABASE cinder;
GRANT ALL PRIVILEGES ON cinder.* TO 'cinder'@'localhost' \
  IDENTIFIED BY 'CINDER_DBPASS';
GRANT ALL PRIVILEGES ON cinder.* TO 'cinder'@'%' \
  IDENTIFIED BY 'CINDER_DBPASS';
(2) Create system user (glance,nova,neutron,cinder) Association roles in keystone
openstack user create --domain default --password CINDER_PASS cinder
openstack role add --project service --user cinder admin
(3) Create services and register api(source admin-openrc) on keystone
openstack service create --name cinder \
  --description "OpenStack Block Storage" volume
openstack service create --name cinderv2 \
  --description "OpenStack Block Storage" volumev2
openstack endpoint create --region RegionOne \
  volume public http://controller:8776/v1/%\(tenant_id\)s
openstack endpoint create --region RegionOne \
  volume internal http://controller:8776/v1/%\(tenant_id\)s
openstack endpoint create --region RegionOne \
  volume admin http://controller:8776/v1/%\(tenant_id\)s
openstack endpoint create --region RegionOne \
  volumev2 public http://controller:8776/v2/%\(tenant_id\)s
openstack endpoint create --region RegionOne \
  volumev2 internal http://controller:8776/v2/%\(tenant_id\)s
openstack endpoint create --region RegionOne \
  volumev2 admin http://controller:8776/v2/%\(tenant_id\)s
(4) Install corresponding software packages for services
[root@controller ~]# yum install openstack-cinder -y
Modify the configuration file for the corresponding service
cp /etc/cinder/cinder.conf{,.bak}
grep -Ev '^$|#' /etc/cinder/cinder.conf.bak >/etc/cinder/cinder.conf
openstack-config --set /etc/cinder/cinder.conf   DEFAULT  rpc_backend  rabbit
openstack-config --set /etc/cinder/cinder.conf   DEFAULT  auth_strategy  keystone
openstack-config --set /etc/cinder/cinder.conf   DEFAULT  my_ip  10.0.0.11
openstack-config --set /etc/cinder/cinder.conf   database connection mysql+pymysql://cinder:CINDER_DBPASS@controller/cinder
openstack-config --set /etc/cinder/cinder.conf   keystone_authtoken   auth_uri  http://controller:5000
openstack-config --set /etc/cinder/cinder.conf   keystone_authtoken   auth_url  http://controller:35357
openstack-config --set /etc/cinder/cinder.conf   keystone_authtoken   memcached_servers  controller:11211
openstack-config --set /etc/cinder/cinder.conf   keystone_authtoken   auth_type  password
openstack-config --set /etc/cinder/cinder.conf   keystone_authtoken   project_domain_name  default
openstack-config --set /etc/cinder/cinder.conf   keystone_authtoken   user_domain_name  default
openstack-config --set /etc/cinder/cinder.conf   keystone_authtoken   project_name  service
openstack-config --set /etc/cinder/cinder.conf   keystone_authtoken   username  cinder
openstack-config --set /etc/cinder/cinder.conf   keystone_authtoken   password  CINDER_PASS
openstack-config --set /etc/cinder/cinder.conf   oslo_concurrency  lock_path  /var/lib/cinder/tmp
openstack-config --set /etc/cinder/cinder.conf   oslo_messaging_rabbit  rabbit_host  controller
openstack-config --set /etc/cinder/cinder.conf   oslo_messaging_rabbit  rabbit_userid  openstack
openstack-config --set /etc/cinder/cinder.conf   oslo_messaging_rabbit  rabbit_password  RABBIT_PASS

openstack-config --set /etc/nova/nova.conf   cinder   os_region_name   RegionOne
Synchronize databases
[root@controller ~]# su -s /bin/sh -c "cinder-manage db sync" cinder
Start the service
systemctl restart openstack-nova-api.service
systemctl enable openstack-cinder-api.service openstack-cinder-scheduler.service
systemctl start openstack-cinder-api.service openstack-cinder-scheduler.service
[root@controller ~]# systemctl status openstack-cinder-api.service openstack-cinder-scheduler.service
Check:
[root@controller ~]# cinder service-list
(2) Install cinder block service storage node
To save resources, install on the computing node, add two hard disks to computer1, two hard disks, one 30G and one 10G.
1. lvm principle:
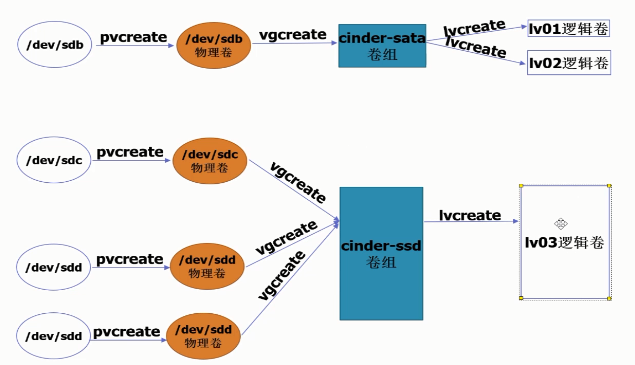
2. Storage node installation steps
1. Install lvm-related software on computing nodes
yum install lvm2 -y
systemctl enable lvm2-lvmetad.service
systemctl start lvm2-lvmetad.service
(2) Create volume groups
echo '- - -' >/sys/class/scsi_host/host0/scan
#The above command is to rescan the hard disk
fdisk -l
//Create physical volume
pvcreate /dev/sdb
pvcreate /dev/sdc
//Create a volume group to create two physical volumes into corresponding volume groups:
vgcreate cinder-ssd /dev/sdb
vgcreate cinder-sata /dev/sdc
//Check the creation:
pvs:
vgs:
lvs:
(3) Modify/etc/lvm/lvm.conf
Insert a line below 130:
Accept sdb, sdc access only
filter = [ "a/sdb/", "a/sdc/","r/.*/"]
(4) Install cinder-related software
yum install openstack-cinder targetcli python-keystone -y
Modify the configuration file
[root@computer1 ~]# cat /etc/cinder/cinder.conf
[DEFAULT]
rpc_backend = rabbit
auth_strategy = keystone
my_ip = 10.0.0.31
glance_api_servers = http://10.0.0.32:9292
enabled_backends = ssd,sata #Distinguish official documents, configure two disk formats here
[BACKEND]
[BRCD_FABRIC_EXAMPLE]
[CISCO_FABRIC_EXAMPLE]
[COORDINATION]
[FC-ZONE-MANAGER]
[KEYMGR]
[cors]
[cors.subdomain]
[database]
connection = mysql+pymysql://cinder:CINDER_DBPASS@controller/cinder
[keystone_authtoken]
auth_uri = http://controller:5000
auth_url = http://controller:35357
memcached_servers = controller:11211
auth_type = password
project_domain_name = default
user_domain_name = default
project_name = service
username = cinder
password = CINDER_PASS
[matchmaker_redis]
[oslo_concurrency]
lock_path = /var/lib/cinder/tmp
[oslo_messaging_amqp]
[oslo_messaging_notifications]
[oslo_messaging_rabbit]
rabbit_host = controller
rabbit_userid = openstack
rabbit_password = RABBIT_PASS
[oslo_middleware]
[oslo_policy]
[oslo_reports]
[oslo_versionedobjects]
[ssl]
[ssd]
volume_driver = cinder.volume.drivers.lvm.LVMVolumeDriver
volume_group = cinder-ssd
iscsi_protocol = iscsi
iscsi_helper = lioadm
volume_backend_name = ssd
[sata]
volume_driver = cinder.volume.drivers.lvm.LVMVolumeDriver
volume_group = cinder-sata
iscsi_protocol = iscsi
iscsi_helper = lioadm
volume_backend_name = sata
Start the application
systemctl enable openstack-cinder-volume.service target.service
systemctl start openstack-cinder-volume.service target.service
Detection on Control Nodes
[root@controller ~]# cinder service-list
_Create volume, verify:
Project-Compute-Volume-Create Volume; lvs on Compute Node 1 to view successfully created volumes.
_Hanging volume:
Step 1: Volume - Edit Volume - Manage Connections - Suspend to the appropriate instance;
Step 2: View on the appropriate instance:
sudo su

fdisk -l
Step 3: Format and mount the new volume:
On the web page: Project-Volume-Management Connection-Connect to the instance you created:
Click Instances Behind Volume: Instances into Console:
mkfs.ext4 /dev/vdb

mount /dev/vdb /mnt

df -h
Volume expansion
Step 1:
unmount /mnt
Step 2:
Project-Compute-Volume-Edit-Volume-Volume Management-Separate Volumes
Project-Compute-Volume-Edit-Volume-Volume Management-Edit-Volume-Extended Volume (2g, computer1:lvs)
Project-Compute-Volume-Edit-Volume-Volume Management-Edit-Manage-Volume-Hang to the appropriate instance
Instance Console:
mount  /dev/vdb /mnt

df -h

resize2fs /dev/vdb

df -h
View storage information:
[root@computer1 ~]# vgs
_Scroll group type
Defined volume group type:
volume_backend_name = ssd
volume_backend_name = sata
Administrator-Volume-Create Type Volume-Name-View Volume Type-Created-Fill in the above information in key and value respectively.
Create Volumes: Select the type of volume
Project-Volume-Create Volume-Create Volume process allows you to choose the type of volume you have created.lvs View Creation
13. Add a flat network
Add a network card to each of the three machines, select the lan segment, address172.16.0.0/24
(1) Add a flat network reason
(Our openstack environment only has one eth0-based network card bridge. The limited ip range it can use determines the limited number of instances it can create and cannot exceed the number of available ips. When our openstack private cloud is large, there is only one network at this time, which can not meet our needs, so here we will learn how to add oneWe use a VMware workstation in which we cannot simulate vlan scenarios, so we continue to use flat, the network type here.
(2) Add eth1 network card
Add a network card to each virtual machine as a lan segment, 172.16.0.0/24
Copy ifcfg-eth0 to ifcfg-eth1, modify the address of eth1 to 172.16.0.0/24, and ifup eth1 starts the network card.
[root@computer1 network-scripts]# scp ifcfg-eth1 10.0.0.11:`pwd`
(3) Configuration of control nodes
1:Control Node
a:
vim /etc/neutron/plugins/ml2/ml2_conf.ini
[ml2_type_flat]
flat_networks = provider,net172_16 #Add the network NOUN net172.16
b:
vim /etc/neutron/plugins/ml2/linuxbridge_agent.ini
[linux_bridge]
physical_interface_mappings = provider:eth0,net172_16:eth1 #Network Noun and Network Card Should Correspond
c: restart
systemctl restart neutron-server.service neutron-linuxbridge-agent.service
(4) Computing node configuration
a:
vim /etc/neutron/plugins/ml2/linuxbridge_agent.ini
[linux_bridge]
physical_interface_mappings = provider:eth0,net172_16:eth1

b: restart
systemctl restart neutron-linuxbridge-agent.service
//Detection: Control Node
neutron agent-list
(5) Creating networks
1. Command line creation:
neutron net-create --shared --provider:physical_network net172_16 \
--provider:network_type flat net172_16

neutron subnet-create --name oldgirl \
--allocation-pool start=172.16.0.1,end=172.16.0.250 \
--dns-nameserver 223.5.5.5 --gateway 172.16.0.254 \
net172_16 172.16.0.0/24
2. web page creation network:
Administrator-Network-Create Network (Vendor, Flat) -Create Subnet
Create an instance: Project-Instance-Create an instance (you can choose the network you just created during creation)
Note: Create a linux system to use as a router:
Based on the net172_16 network, the router server needs to be configured:
Configure eth 0 and eth1, but eth1 has a network address of 172.16.0.254, which is a virtual machine gateway address, and no gateway is configured.
Edit Kernel Profile, Turn Forwarding On
vim /etc/sysctl.conf
net.ipv4.ip_forward = 1

Make Kernel Effective
sysctl -p

Clear the filter table of the firewall
iptables -F

#Add Forwarding Rule
iptables -t nat -A POSTROUTING -s 172.16.0.0/24 -j MASQUERADE
14. cinder docking nfs shared storage
(1) Background
Cinder uses nfs for back-end storage, and cinder services are similar to nova services.
nova: does not provide virtualization, supports multiple virtualization technologies, kvm,xen,qemu,lxc
cinder: no storage, support multiple storage technologies, lvm, nfs, glusterFS, ceph
Later, if you need to dock other types of back-end storage, the approach is similar.
(2) Relevant configuration
1 Precondition Control Node Install nfs
install
[root@controller ~]# yum install nfs-utils.x86_64 -y
//To configure
[root@controller ~]# mkdir /data
[root@controller ~]# vim /etc/exports
/data 10.0.0.0/24(rw,async,no_root_squash,no_all_squash)
//start-up
[root@controller ~]# systemctl restart rpcbind.socket
[root@controller ~]# systemctl restart nfs
(2) Configuration of storage nodes
[root@computer1 ~]# yum install nfs -y
//Modify/etc/cinder/cinder.conf
[DEFAULT]
enabled_backends = sata,ssd,nfs #Increase nfs storage type, configure nfs module below
[nfs]
volume_driver = cinder.volume.drivers.nfs.NfsDriver
nfs_shares_config = /etc/cinder/nfs_shares
volume_backend_name = nfs

vi  /etc/cinder/nfs_shares
10.0.0.11:/data
[root@computer1 ~]# showmount -e 10.0.0.11
Export list for 10.0.0.11:
/data 10.0.0.0/24
//Restart cinder-volume
systemctl restart openstack-cinder-volume.service
//Check on the control node: cinder service-list
3. Error Correction
View volume logs:
[root@computer1 ~]# vim /var/log/cinder/volume.log
Error, need to configure:
[root@computer1 ~]# chown -R cinder:cinder /var/lib/cinder/mnt/
(4) Create volume types and mount instances
Administrator-Volume-Create Type Volume-View extra spec, Set Keys and Values
Project-Volume-Create Volume-Manage Connection-Connect to Instance
[root@computer1 ~]# qemu-img info /var/lib/cinder/mnt/490717a467bd12d34ec324c86a4f35b3/volume-b5f95e9f-7c11-4014-a2a0-26fc756bcdc3
image: /var/lib/cinder/mnt/490717a467bd12d34ec324c86a4f35b3/volume-b5f95e9f-7c11-4014-a2a0-26fc756bcdc3
file format: raw
virtual size: 2.0G (2147483648 bytes)
disk size: 0
[root@computer1 ~]#

[root@controller ~]# ll /data/
total 0
-rw-rw-rw- 1 qemu qemu 2147483648 Jan  8 22:48 volume-b5f95e9f-7c11-4014-a2a0-26fc756bcdc3
//Instance Location
[root@computer1 5ad1db06-c52b-49aa-893d-51d60892c7a5]# ll
total 2536
-rw------- 1 qemu qemu   25100 Jan  8 22:53 console.log
-rw-r--r-- 1 qemu qemu 2555904 Jan  8 22:54 disk
-rw-r--r-- 1 nova nova      79 Jan  8 01:19 disk.info
-rw-r--r-- 1 nova nova    2529 Jan  8 01:19 libvirt.xml
[root@computer1 5ad1db06-c52b-49aa-893d-51d60892c7a5]# qemu-img info disk
image: disk
file format: qcow2
virtual size: 10G (10737418240 bytes)
disk size: 2.4M
cluster_size: 65536
backing file: /var/lib/nova/instances/_base/01c2721b07aea0ded3af18fafca0af9de5ed767c
Format specific information:
    compat: 1.1
    lazy refcounts: false
    refcount bits: 16
    corrupt: false
[root@computer1 5ad1db06-c52b-49aa-893d-51d60892c7a5]# pwd
/var/lib/nova/instances/5ad1db06-c52b-49aa-893d-51d60892c7a5
Error Correction
View error log:
[root@controller cinder]# cat /var/log/cinder/api.log
2020-01-08 23:06:08.748 3023 ERROR cinder.image.glance CommunicationError: Error finding address for http://10.0.0.11:9292/v1/images/456d7600-3bd1-4fb5-aa84-144a61c0eb07: HTTPConnectionPool(host='10.0.0.11', port=9292): Max retries exceeded with url: /v1/images/456d7600-3bd1-4fb5-aa84-144a61c0eb07 (Caused by NewConnectionError('<requests.packages.urllib3.connection.HTTPConnection object at 0x6a58990>: Failed to establish a new connection: [Errno 111] ECONNREFUSED',))
2020-01-08 23:06:08.748 3023 ERROR cinder.image.glance
Mirror glance position:
[root@controller ~]# openstack endpoint list | grep image
| 2b8484d91ec94bd8a5aafd56ea7a1cfe | RegionOne | glance       | image        | True    | public    | http://10.0.0.32:9292                     |
| aec16a57566a4bccae96f9c63885c0b5 | RegionOne | glance       | image        | True    | internal  | http://10.0.0.32:9292                     |
| ceba791635b341d79c1c47182c22c4df | RegionOne | glance       | image        | True    | admin     | http://10.0.0.32:9292                     |
[root@controller ~]#
Add Configuration:
[root@controller ~]# cat  /etc/cinder/cinder.conf
[DEFAULT]
rpc_backend = rabbit
auth_strategy = keystone
my_ip = 10.0.0.11
glance_api_servers = http://10.0.0.32:9292 #Default control node

[root@controller ~]# systemctl restart openstack-cinder-api.service openstack-cinder-scheduler.service
[root@controller ~]# systemctl status  openstack-cinder-api.service openstack-cinder-scheduler.service
[root@controller ~]# cinder service-list

//Create an instance and place it on a volume:
//Project-Instance-Create Instance-Source (Create New Volume) -Storage Size (Same size as flavour)
//Where the instance is placed directly on the volume:
[root@computer1 024b11f6-c490-460b-93b3-b915149fa76e]# ll -h
total 24K
-rw------- 1 qemu qemu  19K Jan  8 23:19 console.log
-rw-r--r-- 1 nova nova 2.5K Jan  8 23:18 libvirt.xml
[root@computer1 024b11f6-c490-460b-93b3-b915149fa76e]# pwd
/var/lib/nova/instances/024b11f6-c490-460b-93b3-b915149fa76e
15. Cold Migration of openstack Cloud Host
(1) Migration conditions
Prerequisite:
1 There are at least two calculation nodes
(2) Two computing nodes must be in the same available area (host cluster)
(3) Computing nodes have enough remaining computing resources
(2) Configure Node nova User Trust
All Computing Nodes
usermod -s /bin/bash  nova
//Compute Node 2:
[root@computer2 ~]# su - nova
Last login: Wed Jan  8 23:40:51 CST 2020 on pts/1
-bash-4.2$
-bash-4.2$
-bash-4.2$ ssh-keygen -q -N "" -f ~/.ssh/id_rsa
/var/lib/nova/.ssh/id_rsa already exists.
Overwrite (y/n)? yes
-bash-4.2$ ls .ssh/
id_rsa  id_rsa.pub
-bash-4.2$ cp -fa .ssh/id_rsa.pub .ssh/authorized_keys
-bash-4.2$ ll .ssh/
total 12
-rw-r--r-- 1 nova nova  396 Jan  8 23:45 authorized_keys
-rw------- 1 nova nova 1675 Jan  8 23:45 id_rsa
-rw-r--r-- 1 nova nova  396 Jan  8 23:45 id_rsa.pub
-bash-4.2$ ssh nova@10.0.0.32
The authenticity of host '10.0.0.32 (10.0.0.32)' can't be established.
ECDSA key fingerprint is SHA256:GYtp4W43k6E/1PUlY9PGAT6HR+oI6j4E4HJF19ZuCHU.
ECDSA key fingerprint is MD5:3f:b3:8b:8e:21:38:6f:51:ba:f4:67:ca:2a:bc:e1:34.
Are you sure you want to continue connecting (yes/no)? yes
Warning: Permanently added '10.0.0.32' (ECDSA) to the list of known hosts.
Last login: Wed Jan  8 23:44:51 2020
-bash-4.2$
-bash-4.2$
-bash-4.2$
-bash-4.2$ scp -rp .ssh root@10.0.0.31:`pwd`
//Compute Node 2:
//Compute Node 1 is sent as root, so it is the root user owner on Compute Node 1:
[root@computer1 ~]# chown  -R nova:nova /var/lib/nova
(3) Configuration of control nodes:
[root@controller ~]# vim /etc/nova/nova.conf
[DEFAULT]
cheduler_default_filters=RetryFilter,AvailabilityZoneFilter,RamFilter,DiskF
ilter,ComputeFilter,ComputeCapabilitiesFilter,ImagePropertiesFilter,ServerG
roupAntiAffinityFilter,ServerGroupAffinityFilter

[root@controller ~]# systemctl restart openstack-nova-scheduler.service
[root@controller ~]# systemctl status openstack-nova-scheduler.service
(4) Configuration of two computing nodes:
[root@computer1 ~]# vim /etc/nova/nova.conf
[DEFAULT]
allow_resize_to_same_host = True
[root@computer1 ~]# systemctl restart openstack-nova-compute.service
[root@computer1 ~]# systemctl status openstack-nova-compute.service
(5) Create instance verification
Create an instance:
Project-Instance-Create Instance
Administrator-Instance-Edit Instance-Migrate Instance-Confirmation.
Netstat-lntp #Check for instance ports to confirm that the instance migration was successful.
16. Custom Cloud Host
(1) openstack New Cloud Host Process
Flow chart: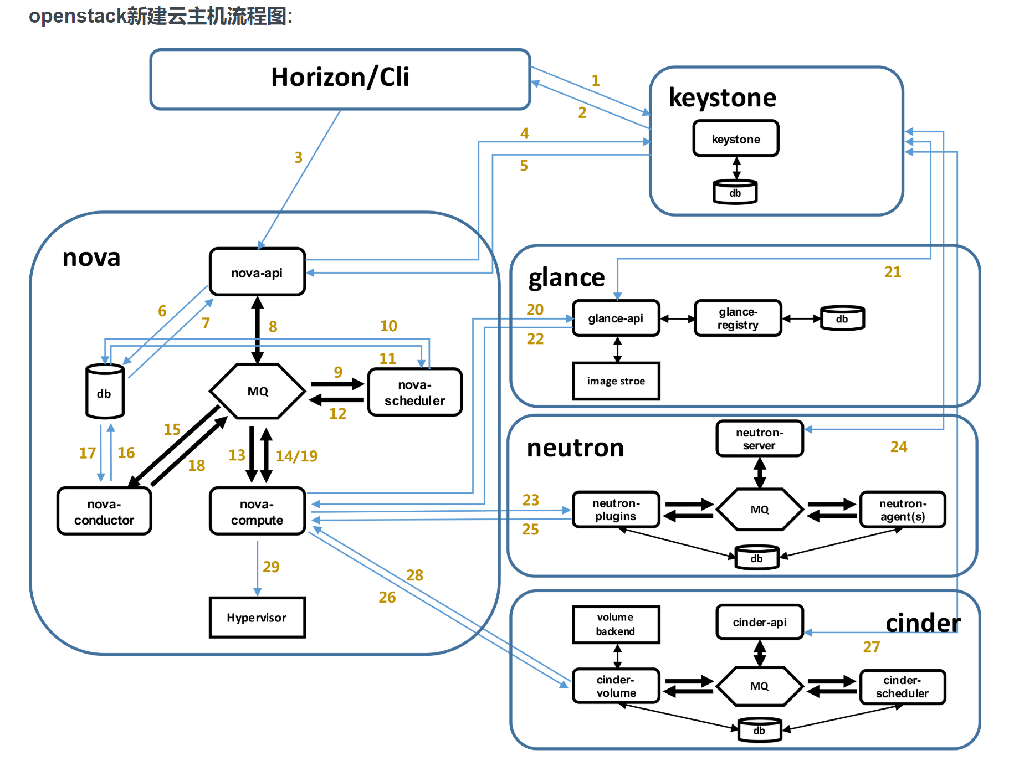
Download location of mirror storage: /var/lib/nova/instance/_base
(2) openstack custom cloud hosts
Think: Why is a cloud host started from the same mirroring template with the same host name as the instance name?
Think: Why can we log on to our cloud hosts password-free on the control node?
Think: Control Node nova In the configuration file, do you need to configure the two lines marked in red below?
vi /etc/nova/nova.com
......
[neutron]
url = http://controller:9696
auth_url = http://controller:35357
auth_type = password
project_domain_name = default
user_domain_name = default
region_name = RegionOne
project_name = service
username = neutron
password = NEUTRON_PASS
service_metadata_proxy = True
metadata_proxy_shared_secret = METADATA_SECRET
Think: Why neutron-metadata and dhcp-agent Do you want to configure the following?
vi  /etc/neutron/metadata_agent.ini
[DEFAULT]
nova_metadata_ip = controller
metadata_proxy_shared_secret = METADATA_SECRET

vi  /etc/neutron/dhcp_agent.ini
[DEFAULT]
interface_driver = neutron.agent.linux.interface.BridgeInterfaceDriver
dhcp_driver = neutron.agent.linux.dhcp.Dnsmasq
enable_isolated_metadata = True
[root@controller ~]# ssh cirros@10.0.0.111
$ cat .ssh/authorized_keys
$ curl http://169.254.169.254/latest/meta-data/
$ curl http://169.254.169.254/latest/meta-data/public-keys/0/openssh-key/
$ ls .ssh/authorized_keys
.ssh/authorized_keys
$ ping 169.254.169.254
$ route -n
[root@controller ~]# ip netns #Network Namespace Container
qdhcp-df321bea-c8fd-4920-9a65-5f89bc036357 (id: 1)
qdhcp-dd7500f9-1cb1-42df-8025-a232ef90d54c (id: 0)
//Enter the container by:
[root@controller ~]# ip netns exec qdhcp-df321bea-c8fd-4920-9a65-5f89bc036357 /bin/bash
[root@controller ~]# ifconfig
[root@controller ~]# route -n
[root@controller ~]# ip a
[root@controller ~]# netstat -lntp
[root@controller ~]# ps -ef | grep 19193
(3) Customize cloud host processes
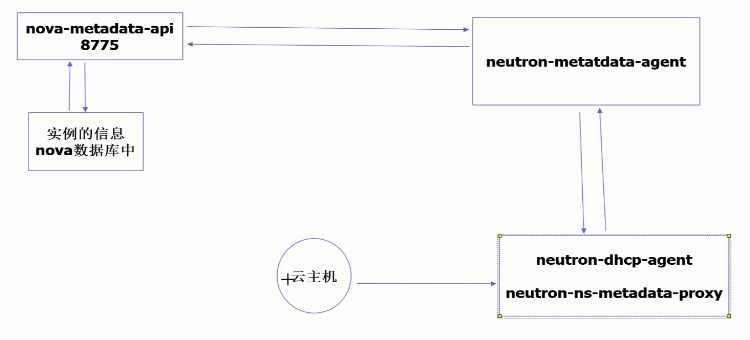
17. openstack three-layer network vxlan
(1) Problem thinking
Think: Why do public cloud-bought cloud hosts now use public IP addresses to connect, but see a private ip?
Think: Every user in the public cloud can set up multiple vpc networks. How can a cloud manufacturer isolate so many vpc networks?
With vlan, a maximum of 1-4094 isolated networks are generated
With vxlan, a maximum of 4096*4096-2 equals 16.78 million isolated networks
(2) Configuration steps
1. Control Node Configuration
(1) Configuration step 1 of vxlan control node for three-layer network
Add a network card for all nodes as tunnel communication ip for vxlan network
[root@controller ~]# cat /etc/sysconfig/network-scripts/ifcfg-eth2
TYPE=Ethernet
BOOTPROTO=none
NAME=eth2
DEVICE=eth2
ONBOOT=yes
IPADDR=172.16.1.11
NETMASK=255.255.255.0
GATEWAY=172.16.1.254
DNS1=223.5.5.5
[root@controller ~]#ifup eth2
(2) Configuration step 2 of vxlan control node for three-layer network
Modify Control Node/etc/neutron/neutron.conf file
[DEFAULT]
...
core_plugin = ml2
service_plugins =

//Modify to:
[root@controller ~]# vim /etc/neutron/neutron.conf
[DEFAULT]
core_plugin = ml2
service_plugins = router
allow_overlapping_ips = True
3 Steps for configuring vxlan control nodes in three-tier network 3
take/etc/neutron/plugins/ml2/ml2_conf.ini Modify to
[DEFAULT]
[ml2]
type_drivers = flat,vlan,vxlan
tenant_network_types = vxlan
mechanism_drivers = linuxbridge,l2population
extension_drivers = port_security
[ml2_type_flat]
flat_networks = provider,net172_16
[ml2_type_geneve]
[ml2_type_gre]
[ml2_type_vlan]
[ml2_type_vxlan]
vni_ranges = 1:100000
[securitygroup]
enable_ipset = True
(4) Configuration step 4 of vxlan control node in three-layer network
take/etc/neutron/plugins/ml2/linuxbridge_agent.ini Modify to
[DEFAULT]
[agent]
[linux_bridge]
physical_interface_mappings = provider:eth0,net172_16:eth1
[securitygroup]
enable_security_group = True
firewall_driver = neutron.agent.linux.iptables_firewall.IptablesFirewallDriver
[vxlan]
enable_vxlan = True
local_ip = 172.16.1.11
l2_population = True
Layer 3 network vxlan control node configuration step 5
take/etc/neutron/l3_agent.ini Modify to
[DEFAULT]
interface_driver = neutron.agent.linux.interface.BridgeInterfaceDriver
external_network_bridge =
[AGENT]
//Start the service:
systemctl restart neutron-server.service   neutron-linuxbridge-agent.service neutron-dhcp-agent.service  neutron-metadata-agent.service

systemctl enable neutron-l3-agent.service
systemctl start neutron-l3-agent.service
2. Compute Node Configuration
(1) Configuration steps of vxlan computing nodes for three-layer network
take/etc/neutron/plugins/ml2/linuxbridge_agent.ini Modify to
[DEFAULT]
[agent]
[linux_bridge]
physical_interface_mappings = provider:eth0,net172_16:eth1
[securitygroup]
enable_security_group = True
firewall_driver = neutron.agent.linux.iptables_firewall.IptablesFirewallDriver
[vxlan]
enable_vxlan = True
local_ip = 172.16.1.31
l2_population = True

systemctl restart  neutron-linuxbridge-agent.service
//View at the control node:
[root@controller ~]# neutron agent-list
3. web Interface Operations
Step 1: Modify oldboy's external network.Administrator-Network-oldly-Edit Network-Modify to External Network
Step 2: Create an internal test network.Project-Network-Create Network (test, 192.168.1.0/24)
Step 3: Turn on Routing for external networks.On computer1:
[root@computer1 ~]# vim /etc/openstack-dashboard/local_settings
OPENSTACK_NEUTRON_NETWORK = {
    'enable_router': True,
//Restart apache:
[root@computer1 ~]# systemctl restart httpd
Step 4: Create a network using the oldboy user.Project-Network-Create Network (test internal network)
Step 5: Create a router using the oldboy user.Project-Network-Router (testr), which adds external and internal interfaces to the router.
Step 6:admin User creates two instances using the internal network, ping www.baidu.com
Instances created based on the test network are not accessible from the outside world (10.0.0.0/24) in this case.
If you want to be accessed from outside, you need to bind a floating ip of an external network.Select Bind Floating ip on the right side of the corresponding instance.Link to the instance virtual machine through a floating ip address.
(3) Network schematic diagram:
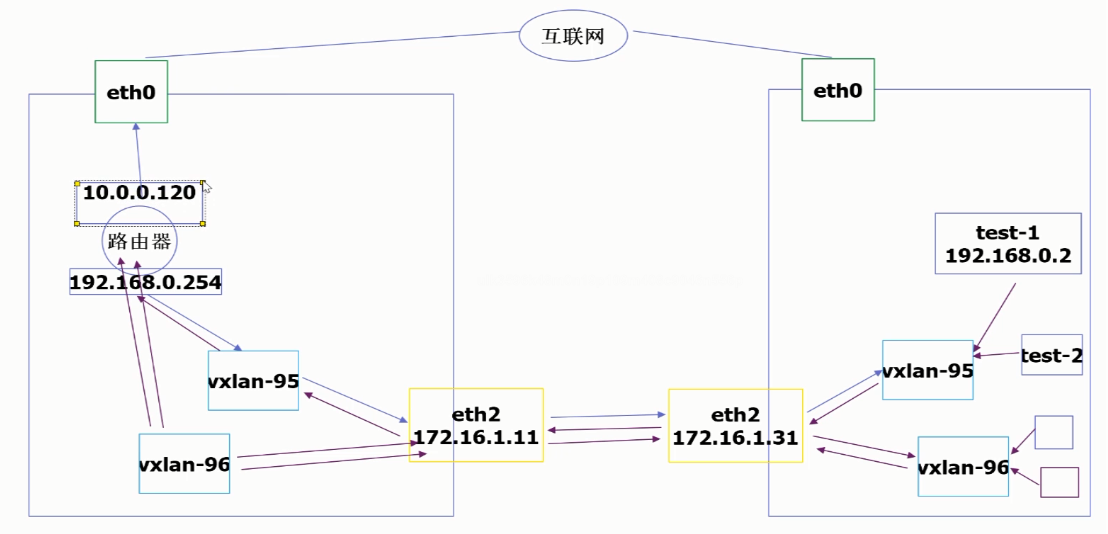
View the network container:
ip netns
Enter the container:
ip netns exec ... /bin/bash
Check the address:
ifconfig
18. What the Second Development Needs to Know
Openstack api, follow restfulAPI principle, the essence of calling API is to send a request for http. By calling api, you can create an instance, delete an instance, create a user, delete a user, create a volume, delete a volume, etc. Learn how to use the API of openstack to develop a dashboard and more customized restful functions using other programming languagesThe API can learn more at https://blog.csdn.net/hjc1984117/article/details/77334616
(1) token acquisition
1. Method 1
1:Obtain token
//Method 1:
curl -i -X POST -H "Content-type: application/json" \
-d '{
    "auth": {
        "identity": {
            "methods": [
                "password"
            ],
            "password": {
                "user": {
                    "domain": {
                        "name": "default"
                    },
                    "name": "admin",
                    "password": "123456"
                }
            }
        },
        "scope": {
            "project": {
                "domain": {
                    "name": "default"
                },
                "name": "admin"
            }
        }
    }
}' http://10.0.0.11:5000/v3/auth/tokens
2. Method 2:
Method 2:
openstack token issue|awk 'NR==5{print $4}'
(2) glance's api call
View glance mirror list (json ized view is easier to see)
curl -H "X-Auth-Token:$token" -H "Content-Type: application/json" http://10.0.0.32:9292/v2/images
(3) Delete the glass image
delete glance image
//Get the mirror id:
openstack image list
//Remove Mirror:
curl -X DELETE -H "X-Auth-Token:$token" -H "Content-Type: application/json" http://10.0.0.32:9292/v2/images/160a5601-6092-445a-8e1b-fbb63e3c7434
(4) api call of nova
nova Of api call
neutron net-list #Get network id
openstack flavor list #Get instance id
openstack imge list
//Start an instance: the process of starting an instance via wireshake (http for the tcp 8774 port post action)
curl -H "Content-Type:application/json" -H "X-Auth-Token:$token" -d '
{
	"server": {
		"name": "vvvvvvvvvvv",
		"imageRef": "91d3c4d8-085d-45cc-9d4c-3cd89bf63e28",
		"availability_zone": "nova",
		"key_name": "mykey",
		"flavorRef": "382ecb64-cbb6-43ba-bb84-b5d489a78845",
		"OS-DCF:diskConfig": "AUTO",
		"max_count": 1,
		"min_count": 1,
		"networks": [{
			"uuid": "d35f62b8-dbfd-4804-8784-12e74e2fda9d"
		}],
		"security_groups": [{
			"name": "e3430acf-6650-4ed2-8d67-aa10de80a78c"
		}]
	}
}'  http://10.0.0.11:8774/v2.1/faa9a9bf8d524fd7932f49b82be953ff/servers
1. Delete an instance
Delete an instance:
nova list #Get the ID of the instance

curl -X DELETE -H "Content-Type:application/json" -H "X-Auth-Token:$token"       http://10.0.0.11:8774/v2.1/faa9a9bf8d524fd7932f49b82be953ff/servers/85d25f05-e683-4782-9da1-b0f45978f462 (followed by the id of the instance)