1. Introduction to Keystone
Kestone is one of the components of OpenStack, which is used to provide unified authentication services for other members of OpenStack family, including authentication, token issuance and verification, service list, user rights definition and so on. The authorization and authentication of all services in the cloud environment need to go through keystone. So keystone is the first service that needs to be installed in the cloud platform.
As the basic support service of OpenStack, Keystone does the following things:
(1) Managing users and their permissions
(2) Maintaining Endpoint of OpenStack Services
Authentication and Authentication
2. Some concepts in Keystone
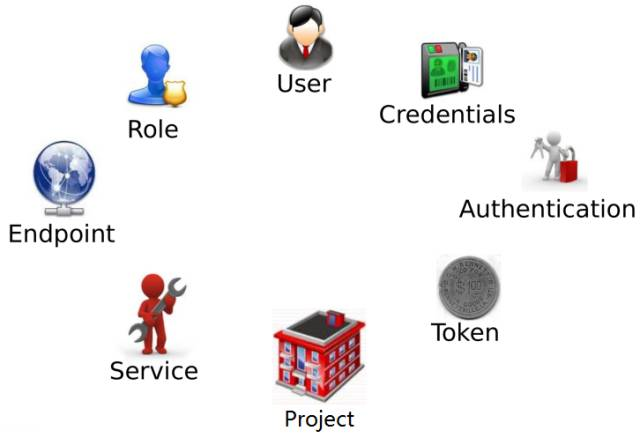
1)User
User refers to any entity that can use OpenStack, can be a real user, can be other systems or services.
When User accesses OpenStack, keystone validates it.
admin: Super Administrator of the openstack Platform, responsible for the management and access rights of the openstack service
Demo: Conventional (non-managed) tasks should use unprivileged projects and users, all of which create demo projects and demo users.
In addition to admin and demo, OpenStack also creates corresponding User s for nova, cinder, glance and neutron services.
2)Credentials
Credentials are information used by User s to prove their identity. They can be:
(1) User name/password
(2)Token
(3)API Key
(4) Other advanced methods
3)Authentication
Authentication is Keystone's process of verifying User identity. User submits Credential s in the form of username and password to Keystone when accessing OpenStack. Keystone will issue a Token to User as redential for subsequent visits after its verification.
4)Token
Token is a string of numbers and letters. After User succeeds in Authentication, Keystone generates Token and assigns it to User.
(1) Token as redential for accessing Service
(2) Service verifies Token's validity through Keystone
(3) Token's expiry date defaults to 24 hours
5)Project
Project is used to group and isolate OpenStack's resources (computing, storage, and network). Depending on the object of the OpenStack service, a project can be a customer (public cloud, also known as a tenant), department, or project group (private cloud).
Be careful:
(1) The ownership of resources belongs to Project, not User.
(2) Tenant / Project / Account terms are common in OpenStack's interface and documentation, but tend to use Project in the long run.
(3) Each User (including admin) must be hung in the Project to access its resources. A User can belong to multiple projects.
(4) admin is equivalent to root user and has the highest privilege
6)Service
OpenStack's Service includes Compute (Nova), Block Storage (Cinder), Object Storage (Swift), Image Service (Glance), Networking Service (Neutron), etc. Each service provides several Endpoint s, through which the User accesses resources and performs operations.
7)Endpoint
Endpoint is an accessible address on a network, usually a URL. Service exposes its API through Endpoint. Keystone is responsible for managing and maintaining the Endpoint of each service.
You can view Endpoint using the following command:
    openstack catalog list

    [root@node1 ~]# openstack catalog list
    +----------+----------+-----------------------------------+
    | Name     | Type     | Endpoints                         |
    +----------+----------+-----------------------------------+
    | keystone | identity | RegionOne                         |
    |          |          |   admin: http://node1:35357/v3/   |
    |          |          | RegionOne                         |
    |          |          |   public: http://node1:5000/v3/   |
    |          |          | RegionOne                         |
    |          |          |   internal: http://node1:5000/v3/ |
    |          |          |                                   |
    +----------+----------+-----------------------------------+
8)Role
Security consists of two parts: Authentication and Authentication.
Authentication addresses "Who are you?" Questions
Authorization's solution is "What can you do?" Questions
Keystone implements Authorization with Role:
Keystone defines Role
You can assign one or more roles to the User, and Service decides what each Role can do. Service controls access to the Role through its own policy. JSON file. The following is an example in Nova service/etc/nova/policy.json:

The implication of the above configuration is that for create, attach_network, and attach_volume operations, any Role User can be executed; but only admin, the Role User, can perform the forced_host operation.
OpenStack default configuration distinguishes admin from non-admin Role only. If you need to authorize a particular Role, you can modify policy.json.
In addition to authentication, Openstack authentication of User also needs to identify whether User has access to a Service. Policy is used to define what roles correspond to what permissions. For Keystone, Policy is actually a JSON file, defaulting to / etc/keystone/policy.json. Through Policy, Keystone implements the privilege management of User.
2. Preparing the OpenStack environment
1) Install the openstack environment
    yum install python-openstackclient
    yum install openstack-selinux
2) Preparing database
    yum install mariadb mariadb-server python2-PyMySQL
    vim /etc/my.cnf.d/openstack.cnf
        [mysqld]
        bind-address = 192.168.52.101
        default-storage-engine = innodb
        innodb_file_per_table = on
        max_connections = 4096
        collation-server = utf8_general_ci
        character-set-server = utf8


    systemctl enable mariadb.service
    systemctl start mariadb.service

    mysql_secure_installation    #Initialization of database
3) Building Message Queuing Service
    yum install rabbitmq-server

    systemctl restart rabbitmq-server.service
    systemctl enable rabbitmq-server.service

    //Create openstack users
    rabbitmqctl add_user openstack openstack
    rabbitmqctl set_permissions openstack ".*" ".*" ".*"
4) Creating Cache Services
    yum install memcached python-memcached

    vim /etc/sysconfig/memcached
    OPTIONS="-l 127.0.0.1,::1,controller,node1"

    systemctl restart memcached.service
    systemctl enable memcached.service
3. Deployment of Keystone services
1) Installation and configuration
(1) Log in to the database
    mysql -uroot -p
    MariaDB [(none)]> create database keystone;    #Establish keystone data base
    MariaDB [(none)]> grant all privileges on keystone.* to 'keystone'@'localhost' identified by 'KEYSTONE_DBPASS';    #Grant user privileges and set passwords to allow local login
    grant all privileges on keystone.* to 'keystone'@'%' identified by 'KEYSTONE_DBPASS';    #Grant user privileges and set passwords to allow login on any host
(2) Install and configure the keystone package
    yum install openstack-keystone httpd mod_wsgi

    vim /etc/keystone/keystone.conf
    [database]
    connection = mysql+pymysql://keystone:KEYSTONE_DBPASS@controller/keystone
    [token]
    provider = fernet
Or set it up as follows
    cp /etc/keystone/keystone.conf /etc/keystone/keystone.conf.bak -a    #Backup configuration file

    vim /etc/keystone/keystone.conf        #Delete all the contents of the configuration file and add the following

    [DEFAULT]

    [assignment]

    [auth]

    [cache]

    [catalog]

    [cors]

    [cors.subdomain]

    [credential]

    [database]
    connection = mysql+pymysql://keystone:KEYSTONE_DBPASS@controller/keystone

    [domain_config]

    [endpoint_filter]

    [endpoint_policy]

    [eventlet_server]

    [federation]

    [fernet_tokens]

    [healthcheck]

    [identity]

    [identity_mapping]

    [kvs]

    [ldap]

    [matchmaker_redis]

    [memcache]

    [oauth1]

    [oslo_messaging_amqp]

    [oslo_messaging_kafka]

    [oslo_messaging_notifications]

    [oslo_messaging_rabbit]

    [oslo_messaging_zmq]

    [oslo_middleware]

    [oslo_policy]

    [paste_deploy]

    [policy]

    [profiler]

    [resource]

    [revoke]

    [role]

    [saml]

    [security_compliance]

    [shadow_users]

    [signing]

    [token]
    provider = fernet

    [tokenless_auth]

    [trust]
(3) Loading data to database
su -s /bin/sh -c "keystone-manage db_sync" keystone
(4) Initialization of fernet key repository
    keystone-manage fernet_setup --keystone-user keystone --keystone-group keystone
    keystone-manage credential_setup --keystone-user keystone --keystone-group keystone
(5) Guiding authentication services
    keystone-manage bootstrap --bootstrap-password admin \
    > --bootstrap-admin-url http://node1:35357/v3/ \
    > --bootstrap-internal-url http://node1:5000/v3/ \
    > --bootstrap-public-url http://node1:5000/v3/ \
    > --bootstrap-region-id RegionOne
(6) Configuring httpd services
    vim /etc/httpd/conf/httpd.conf
    ServerName node1    #Modify only here

    ln -s /usr/share/keystone/wsgi-keystone.conf /etc/httpd/conf.d/    #Creating Soft Links

    [root@node1 ~]# cd /etc/httpd/conf.d
    [root@node1 conf.d]# ls -l
    //Total dosage 16
    -rw-r--r-- 1 root root 2926 11 May 5, 2018 autoindex.conf
    -rw-r--r-- 1 root root  366 11 May 5, 2018 README
    -rw-r--r-- 1 root root 1252 10 Month 30 2018 userdir.conf
    -rw-r--r-- 1 root root  824 10 Month 30 2018 welcome.conf
    lrwxrwxrwx 1 root root   38 7 29/14:47 wsgi-keystone.conf -> /usr/share/keystone/wsgi-keystone.conf

    systemctl restart httpd.service
    systemctl enable httpd.service
(7) Setting up login information
    vim openrc
    export OS_USERNAME=admin
    export OS_PASSWORD=admin
    export OS_PROJECT_NAME=admin
    export OS_USER_DOMAIN_NAME=Default
    export OS_PROJECT_DOMAIN_NAME=Default
    export OS_AUTH_URL=http://node1:35357/v3
    export OS_IDENTITY_API_VERSION=3

    source openrc Log in in command line mode openstack
2) Create domains, projects, users, roles
    Establish service project
    openstack project create --domain default --description "Service Project" service
    +-------------+----------------------------------+
    | Field       | Value                            |
    +-------------+----------------------------------+
    | description | Service Project                  |
    | domain_id   | default                          |
    | enabled     | True                             |
    | id          | a1710fdff32a4605a8ab549f8680dd45 |
    | is_domain   | False                            |
    | name        | service                          |
    | parent_id   | default                          |
    +-------------+----------------------------------+

    //Create demo projects
    openstack project create --domain default --description "Demo Project" demo
    +-------------+----------------------------------+
    | Field       | Value                            |
    +-------------+----------------------------------+
    | description | Demo Project                     |
    | domain_id   | default                          |
    | enabled     | True                             |
    | id          | 9f4f23f099bb4da3bc41c99f7a8a4f20 |
    | is_domain   | False                            |
    | name        | demo                             |
    | parent_id   | default                          |
    +-------------+----------------------------------+

    //View Projects
    openstack project list
    +----------------------------------+---------+
    | ID                               | Name    |
    +----------------------------------+---------+
    | 7d3f0cd56a104c60a36196675f62428e | admin   |
    | 9f4f23f099bb4da3bc41c99f7a8a4f20 | demo    |
    | a1710fdff32a4605a8ab549f8680dd45 | service |
    +----------------------------------+---------+
(2) Create user demo and set password
    openstack user create --domain default --password-prompt demo Manual input password
    //Or:
    openstack user create --domain default --password=demo demo
    +---------------------+----------------------------------+
    | Field               | Value                            |
    +---------------------+----------------------------------+
    | domain_id           | default                          |
    | enabled             | True                             |
    | id                  | e880cc125bb541128c9bc47233d91732 |
    | name                | demo                             |
    | options             | {}                               |
    | password_expires_at | None                             |
    +---------------------+----------------------------------+

    //View Users
    openstack user list
    +----------------------------------+-------+
    | ID                               | Name  |
    +----------------------------------+-------+
    | cd9ce1eb589b445e9b98c53a36bdc8d8 | admin |
    | e880cc125bb541128c9bc47233d91732 | demo  |
    +----------------------------------+-------+
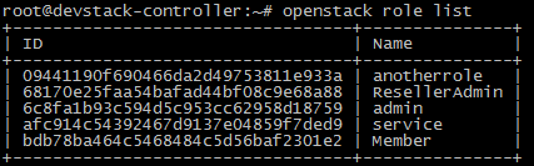
(3) Create role user
    openstack role create user
    +-----------+----------------------------------+
    | Field     | Value                            |
    +-----------+----------------------------------+
    | domain_id | None                             |
    | id        | 348324e7aee745229551eb412fd96a18 |
    | name      | user                             |
    +-----------+----------------------------------+

    //View roles
    openstack role list
    +----------------------------------+----------+
    | ID                               | Name     |
    +----------------------------------+----------+
    | 348324e7aee745229551eb412fd96a18 | user     |
    | 9fe2ff9ee4384b1894a90878d3e92bab | _member_ |
    | c6b4ab1a75d041e298f59570bd7dd46e | admin    |
    +----------------------------------+----------+
(4) Set the demo user under the demo project to the user role
openstack role add --project demo --user demo user
3) Verify login information
(1) Cancellation of environmental variable values
unset OS_AUTH_URL OS_PASSWORD
(2) Enter admin user login information to login
    openstack --os-auth-url http://node1:35357/v3 \
    > --os-project-domain-name default \
    > --os-user-domain-name default \
    > --os-project-name admin \
    > --os-username admin token issue
    Password:
    +------------+-------------------------------------------------------------------------------------------+
    | Field      | Value                                                                                     |
    +------------+-------------------------------------------------------------------------------------------+
    | expires    | 2019-07-29T09:44:06+0000                                                                  |
    | id         | gAAAAABdPrHWXAwrKHKnU3CMr5odqMjYwK90C5bD6rdPEfoJzTuAh-G3YZcb0SHzr8ek8qaS5zgN4haULRxpgcrli |
    |            | XJ32hhKvmN8UZTSRgW58l_Nu1e1l4gjDjxXyUS25a4krWJ46brr4qpq3AvUu40_B9ccw9Z_7vjiDA_-           |
    |            | FTKpmqFnRNrAH-k                                                                           |
    | project_id | 7d3f0cd56a104c60a36196675f62428e                                                          |
    | user_id    | cd9ce1eb589b445e9b98c53a36bdc8d8                                                          |
    +------------+-------------------------------------------------------------------------------------------+
4.Troubleshoot
OpenStack mainly relies on logs, and each service has its own log file.
Keystone has two main logs: keystone.log and keystone_access.log, which are stored in / var/log/keystone and / var/log/httpd / directory.
    vim /var/log/keystone/keystone.log
    2019-07-29 14:36:47.607 43150 INFO migrate.versioning.api [-] 66 -> 67...
    2019-07-29 14:36:48.060 43150 INFO migrate.versioning.api [-] done
    2019-07-29 14:36:48.060 43150 INFO migrate.versioning.api [-] 67 -> 68...
    2019-07-29 14:36:48.065 43150 INFO migrate.versioning.api [-] done
    2019-07-29 14:36:48.065 43150 INFO migrate.versioning.api [-] 68 -> 69...
    2019-07-29 14:36:48.069 43150 INFO migrate.versioning.api [-] done
    2019-07-29 14:36:48.069 43150 INFO migrate.versioning.api [-] 69 -> 70...
    2019-07-29 14:36:48.073 43150 INFO migrate.versioning.api [-] done
    vim /var/log/httpd/keystone_access.log
    192.168.52.101 - - [29/Jul/2019:15:01:40 +0800] "GET /v3 HTTP/1.1" 200 245 "-" "osc-lib/1.3.1 keystoneauth1/2.18.0 python-requests/2.11.1 CPython/2.7.5"
    192.168.52.101 - - [29/Jul/2019:15:01:42 +0800] "POST /v3/auth/tokens HTTP/1.1" 201 1082 "-" "osc-lib/1.3.1 keystoneauth1/2.18.0 python-requests/2.11.1 CPython/2.7.5"
    192.168.52.101 - - [29/Jul/2019:15:02:21 +0800] "GET /v3 HTTP/1.1" 200 245 "-" "osc-lib/1.3.1 keystoneauth1/2.18.0 python-requests/2.11.1 CPython/2.7.5"
    192.168.52.101 - - [29/Jul/2019:15:02:23 +0800] "POST /v3/auth/tokens HTTP/1.1" 201 1082 "-" "osc-lib/1.3.1 keystoneauth1/2.18.0 python-requests/2.11.1 CPython/2.7.5"
If you need detailed log information, you can turn on the debug option in the configuration file
    vim /etc/keystone/keystone.conf

    [DEFAULT]
    debug=True