Openssh
1, Introduction to Openssh
OpenSSH is a free open source implementation of SSH (Secure SHell) protocol. SSH protocol family can be used for remote control or transfer files between computers. The traditional methods to realize this function, such as telnet (terminal emulation protocol), RCP, FTP, rlogin and rsh, are extremely insecure, and will use plaintext to transmit passwords. OpenSSH provides server-side background programs and client-side tools to encrypt data in the process of remote control and file transmission, so as to replace the original similar services.
Knowledge extension:
ssh protocol has two versions:
v1: MAC based on CRC-32 is not secure; (generally used for host authentication)
v2: select the most secure MAC mechanism supported by both parties based on protocol negotiation
DH based key exchange, based on RSA or DSA to achieve identity authentication, so as to achieve no need to enter account mask.
The client determines whether the communication can continue by checking the host secret key of the server;
Certification method:
- Password based authentication
- Key based authentication
2, The role of Openssh
Because the traditional telnet, RCP, FTP and other tools transmit data in plaintext, there are great security risks to the data security, and OpenSSH can encrypt the transmitted data, which greatly improves the data security.
3, Introduction to OpenSSH program
OpenSSH is divided into client and server
Client side configuration file: / etc/ssh/ssh_config
Server side configuration file: / etc/ssh/sshd_config
Server side service script: / etc/rc.d/init.d/sshd
OpenSSH is installed and started by default in Linux system
There are four key packages for openssh
openssh.x86_64 5.3p1-104.el6 / / common components of server and client
openssh-askpass.x86_64 5.3p1-104.el6 //
openssh-clients.x86_64 5.3p1-104.el6 / / client installation package
openssh-server.x86_64 5.3p1-104.el6 / / server installation package
Several common files of OpenSSL clients
[root@localhost ~]# rpm -ql openssh-clients
/etc/ssh/ssh_config / / client configuration file
/usr/bin/scp / / copy files remotely
/usr/bin/sftp / / remote file share
/usr/bin/slogin
/usr/bin/ssh
/usr/bin/ssh-add
/usr/bin/ssh-agent
/usr/bin/ssh-copy-id
/usr/bin/ssh-keyscan
Several common files of OpenSSL server
/etc/rc.d/init.d/sshd
/etc/ssh/sshd_config
/etc/sysconfig/sshd
Server side configuration file / etc / SSH / sshd_ Detailed explanation of main parameters of config
The server configuration file is used when others log in
Note: if "#" is used in the configuration file, the default is generally used
Parameter notes
#Port 22 / / the default port number. For its security, it is generally changed to another port
#AddressFamily any / / indicates that you want to listen to any address
#ListenAddress 0.0.0.0 / / listen to all IPV4 ip addresses on this machine
#ListenAddress:: / / listen for all IPV6 addresses on this computer
Protocol version monitored by Protocol 2
HostKey for protocol version 1 / / describes the protocol version of the key
SyslogFacility AUTHPRIV / / use AUTHPRIV to log
#LogLevel INFO //log level
#Authentication: / authentication related
#Permitrotlogin yes / / does it support administrators to log in directly
#StrictModes yes / / whether to use strict mode (strictly check some related information of the user)
#RSAAuthentication yes / / does RSA key authentication support
#PubkeyAuthentication yes / / whether public key authentication is supported
Client configuration file / etc / SSH / SSH_ Detailed explanation of main parameters of config
It is used to log in to others' ssh when logging in to the client configuration file
Parameter notes
#Host * / / indicates that all hosts are connected
#Port 22 / / default connection port
#Cipher 3des / / encryption mechanism used in encryption
#StrictHostKeyChecking ask / / strict host key checking, that is, whether to ask for the first connection
4, Use of client ssh
1. Basic syntax of ssh
ssh [OPTIONS] [user]@server [COMMAND]
-l user: connect to the server as the specified user; The default local user is the user in remote login;
ssh user@server
ssh -l user server
example
environment
Host ip
node1 192.168.58.10
node2 192.168.58.20
[root@node1 ~]# ip a / / view the current host ip
1: lo: <LOOPBACK,UP,LOWER_UP> mtu 65536 qdisc noqueue state UNKNOWN group default qlen 1000
    link/loopback 00:00:00:00:00:00 brd 00:00:00:00:00:00
    inet 127.0.0.1/8 scope host lo
       valid_lft forever preferred_lft forever
    inet6 ::1/128 scope host
       valid_lft forever preferred_lft forever
2: ens160: <BROADCAST,MULTICAST,UP,LOWER_UP> mtu 1500 qdisc mq state UP group default qlen 1000
    link/ether 00:0c:29:b7:b0:df brd ff:ff:ff:ff:ff:ff
    inet 192.168.58.10/24 brd 192.168.58.255 scope global noprefixroute ens160
       valid_lft forever preferred_lft forever
    inet6 fe80::ca43:3f86:3176:184c/64 scope link noprefixroute
       valid_lft forever preferred_lft forever

[root@node1 ~]# ssh root@192.168.58.20
The authenticity of host '192.168.58.20 (192.168.58.20)' can't be established.
ECDSA key fingerprint is SHA256:WWNUfnxMY6JpaYtzbdkxTIZSANvOUmXQl0hTULKwikw.
Are you sure you want to continue connecting (yes/no/[fingerprint])? yes
Warning: Permanently added '192.168.58.20' (ECDSA) to the list of known hosts.
root@192.168.58.20's password:      //Enter the ip address of the connected host
Activate the web console with: systemctl enable --now cockpit.socket

This system is not registered to Red Hat Insights. See https://cloud.redhat.com/
To register this system, run: insights-client --register

Last login: Fri Sep 24 23:05:07 2021 from 192.168.58.10
[root@node2 ~]#

test (ssh link up node2 Create a directory after) Then view

```bash
Last login: Fri Sep 24 23:01:36 2021 from 192.168.58.1
[root@node2 ~]# mkdir test
[root@node2 ~]#
Last login: Fri Sep 24 23:05:07 2021 from 192.168.58.10
[root@node2 ~]# ls
anaconda-ks.cfg  test
[root@node2 ~]# exit
 cancellation
Connection to 192.168.58.20 closed.
[root@node1 ~]#
SSH host key
SSH maintains communication security through public key encryption. When an SSH client connects to the ssh server, the server will send a copy of the public key to the client before the client logs in. This can be used to set up secure encryption for communication channels and authenticate the client's server.
When a user uses ssh to connect to a specific server for the first time, the ssh command can be displayed in /. ssh / known of the user_ The hosts file stores the public key of the server. After that, whenever the user connects, the client will compare /. ssh / known_ The server entry in the hosts file and the public key sent by the server ensure that the same public key is obtained from the server. If the public keys do not match, the client will assume that the network communication has been hijacked or the server has been invaded and disconnect.
This means that if the public key of the server is changed (the public key is lost due to the failure of the hard disk, or the public key is replaced for some legitimate reason), the user needs to update its ~ /. SSH / known_ The hosts file and delete the old entry before you can log in.
The host ID is stored on the local client system
[root@node1 ~]# cat ~/.ssh/known_hosts
192.168.58.10 ecdsa-sha2-nistp256 AAAAE2VjZHNhLXNoYTItbmlzdHAyNTYAAAAIbmlzdHAyNTYAAABBBEPb6+ibxzWLa1GPNeAMu91/GMzYJRa7jmOh48WtzFoUc4OqQvsc5DY38fqsK2U+APD4NEf+anv7bcieX7eLNBs=
192.168.58.20 ecdsa-sha2-nistp256 AAAAE2VjZHNhLXNoYTItbmlzdHAyNTYAAAAIbmlzdHAyNTYAAABBBKaCw+2ojcY4NMpki7fEmMuVC6j6zjeASNLilekY8u4FaVPgJQG+lbA2+nzBusqa0oHiC4WlIY3kJJ5p2ejCvGw=
The host key is stored in / etc / SSH / SSH on the ssh server_ host_ Key *
[root@node1 ~]# ls /etc/ssh/*key*
/etc/ssh/ssh_host_ecdsa_key      /etc/ssh/ssh_host_ed25519_key      /etc/ssh/ssh_host_rsa_key
/etc/ssh/ssh_host_ecdsa_key.pub  /etc/ssh/ssh_host_ed25519_key.pub  /etc/ssh/ssh_host_rsa_key.pub
Configure SSH key based authentication
Users can use public key authentication for SSH login authentication. SSH allows users to authenticate using a private key public key scheme. This means that both private and public keys will be generated. The private key file is used as authentication credentials and, like a password, must be kept properly. The public key is copied to the system where the user wants to log in and used to verify the private key. The public key does not need to be kept secret. An ssh server with a public key can publish questions that can only be answered by the system that holds your private key. Therefore, it can be verified according to the key held. In this way, it is not necessary to type the password every time you access the system, but the security can still be guaranteed.
Use the SSH keygen command to generate the password. The private key /. SSH / ID will be generated_ RSA and public key /. ssh/id_rsa.pub.
be careful:
When generating the key, the system will provide the option to specify the password, which must be provided when accessing the private key. If the private key is stolen, it is difficult for anyone other than the issuer to use the private key because it is protected with a password. In this way, the attacker will have enough time to generate a new key pair and delete all contents involving the old key before cracking and using the private key.
After the ssh key is generated, the key will be stored in the. ssh / directory under the home directory by default. The permissions of private key and public key are 600 and 644 respectively ssh directory permission must be 700.
Before you can use key based authentication, you need to copy the public key to the target system. You can do this Using SSH copy ID
[root@localhost ~]# ssh-copy-id remoteuser@remotehost
When the key is copied to another system through SSH copy ID, it copies ~ /. SSH / ID by default_ Rsa.pub file
[root@node1 ~]# ssh-keygen -t rsa
Generating public/private rsa key pair.
Enter file in which to save the key (/root/.ssh/id_rsa):
/root/.ssh/id_rsa already exists.
Overwrite (y/n)? y
Enter passphrase (empty for no passphrase):
Enter same passphrase again:
Your identification has been saved in /root/.ssh/id_rsa.
Your public key has been saved in /root/.ssh/id_rsa.pub.
The key fingerprint is:
SHA256:C/WzHuRyyUroR3q8PIrRj2EO50vFEz4hujfv13CpoAU root@node1
The key's randomart image is:
+---[RSA 3072]----+
|                 |
|                 |
|      . +        |
|     .E= +       |
|    . ..S +  .   |
|     o ++B.+o    |
|    + X*+.B=     |
|     %oO==o..    |
|    . B*B+.      |
+----[SHA256]-----+
[root@node1 ~]# ssh-copy-id -i  ~/.ssh/id_rsa.pub root@192.168.58.20
/usr/bin/ssh-copy-id: INFO: Source of key(s) to be installed: "/root/.ssh/id_rsa.pub"
/usr/bin/ssh-copy-id: INFO: attempting to log in with the new key(s), to filter out any that are already installed
/usr/bin/ssh-copy-id: INFO: 1 key(s) remain to be installed -- if you are prompted now it is to install the new keys
root@192.168.58.20's password:

Number of key(s) added: 1

Now try logging into the machine, with:   "ssh 'root@192.168.58.20'"
and check to make sure that only the key(s) you wanted were added.
5, Introduction to scp remote replication tool
Syntax:
scp [OPTIONS] SRC...DEST
Common options:
-r: Recursive copy, used when copying directories and internal files;
-p: Save the owner, group and permission in the metadata information of the source file;
-q: Silent mode
-P PORT: indicates the port used by the remote server;
Two modes:
PUSH: scp [OPTIONS] /PATH/FROM/SOMEFILE ... user@server:/PATH/TO/DEST
//Copy local files to the remote host (but the remote directory must have write permission)
PULL: SCP [OPTIONS] user@server:/PATH/FROM/SOMEFILE /PATH/TO/DEST
example
//Remote target host files to local
eg1: copy / root/test2 on the current host to / opt / directory of 192.168.58.20 host
 [root@node1 ~]# ls
anaconda-ks.cfg  test2
[root@node1 ~]# scp -p /root/test2 root@192.168.58.20:/opt/
test2                                                                         100%    0     0.0KB/s   00:00
[root@node1 ~]# ls
//Go to node2 to view
[root@node2 ~]# ls /opt/
data  test2
g2: copy the remote host / etc/fstab to the current directory of the current host
//Create a testing.txt file in node2
[root@node2 ~]# touch testing.txt
[root@node2 ~]# ls
anaconda-ks.cfg  testing.txt
//In node1, add the testing cp of node2 to the current directory
 [root@node1 ~]# scp root@192.168.58.20:/root/testing.txt  ./
testing.txt                                                                   100%    0     0.0KB/s   00:00
[root@node1 ~]# ls
anaconda-ks.cfg  test2  testing.txt
[root@node1 ~]#
7, Enhanced server sshd Configuration Guide
1. Do not use the default port; (modify the default port to another port)
Configuration file: / etc/ssh/sshd_config
Port 22
service sshd restart / / after modification, the service needs to be restarted
2. Do not use the v1 version protocol:
Protocol 2
3. Restrict users who can log in {need to add}
AllowUsers: white list of users allowed to log in (multiple users are separated by spaces)
AllowGroups: white list of groups allowed to log in
DenyUsers
DenyGroups
/etc/ssh/sshd_config
#service sshd reload
==Obtain the details of the configuration file; [ man sshd_conifg ]
4. Set idle session timeout:
5. Set ssh access policy with firewall:
The qualified ssh service only allows * * * servers to access hosts within a limited address range
6. Listen only to specific IP addresses:
7. Use strong password policy:
[root@node1 ssh]# tr -dc A-Za-z0-9 < /dev/urandom | head -c 30 | xargs
Qe6zOmB2sBNpEONVcKhWS8T4bVrcb0
8. Using key based authentication;
9. Do not use empty passwords
10. Prohibit root from logging in directly
PermitRootLogin no
11. Limit ssh access frequency
12. Keep a good log and often do log analysis
/var/log/secure
Nfs
1, Introduction to Nfs
NFS is the abbreviation of Network File System. Its biggest function is that different machines and different operating systems can share each other's files through the network.
Server for NFS allows PC to mount the directory shared by server for NFS in the network to the local file system. In the local system, the directory of the remote host is like its own disk partition, which is quite convenient to use;
NFS is generally used to store static data such as shared videos and pictures.
The NFS mounting principle is shown in the figure below
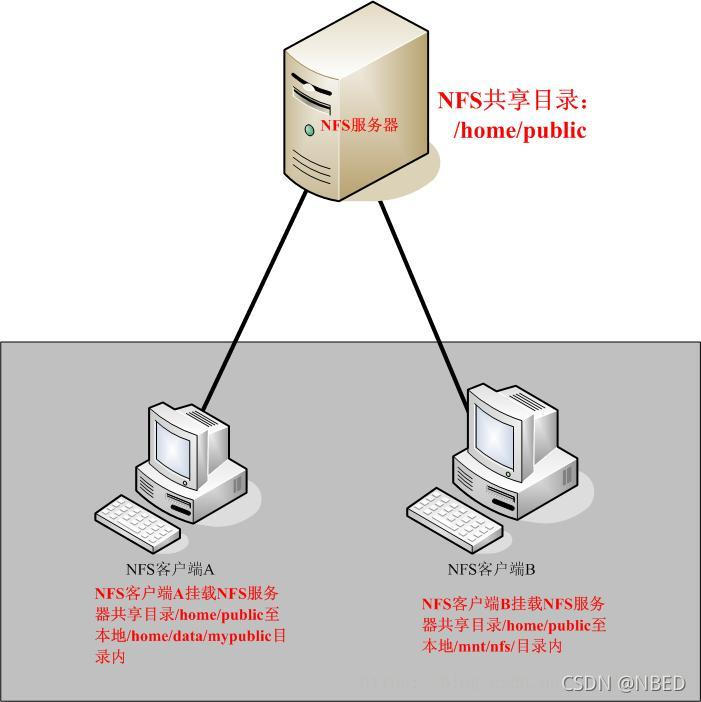
After setting A shared directory / home/public on the NFS server, other NFS clients with access to the NFS server can mount this directory to A mount point of their file system, which can be defined by themselves. As shown in the figure above, the directories mounted by client A and client B are different. After mounting, we can see all the data of the server / home/public locally. If the client configured on the server side is read-only, the client can only be read-only. If read / write is configured, the client can read / write. After mounting, the NFS client views the disk information command: #df – h.
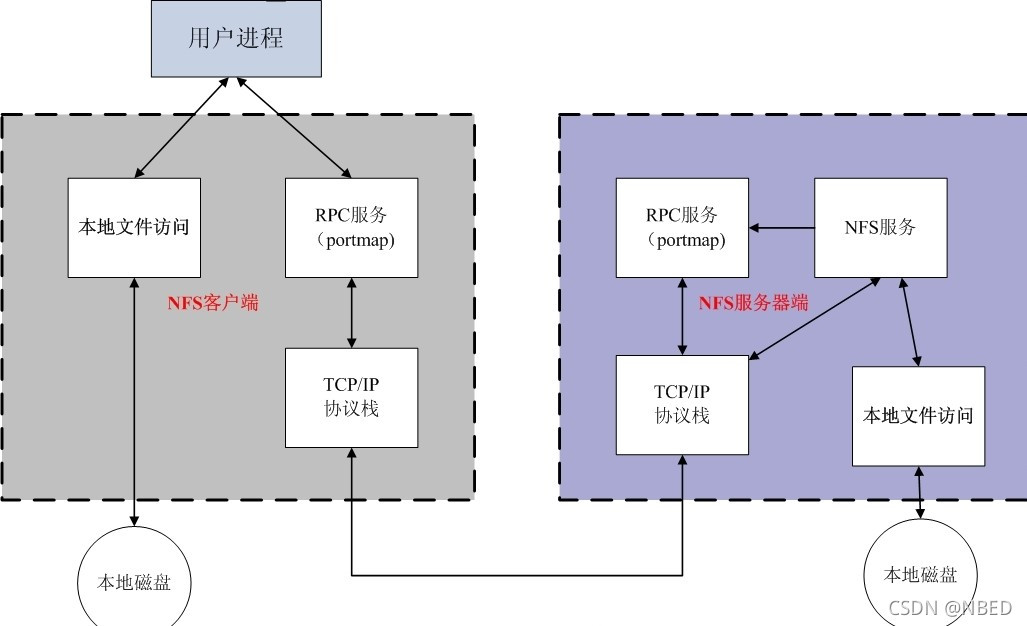
Since NFS transmits data between server and client through the network, there must be a corresponding network port to transmit data between them. Which port does NFS server use for data transmission? Basically, the port of NFS server is 2049, but the file system is very complex. Therefore, NFS has other programs to start additional ports. These additional ports used to transmit data are randomly selected, which are ports less than 1024; Since it is random, how does the client know which port is used by the NFS server? At this time, it needs to be implemented through the remote procedure call (RPC) protocol.
2, Communication principle between RPC and NFS:
Because NFS supports many functions, and different functions will be started with different programs. Each function will enable some ports to transmit data. Therefore, the port corresponding to the NFS function is not fixed. The client needs to know the relevant ports on the NFS server to establish a connection for data transmission, and RPC is a service used to uniformly manage NFS ports, In addition, the unified external port is 111, and RPC will record the information of NFS port, so that we can communicate the port information between the server and the client through RPC. The main function of PRC is to specify the port number corresponding to each NFS function, and notify the client that the client can connect to the normal port.
So how does RPC know the port of each NFS function?
First, after NFS is started, some ports will be used randomly. Then NFS will register these ports with RPC, and RPC will record these ports. RPC will open port 111 and wait for the client's RPC request. If the client has a request, the server's RPC will inform the client of the previously recorded NFS port information. In this way, the client will obtain the port information of the NFS server and transfer data with the actual port.
Note: before starting NFS SERVER, first start the RPC service (i.e. portmap service, the same below), otherwise NFS SERVER cannot register with the RPC service area. In addition, if the RPC service is restarted, all the previously registered NFS port data will be lost. Therefore, at this time, the NFS program managed by RPC service should also be restarted to re register with RPC. Special note: generally, after modifying the NFS configuration document, you do not need to restart NFS. Directly execute systemctl reload nfs or exportfs – rv to make the modified / etc/exports effective
3, Communication process between client for NFS and server for NFS:
First, the server starts the RPC service and opens port 111
The server starts NFS service and registers port information with RPC
The client starts the RPC (portmap service) and requests the server's NFS port from the server's RPC(portmap) service
The server RPC(portmap) service feeds back NFS port information to the client.
The client establishes an NFS connection with the server through the obtained NFS port and transmits data.
4, NFS server deployment
To install services for NFS, you need to install two software:
RPC main program: rpcbind
NFS can actually be regarded as an RPC service, because before starting any RPC service, we need to map the port. This work is actually the responsibility of the "rpcbind" service! In other words, before starting any RPC service, we need to start rpcbind! (this software was called portmap before CentOS 5.x and rpcbind after CentOS 6.x!).
NFS master: NFS utils
It is the software that provides rpc.nfsd and rpc.mountd NFS daemons and other related documents, description files and execution files! This is the main software required for NFS services.
NFS related files:
Main configuration file: / etc/exports
This is the main configuration file for NFS. This file is blank. It may not exist in some systems. It is mainly created manually. NFS configuration is generally only configured in this file.
NFS file system maintenance instruction: / usr/sbin/exportfs
This is an instruction for maintaining NFS shared resources. You can use this instruction to re share the directory resources changed by / etc/exports, dismount or re share the directory shared by NFS Server.
Login file of shared resources: / var/lib/nfs/*tab
The login files of NFS server are placed in the / var/lib/nfs / directory. There are two important login files in this directory. One is etab, which mainly records the full permission setting value of the directory shared by NFS; The other xtab records the relevant client data that has been linked to this NFS server.
Instructions for the client to query the server to share resources: / usr/sbin/showmount
This is another important NFS instruction. exportfs is used on the NFS Server side, while showmount is mainly used on the Client side. Showmount can be used to view the directory resources shared by NFS.
5, Services for NFS installation
//Install NFS and rpc (both node1 and node2 are downloaded)
[root@node1 ~]# yum install -y nfs-utils rpcbind
//Turn off the firewall (both node1 and 2 are turned off)
[root@node1 ~]# systemctl stop firewalld
[root@node1 ~]# systemctl disable firewalld
Removed /etc/systemd/system/multi-user.target.wants/firewalld.service.
Removed /etc/systemd/system/dbus-org.fedoraproject.FirewallD1.service.
[root@node1 ~]# setenforce 0
/Start the service and set the startup self startup
Note: start the rpc service first, and then the nfs service.
[root@node1 ~]# systemctl start rpcbind
[root@node1 ~]# systemctl enable rpcbind
[root@node1 ~]# systemctl start nfs-server
//Create a shared file directory and edit the configuration file
[root@node1 ~]# mkdir /public
#Create public shared directory
[root@node1 ~]# vim/etc/exports
	/public 192.168.58.0/24(ro)
	/protected 192.168.58.0/24(rw)
[root@node1 ~]# systemctl restart nfs-server rpcbind
#Reload services for NFS for the configuration file to take effect
Profile description:
Format: NFS clients allowed to access the path of the shared directory (shared permission parameter)
As above, the shared directory is / public, the clients allowed to access are 192.168.58.0/24 network users, and the permissions are read-only.
Note that there is no space between the NFS client address and permissions.
kerberos encryption (none, sys, krb5, krb5i, krb5p) is required for NFS output protection. The format is sec=XXX
none: access as anonymous. If you want to allow write operations, map to the nfsnobody user. At the same time, turn on the Boolean switch, setsebool nfsd_anon_write 1
Sys: file access is based on standard file access. If it is not specified, it is sys by default and trusts any user name sent
Krb5: the client must provide an identity, and the representation of the client must also be krb5, which is based on domain environment authentication
krb5i: Based on krb5, the user's password is encrypted, but the transmitted data is not encrypted
krb5p: all data is encrypted
Parameters for configuring the NFS service provider configuration file:
Parameter action
ro read only
rw reading and writing
root_squash when an NFS client is accessed as a root administrator, it is mapped to an anonymous user of the NFS server
no_ root_ Square when an NFS client is accessed as a root administrator, it is mapped to the root administrator of the NFS server
all_squash is mapped to an anonymous user of the NFS server no matter what account the NFS client uses to access
sync writes data to memory and hard disk at the same time to ensure no data loss
async first saves the data to the memory, and then writes it to the hard disk; This is more efficient, but data may be lost
NFS client mount configuration:
Use the showmount command to view the nfs server share information. The output format is "shared directory name allows client address"
[root@node2 ~]# showmount -e 192.168.58.10
Export list for 192.168.58.10:
/protected 192.168.58.0/24
/public    192.168.58.0/24
Usage of showmount command;
-e displays a list of shares for NFS servers
-a displays the status of locally mounted file resources and NFS resources
-v displays the version number
//Create a directory on the client and mount the shared directory.
[root@node2 ~]# mkdir /mnt/public
[root@node2 ~]# mkdir /mnt/data
[root@node2 ~]# vim /etc/fstab
#Mount in this file so that the system can be automatically mounted every time it starts
	192.168.58.10:/public  /mnt/public       nfs    defaults 0 0
	192.168.58.10:/protected /mnt/data     nfs    defaults  0 1
[root@node1 ~]# mount -a   #Yes, the file / etc/fstab takes effect
/Check
[root@node2~]# df -Th
Filesystem                 Type      Size  Used Avail Use% Mounted on
/dev/mapper/rhel-root      xfs        17G  3.1G   14G  18% /
devtmpfs                   devtmpfs  1.4G     0  1.4G   0% /dev
tmpfs                      tmpfs     1.4G  140K  1.4G   1% /dev/shm
tmpfs                      tmpfs     1.4G  9.1M  1.4G   1% /run
tmpfs                      tmpfs     1.4G     0  1.4G   0% /sys/fs/cgroup
/dev/sda1                  xfs      1014M  173M  842M  18% /boot
tmpfs                      tmpfs     280M   32K  280M   1% /run/user/0
/dev/sr0                   iso9660   3.6G  3.6G     0 100% /mnt/cdrom
192.168.58.10:/public    nfs4       17G  3.7G   14G  22% /mnt/public
192.168.58.10:/protected nfs4       17G  3.7G   14G  22% /mnt/data
task
1. Manually set up an nfs server
Open the / nfs/shared directory for all users to consult materials
The open / nfs/upload directory is the data upload directory of the 172.16.12.0/24 network segment, and maps all users and their user groups to NFS upload, with both UID and GID of 300
Manually set up an nfs server
Open the / nfs/shared directory for all users to consult materials
Turn off firewall
[root@node1 ~]# systemctl stop firewalld
[root@node1 ~]# systemctl disable firewalld
Removed /etc/systemd/system/multi-user.target.wants/firewalld.service.
Removed /etc/systemd/system/dbus-org.fedoraproject.FirewallD1.service.
[root@node1 ~]# setenforce 0
Installing services for NFS
[root@node1 ~]# yum install -y nfs-utils
systemctl start nfs-server rpcbind
Edit profiles and shared directories
[root@node1 ~]# vim /etc/exports
[root@node1 nfs]# cat /etc/exports
/nfs/shared *(ro,sync)
Turn off firewall on client
[root@node2 ~]# systemctl stop firewaldd
Failed to stop firewaldd.service: Unit firewaldd.service not loaded.
[root@node2 ~]# systemctl stop firewalld
[root@node2 ~]# systemctl disable firewalld
Removed /etc/systemd/system/multi-user.target.wants/firewalld.service.
Removed /etc/systemd/system/dbus-org.fedoraproject.FirewallD1.service.
[root@node2 ~]# setenforce 0
Installing services for NFS
[root@node2 ~]# yum install -y nfs-utils rpcbind
[root@node2 ~]# systemctl start nfs-server rpcbind
View shared directory on client
[root@node2 ~]# showmount -e 192.168.58.120
Export list for 192.168.58.120:
/nfs/shared *
Create a mount point directory and mount
[root@node2 ~]# mkdir /hy
[root@node2 ~]# mount -t nfs 192.168.58.120:/nfs/shared /hy
[root@node2 ~]# df -h
 file system                    Capacity used available used% Mount point
devtmpfs                    883M     0  883M    0% /dev
tmpfs                       901M     0  901M    0% /dev/shm
tmpfs                       901M  8.7M  892M    1% /run
tmpfs                       901M     0  901M    0% /sys/fs/cgroup
/dev/mapper/rhel-root        47G  1.7G   46G    4% /
/dev/nvme0n1p1             1014M  179M  836M   18% /boot
tmpfs                       181M     0  181M    0% /run/user/0
192.168.58.120:/nfs/shared   47G  1.7G   46G    4% /hy
2. The open / nfs/upload directory is the data upload directory of the 172.16.12.0/24 network segment, and all users and their user groups are mapped to NFS upload, with both UID and GID of 300
Create shared directory
[root@node1 ~]# mkdir /nfs/upload
Create NFS upload user with UID and GID of 300
[root@node1 ~]# useradd -r -u 300 nfs-upload
Modify profile
[root@node1 nfs]# cat /etc/exports
/nfs/shared *(ro,sync)
/nfs/upload 192.168.58.0/24(rw,anonuid=300,anongid=300,sync)
 systemctl restart nfs-server rpcbind
View shared directory on client
[root@node2 ~]# showmount -e 192.168.58.120
Export list for 192.168.58.120:
/nfs/shared *
/nfs/upload 192.168.58.0/24
Create a mount point directory and mount
[root@node2 ~]# mkdir /hy
[root@node2 ~]# mount -t nfs 192.168.58.120:/nfs/upload /hy
Set master and group on the server side
[root@node1 ~]# chown nfs-upload.nfs-upload /nfs/upload
[root@node1 ~]# cd /nfs
[root@node1 nfs]# ll
 Total consumption 0
drwxr-xr-x. 2 root       root       6 9 June 24-18:38 shared
drwxr-xr-x. 2 nfs-upload nfs-upload 6 9 June 24-18:41 upload