2. What is Feign?
Feign is also a hard role, and it is designed to make Java Http clients easier.
Feign integrates Ribbon and RestTemplate to make load balancing Http calls, but encapsulates the original way (Ribbon+RestTemplate). Instead of manually using RestTemplate to invoke services, developers define an interface in which service calls can be completed by annotating a comment. This is more in line with the purpose of Interface-oriented programming. Simplified development.
Unfortunately, Feign is now stopping iteration, and of course there are many businesses working on it.
Readers who want to learn Feign can go to the spring Cloud website, which is not the focus of today.
3. What is openFeign?
Feign, which stopped iteration, was described earlier. To put it simply, OpenFeign is springcloud's support for SpringMVC annotations based on Feign, such as @RequestMapping. OpenFeign's @FeignClient resolves the interfaces under the @RequestMapping annotation of SpringMVC and generates implementation classes through dynamic proxies to load balance the classes and invoke other services.
Official address: https://docs.spring.io/spring-cloud-openfeign/docs/2.2.10.BUILD-SNAPSHOT/reference/html
4. What is the difference between Feign and openFeign?
| Feign | openFiegn |
|---|---|
| Feign is a lightweight RESTful HTTP service client in the SpringCloud component. Feign has Ribbon built in to load balance clients and invoke services from the Service Registry. Feign is used by defining an interface with Feign's annotations, which can be invoked to invoke a service in the Service Registry | OpenFeign is SpringCloud's Feign-based support for SpringMVC annotations such as @RequestMapping. OpenFeign's @FeignClient resolves the interfaces under the @RequestMapping annotation of SpringMVC and generates implementation classes through dynamic proxies to load balance the classes and invoke other services. |
5. Environmental Preparation
Instead of using Eureka, the registry uses Nacos directly as the registry and configuration center, and no one can view Nacos articles.
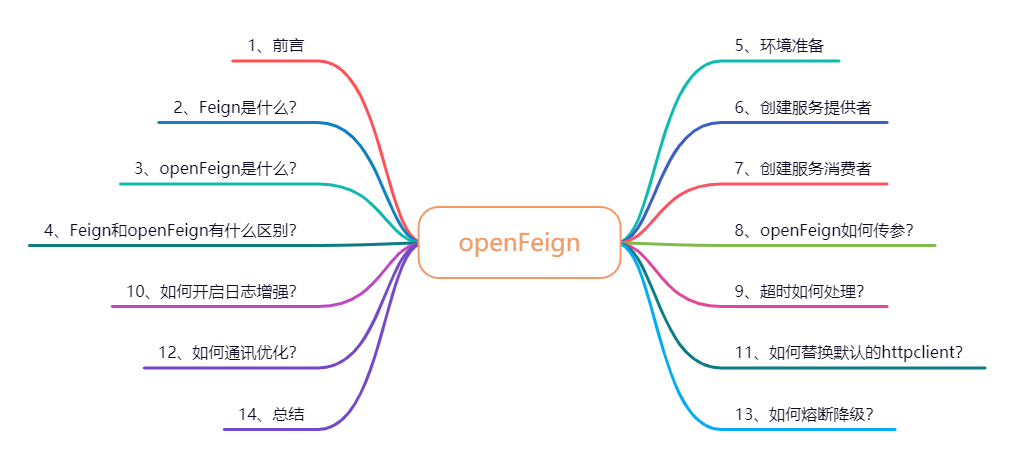
The project structure built in this article is as follows:
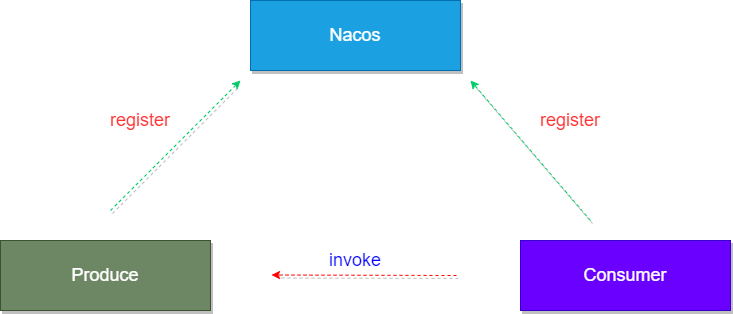
The registry uses Nacos to create micro services, Produce, the service provider, Consumer.
6. Create a service provider
Since it is the mutual invocation of micro services, there must be a service provider, create openFeign-provider 9005, register it into Nacos, and configure it as follows:
server:
  port: 9005
spring:
  application:
    ## Specify service name, name in nacos
    name: openFeign-provider
  cloud:
    nacos:
      discovery:
        # Nacos service address, IP address in nacos-server: port number
        server-addr: 127.0.0.1:8848
management:
  endpoints:
    web:
      exposure:
        ## Special characters exist in the yml file and must be enclosed in single quotes or start error
        include: '*'
Note: The name specified here in spring.application.name will be used in the openFeign interface call.
7. Creating Service Consumers
Create a new module, openFeign-consumer9006, as consumer service, as follows.
1. Add Dependency
In addition to the Nacos registry center dependency, add the openFeign dependency as follows:
<dependency>
      <groupId>org.springframework.cloud</groupId>
      <artifactId>spring-cloud-starter-openfeign</artifactId>
</dependency>
2. Add a comment @EnableFeignClients to turn on openFeign
Old fashion, add a comment @EnableFeignClients to the Springboot main startup class to turn on the openFeign function, as follows:
@SpringBootApplication
@EnableDiscoveryClient
@EnableFeignClients
public class OpenFeignConsumer9006Application
{
    public static void main(String[] args) {
        SpringApplication.run(OpenFeignConsumer9006Application.class, args);
    }
}
3. New openFeign interface
Create a new openFeign interface labeled with the @FeignClient annotation as follows:
@FeignClient(value = "openFeign-provider")
public interface OpenFeignService {
}
Note: The value property in the annotation @FeignClient specifies the service name of the service provider in the nacos registry.
4. Create a new Controller debugging
Create a new controller to debug the interface and call openFeign directly, as follows:
@RestController
@RequestMapping("/openfeign")
public class OpenFeignController {

}
Well, at this point, an openFeign micro-service has been set up, and the specific functions have not been implemented, so let's do the following bit by bit.
8. How is openFeign transmitted?
There are many ways to pass interface parameters in development, but there are some rules for passing parameters in openFeign, which are described in detail below.
1. Transfer JSON data
This is also a common parameter rule in interface development and is entered in the Spring Book with the @RequestBody identity.
The JSON parameters in the provider interface are as follows:
@RestController
@RequestMapping("/openfeign/provider")
public class OpenFeignProviderController {
    @PostMapping("/order2")
    public Order createOrder2(@RequestBody Order order){
        return order;
    }
}
The code passed in the openFeign interface in consumer is as follows:
@FeignClient(value = "openFeign-provider")
public interface OpenFeignService {
    /**
     * The parameter defaults to the @RequestBody label, where @RequestBody can be left unfilled
     * Method name is arbitrary
     */
    @PostMapping("/openfeign/provider/order2")
    Order createOrder2(@RequestBody Order order);
}
Note: The default way of passing parameters to openFeign is the JSON parameter (@RequestBody), so you can define an interface without the @RequestBody annotation, but it is usually filled in for specification purposes.
2. POJO form parameters
This is also a common way of passing parameters, which are received using POJO objects.
The provider service provider code is as follows:
@RestController
@RequestMapping("/openfeign/provider")
public class OpenFeignProviderController {
    @PostMapping("/order1")
    public Order createOrder1(Order order){
        return order;
    }
}
The consumer consumer openFeign code is as follows:
@FeignClient(value = "openFeign-provider")
public interface OpenFeignService {
    /**
     * Parameters are labeled @RequestBody by default, and if passed through a POJO form, labeled with @SpringQueryMap
     */
    @PostMapping("/openfeign/provider/order1")
    Order createOrder1(@SpringQueryMap Order order);
}
Many people on the Internet are confused about how POJO forms are transmitted. Official documents clearly provide solutions as follows:
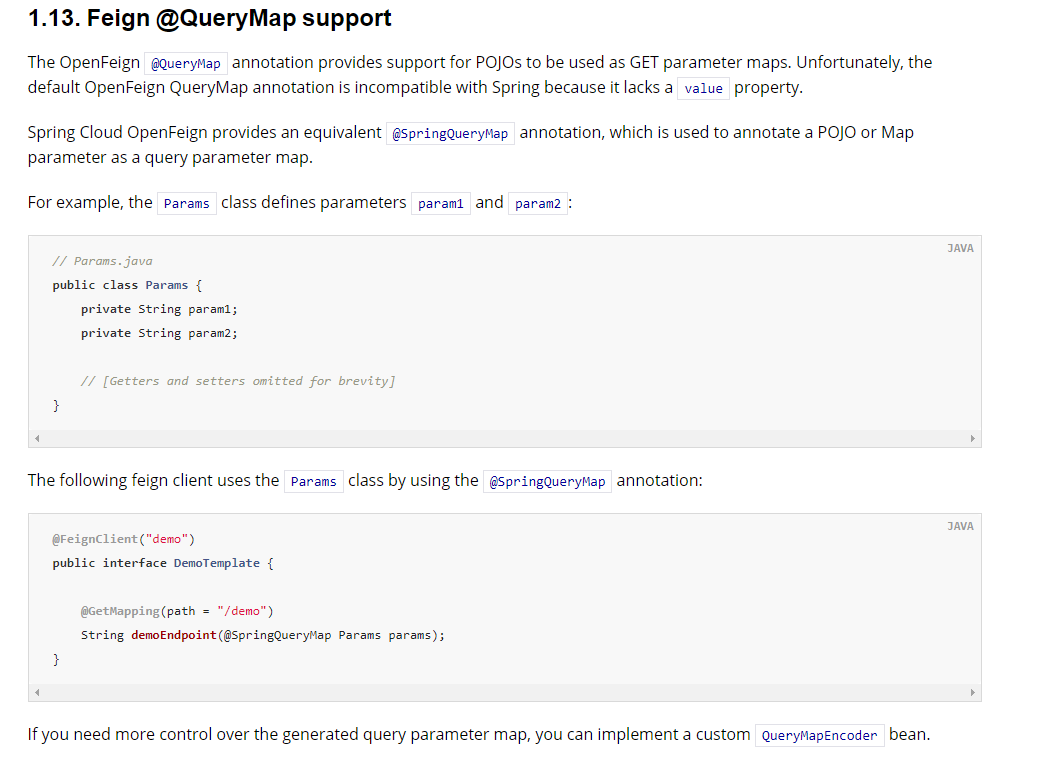
openFeign provides a comment @SpringQueryMap that perfectly solves POJO form parameters.
3. Carry parameters in URL s
This is also a common way of requesting GET requests in the restful way.
The provider service provider code is as follows:
@RestController
@RequestMapping("/openfeign/provider")
public class OpenFeignProviderController {

    @GetMapping("/test/{id}")
    public String test(@PathVariable("id")Integer id){
        return "accept one msg id="+id;
}
The consumer consumer openFeign interface is as follows:
@FeignClient(value = "openFeign-provider")
public interface OpenFeignService {

    @GetMapping("/openfeign/provider/test/{id}")
    String get(@PathVariable("id")Integer id);
}
Receiving placeholders in URLs using the annotation @PathVariable is a good way to understand.
4. Common form parameters
This is not recommended, but there are many developments in use.
The provider service provider code is as follows:
@RestController
@RequestMapping("/openfeign/provider")
public class OpenFeignProviderController {
    @PostMapping("/test2")
    public String test2(String id,String name){
        return MessageFormat.format("accept on msg id={0},name={1}",id,name);
    }
}
The consumer consumer openFeign interface parameter is as follows:
@FeignClient(value = "openFeign-provider")
public interface OpenFeignService {
    /**
     * The @RequestParam annotation must be labeled and the value attribute must be filled in with the parameter name
     * Method parameter names can be arbitrary, but the value property in the @RequestParam comment must be the same as the parameter name in the provider
     */
    @PostMapping("/openfeign/provider/test2")
    String test(@RequestParam("id") String arg1,@RequestParam("name") String arg2);
}
5. Summary
There are many ways to transfer data, such as file transfer... Here are just four common ways to transfer data.
9. How to handle the timeout?
To understand timeout handling, let's start with an example: I sleep the provider service interface for three seconds, and the interface is as follows:
@PostMapping("/test2")
public String test2(String id,String name) throws InterruptedException {
        Thread.sleep(3000);
        return MessageFormat.format("accept on msg id={0},name={1}",id,name);
}
At this point, we call consumer's openFeign interface and return the result as follows:
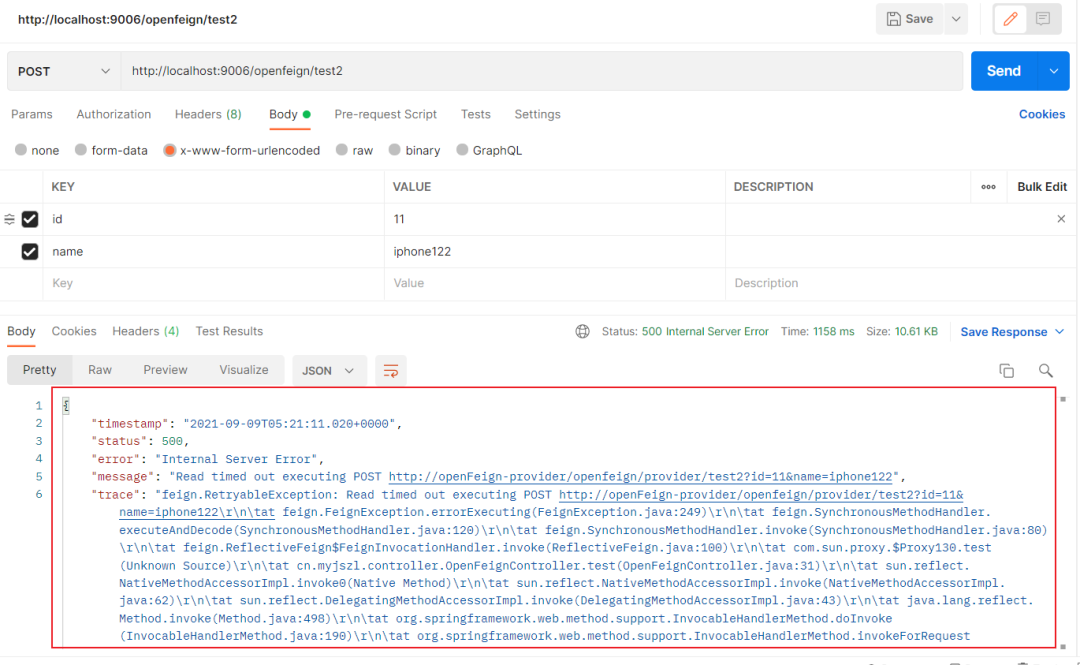
It was obvious that the program was abnormal and returned an interface call timeout. what? why?...
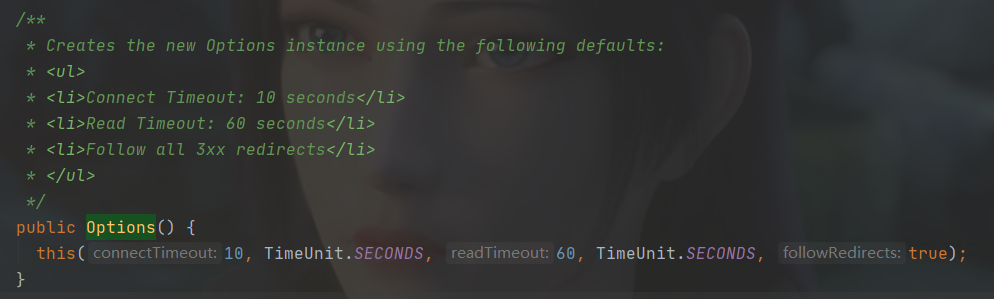
openFeign actually has a default timeout of 10 seconds for connections and 60 seconds for reads. The source code is feign.Request.Options#Options(), which is shown below:
Then the question arises: Why do I just set sleep for 3 seconds and then report a timeout?
In fact, openFeign integrates Ribbon. Ribbon's default timeout connection time and read timeout time are 1 second. The source code is in the org.springframework.cloud.openfeign.ribbon.FeignLoadBalancer#execute() method, as follows:
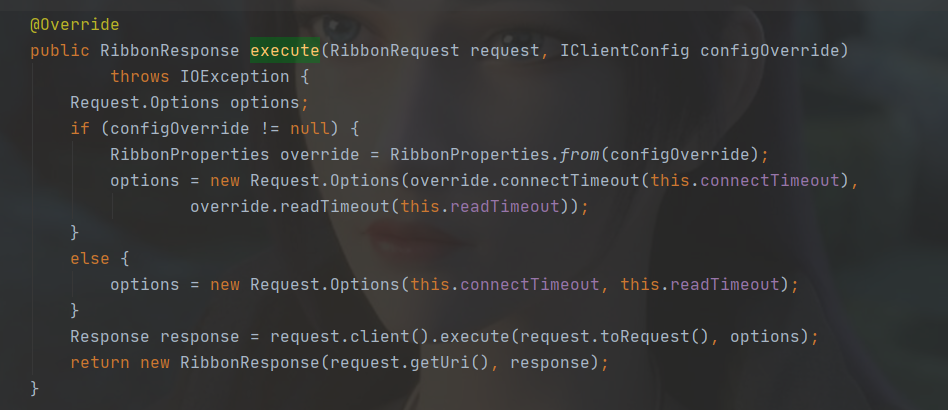
The source code roughly means that if openFeign does not set a corresponding timeout, Ribbon's default timeout will be used.
Understanding the principle of timeout settings, it is also clear that the two scenarios result from it, as follows:
- Set timeout for openFeign
- Set Ribbon timeout
1. Set Ribbon timeout (not recommended)
The settings are simple. Add the following settings to the configuration file:
ribbon:
  # Value is the amount of time it takes to establish a link, which is appropriate for both ends of the link when the network is healthy
  ReadTimeout: 5000
  # Refers to the time taken to read available resources from the server after a link has been established
  ConectTimeout: 5000
2. Set timeout for openFeign (recommended)
The openFeign setup timeout is very simple and only needs to be configured in the configuration file, as follows:
feign:
  client:
    config:
      ## Global timeout set by default, specifying a service name can set the timeout for a single service
      default:
        connectTimeout: 5000
        readTimeout: 5000
default sets the global timeout to take effect for all openFeign interface services
However, normal business logic may involve calls to multiple openFeign interfaces, as shown in the following figure:
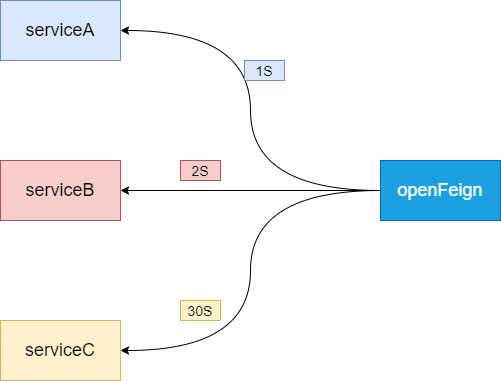
The pseudocode in the figure above is as follows:
public T invoke(){
    //1. Call serviceA
    serviceA();

    //2. Call serviceA
    serviceB();

    //3. Call serviceA
    serviceC();
}
Can the global timeout configured above pass? Obviously serviceA, serviceB can be successfully invoked, but serviceC can not be successfully executed, and must report a timeout.
At this point we can configure a separate timeout for serviceC as follows:
feign:
  client:
    config:
      ## Global timeout set by default, specifying a service name can set the timeout for a single service
      default:
        connectTimeout: 5000
        readTimeout: 5000
      ## Configure timeout separately for serviceC
      serviceC:
        connectTimeout: 30000
        readTimeout: 30000
Note: Timeout for a single configuration will override the global configuration.
10. How do I turn on log enhancement?
While openFeign provides log enhancements, it does not display any logs by default, but developers can configure the level of the logs themselves during debugging.
The log level for openFeign is as follows:
- NONE: No log is displayed by default;
- BASIC: Only request method, URL, response status code and execution time are recorded;
- HEADERS: In addition to the information defined in BASIC, there are headers for requests and responses;
- FULL: In addition to the information defined in HEADERS, there is also the body and metadata of the request and response.
It is also easy to configure as follows:
1. Configure log level in configuration class
You need to customize a configuration class in which to set the log level as follows:
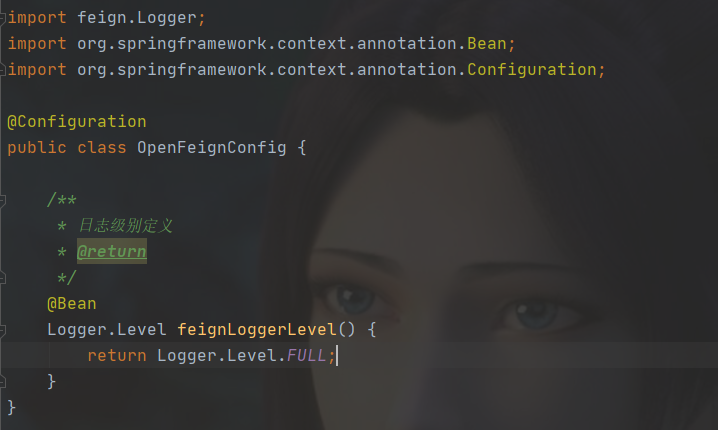
Note: The logger here is in the feign package.
2. Setting interface log level in yaml file
Simply adjust the interface log level for the specified package or openFeign in the configuration file as follows:
logging:
  level:
    cn.myjszl.service: debug
Here cn.myjszl.service is the package name of the openFeign interface, and you can also configure a specific openFeign interface.
3. Demonstration effect
The above steps set the log to FULL, at which point a request is made, and the log effect is as follows:
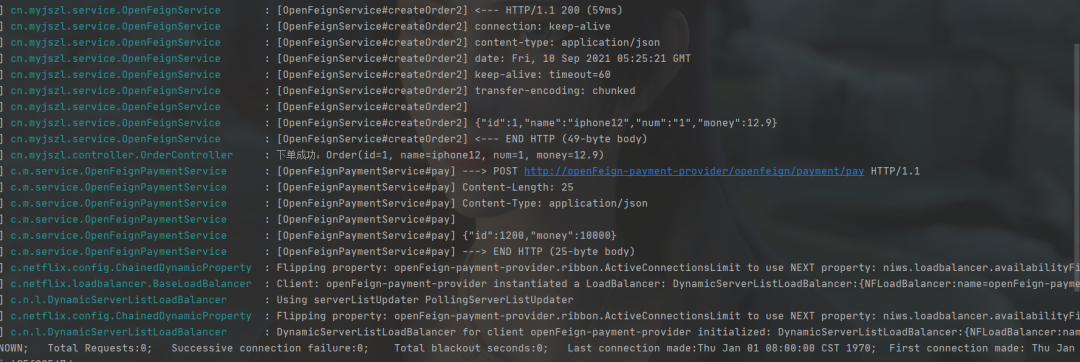
The contents of the request header and body are printed in detail in the log.
11. How do I replace the default httpclient?
By default, Feign uses JDK's native URLConnection to send HTTP requests without a connection pool, but maintains a long connection to each address, that is, a persistence connection using HTTP.
In production environments, the default http client is usually not used, and there are usually two options:
- Use Apache HttpClient
- Use OkHttp
As for which one is better, there are many advantages to it. I prefer Apache HttpClient, because stability is no longer a concern.
So how do I replace it? It's really simple. The following demonstrates using Apache HttpClient instead.
1. Add ApacheHttpClient dependencies
Add the following dependencies to the pom file of the openFeign interface service:
<!--     Use Apache HttpClient replace Feign Native httpclient-->
    <dependency>
      <groupId>org.apache.httpcomponents</groupId>
      <artifactId>httpclient</artifactId>
    </dependency>

    <dependency>
      <groupId>io.github.openfeign</groupId>
      <artifactId>feign-httpclient</artifactId>
    </dependency>
Why add the above dependencies? As you can see from the source code, look at the class org.springframework.cloud.openfeign.FeignAutoConfiguration.HttpClientFeignConfiguration, which has the following code:
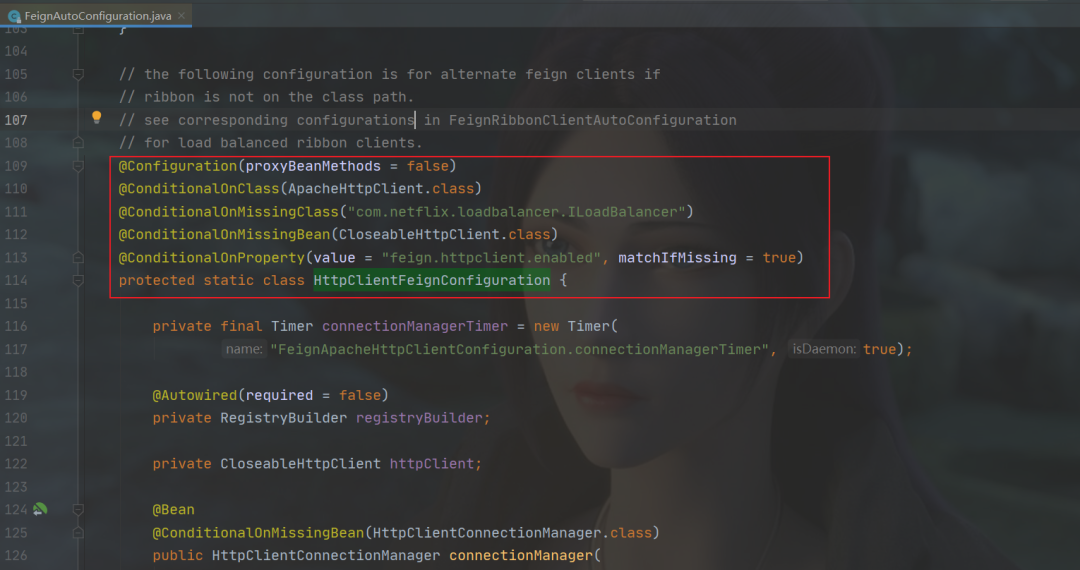
The generation criteria in the red box above, where @ConditionalOnClass(ApacheHttpClient.class), must have an ApacheHttpClient class to take effect, and the feign.httpclient.enabled configuration is set to true.
2. Open in Configuration File
To configure Open in the configuration file, the code is as follows:
feign:
  client:
    httpclient:
      # Open Http Client
      enabled: true
3. How can I verify that the replacement was successful?
In fact, it's easy to see which client was called in feign.SynchronousMethodHandler#executeAndDecode(), as shown below:
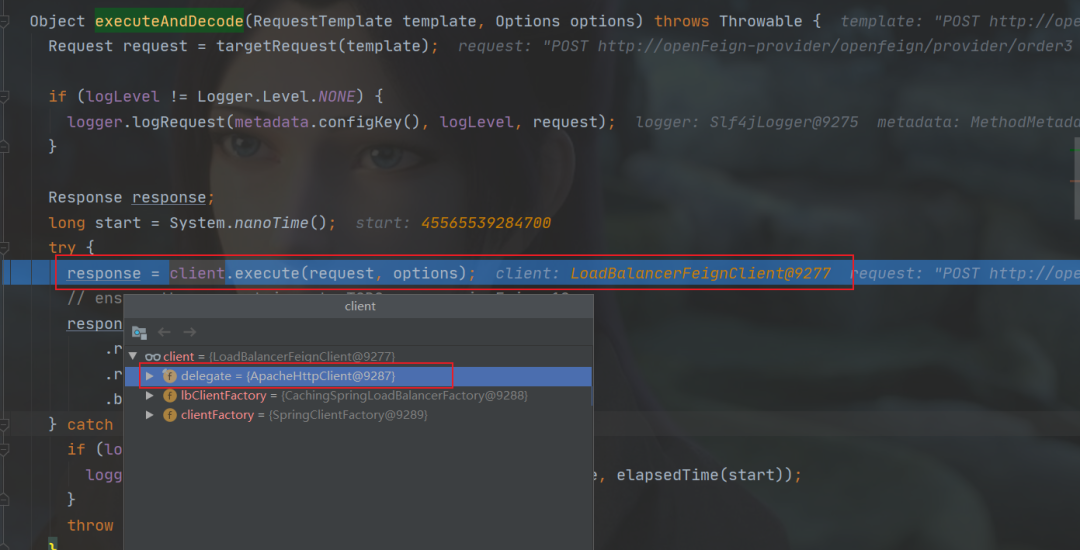
As you can see in the figure above, the final call is to ApacheHttpClient.
4. Summary
The steps above show only one alternative, the rest are no longer shown and work the same way.
12. How to optimize communication?
Before we talk about how to optimize, let's first look at the GZIP compression algorithm, which has the following concepts:
gzip is a data format that uses deflate algorithm to compress data. gzip is a popular data compression algorithm and is widely used, especially on the Linux platform.
When GZIP is compressed into a single plain text data, the effect is obvious, which can reduce the data size by more than 70%.
Compressed network data actually reduces the number of bytes transmitted over the network. The most obvious benefit is that it can speed up the loading of web pages. It goes without saying that in addition to saving traffic and improving users'browsing experience, another potential benefit is that GZIP has a better relationship with search engine grabbing tools. For example, Google can retrieve Web pages more quickly by directly reading GZIP files than by manual crawling.
The principle of GZIP compressed transmission is as follows:

Follow the steps in the above illustration:
- The client requests a header from the server with the Accept-Encoding:gzip,deflate field, indicating to the server that the client supports a compressed format (gzip or deflate), which the server will not compress if the header is not sent.
- After receiving the request, if the server finds that the request header contains an Accept-Encoding field and supports this type of compression, it compresses the response message and returns it to the client with a Content-Encoding:gzip header, indicating that the response message is compressed according to this format.
- After the client receives the response, it first determines whether there is a Content-Encoding header and, if so, decompresses the message in that format. Otherwise, it is processed as a normal message.
openFeign supports request/response to turn on GZIP compression, the overall process is as follows:
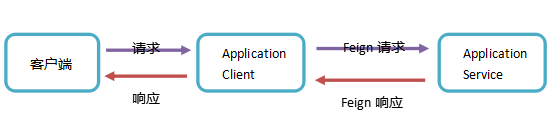
Only two pieces of GZIP transport are involved in the above diagram, Application Client -> Application Service, Application Service -> Application Client.
Note: GZIP supported by openFeign is only a request and response from the openFeign interface, that is, the openFeign consumer invokes the service provider's interface.
The openFeign step to open GZIP is also simple, just turn on the following configuration in the configuration file:
feign:
  ## Turn on compression
  compression:
    request:
      enabled: true
      ## Turn on the compression threshold, unit byte, default 2048, which is 2k, here set to 10 bytes for demonstration purposes
      min-request-size: 10
      mime-types: text/xml,application/xml,application/json
    response:
      enabled: true
After the above configuration is completed, the request is sent and you can clearly see that the request header has carried GZIP compression, as shown below:
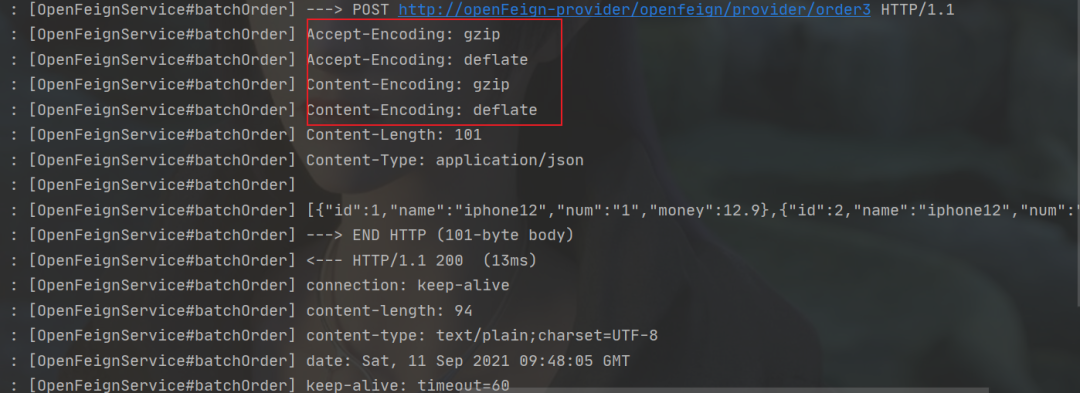
13. How to melt and demote?
Common downgrading frameworks are Hystrix, Sentinel, and Hystrix is the default supported by openFeign. This is reflected in official documents, after all, it's a milk sibling. Ha-ha...
But Ali's entinel kills Hystrix in seconds in terms of functionality, ease of use, and so this chapter uses openFeign+Sentinel integration to downgrade services.
Note: Sentinel is not highlighted here, but the power of Sentinel is detailed in the next article.
1. Add Sentinel Dependencies
Add sentinel dependencies to the open Feign-consumer9006 consumer's pom file (no version number is specified due to the use of aggregation modules), as follows:
<dependency>
      <groupId>com.alibaba.cloud</groupId>
      <artifactId>spring-cloud-starter-alibaba-sentinel</artifactId>
</dependency>
2. Turn sentinel downgrade on in profile
In order for openFeign to use sentinel's downgrade capabilities, it also needs to be turned on in the configuration file by adding the following configuration:
feign:
  sentinel:
    enabled: true
3. Add demoted callback class
This class must implement the same class as the openFeign interface, as shown below:

OpenFeignFallbackService This is a class that demotes callbacks. Once an exception occurs to the corresponding interface in OpenFeignService This class is called to demote the corresponding method.
4. Add fallback attribute
Add the fallback attribute to @FeignClient, whose value is the class for the demotion callback, as follows:
@FeignClient(value = "openFeign-provider",fallback = OpenFeignFallbackService.class)
public interface OpenFeignService {}
5. Demonstration
After the above 4 steps, the open Feign's melt downgrade has been set and the effect is demonstrated.
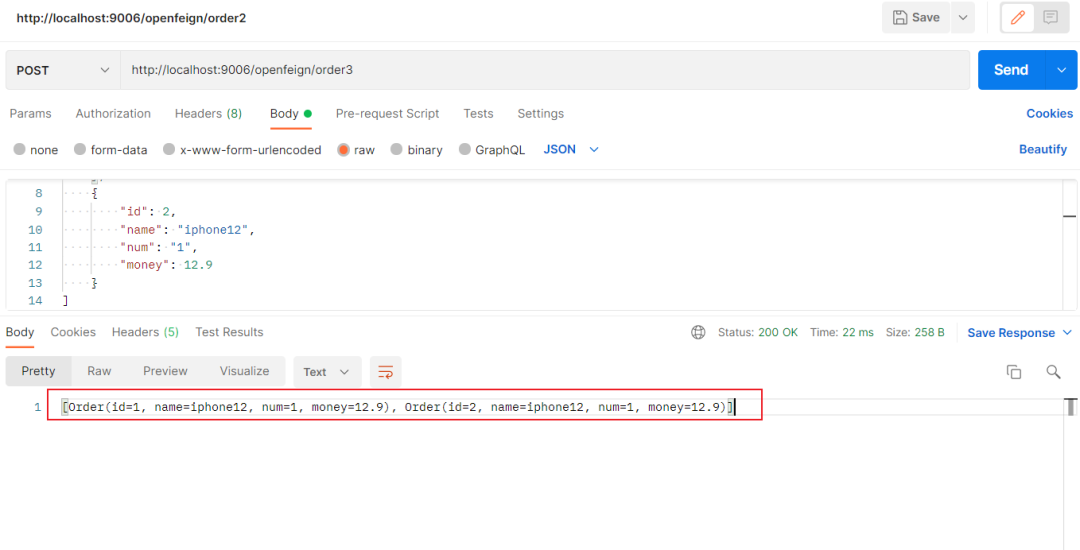
Called through postman http://localhost:9006/openfeign/order3 This interface, normal logic returns as follows:
Now manually create an exception and throw it in the interface provided by the service, as shown below:
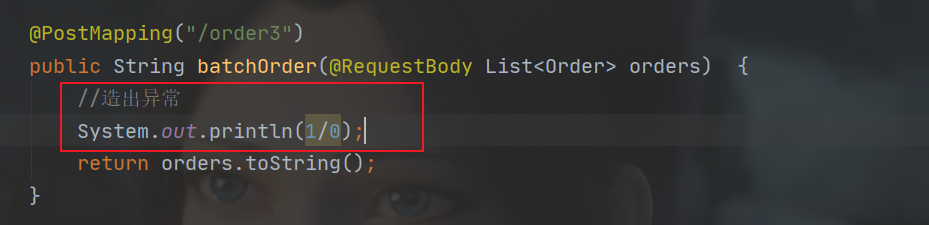
Re-call at this time http://localhost:9006/openfeign/order3 And returns the following image:
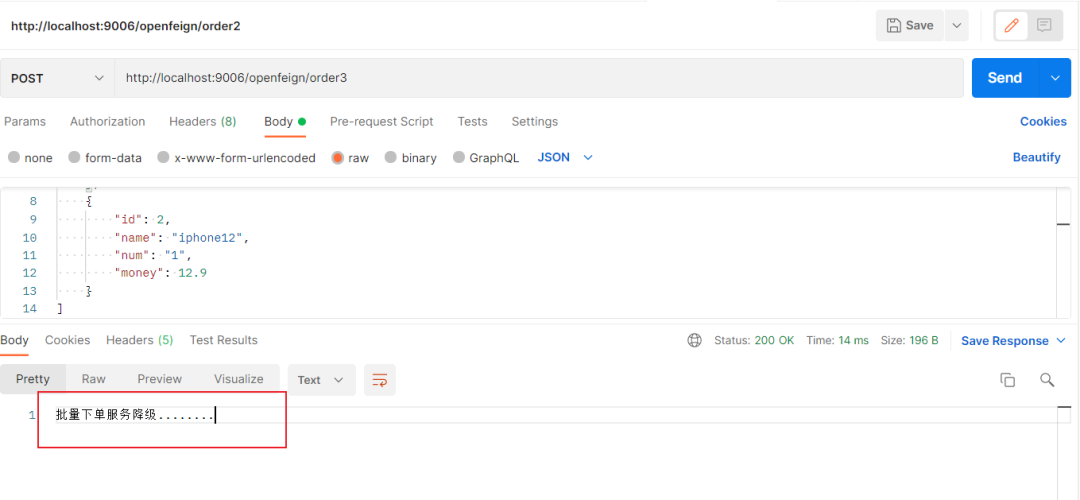
Oh oh, it is very clear that the service has been successfully downgraded, oh, the function is complete.
Note: The results returned in the actual development should be customized according to the architecture. This is just for demonstration convenience, not for reference, haha.