Service concept:
Virtual private network, in fact, is to open up a virtual private line in the network
Application classification:
1. Host remote access * * * service
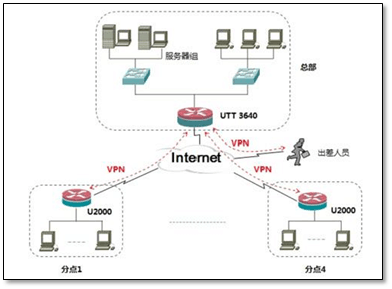
2. Services between enterprise networks
3. Services between IDC rooms of Internet companies
Transmission data protocol mode:
Establishment between PPTP terminal and terminal
L2TP: layer 2 Tunneling Protocol L2TP can provide tunnel validation, but not PPTP does not support tunnel validation
Special encapsulation technology for IPsec to guarantee the encryption characteristics of data packets
SSL guarantees that the data packet encryption communication mode encrypts the data information (public key certificate private key key)
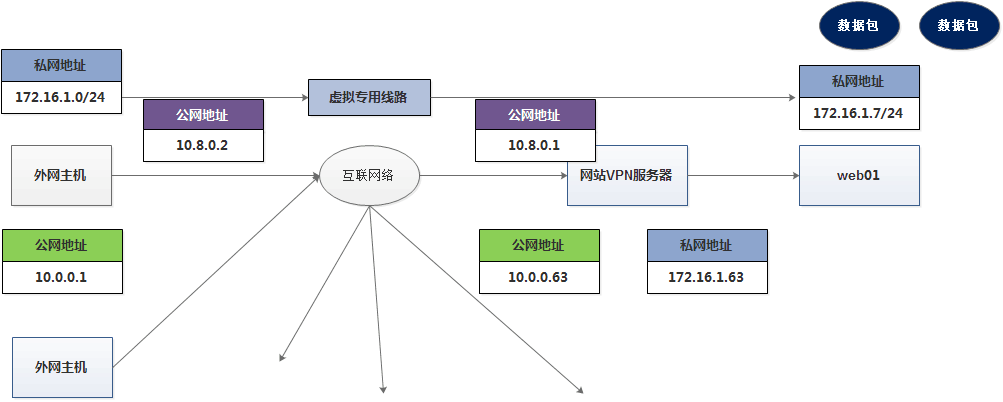
Principle of service architecture:
By using virtual private network, the external network host can obtain the internal network address information in the architecture, and realize the data transmission by using the internal network address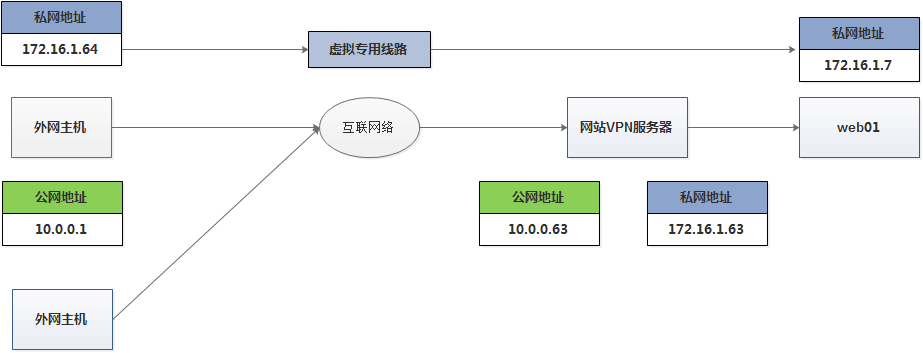

Service architecture environment
windows host external network host 10.0.0.1 (analog public network address)
v*nserver host 10.0.0.63 (analog public network address) 172.16.1.41 (analog private network address)
Web01 172.16.1.7 (analog private network address)
PS: ensure that the time of each host is properly synchronized
Service deployment process
The first process: Download and install the required software programs
yum install -y openv*n easy-rsa
open vipne: service package
Easy RSA: can be used to generate Certificate (public key) and secret key information = = similar to SSH keygen, which generates private key and public key information
The second process: create the certificate and key information required by the server
cp -r /usr/share/easy-rsa/  /etc/openv*n/
	cp  /usr/share/doc/easy-rsa-3.0.6/vars.example  /etc/openv*n/easy-rsa/3.0.6/vars   --- Enterprise company information record file
	cd /etc/openv*n/easy-rsa/3.0.6/
./easyrsa init-pki    --- Create a directory environment for saving certificates and secret key information
	Your newly created PKI dir is: /etc/openv*n/easy-rsa/3.0.6/pki
# Create server ca certificate?? Public key?
	./easyrsa build-ca  nopass
	/etc/openv*n/easy-rsa/3.0.6/pki/ca.crt
# Create server certificate similar to server public key and private key
	./easyrsa gen-req openv*n nopass
	/etc/openv*n/easy-rsa/3.0.6/pki/private/openv*n.key    --- Generate secret key information
	./easyrsa sign server openv*n
	/etc/openv*n/easy-rsa/3.0.6/pki/issued/openv*n.crt     --- Generate certificate file information
#Generate Diffie Hellman data file
	. / easyrsa Gen DH -- generate key exchange file
	/etc/openv*n/easy-rsa/3.0.6/pki/dh.pem
=========================================================
	//Summary: after the above operations are completed, the following file information is generated
	cp /etc/openv*n/easy-rsa/3.0.6/pki/ca.crt  /etc/openv*n/server
	cp /etc/openv*n/easy-rsa/3.0.6/pki/private/openv*n.key  /etc/openv*n/server
	cp /etc/openv*n/easy-rsa/3.0.6/pki/issued/openv*n.crt   /etc/openv*n/server
	cp /etc/openv*n/easy-rsa/3.0.6/pki/dh.pem    /etc/openv*n/server
	=========================================================
The third process: writing an open configuration file
cp /usr/share/doc/openvn-2.4.8/sample/sample-config-files/server.conf /etc/openvn/
vim /etc/openvn/server.conf
[root@v*n openv*n]# grep  ^[a-Z]  server.conf
local 10.0.0.41
port 1194
proto tcp
dev tun
ca /etc/openv*n/server/ca.crt
cert /etc/openv*n/server/openv*n.crt
key  /etc/openv*n/server/openv*n.key  # This file should be kept secret
dh /etc/openv*n/server/dh.pem
topology subnet
server 10.8.0.0 255.255.255.0
ifconfig-pool-persist ipp.txt
push "route 172.16.1.0 255.255.255.0"
keepalive 10 120
cipher AES-256-CBC
persist-key
persist-tun
status /var/log/openv*n-status.log
log-append /var/log/openv*n.log
verb 3
mute 20
Interpretation:
25 local 10.0.0.63 -- set V*N service to listen to address information
	32 port 1194 -- set the service port number, which is 1194 by default
	35 proto TCP -- V * n link communication protocol uses TCP protocol to ensure data transmission security
	53 dev tun -- use tunnel to transfer data
    78 ca /etc/openv*n/server/ca.crt
    79 cert /etc/openv*n/server/openv*n.crt
	80 key /etc/openv*n/server/openv*n.key
	85 dh /etc/openv*n/server/dh.pem
	92 topology subnet -- identify correct mask information
	101 server 10.8.0.0 255.255.255.0 - set a direct communication address between a client and v*n server
	141 push "route 172.16.1.0 255.255.255.0" -- client pushes an intranet segment route entry information
    231 keepalive 10 120 -- TCP long connection timeout
    244 ;tls-auth ta.key 0      --- !!!  Be sure to turn off the TLS function
	287 status /var/log/openv*n-status.log --- generate an openv*n service status log information file
	297 log append / var / log / openv*n.log -- generate an openv*n service running log information file
	315 ;explicit-exit-notify 1 --- !!!  Be sure to turn off this function
The fourth process: start the service program (start in the mode of daemons)
# vim /usr/lib/systemd/system/openv*n.service
    [Unit]
    Description=openv*n service
    After=network-online.target
    Wants=network-online.target

    [Service]
    Type=forking
    User=root
    Group=root
    ExecStart=/usr/sbin/openv*n --daemon --config /etc/openv*n/server.conf
    ExecStop=/bin/kill -9 $MAINPID
    Restart=on-failure
    PrivateTmp=true

    [Install]
    WantedBy=multi-user.target
systemctl daemon-reload
systemctl start openvn
systemctl enable openvn
================================================================
	The first big hole of openv*n service: service cannot be started
	Step 1: use the command to test whether the configuration file information is correct
	        openv*n /etc/openv*n/server.conf
			netstat -lntup|grep 1194
	Step 2: view profile configuration information
	Step 3: confirm whether the preparation of startup file is correct
	================================================================
windows host configuration deployment process (* * client deployment process)
The first process: Download and install the open client software
D:\Program Files (x86)\OpenV*N\config --- clients can be configured in this directory
Tip: it is in the config directory, not subdirectory, as long as it is in config
The second process: generate client certificate and key file
cd /etc/openv*n/easy-rsa/3.0.6/
	./easyrsa gen-req client01  nopass
	/etc/openv*n/easy-rsa/3.0.6/pki/private/client01.key

    ./easyrsa sign client client01
	/etc/openvp*n/easy-rsa/3.0.6/pki/issued/client01.crt
Organize data files in client directory
cp /etc/openv*n/easy-rsa/3.0.6/pki/private/client01.key  /etc/openv*n/client/
cp /etc/openv*n/easy-rsa/3.0.6/pki/issued/client01.crt   /etc/openv*n/client/
cp /etc/openv*n/easy-rsa/3.0.6/pki/ca.crt  /etc/openv8n/client
The third process: import the client certificate or key file into Windows
cd /etc/openv*n/client/
	sz -y  client01.key client01.crt ca.crt
Build profile in Windows
Under the openn program directory – \ sample config - get client.ovn and put it into the corresponding subdirectory of the – config directory
Copy to the following figure:
The rest of the client files are generated and exported here in linux
The fourth process: write and modify the client configuration file
Write client.ov*n client configuration file
client
dev tun
proto tcp
remote 10.0.0.63 1194
resolv-retry infinite
nobind
persist-key
persist-tun
ca ca.crt
cert client01.crt
key client01.key
cipher AES-256-CBC
verb 3
The fifth process: start the open client program
Double click to run the openVNgui program on the Windows host -- find the run openvn icon in the lower right corner -- right click the input connection
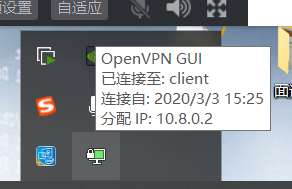
The sixth process: Test and verify:
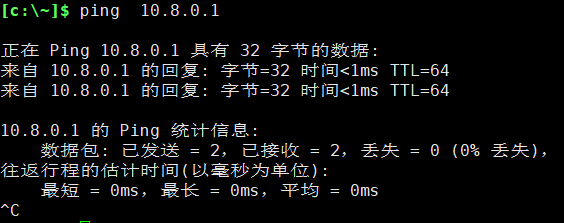
Verification 1: conduct address test of 10.0.0.1
Verification 2: ping the intranet address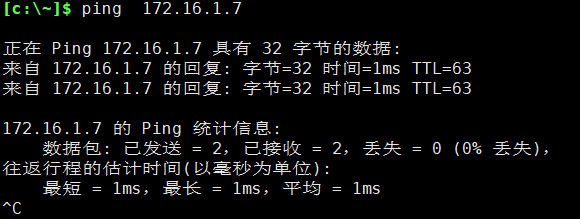
Confirm 01: whether the intranet host of the server can enable the configuration of return route information
Confirm 02: confirm whether openV*N turns on kernel forwarding function
Pits encountered during deployment:
Verify that the certificate and private key files are created correctly
 If private key or certificate file creation is abnormal --- delete pki directory and recreate pki directory to generate certificate and private key file

