What language does blockchain development use? Through this article, you will use go language to develop your own blockchain (or build blockchain with go language), understand how hash function keeps the integrity of blockchain, master how to create and add new blocks with go language programming, realize multiple nodes to generate blocks through competition, view the whole chain through browser, and learn all other basic knowledge about blockchain.
However, this article will not involve such consensus algorithms as the workload proof algorithm (PoW) and the rights and interests proof algorithm (PoS). At the same time, in order to let you see more clearly the blockchain and the addition of blocks, we simplify the process of network interaction. For P2P networks, such as the process of "whole network broadcasting", etc., we will fill in the following articles.
development environment
Let's assume you have a little experience in Go language development. After installing and configuring the Go development environment, we also need to obtain the following dependencies:
~$ go get github.com/davecgh/go-spew/spew
spew can help us to directly view the struct and slice data structures in the terminal.
~$ go get github.com/gorilla/mux
Gorilla's mux package is very popular. We use it to write web handler s.
~$ go get github.com/joho/godotenv
godotenv can help us read the. env configuration file in the root directory of the project, so that we don't have to hardcode the configuration such as http port into the code. Like this:
ADDR=8080
Next, we create a main.go file. After most of the work around this file, start to write code!
Import dependency package
We import all dependency packages declaratively:
package main

import (
    "crypto/sha256"
    "encoding/hex"
    "encoding/json"
    "io"
    "log"
    "net/http"
    "os"
    "time"

    "github.com/davecgh/go-spew/spew"
    "github.com/gorilla/mux"
    "github.com/joho/godotenv"
)
data model
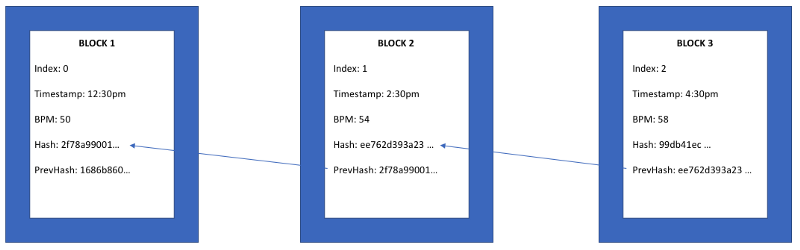
Next, we define a structure that represents the data model of each block that makes up the blockchain:
type Block struct {
    Index     int
    Timestamp string
    BPM       int
    Hash      string
    PrevHash  string
}
- Index is the position of this block in the whole chain
- Timestamp is obviously the timestamp of block generation
- Hash is the hash value generated by this block through SHA256 algorithm
- PrevHash represents the SHA256 hash value of the previous block
- BPM heart rate per minute
Next, we define a structure to represent the whole chain. The simplest representation is a Block slice:
var Blockchain []Block
We use the Hash algorithm (SHA256) to determine and maintain the correct order of blocks and blocks in the chain, ensuring that the PrevHash value of each block is equal to the Hash value of the previous block, so as to build the chain in the correct block order:
Hashing and generating new blocks
Why do we need hashing? There are two main reasons:
- Uniquely identify data on the premise of space saving. Hash is calculated from the data of the whole block. In our example, the data of the whole block is calculated into a fixed length and non forgeable string through SHA256.
- Maintain chain integrity. By storing the hash value of the previous block, we can ensure the correct order of each block in the chain. Any tampering with the data will change the hash value and destroy the chain at the same time. Take the medical and health field we are engaged in as an example. For example, if a malicious third party modifies the BPM value representing unhealthy in one or several blocks in order to adjust the price of "life insurance", then the whole chain becomes untrustworthy.
We then write a function to calculate the SHA256 hash value of the given data:
func calculateHash(block Block) string {
    record := string(block.Index) + block.Timestamp + string(block.BPM) + block.PrevHash
    h := sha256.New()
    h.Write([]byte(record))
    hashed := h.Sum(nil)
    return hex.EncodeToString(hashed)
}
The calculateHash function takes a block and calculates the SHA256 hash value from the Index, Timestamp, BPM, and PrevHash values in the block. Next, we can write a function to generate blocks:
func generateBlock(oldBlock Block, BPM int) (Block, error) {
    var newBlock Block

    t := time.Now()
    newBlock.Index = oldBlock.Index + 1
    newBlock.Timestamp = t.String()
    newBlock.BPM = BPM
    newBlock.PrevHash = oldBlock.Hash
    newBlock.Hash = calculateHash(newBlock)

    return newBlock, nil
}
The Index is obtained from the Index increment of the given previous block, the timestamp is obtained directly through the time.Now() function, the Hash value is calculated by the calculateHash function, and PrevHash is the Hash value of the given previous block.
Check block
After that, we need to have a function to judge whether a block has been tampered with. Check the Index to see whether the block is incrementing correctly, check whether PrevHash is consistent with the previous block's Hash, and then check whether the current block's Hash value is correct through calculateHash. In these steps, we can write a verification function:
func isBlockValid(newBlock, oldBlock Block) bool {
    if oldBlock.Index+1 != newBlock.Index {
        return false
    }
    if oldBlock.Hash != newBlock.PrevHash {
        return false
    }
    if calculateHash(newBlock) != newBlock.Hash {
        return false
    }
    return true
}
In addition to the check block, we will encounter a problem: both nodes generate blocks and add them to their chains. Who should we take as the criterion? We'll leave the details here for the next article,
Let's remember a principle: always choose the longest chain:
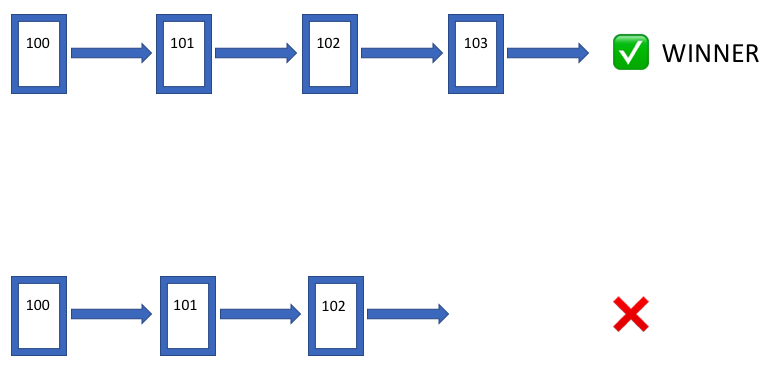
Generally speaking, a longer chain means that its data (status) is updated, so we need a function to help us switch the local expired chain to the latest one:
func replaceChain(newBlocks []Block) {
    if len(newBlocks) > len(Blockchain) {
        Blockchain = newBlocks
    }
}
At this stage, we have basically completed all the important functions. Next, we need a convenient and intuitive way to view our chain, including data and status. Viewing web pages through a browser may be the most appropriate way!
Web services
I guess you must be very familiar with traditional web services and development, so you will definitely see this part.
With the Gorilla/mux package, we first write a function to initialize our web service:
func run() error {
    mux := makeMuxRouter()
    httpAddr := os.Getenv("ADDR")
    log.Println("Listening on ", os.Getenv("ADDR"))
    s := &http.Server{
        Addr:           ":" + httpAddr,
        Handler:        mux,
        ReadTimeout:    10 * time.Second,
        WriteTimeout:   10 * time.Second,
        MaxHeaderBytes: 1 << 20,
    }

    if err := s.ListenAndServe(); err != nil {
        return err
    }

    return nil
}
The port number is obtained through the. env mentioned above. Add some basic configuration parameters, and the web service can listen and serve!
Next, we will define different endpoint s and corresponding handler s. For example, for GET request of "/", we can view the whole chain, and POST request of "/" can create blocks.
func makeMuxRouter() http.Handler {
    muxRouter := mux.NewRouter()
    muxRouter.HandleFunc("/", handleGetBlockchain).Methods("GET")
    muxRouter.HandleFunc("/", handleWriteBlock).Methods("POST")
    return muxRouter
}
handler for GET request:
func handleGetBlockchain(w http.ResponseWriter, r *http.Request) {
    bytes, err := json.MarshalIndent(Blockchain, "", "  ")
    if err != nil {
        http.Error(w, err.Error(), http.StatusInternalServerError)
        return
    }
    io.WriteString(w, string(bytes))
}
To simplify, we directly return the whole chain in JSON format. You can visit localhost:8080 or 127.0.0.1:8080 in the browser to check (here 8080 is the port number ADDR defined in. env).
The handler of POST request is a little complicated. Let's define the payload of POST request first:
type Message struct {
    BPM int
}
Let's look at the implementation of handler:
func handleWriteBlock(w http.ResponseWriter, r *http.Request) {
    var m Message

    decoder := json.NewDecoder(r.Body)
    if err := decoder.Decode(&m); err != nil {
        respondWithJSON(w, r, http.StatusBadRequest, r.Body)
        return
    }
    defer r.Body.Close()

    newBlock, err := generateBlock(Blockchain[len(Blockchain)-1], m.BPM)
    if err != nil {
        respondWithJSON(w, r, http.StatusInternalServerError, m)
        return
    }
    if isBlockValid(newBlock, Blockchain[len(Blockchain)-1]) {
        newBlockchain := append(Blockchain, newBlock)
        replaceChain(newBlockchain)
        spew.Dump(Blockchain)
    }

    respondWithJSON(w, r, http.StatusCreated, newBlock)

}
The payload defined above can be used in our POST request body, for example:
{"BPM":75}
Remember the generateBlock function we wrote earlier? It takes a "previous block" parameter and a BPM value. After the POST handler accepts the request, it can get the BPM value in the request body, and then generate a new block with the function of generating block and verifying block!
In addition, you can:
- Using spew.Dump function can print struct, slice and other data in the console in a very beautiful and easy to read way, which is convenient for us to debug.
- When testing POST requests, you can use the chrome plug-in of POSTMAN, which is more intuitive and convenient than curl.
After the POST request is processed, whether the block is created successfully or not, we need to return a response from the client:
func respondWithJSON(w http.ResponseWriter, r *http.Request, code int, payload interface{}) {
    response, err := json.MarshalIndent(payload, "", "  ")
    if err != nil {
        w.WriteHeader(http.StatusInternalServerError)
        w.Write([]byte("HTTP 500: Internal Server Error"))
        return
    }
    w.WriteHeader(code)
    w.Write(response)
}
It's almost done.
Next, we "assemble" these functions about blockchain and web Service:
func main() {
    err := godotenv.Load()
    if err != nil {
        log.Fatal(err)
    }

    go func() {
        t := time.Now()
        genesisBlock := Block{0, t.String(), 0, "", ""}
        spew.Dump(genesisBlock)
        Blockchain = append(Blockchain, genesisBlock)
    }()
    log.Fatal(run())
}
The genesis block is the most important part of the main function. It is used to initialize the blockchain. After all, the PrevHash of the first block is empty.
Oh yeah! It's done
You can get the complete code here: Github repo
Let's start it:
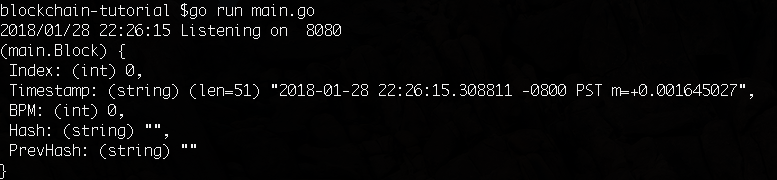
~$ go run main.go
In the terminal, we can see the log information of web server startup, and print out the information of creation block:
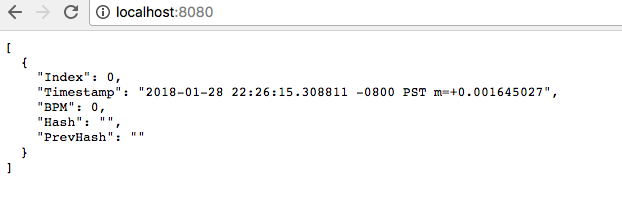
Then we open the browser and visit the address of localhost:8080. We can see that the current information of the whole blockchain is displayed in the page (of course, there is only one creation block at present):
Next, we send some POST requests through POSTMAN:

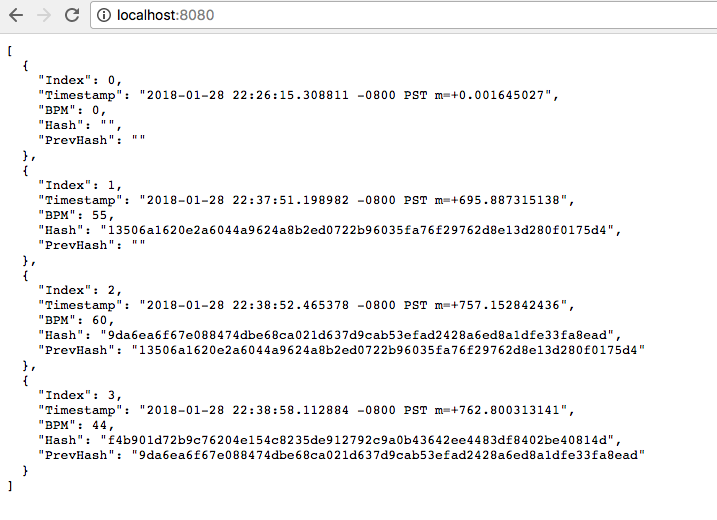
Refresh the page just now. Now there are more blocks in the chain. That's what we just generated. At the same time, you can see that the order and hash value of the blocks are correct.
summary
Just now we have completed a blockchain of our own. Although it is very simple (crude), it has the basic capabilities of block generation, hash calculation, block verification, etc. Then you can continue to study in depth
Other important knowledge of blockchain, such as consensus algorithm such as workload proof and equity proof, or smart contract, Dapp, side chain, etc.
At present, this implementation does not include any P2P network content. We will supplement this part in the next article. Of course, we encourage you to practice on this basis!
In addition, Amway has two courses: 1 Introduction to DApp development of Ethereum 2.DApp practice of Ethereum blockchain E-commerce