Preface:
The opening is relatively simple: Sagit.Framework For IOS Development Framework Introduction Development Tutorial 1: Framework Download and Environment Configuration
The second tutorial was written half before, which was not very easy to write. Besides, the content of the second tutorial simply introduced API. It had a lot to say and was boring.
So that half of the article was put down.
Later, I began to think about how to write this course. After several days of settling down, I finally made a decision:
This tutorial is shared with you with examples of IT love to see how it is applied in real combat.
This article is divided into two parts. The first part talks about the practical application, the second part supplements the design principles of the framework, and the expansion of future ideas.
Sagit implements boot page functionality:
1: First of all, we need to have N pictures of the guide page.
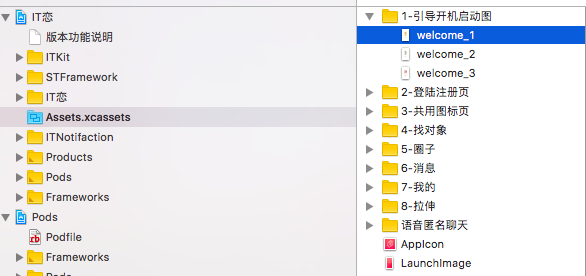
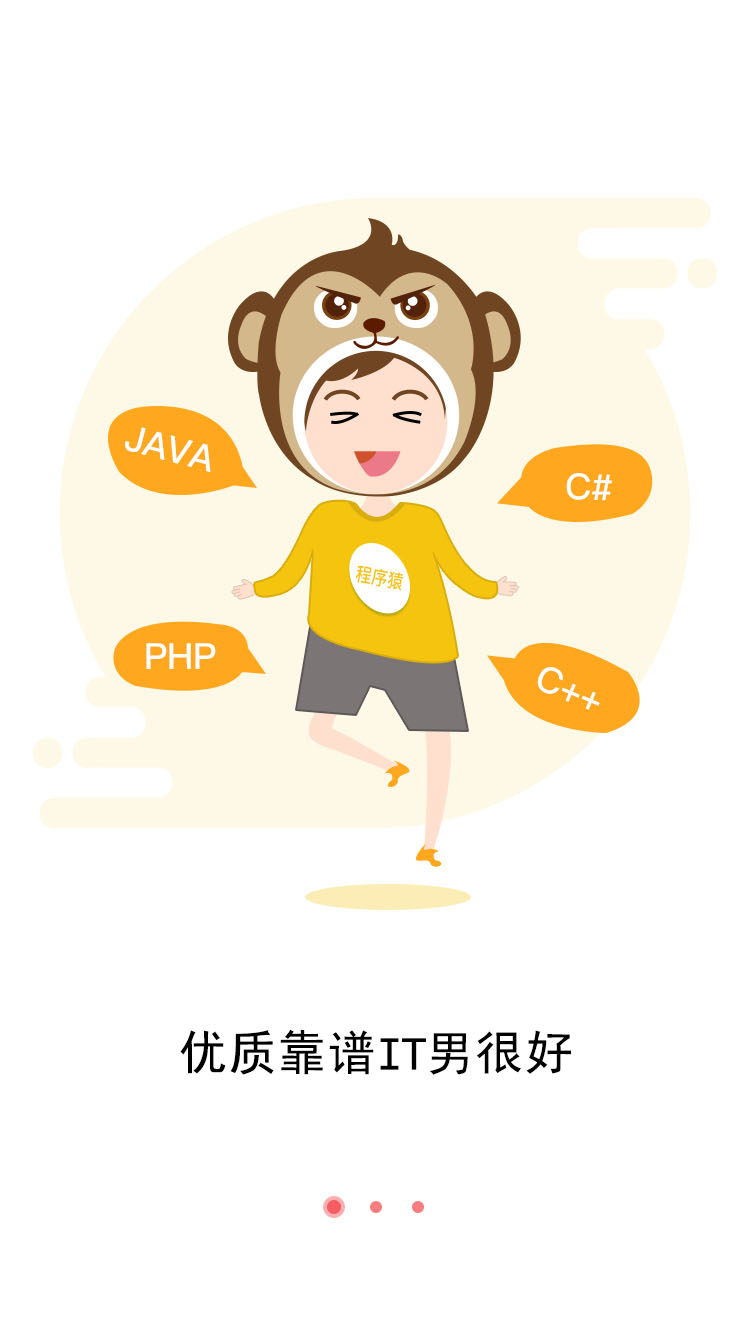
In IT love, there are three pieces, as follows (here the picture directly brings the effect of page turning, so we can save some trouble):


2: Then, logic and code:
Logical flow:
AppDelegate Startup= Check if App= WelcomeController is first started (Welcome Guide Page)
if([ITGlobal share].IsFirstRun)
    {
        //Welcome interface
        self.window.rootViewController = [WelcomeController new];
    }
    else if (launchOptions) {}
After sliding three pictures, the last one triggers the click event and enters the following interface according to the conditions:
A: (Update App) Token exists, jump to: MainController (main interface)

B: (First time) When there is no Token, jump to Start Controller.
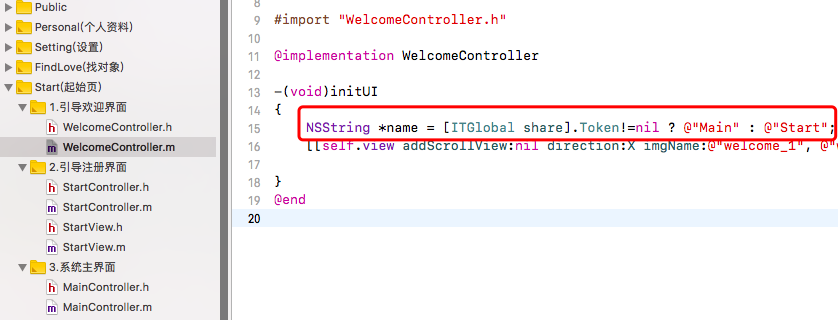
Then there's a line of code at the core that implements the functionality. Everything is so simple and easy:
[[self.view addScrollView:nil direction:X imgName:@"welcome_1", @"welcome_2", @"welcome_3", nil].lastSubView click:name];
Sagit Framework Principle Explanation:
1: Controller Load View Principle:
In the first picture above, pay attention to the details:
A: You can see the boot welcome interface. There is only one WelcomeController, and there is a WelcomeView.

B: To guide the registration interface, there is StartView corresponding to StartController.
This feature has been added in the past two days, mainly considering that when there is very little code in View, it saves files and is more concise.
So, the current process for Controller to detect loading View is:
@implementation STController

- (void)viewDidLoad {
    [super viewDidLoad];//Get the current class name
    NSString* className= NSStringFromClass([self class]);
    NSString* viewClassName=[className replace:@"Controller" with:@"View"];
    Class viewClass=NSClassFromString(viewClassName);
    if(viewClass!=nil)//view
    {
        self.view=self.stView=[[viewClass alloc] initWithController:self];
        [self.stView initView];
    }
    else
    {
        self.view=[[STView alloc] initWithController:self];//take view change into STView
        [self initUI];
    }
}
//Empty method (reserved for subclass coverage)
-(void)initUI{}
The code reads like this:
1: If XXXController detects the existence of XXXView, it loads and calls its initView method (which calls the initUI method again).

So the default loading convention of the framework is that the XXX name prefix is the same, and it will be loaded.

2: If the detection does not exist, call its own initUI method (which is why a single WelcomeController exists here).
2: AdUI-related methods of UIView.
The framework extends UIView, adds common component methods, and makes some special treatments on these components:
-(void)addView:(UIView *)view name:(NSString*)name;
-(UIView*)addUIView:(NSString*)name;
-(UIButton*)addSwitch:(NSString*)name;
-(UIButton *)addStepper:(NSString *)name;
-(UIButton *)addSlider:(NSString *)name;
-(UIButton *)addProgress:(NSString *)name;

-(UILabel*)addLabel:(NSString*)name;
-(UILabel*)addLabel:(NSString*)name text:(NSString*)text;
-(UILabel*)addLabel:(NSString*)name text:(NSString*)text font:(NSInteger)px;
-(UIImageView*)addImageView:(NSString*)name;
-(UIImageView*)addImageView:(NSString*)name imgName:(NSString*)imgName;
-(UIImageView*)addImageView:(NSString*)name imgName:(NSString*)imgName xyFlag:(XYFlag)xyFlag;

-(UITextField*)addTextField:(NSString*)name;
-(UITextField*)addTextField:(NSString*)name placeholder:(NSString*)placeholder;
-(UITextView*)addTextView:(NSString*)name;

-(UIButton*)addButton:(NSString*)name;
-(UIButton*)addButton:(NSString*)name imgName:(NSString*)imgName;
-(UIButton*)addButton:(NSString*)name imgName:(NSString*)imgName buttonType:(UIButtonType)buttonType;
-(UIButton*)addButton:(NSString*)name title:(NSString*)title;
-(UIButton*)addButton:(NSString*)name title:(NSString*)title font:(NSInteger)px;
-(UIButton*)addButton:(NSString*)name title:(NSString*)title font:(NSInteger)px buttonType:(UIButtonType)buttonType;
-(UIButton*)addButton:(NSString*)name title:(NSString*)title font:(NSInteger)px imgName:(NSString*)imgName buttonType:(UIButtonType)buttonType;
-(UIView*)addLine:name color:(id)colorOrHex;
-(UIScrollView*)addScrollView:(NSString*)name;
-(UIScrollView *)addScrollView:(NSString*)name direction:(XYFlag)direction imgName:(NSString*)imgName,...NS_REQUIRES_NIL_TERMINATION;
Some components are not involved at present, and may be added or further optimized according to the project situation in the future.
Let's start with the basic usage of addScrollView:
-(UIScrollView *)addScrollView:(NSString*)name direction:(XYFlag)direction imgName:(NSString*)imgName,...NS_REQUIRES_NIL_TERMINATION;
Core Notes:
1: Each UI has a name attribute, which is very core. It can be used to correlate events, find UI, and assign UI values. If it is not used, it can assign nil.

2: XYFlag refers to whether the sliding is about X or up and down Y.

3: You can specify an additional image name to load the image (when loaded internally, the ScrollView and the width and height of the image are automatically adjusted according to the data).

4: For an add UIView, when the width and height of xy are not specified, the frame property of the previous relative view is automatically inherited. Here is the parent view, full screen.
3: Trigger of events
AddScrollView just adds images and can slide, but we need to add click events to the last image:
So you need to get the last picture first. The framework extends four attributes to UIView:
-(UIView*)lastSubView;
-(UIView*)firstSubView;
-(UIView*)preView;
-(UIView*)nextView;
Used for easy access to the first and last sub-views, as well as their own peers of the previous and next.
Next, add a click event to the UIView.
The framework extends two types of click event binding for UIView:
#pragma mark Extended System Events
-(UIView*)click:(NSString*)event;
- (UIView*)addClick:(onClick)block;
click is used to specify the name of an event, and addClick is used to append a block of code for event execution.
First, we will talk about the process of finding events by click's event name: Click's event name, Click's event name, Click's event name, Click's event name and Click's event name.
1: Find out if the incoming event has a corresponding event in the Controller. If so, execute it if it does not continue as follows:

2: Append the suffix of event to eventClick and eventClick: See if there are corresponding events, if there are, execute, if not continue the following:

3: Append the suffix to Event Controller to see if there is a corresponding controller. If there is, execute the default open: event jump, if not, there is no bound event.
OK, the principle is explained here. Let's go over this line of code again.
[[self.view addScrollView:nil direction:X imgName:@"welcome_1", @"welcome_2", @"welcome_3", nil].lastSubView click:name];
Conclusion:
These days, I have been improving the framework. I believe that with the continuous improvement of the framework, we can make it much easier for everyone to write IOS code!!!
In the next article, we will continue with the next tutorial, taking jumping to the landing registration boot page as an example.
Finally, thank you for your attention to the Sagit framework and my IT company entrepreneurship project!