I. Introduction
Spring Boot simplifies the development of Spring applications. By adopting the idea that conventions are greater than configurations, it is easy to build an independent, product-level application with simplicity and simplicity.
1. Disadvantages of traditional J2EE development
Development is cumbersome, configuration is complex, development efficiency is low, deployment process is complex, third-party technology integration is difficult.
2. Advantages of SpringBoot
- Quickly rebuild stand-alone Spring projects and integrate with mainstream frameworks.
- With embedded Servlet containers, applications do not need to be packaged as WAR packages
- starters Auto-Dependence and Version Control
- A large number of automatic configuration, simplified development, can also modify its default values
- No need to configure XML, no code generation
- Runtime application monitoring in quasi-production environment
- Natural Inheritance of Cloud Computing
3. Spring Boot HelloWorld description
1.starters
- SpringBoot provides starters pom (starters) to simplify most scenarios of enterprise development. As long as starters pom of corresponding scenarios is introduced, most configuration of related technologies will be eliminated (field configuration), thus simplifying our development. We will use SpringBoot's Bean for our field configuration in our business.
- These starters cover almost all the common scenarios in javaee, and SpringBoot has rigorously tested and versioned the jar s that these scenarios depend on.
- The version of the jar package is defined in spring-boot-dependencies.
2. Entry class and @SpringBootApplication
- The program starts with the main method.
- Load the main program class using SpringApplication.run()
- The main program class needs to be marked @SpringBootApplication
- @ Enable AutoConfiguration is the core annotation
- @ Import imports all automatic configuration scenarios
- @ AutoConfiguration Package defines default package scanning rules.
- Program startup scans the package of the main program class and the components of all the subpackages below
3. Automatic Configuration
Automatic Configuration of xxxAutoConfiguration
- There are a lot of these classes in SpringBoot, and their purpose is to help us assemble automatically.
- It registers and configures all the components required for this scenario into the container
- They are in the META-INF/spring.factories file under the classpath
- spring-boot-autoconfigure.jar contains field configuration class code for all scenarios
- These automatic configuration classes are the key to SpringBoot's automatic assembly.
2. SpringBoot configuration
1. Configuration file
SpringBook uses a global configuration file. The configuration file name is fixed.
- application.properties or application.yml- The configuration file is placed in the src/main/resources directory or under the classpath/config.
The purpose of the global configuration file is to modify some default configurations
2. Configuration file value injection
- @ Value and @Configuration Properties are compared for attribute injection values
| Contrast point | @ConfigurationProperties | @Value |
|---|---|---|
| function | Bulk injection of attributes in configuration files | Specify one by one |
| Loose Binding (Loose Grammar) | Support | I won't support it |
| SpEL | I won't support it | Support |
| JSR303 Data Check | Support | I won't support it |
| Complex type encapsulation | Support | I won't support it |
Property name matching rule
- person.firstName uses a standard approach
- person.first-name is used-
- person.first_name is used_
- PERSON_FIRST_NAME Recommendation System Properties Use this Writing Method@PropertySource
Load the specified configuration fileConfigurationProperties
- Combining with @Bean to assign attributes
- Read the specified file in conjunction with @PropertySource (only for properties files).ConfigurationProperties Validation
- Support JSR303 for profile validation.
@Component
@PropertySource(value={"classpath:person.properties"})
@ConfigurationProperties(prefix="person")
@Validated
public class Person{
    @Email
    @Value("${person.email}")
    private String email;
}- ImportResource reads external configuration files
3. Configuration file placeholders
RandomValuePropertySource
Random numbers can be used in configuration files
-${random.value}
-${random.int}
-${random.long}
-${random.int(10)}
-${random.int[1024,65536]}- Property configuration occupier
- You can refer to the properties previously configured in the configuration file (you can use them here before Y priority).
- ${app.name: default value} to specify the default value when an attribute cannot be found.
app.name=MyApp
app.description=${app.name} is a SpringBoot Application
4.profile
profile is Spring's support for different configurations in different environments. It can switch environments quickly by activating specified parameters.
#### 1. Multi-profile file format
-
Format: application-{profile}.properties/yml
application-dev.properties,application-prod.properties2. Multi-profile Document Block Patterns
spring.profiles.active=prod #Activate the specified configuration
spring.profiles=prod
server.port=80
# Default represents the default configuration when not specified
spring.profiles=default
server.port=8080
3. Activation modes
- Command line: -- spring.profiles.active=dev
- Configuration file: spring.profiles.active=dev
- jvm parameter: - Dspring.profiles.active=dev
5. Configuration file loading location
SpringBoot startup scans the application.properties or application.yml file of the location as the default configuration file for SpringBoot.
- file:./config/
- file:./
- classpath:/config/
-classpath:/
- The above is in the order of priority from high to low. Files in all locations will be loaded, and the high priority configuration content will cover the low priority configuration content.
- You can change the default configuration by configuring spring.config.location.
6. Loading order of external configuration
- Command line parameters
- JNDI attributes from java: comp/env
- Java System Properties (System.getProperties())
- Operating system environment variables
- RandomValuePropertySource Configuration random. * Property Value
- application-{profile}.properties or application. YML (with spring.profile) configuration file outside the jar package
- application-{profile}.properties or application. YML (with spring.profile) configuration files inside the jar package
- application.properties or application. YML (without spring.profile) configuration files outside the jar package
- application.properties or application. YML (without spring.profile) configuration files inside the jar package
- @ The @PropertySource on the Configuration annotation class.
- Default properties specified by SpringApplication.setDefaultproperties.
7. Principle of Automatic Configuration
1.SpringBoot loads the main configuration class at startup, and turns on the automatic configuration function @EnableAutoConfiguration
2. @Enable AutoConfiguration
- Use Enable AutoConfiguration Import Selector to import some components into the container.
- Add all EnableAutoConfiguration values configured in META-INF/spring.factories to the container.
3.@Conditional Derived Annotations
| @ Conditional Extension Annotation | Function (judging whether the specified conditions of the current period are met) |
|---|---|
| @ConditionalOnJava | Does the java version of the system meet the requirements |
| @ConditionalOnBean | The specified Bean exists in the container |
| @ConditionalOnMissingBean | No specified Bean exists in the container |
| @ConditionalOnExpression | Satisfies SpEL expression specification |
| @ConditionalOnClass | There are specified classes in the system |
| @ConditionalOnMissingClass | There are no specified classes in the container |
| @ConditionalOnSingleCandidate | There is only one specified Bean in the container, or this Bean is the preferred Bean. |
| @ConditionalOnProperty | Does the property specified in the system have a specified value? |
| @ConditionalOnResource | Is there a specified resource file in the class path |
| @ConditionalOnWebApplication | The current web Environment |
| @ConditionalOnNotWebApplication | Currently, it is not a web environment |
| @ConditionalOnJndi | JNDI has specified items |
- Function: The condition specified by @Conditional must be established before adding components to the container and configuring all the contents in the container will take effect.
3. SpringBoot and Log
1. Logging Framework
There are many log frameworks in the market, such as JUL(java.util.logging), JCL(Apache Commons Logging), Log4J, Log4J2, Logback, SLF4j, jboss-logging, etc.
- SpringBook uses JCL internally in its early framework. spring-boot-starter-logging takes the form of slf4j+logback. Spring Boot can also be automatically configured (jul, log4j2, logback) and simplified.
| Log facade | Log implementation |
|---|---|
| JCL,SLF4J,jboss-logging | log4j,JUL,Log4j2,Logback |
| Log system | configuration file |
|---|---|
| Logback | logback-spring.xml, logback-spring.groovy, logback.xml or logback.groovy |
| Log4j2 | log4j2-spring.xml,log4j2.xml |
| JUL | logging.properties |
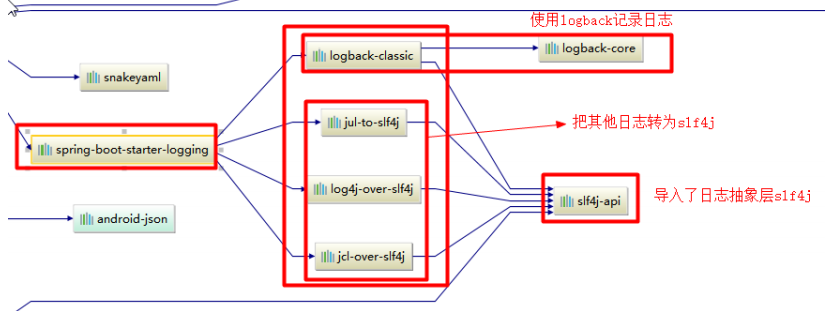
- Conclusion:
1. The SpringBook underlying layer also uses slf4j+logback for logging.
2. SpringBook also replaced all other logs with slf4j.
3. If other logging frameworks are introduced, commons-logging dependencies of Spring frameworks should be excluded.
IV. Web Development
1. Mapping rules of SpringBoot for static resources
- For all / webjars /**, go to classpath:/META-INF/resources/webjars/ for resources.
- If /** accesses any resources of the current project, go to the (folder of static resources) to find the mapping.
- Welcome pages; all index.html pages under the static resource folder are mapped by "/**".
- All **/favicon.ico is found under static resource files.
2. Spring MVC automatic configuration
1.SpringMVC auto-configuration
SpringBoot's default configuration for Spring MVC (WebMvc AutoConfiguration) is as follows:
- Contains Content Negotiating ViewResolver and BeanNameViewResolver.
- ViewResolver is automatically configured
- Content Negotiating ViewResolver: Combine all view parsers
- Support static resources, including support for Wenjars
 - Static Home Page Access
 - Support for favicon.ico
 - Converter, GenericConverter, Formatter are automatically registered.
     - Converter: Converter.
- Formatter: Formatter- Support for HttpMessageConverters
- HttpMessageConverter: Spring MVC is used to convert Http requests and responses.
- HttpMessageConverters: Determine from the container and get all HttpMessageConverters;
- HttpMessageConverter: Spring MVC is used to convert Http requests and responses.
- MessageCodes Resolver is automatically injected, and error code generation rules are defined.
- Automatically use Configurable Web Binding Initializer.
2. Extending Spring MVC
Write a configuration class (@Configuration), which is a WebMvc Configurer Adapter type and cannot be annotated with the @Enable WebMvc annotation
@Configuration
public class MyMvcConfig extends WebMvcConfigurerAdapter {

    @Override
    public void addViewControllers(ViewControllerRegistry registry) {
        registry.addViewController("/desperado").setViewName("success");
    }
}
principle
- WebMvc AutoConfiguration is an automatic configuration class for Spring MVC.
- Import when doing other automatic configurations.
- All WebMvcConfigurer s in the container are registered together.
- Our custom configuration class will also be invoked.
3. Take over Spring MVC
If you want to invalidate Spring MVC's automatic configuration, you just need to add @Enable WebMvc annotation to our custom configuration class.
@EnableWebMvc
@Configuration
public class MyMvcConfig extends WebMvcConfigurerAdapter {

    @Override
    public void addViewControllers(ViewControllerRegistry registry) {
        registry.addViewController("/desperado").setViewName("success");
    }
}
principle
- @ Annotations to Enable WebMvc
@Import(DelegatingWebMvcConfiguation.class)
public @interface EnableWebMvc{}- DelegatingWebMvcConfiguation
@Configuration
public class DelegatingWebMvcConfiguation extend WebMvcConfigurationSupport{}- WebMvcAutoConfiguration
@Configuration
@ConditionalOnWebApplication
@ConditionalOnClass({Servlet.class,DispatcherServlet.class,
                      WebMvcConfigurerAdapter.class})
//Without this component in the container, the automatic configuration class will take effect
@ConditionalOnMissingBean(WebMvcConfigurationSupport.class)
@AutoConfigureOrder(Ordered.HIGHEST_PRECEDENCE + 10)
@AutoConfigureAfter({DispatcherServletAutoConfiguration.class,
                ValidationAutoConfiguration.class})
public class WebMvcAutoConfiguration{}- @ Enable WebMvc imports WebMvc Configuration Support components.
- Importing WebMvc Configuration Supports is only the most basic function of Spring MVC.
4. Modify the default configuration
- When SpringBoot configures many components automatically, does the graphics card container have user configurations (@Bean,@Component)? If it has user configurations, it will configure automatically if it does not; if some components can have multiple components, it will combine user configurations with its default.
- There are many xxxConfigurer s in SpringBook that help us with extended configuration
- There are many xxxCustomizer s in SpringBook that help us customize our configuration
5. Default Access to Home Page
Configuration using custom WebMvc Configuration Adapter
//Spring MVC can be extended with WebMvc Configuration Adapter
@Configuration
public class MyMvcConfig extends WebMvcConfigurerAdapter {

    @Override
    public void addViewControllers(ViewControllerRegistry registry) {
        //Browsers send / desperado requests to success
        registry.addViewController("/desperado").setViewName("success");
    }

    //All webMvc Configurer Adapter components work together
    @Bean   //Register components into containers
    public WebMvcConfigurerAdapter webMvcConfigurerAdapter(){
        WebMvcConfigurerAdapter adapter = new WebMvcConfigurerAdapter() {
            @Override
            public void addViewControllers(ViewControllerRegistry registry) {
                //Pages that configure default paths
                registry.addViewController("/").setViewName("login");
                registry.addViewController("/index.html").setViewName("login");
            }
        };
        return adapter;
    }
}
6. internationalization
1. Write an internationalized configuration file
Write configuration files in different languages, such as login.properties, login_en_US.properties, login_zh_CN.properties, etc.
- SpringBook automatically configures components to manage international resource files.
@EnableConfigurationProperties
public class MessageSourceAutoConfiguration {
    private static final Resource[] NO_RESOURCES = new Resource[0];

    public MessageSourceAutoConfiguration() {
    }

    @Bean
    @ConfigurationProperties(
        prefix = "spring.messages"
    )
    public MessageSourceProperties messageSourceProperties() {
        return new MessageSourceProperties();
    }

    @Bean
    public MessageSource messageSource(MessageSourceProperties properties) {
        ResourceBundleMessageSource messageSource = new ResourceBundleMessageSource();
        if (StringUtils.hasText(properties.getBasename())) {
            //Set the base name of the internationalized resource file (remove the language country code)

                messageSource.setBasenames(StringUtils.commaDelimitedListToStringArray(StringUtils.trimAllWhitespace(properties.getBasename())));
        }

        if (properties.getEncoding() != null) {
            messageSource.setDefaultEncoding(properties.getEncoding().name());
        }

        messageSource.setFallbackToSystemLocale(properties.isFallbackToSystemLocale());
        Duration cacheDuration = properties.getCacheDuration();
        if (cacheDuration != null) {
            messageSource.setCacheMillis(cacheDuration.toMillis());
        }

        messageSource.setAlwaysUseMessageFormat(properties.isAlwaysUseMessageFormat());
        messageSource.setUseCodeAsDefaultMessage(properties.isUseCodeAsDefaultMessage());
        return messageSource;
    }
principle
Locale is acquired according to the regional information brought by the request header for internationalization.
5. Error handling mechanism
1. Default error handling mechanism
- Browser, return a default error page by default.
- Other clients respond to a json data by default.
principle
- Get information about the error page in Default Error Attributes
public class DefaultErrorAttributes implements ErrorAttributes {

    //Get information about the error page
    public Map<String, Object> getErrorAttributes(ServerRequest request, boolean includeStackTrace) {
        Map<String, Object> errorAttributes = new LinkedHashMap();
        errorAttributes.put("timestamp", new Date());
        errorAttributes.put("path", request.path());
        Throwable error = this.getError(request);
        HttpStatus errorStatus = this.determineHttpStatus(error);
        errorAttributes.put("status", errorStatus.value());
        errorAttributes.put("error", errorStatus.getReasonPhrase());
        errorAttributes.put("message", this.determineMessage(error));
        this.handleException(errorAttributes, this.determineException(error), includeStackTrace);
        return errorAttributes;
    }
}- Processing/error requests in Basic Error Controller
@Controller
@RequestMapping({"${server.error.path:${error.path:/error}}"})
public class BasicErrorController extends AbstractErrorController {

    //Generate html-type data, and browsers send requests to process this method
    @RequestMapping(
        produces = {"text/html"}
    )
    public ModelAndView errorHtml(HttpServletRequest request, HttpServletResponse response) {
        HttpStatus status = this.getStatus(request);
        Map<String, Object> model = Collections.unmodifiableMap(this.getErrorAttributes(request, this.isIncludeStackTrace(request, MediaType.TEXT_HTML)));
        response.setStatus(status.value());
       //Which page to go as the error page? Contains page address and page content
        ModelAndView modelAndView = this.resolveErrorView(request, response, status, model);
        return modelAndView != null ? modelAndView : new ModelAndView("error", model);
    }

   //Generate json data, and other clients come to this method for processing
    @RequestMapping
    public ResponseEntity<Map<String, Object>> error(HttpServletRequest request) {
        Map<String, Object> body = this.getErrorAttributes(request, this.isIncludeStackTrace(request, MediaType.ALL));
        HttpStatus status = this.getStatus(request);
        return new ResponseEntity(body, status);
    }
}- Error Page Customizer for misconfiguration
public class ErrorProperties {
    @Value("${error.path:/error}")
    private String path = "/error";
    private boolean includeException;
    private ErrorProperties.IncludeStacktrace includeStacktrace;
    private final ErrorProperties.Whitelabel whitelabel;
}- Error Mvc AutoConfiguration Generates Error Pages
public class ErrorMvcAutoConfiguration {

    private static class StaticView implements View {
        private static final Log logger = LogFactory.getLog(ErrorMvcAutoConfiguration.StaticView.class);

        private StaticView() {
        }

        public void render(Map<String, ?> model, HttpServletRequest request, HttpServletResponse response) throws Exception {
            if (response.isCommitted()) {
                String message = this.getMessage(model);
                logger.error(message);
            } else {
                StringBuilder builder = new StringBuilder();
                Date timestamp = (Date)model.get("timestamp");
                Object message = model.get("message");
                Object trace = model.get("trace");
                if (response.getContentType() == null) {
                    response.setContentType(this.getContentType());
                }

                builder.append("<html><body><h1>Whitelabel Error Page</h1>").append("<p>This application has no explicit mapping for /error, so you are seeing this as a fallback.</p>").append("<div id='created'>").append(timestamp).append("</div>").append("<div>There was an unexpected error (type=").append(this.htmlEscape(model.get("error"))).append(", status=").append(this.htmlEscape(model.get("status"))).append(").</div>");
                if (message != null) {
                    builder.append("<div>").append(this.htmlEscape(message)).append("</div>");
                }

                if (trace != null) {
                    builder.append("<div style='white-space:pre-wrap;'>").append(this.htmlEscape(trace)).append("</div>");
                }

                builder.append("</body></html>");
                response.getWriter().append(builder.toString());
            }
        }

        private String htmlEscape(Object input) {
            return input != null ? HtmlUtils.htmlEscape(input.toString()) : null;
        }

        private String getMessage(Map<String, ?> model) {
            Object path = model.get("path");
            String message = "Cannot render error page for request [" + path + "]";
            if (model.get("message") != null) {
                message = message + " and exception [" + model.get("message") + "]";
            }

            message = message + " as the response has already been committed.";
            message = message + " As a result, the response may have the wrong status code.";
            return message;
        }

        public String getContentType() {
            return "text/html";
        }
    }
5.DefaultErrorViewResolver parsing page
public class DefaultErrorViewResolver implements ErrorViewResolver, Ordered {

    public ModelAndView resolveErrorView(HttpServletRequest request, HttpStatus status, Map<String, Object> model) {
        ModelAndView modelAndView = this.resolve(String.valueOf(status.value()), model);
        if (modelAndView == null && SERIES_VIEWS.containsKey(status.series())) {
            modelAndView = this.resolve((String)SERIES_VIEWS.get(status.series()), model);
        }

        return modelAndView;
    }

    private ModelAndView resolve(String viewName, Map<String, Object> model) {
        //Find a page by default, error/404
        String errorViewName = "error/" + viewName;
        //Template engine can parse this page address, so template engine parses it.
        TemplateAvailabilityProvider provider = this.templateAvailabilityProviders.getProvider(errorViewName, this.applicationContext);
        //Return to the view address specified by errorViewName when the template engine is available
        //Template engine is not available, just find the corresponding page under the static resource folder
        return provider != null ? new ModelAndView(errorViewName, model) : this.resolveResource(errorViewName, model);
    }
2. Priority of error pages (custom error pages)
- In the case of template engine, error/status code (named error status code for the error page. html is placed under the error folder in the template engine folder), the error of this status code will come to the corresponding page.
- If there is no template engine (the template engine can't find the error page), look under the static resource folder.
- None of the above error pages is the default error prompt page for SpringBoot.
3. How to customize wrong json data
- Custom exception handling & returns custom json data (no adaptive effect)
@ControllerAdvice
public class MyExceptionHandler  {

    @ResponseBody
    @ExceptionHandler(CustomException.class)
    public Map<String,Object> handleException(Exception e){
        HashMap<String, Object> map = new HashMap<>();
        map.put("code","error message");
        map.put("message",e.getMessage());
        return map;
    }
}
2. Forwarding to/error for adaptive response effect processing.
@ControllerAdvice
public class MyExceptionHandler  {

    @ResponseBody
    @ExceptionHandler(CustomException.class)
    public String handleException(Exception e, HttpServletRequest request){
        HashMap<String, Object> map = new HashMap<>();
        //Pass in our own error status code, otherwise we won't go into the parsing process of customized error pages.
        request.setAttribute("java.servlet.error.status_code","500");
        map.put("code","error message");
        map.put("message",e.getMessage());
        //Forwarding to / error
        return "forward:/error";
    }
}
4. Send out customized data
After an error occurs, the return to / error request is processed by BasicErrorController, and the data that can be retrieved in response is retrieved by getErrorAttributes.
- Write an implementation class of ErrorController (or a subclass of AbstractErrorController) and put it in a container.
- The data available on the page or returned by json is obtained through errorAttributes.getErrorAttributes; DefaultErrorAttributes.getErrorAttributes() in the container defaults to data processing.
//Add custom ErrorAttributes to the container
@Component
public class MyErrorAttributes extends DefaultErrorAttributes {

    @Override
    public Map<String, Object> getErrorAttributes(WebRequest webRequest, boolean includeStackTrace) {
        //Get the map of ErrorAttributes
        Map<String, Object> map = super.getErrorAttributes(webRequest, includeStackTrace);
        //Add your own property field
        map.put("name","desperado");
        return map;
    }
}
Configuration of Embedded Servlet Container
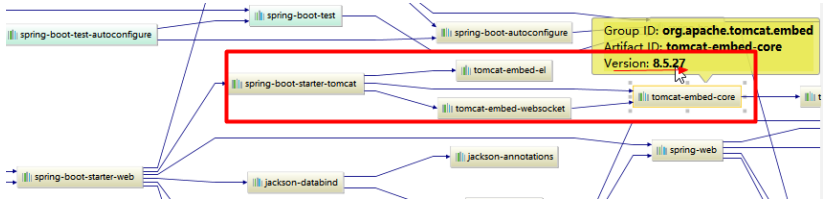
SpringBoot defaults to Tomcat as an embedded Servlet container
1. Modify the configuration of the Servlet container
Modify the server-related configuration in the configuration file application file.
server.port=8081
server.context_path=/crud
server.tomcat.uri-encoding=utf-8
2. Configuration of customized Servlet containers
Write an Embedded Servlet Container Customizer (using Web Server Factory Customizer in 2.x) to modify the configuration of the Servlet container.
@Bean
    public WebServerFactoryCustomizer<ConfigurableWebServerFactory> webServerFactoryCustomizer(){
        return new WebServerFactoryCustomizer<ConfigurableWebServerFactory>(){
            @Override
            public void customize(ConfigurableWebServerFactory factory) {
                 factory.setPort(8081);
            }
        };
    }
3. Register three components of Servlet
Because SpringBoot is the default way to start the embedded Servlet container in the jar package to start SpringBoot's web application, there is no web.xml file. So the way to register Servlet, Filter and Listener is different.
1. Injecting Servlet
    @Bean
    public ServletRegistrationBean<MyServlet> myServlet(){
        ServletRegistrationBean<MyServlet> registrationBean =
                new ServletRegistrationBean<>(new MyServlet(), "/myServlet");
        return registrationBean;
    }
2. Injecting Filter
    @Bean
    public FilterRegistrationBean<MyFilter> myFilter(){
        FilterRegistrationBean<MyFilter> registrationBean = new FilterRegistrationBean<>();
        registrationBean.setFilter(new MyFilter());
        registrationBean.setUrlPatterns(Arrays.asList("/hello","/myServlet"));
        return registrationBean;
    }
3. Injecting Listener
    @Bean
    public ServletListenerRegistrationBean<MyListener> myListener(){
        ServletListenerRegistrationBean<MyListener> registrationBean =
                new ServletListenerRegistrationBean<>(new MyListener());
        return registrationBean;
    }
4. Replace with other embedded Servlet containers
Replacing other servlets is very simple, just introduce their dependencies into the pom and then eliminate tomcat's dependencies.
      <dependency>
            <groupId>org.springframework.boot</groupId>
            <artifactId>spring-boot-starter-web</artifactId>
            <exclusions>
                <exclusion>
                    <groupId>org.springframework.boot</groupId>
                    <artifactId>spring-boot-starter-tomcat</artifactId>
                </exclusion>
            </exclusions>
        </dependency>

        <dependency>
            <groupId>org.springframework.boot</groupId>
            <artifactId>spring-boot-starter-jetty</artifactId>
        </dependency>
5. Principle of Automatic Configuration of Embedded Servlet Containers
- Embedded Servlet Container AutoConfiguration (2.x corresponding to Servlet Web Server Factory Configuration): Automatic configuration of embedded containers
@Configuration
class ServletWebServerFactoryConfiguration {
    ServletWebServerFactoryConfiguration() {
    }

    @Configuration
    @ConditionalOnClass({Servlet.class, Undertow.class, SslClientAuthMode.class})
    @ConditionalOnMissingBean(
        value = {ServletWebServerFactory.class},
        search = SearchStrategy.CURRENT
    )
    public static class EmbeddedUndertow {
        public EmbeddedUndertow() {
        }

        @Bean
        public UndertowServletWebServerFactory undertowServletWebServerFactory() {
            return new UndertowServletWebServerFactory();
        }
    }

    @Configuration
    @ConditionalOnClass({Servlet.class, Server.class, Loader.class, WebAppContext.class})
    @ConditionalOnMissingBean(
        value = {ServletWebServerFactory.class},
        search = SearchStrategy.CURRENT
    )
    public static class EmbeddedJetty {
        public EmbeddedJetty() {
        }

        @Bean
        public JettyServletWebServerFactory JettyServletWebServerFactory() {
            return new JettyServletWebServerFactory();
        }
    }

    @Configuration
   //Determine whether tomcat dependencies are currently introduced
    @ConditionalOnClass({Servlet.class, Tomcat.class, UpgradeProtocol.class})
    /// Determine that the current container does not have a user-defined Servlet Web ServerFactory:
    //Embedded Servlet Container Factory; Role: Create Embedded Servlet Containers

    @ConditionalOnMissingBean(
        value = {ServletWebServerFactory.class},
        search = SearchStrategy.CURRENT
    )
    public static class EmbeddedTomcat {
        public EmbeddedTomcat() {
        }

        @Bean
        public TomcatServletWebServerFactory tomcatServletWebServerFactory() {
            return new TomcatServletWebServerFactory();
        }
    }
}- Embedded Servlet Container Factory
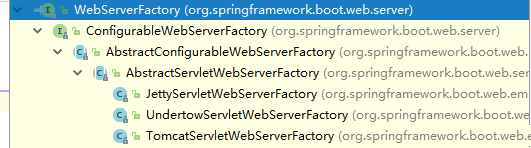
- Embedded Servlet container
4. Take tomcat as an example
public WebServer getWebServer(ServletContextInitializer... initializers) {
        Tomcat tomcat = new Tomcat();
        File baseDir = this.baseDirectory != null ? this.baseDirectory : this.createTempDir("tomcat");
        tomcat.setBaseDir(baseDir.getAbsolutePath());
        Connector connector = new Connector(this.protocol);
        tomcat.getService().addConnector(connector);
        this.customizeConnector(connector);
        tomcat.setConnector(connector);
        tomcat.getHost().setAutoDeploy(false);
        this.configureEngine(tomcat.getEngine());
        Iterator var5 = this.additionalTomcatConnectors.iterator();

        while(var5.hasNext()) {
            Connector additionalConnector = (Connector)var5.next();
            tomcat.getService().addConnector(additionalConnector);
        }

        this.prepareContext(tomcat.getHost(), initializers);
        return thisb.getTomcatWebServer(tomcat);
    }
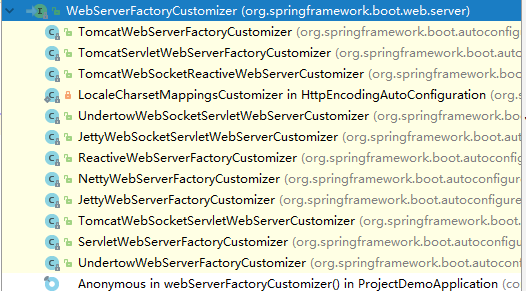
- Import Web Server Factory Customizer Bean PostProcessor into the container
public class WebServerFactoryCustomizerBeanPostProcessor implements BeanPostProcessor, BeanFactoryAware {

     //Before initialization
    public Object postProcessBeforeInitialization(Object bean, String beanName) throws BeansException {
        //If the current initialization is a component of type WebServerFactory
        if (bean instanceof WebServerFactory) {
            this.postProcessBeforeInitialization((WebServerFactory)bean);
        }

        return bean;
    }

    public Object postProcessAfterInitialization(Object bean, String beanName) throws BeansException {
        return bean;
    }

    private void postProcessBeforeInitialization(WebServerFactory webServerFactory) {
       //  Get all the customizers and call the customize method of each customizer to assign attributes to the servlet container
        ((Callbacks)LambdaSafe.callbacks(WebServerFactoryCustomizer.class, this.getCustomizers(), webServerFactory, new Object[0]).withLogger(WebServerFactoryCustomizerBeanPostProcessor.class)).invoke((customizer) -> {
            customizer.customize(webServerFactory);
        });
    }

    private Collection<WebServerFactoryCustomizer<?>> getCustomizers() {
        if (this.customizers == null) {
            // Customize the Servlet container to add a component of type WebServerFactoryCustomizer to the container
            this.customizers = new ArrayList(this.getWebServerFactoryCustomizerBeans());
            this.customizers.sort(AnnotationAwareOrderComparator.INSTANCE);
            this.customizers = Collections.unmodifiableList(this.customizers);
        }

        return this.customizers;
    }

    private Collection<WebServerFactoryCustomizer<?>> getWebServerFactoryCustomizerBeans() {
      //Get all the components of this type from the container: WebServerFactoryCustomizer
        return this.beanFactory.getBeansOfType(WebServerFactoryCustomizer.class, false, false).values();
    }
}
summary
- SpringBoot adds the corresponding WebServer Factory to the container according to the import dependencies.
- To create an object, a component in the container uses a WebServer Factory Customizer Bean PostProcessor postprocessor, which processes as long as it is an embedded Servlet factory.
- The post processor fetches all WebServer FactoryCustomizer from the container and calls the customization method of the customizer.
6. Embedded Servlet Container Startup Process
- SpringBoot starts running the run method.
- Call refreshContext(context); refresh IOC container (create IOC container, initialize container, create each component in container); create Annotation Config Servlet Web Server Application Context if a web application, and Annotation Config Reactive Web Application Context if a reactive application, otherwise create Annotation Config Reactive Web Application Context.
 protected ConfigurableApplicationContext createApplicationContext() {
        Class<?> contextClass = this.applicationContextClass;
        if (contextClass == null) {
            try {
                switch(this.webApplicationType) {
                case SERVLET:
                    contextClass = Class.forName("org.springframework.boot.web.servlet.context.AnnotationConfigServletWebServerApplicationContext");
                    break;
                case REACTIVE:
                    contextClass = Class.forName("org.springframework.boot.web.reactive.context.AnnotationConfigReactiveWebServerApplicationContext");
                    break;
                default:
                    contextClass = Class.forName("org.springframework.context.annotation.AnnotationConfigApplicationContext");
                }
            } catch (ClassNotFoundException var3) {
                throw new IllegalStateException("Unable create a default ApplicationContext, please specify an ApplicationContextClass", var3);
            }
        }

        return (ConfigurableApplicationContext)BeanUtils.instantiateClass(contextClass);
}- Call refresh(context); refresh the IOC container created above
 public void refresh() throws BeansException, IllegalStateException {
        Object var1 = this.startupShutdownMonitor;
        synchronized(this.startupShutdownMonitor) {
            //context to be refreshed
            this.prepareRefresh();
            //Call subclasses to refresh internal instance factories
            ConfigurableListableBeanFactory beanFactory = this.obtainFreshBeanFactory();
            //Instance factory to be used in this context
            this.prepareBeanFactory(beanFactory);

            try {

                // Allows post-processing of bean factories in context subclasses.
                this.postProcessBeanFactory(beanFactory);
                //Call the factory processor registered as a bean in context.
                this.invokeBeanFactoryPostProcessors(beanFactory);
                //Register the bean processor created by the intercepting bean.
                this.registerBeanPostProcessors(beanFactory);
                //Initialize the message source for this context
                this.initMessageSource();
                //Initialize the event multicast for this context.
                this.initApplicationEventMulticaster();
                //Initialize other special bean s in a specific context subclass.
                this.onRefresh();
                // Check listener bean s and register them.
                this.registerListeners();
                // Instantiate all remaining (non-delayed initialization) singletons.
                this.finishBeanFactoryInitialization(beanFactory);
                //Last step: Publish the corresponding events.
                this.finishRefresh();
            } catch (BeansException var9) {
                if (this.logger.isWarnEnabled()) {
                    this.logger.warn("Exception encountered during context initialization - cancelling refresh attempt: " + var9);
                }

                //Destroy the created singletons to avoid occupying resources.
                this.destroyBeans();
                //Reset the'active'flag
                this.cancelRefresh(var9);
                //Propagate exception to caller.
                throw var9;
            } finally {
              //Starting with us, reset the common introspective caches in the Spring core
              //The metadata of a single bean may no longer be needed.
                this.resetCommonCaches();
            }

        }
}- Call onRefresh (); the IOC container of the web overrides the onRefresh method.
- Web IOC containers create embedded Servlet containers.
private void createWebServer() {
        WebServer webServer = this.webServer;
        ServletContext servletContext = this.getServletContext();
        if (webServer == null && servletContext == null) {
            ServletWebServerFactory factory = this.getWebServerFactory();
            this.webServer = factory.getWebServer(new ServletContextInitializer[]{this.getSelfInitializer()});
        } else if (servletContext != null) {
            try {
                this.getSelfInitializer().onStartup(servletContext);
            } catch (ServletException var4) {
                throw new ApplicationContextException("Cannot initialize servlet context", var4);
            }
        }

        this.initPropertySources();
    }
Get the embedded Servlet container factory: Servlet WebServerFactory = this. getWebServerFactory (); Get the Servlet WebServerFactory component from the IOC container;
Get the embedded Servlet container using the container factory: his. webServer = factory. getWebServer (new Servlet Context Initializer []{this. getSelfInitializer ()});
public WebServer getWebServer(ServletContextInitializer... initializers) {
        Tomcat tomcat = new Tomcat();
        File baseDir = this.baseDirectory != null ? this.baseDirectory : this.createTempDir("tomcat");
        tomcat.setBaseDir(baseDir.getAbsolutePath());
        Connector connector = new Connector(this.protocol);
        tomcat.getService().addConnector(connector);
        this.customizeConnector(connector);
        tomcat.setConnector(connector);
        tomcat.getHost().setAutoDeploy(false);
        this.configureEngine(tomcat.getEngine());
        Iterator var5 = this.additionalTomcatConnectors.iterator();

        while(var5.hasNext()) {
            Connector additionalConnector = (Connector)var5.next();
            tomcat.getService().addConnector(additionalConnector);
        }

        this.prepareContext(tomcat.getHost(), initializers);
        return this.getTomcatWebServer(tomcat);
}- The embedded Servlet container creates and starts the Servlet container.
9. Start the embedded Servlet container first, then fetch the remaining uncreated objects in the IOC container, and the embedded Servlet container will be created when the IOC container starts.
7. Use an external Servlet container
1. Advantages and disadvantages of embedded Servlet container
Advantages: Simple and convenient.
Disadvantage: JSP is not supported by default, and optimizing customization is complex.
2. Using external Servlet container steps
- You must create a war project.
- Specify the embedded Tomcat as provided.
<dependency>
    <groupId>org.springframework.boot</groupId>
    <artifactId>spring‐boot‐starter‐tomcat</artifactId>
    <scope>provided</scope>
</dependency>
- You must write a subclass of SpringBootServletInitializer and call the configure method.
public class ServletInitializer extends SpringBootServletInitializer {
    @Override
    protected SpringApplicationBuilder configure(SpringApplicationBuilder application) {
        //Main program imported into SpringBoot application
        return application.sources(SpringBoot04WebJspApplication.class);
  }
}
- Start the server.
3. Principles and Rules
principle
Start the server, the server starts the SpringBoot application [SpringBoot Servlet Initializer], and starts the IOC container.
rule
- Server startup creates a Servlet Container Initializer instance in each jar package in the current web application.
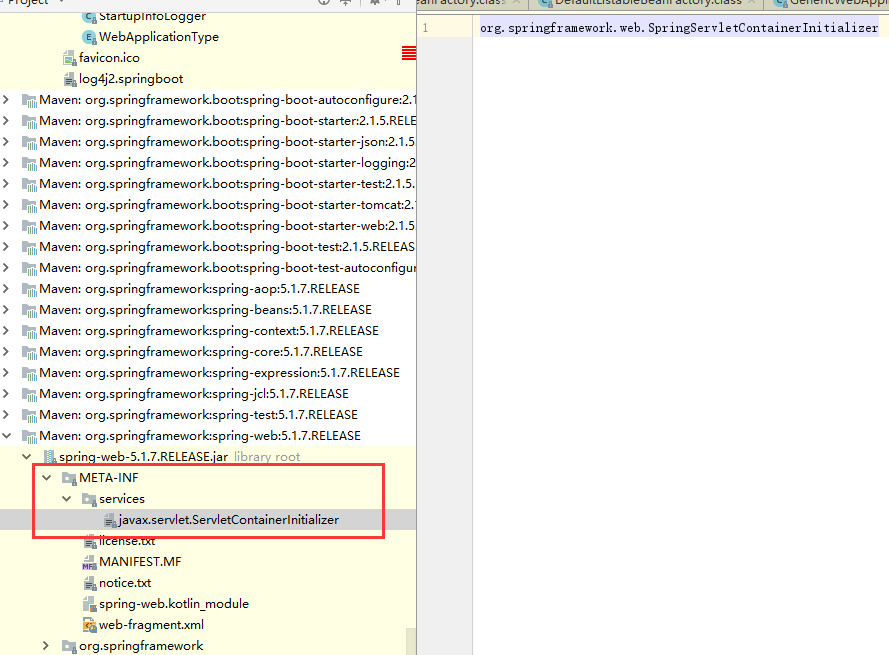
- The implementation of Servlet Container Initializer is placed under the META-INF/services file of the jar package. There is a file named javax. servlet. Servlet Container Initializer, which contains the full class name of the Servlet Container Initializer implementation class.
- You can also use @HandlerType to load the specified class when starting the application.
4. Start up the process
- Start tomcat.
- Load the javax. servlet. Servlet Container Initializer file under META-INF/services under the spring-web package.
- Spring Servlet Container Initializer passes all classes of this type labeled with @HandlerType into Set s with onStartup methods to create instances for these classes of Web Application Initializer type.
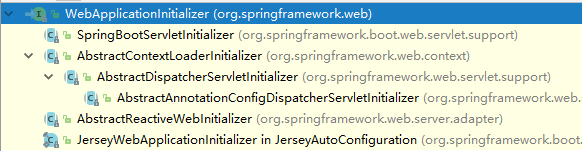
@HandlesTypes({WebApplicationInitializer.class})
public class SpringServletContainerInitializer implements ServletContainerInitializer {
    public SpringServletContainerInitializer() {
    }

    public void onStartup(@Nullable Set<Class<?>> webAppInitializerClasses, ServletContext servletContext) throws ServletException {
        List<WebApplicationInitializer> initializers = new LinkedList();
        Iterator var4;
        if (webAppInitializerClasses != null) {
            var4 = webAppInitializerClasses.iterator();

            while(var4.hasNext()) {
                Class<?> waiClass = (Class)var4.next();
                if (!waiClass.isInterface() && !Modifier.isAbstract(waiClass.getModifiers()) && WebApplicationInitializer.class.isAssignableFrom(waiClass)) {
                    try {
                        initializers.add((WebApplicationInitializer)ReflectionUtils.accessibleConstructor(waiClass, new Class[0]).newInstance());
                    } catch (Throwable var7) {
                        throw new ServletException("Failed to instantiate WebApplicationInitializer class", var7);
                    }
                }
            }
        }

        if (initializers.isEmpty()) {
            servletContext.log("No Spring WebApplicationInitializer types detected on classpath");
        } else {
            servletContext.log(initializers.size() + " Spring WebApplicationInitializers detected on classpath");
            AnnotationAwareOrderComparator.sort(initializers);
            var4 = initializers.iterator();

            while(var4.hasNext()) {
                WebApplicationInitializer initializer = (WebApplicationInitializer)var4.next();
                initializer.onStartup(servletContext);
            }

        }
    }
}- Each Web Application Initializer calls its own onStartup() method.
The class equivalent to SpringBootServletInitializer is created and the onStartup() method is executed.
When the SpringBootServletInitializer instance executes onStartup, crateRootApplication Context creates the container.
protected WebApplicationContext createRootApplicationContext(ServletContext servletContext) {
        // 1. Create Spring Application Builder
        SpringApplicationBuilder builder = this.createSpringApplicationBuilder();
        builder.main(this.getClass());
        ApplicationContext parent = this.getExistingRootWebApplicationContext(servletContext);
        if (parent != null) {
            this.logger.info("Root context already created (using as parent).");
            servletContext.setAttribute(WebApplicationContext.ROOT_WEB_APPLICATION_CONTEXT_ATTRIBUTE, (Object)null);
            builder.initializers(new ApplicationContextInitializer[]{new ParentContextApplicationContextInitializer(parent)});
        }

        builder.initializers(new ApplicationContextInitializer[]{new ServletContextApplicationContextInitializer(servletContext)});
        builder.contextClass(AnnotationConfigServletWebServerApplicationContext.class);
        // 2. Call the configure method, and the subclass reappears the method, passing in SpringBook's main program class
        builder = this.configure(builder);
        builder.listeners(new ApplicationListener[]{new SpringBootServletInitializer.WebEnvironmentPropertySourceInitializer(servletContext)});
        // 3. Create a Spring application using builder
        SpringApplication application = builder.build();
        if (application.getAllSources().isEmpty() && AnnotationUtils.findAnnotation(this.getClass(), Configuration.class) != null) {
            application.addPrimarySources(Collections.singleton(this.getClass()));
        }

        Assert.state(!application.getAllSources().isEmpty(), "No SpringApplication sources have been defined. Either override the configure method or add an @Configuration annotation");
        //Ensure that error pages are registered
        if (this.registerErrorPageFilter) {
            application.addPrimarySources(Collections.singleton(ErrorPageFilterConfiguration.class));
        }
        // 4. q Start Spring Application
        return this.run(application);
    }
Spring's application starts and creates an IOC container.
Start the Servlet container first, then the SpringBook application.