0. Preface
Qt3D is initiated by Nokia, and then improved by Digia and KDAB (the new version seems to be basically made by KDAB). It is a 3D image display and processing module based on OpenGL. Unfortunately, the data of Qt3D is relatively small, and with the version change, many online old Demo can't run.
In addition to the examples in QtCreator, here we recommend several github projects of Qt3D, which can refer to learning:
https://github.com/MidoriYakumo/learnopengl-qt3d
https://github.com/jaredtao/Qt3D-learn
https://github.com/KDAB/qt3d-examples
In addition, you can see the overview of Qt3D: https://doc.qt.io/qt-5/qt3d-overview.html
Because I just played, so a lot of things do not understand, slowly learn. Text code link: https://github.com/gongjianbo/HelloQt3D
1. Use Qt3D in QtQuick
Before use, add the Qt3D module to the pro file
QT += qml quick
QT += 3dcore 3drender 3dinput 3dlogic 3dextras 3dquick 3danimation
To create a 3D scene embedded in QtQuick, you need a Scene3D object. In scene, we define our 3D objects through Entity. The organizational structure of multiple entities is similar to the object tree. Scene3D needs a root Entity to define some basic behaviors. A simple empty window example is as follows:

import QtQuick 2.15
import QtQuick.Scene3D 2.15
import Qt3D.Core 2.15
import Qt3D.Render 2.15

Item{
    //Create 3d scene embedded in QtQuick
    Scene3D {
        id: scene3d
        anchors.fill: parent
        anchors.margins: 20
        //Entity entity is a Node subclass, which can aggregate several Component3D instances to specify its behavior
        //Root entity
        Entity {
            //The RenderSettings component must be a component of the scene root entity.
            //It specifies the rendering policy and selection settings, and hosts the active FrameGraph
            RenderSettings {
                //Equivalent to glClearColor
                activeFrameGraph: ClearBuffers {
                    buffers: ClearBuffers.ColorBuffer
                    clearColor: Qt.rgba(0.0,0.5,0.0,1.0)
                    RenderSurfaceSelector {
                        // Default render output: window surface
                    }
                }
            }
        }
    }
    Text {
        anchors.centerIn: parent
        text: "First Window"
    }
}
Qt3D provides us with some basic Mesh and Material components. For simple applications, we can directly splice these basic shapes (some basic information in my book is written on the code Notes):

import QtQuick.Scene3D 2.15
import Qt3D.Core 2.15
import Qt3D.Render 2.15
import Qt3D.Input 2.15
import Qt3D.Extras 2.15
import Qt3D.Logic 2.15

//Create 3d scene embedded in QtQuick
Scene3D {
    //Automatic Aspect Ratio
    cameraAspectRatioMode: Scene3D.AutomaticAspectRatio
    aspects: ["logic", "input"]

    //Entity entity is a Node subclass, which can aggregate several Component3D instances to specify its behavior
    //Root entity
    Entity {
        id: root
        //camera
        Camera {
            id: camera
            //perspective projection
            projectionType: CameraLens.PerspectiveProjection
            fieldOfView: 45
            nearPlane: 0.1
            farPlane: 1000.0
            position: Qt.vector3d(0.0, 0.0, 10.0)
            upVector: Qt.vector3d(0.0, 1.0, 0.0)
            viewCenter: Qt.vector3d(0.0, 0.0, 0.0)
        }
        //For camera control
        OrbitCameraController {
            // Press the left mouse button to move the camera position when dragging along the x or y axis
            // Press the right mouse button to control the camera deflection when dragging along the x or y axis
            camera: camera
        }
        //The RenderSettings component must be a component of the scene root entity.
        //It specifies the rendering policy and selection settings, and hosts the active FrameGraph
        RenderSettings {
            //Forward rendering. A rendering method that is calculated on a light by light basis.
            activeFrameGraph: ForwardRenderer {
                camera: camera
                clearColor: Qt.rgba(0.0, 0.3, 0.0, 1.0)
            }
        }
        //The InputSettings component must be a component of the scene root entity.
        //It stores a pointer to an object that acts as the source of input events to be processed by various input classes.
        InputSettings{
        }

        //Object Node
        Entity {
            PhongMaterial {
                id: material
                //Ambient light
                ambient: "gray"
                //Diffuse light
                diffuse: "orange"
                //Specular Highlights
                specular: "yellow"
                //Highlight radius
                shininess:32

            }
            /*CuboidMesh {
                id: cube
            }
            Transform {
                id: trans
                matrix: {
                    let m = Qt.matrix4x4();
                    //Rotate the lower angle, the default front facing can't see the effect
                    m.rotate(45, Qt.vector3d(1, 1, 0))
                    return m;
                }
            }
            components: [material, cube, trans]*/
            Entity{
                id: sub1
                CuboidMesh {
                    id: cube1
                    xExtent: 2
                    zExtent: 2
                }
                Transform {
                    id: trans1
                    matrix: {
                        let m = Qt.matrix4x4();
                        //The angle under the rectangle rotation is invisible by default
                        m.rotate(45, Qt.vector3d(1, 1, 0))
                        return m;
                    }
                }
                components: [cube1, trans1,material]
            }
            Entity{
                id:sub2
                SphereMesh {
                    id: ball2
                    //Radius defaults to 1
                    radius: 1
                    //Number of grid rings
                    rings: 2
                    //Number of grid slices
                    slices: 10
                }
                Transform {
                    id: trans2
                    matrix: {
                        let m = Qt.matrix4x4();
                        //Stagger with another mesh
                        m.translate(Qt.vector3d(3, 0, 0))
                        return m;
                    }
                }
                components: [ball2, trans2,material]
            }
        }
    }
}
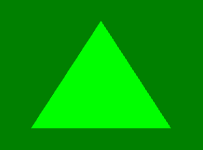
2. Draw a triangle
3D learning without triangles is incomplete. To draw triangles, you need to add GeometryRenderer geometric rendering objects and Material objects to entities. Vertex information is in Geometry, while shaders are in Material:
import QtQuick 2.15
import QtQuick.Scene3D 2.15
import Qt3D.Core 2.15
import Qt3D.Render 2.15
import Qt3D.Extras 2.15

//The documents of Qt3D QML are not very detailed. For some documents, please refer to the CPP version
//Create 3d scene embedded in QtQuick
Scene3D{
    id:scene
    anchors.fill: parent

    //Root Entity
    Entity {
        //The RenderSettings component must be a component of the scene root entity.
        //It specifies the rendering policy and selection settings, and hosts the active FrameGraph
        RenderSettings {
            id: renderSettings
            //Save the currently active FrameGraph
            //Qt 3D rendering allows the rendering algorithm to be completely data driven.
            //The data structure of this control is called framework
            activeFrameGraph: ClearBuffers {
                //Why can't ColorBuffer render triangles?
                buffers: ClearBuffers.ColorDepthBuffer
                clearColor: Qt.rgba(0.0,0.5,0.0,1.0)

                //Can be used to select the surface of the Qt3D rendered content.
                //The surface can be a window surface or an off screen surface.
                RenderSurfaceSelector {
                    //In contrast to each material state that you can set on RenderPass,
                    //The state set on the RenderStateSet is global
                    RenderStateSet {
                        renderStates: DepthTest {
                            //Pass the depth test if the fragment depth is less than the z buffer value
                            depthFunction: DepthTest.Less
                        }
                    }
                }
            }
        }

        //Triangle Entity
        Entity{
            //Geometry renderer
            GeometryRenderer {
                id: geometry
                //Geometry
                //The Geometry type is used to group the list of Attribute objects together,
                //To form the geometry that Qt3D can render with GeometryRenderer.
                geometry: Geometry {
                    //Attribute attribute, corresponding to attribute in Shader
                    Attribute {
                        id: position
                        attributeType: Attribute.VertexAttribute
                        vertexBaseType: Attribute.Float
                        vertexSize: 3
                        count: 3
                        name: "position"
                        buffer: Buffer {
                            type: Buffer.VertexBuffer
                            usage: Buffer.StaticDraw
                            accessType: Buffer.Write
                            data: new Float32Array(
                                      [
                                          -0.5, -0.5, 0.0,
                                          0.5, -0.5, 0.0,
                                          0.0,  0.5, 0.0,
                                      ])

                        }
                    }
                }
            }//end GeometryRenderer
            //Material definition how to render Entity
            Material {
                id: material
                effect: Effect {
                    //A rendering method, Technique, specifies a set of RenderPass objects, FilterKey objects, Parameter objects and graphicfiifilter,
                    //Together, they define rendering techniques that a given graphics API can render.
                    techniques: Technique {
                        //Specify the graphics API filter to use
                        //profile defaults to NoProfile. When in Core mode, set to CoreProfile. Streamline.
                        graphicsApiFilter.profile: GraphicsInfo.profile === GraphicsInfo.CoreProfile ?
                                                       GraphicsApiFilter.CoreProfile : GraphicsApiFilter.NoProfile
                        //Specifies the rendering channel used by tehcnique
                        renderPasses: RenderPass {
                            //Shaders
                            shaderProgram: ShaderProgram {
                                //GLSL can use strings or files
                                vertexShaderCode: vertStr
                                //vertexShaderCode: loadSource('qrc:/triangle1.vert')
                                fragmentShaderCode: fragStr
                                //fragmentShaderCode: loadSource('qrc:/triangle1.frag')
                            }
                        }
                    }
                }

            }//end Material
            components: [geometry, material]
        }


    }

    property string vertStr: '
                    #version 330 core
                    layout (location = 0) in vec3 position;
                    void main()
                    {
                        gl_Position = vec4(position, 1.0f);
                    }
                    '
    property string fragStr: '
                    #version 330 core
                    out vec4 color;
                    void main()
                    {
                        color = vec4(0.0f, 1.0f, 0.0f, 1.0f);
                    }
                    '
}