Ocelot (IV) - Authentication and Authorization
Author: markjiang7m2
Original address: https://www.cnblogs.com/markjiang7m2/p/10932805.html
Source address: https://gitee.com/Sevenm2/OcelotDemo
This article is the fourth in my Ocelot series, Authentication and Authorization. In the previous series of articles, our downstream service interfaces are open, without any authentication. Anyone can call them at will as long as they know the calling method of the interface. Therefore, it is easy to cause information leakage or service attack.
Just like before I want to find Willing, I have to register with HR department and get my own work card. Then I take my work card to Willing, show my identity as a company employee, and have the right to ask him to help me complete a task.
This paper integrates A. net core service authentication framework Identity Server 4 and how to access Identity Server 4 authentication and authorization in Ocelot.
Keep up with an article Ocelot (III) - Service Discovery Consul in this article is similar. This is a series of articles about Ocelot. I am not going to go into details about Identity Server 4 for the time being. In this article, I also use Identity Server 4's simplest Client authentication mode.
For more information on Ocelot functions, check out my series of articles
- Ocelot -.Net Core Open Source Gateway
- Ocelot (II) - Request Aggregation and Load Balancing
- Ocelot (III) - Service Discovery
The complete code for the case in this article can be downloaded from my code repository.
- Warehouse Address: https://gitee.com/Sevenm2/OcelotDemo
Identity Server 4 uses
Identity Server 4 has many authentication modes, including user password, client and so on. I just need to implement the authentication process of Identity Server 4, so I choose the simplest client mode.
First, let's look at how the system uses Identity Server 4 for authentication when there is no Ocelot gateway.
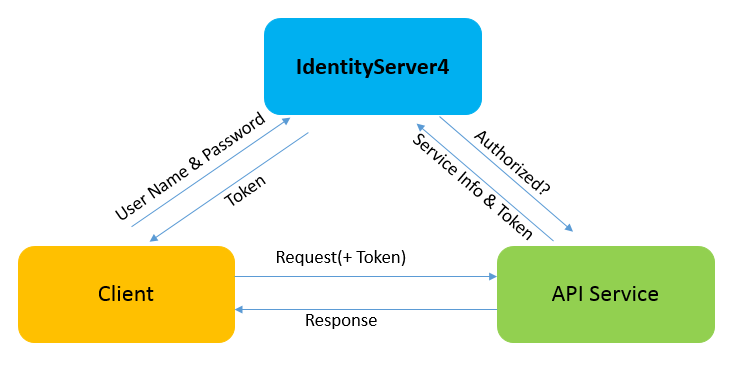
Clients need to first think of Identity Server to request authentication, get a Token, and then take the Token to the downstream service to make a request.
I try to build this authentication service according to the flow chart.
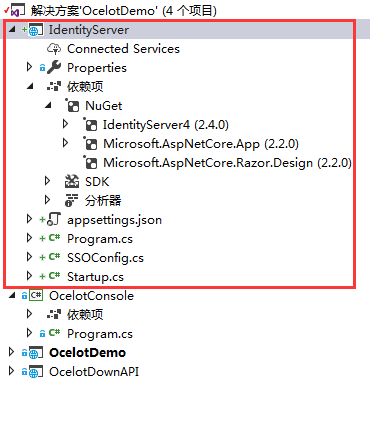
Create Identity Server Server Server
Create an empty Asp.Net Core Web API project, because this project only serves as Identity Server, so I delete Controller directly.
Using NuGet to add Identity Server 4, you can install Identity Server 4 directly using NuGet package manager search, or execute the following command line through PowerShell built in VS
Install-Package IdentityServer4
Add the configuration of Identity Server 4 to appsettings.json
{
  "Logging": {
    "LogLevel": {
      "Default": "Warning"
    }
  },
  "SSOConfig": {
    "ApiResources": [
      {
        "Name": "identityAPIService",
        "DisplayName": "identityAPIServiceName"
      }
    ],
    "Clients": [
      {
        "ClientId": "mark",
        "ClientSecrets": [ "markjiang7m2" ],
        "AllowedGrantTypes": "ClientCredentials",
        "AllowedScopes": [ "identityAPIService" ]
      }
    ]
  },
  "AllowedHosts": "*"
}
ApiResources is an array type that represents a list of all downstream services managed by Identity Server
- Name: downstream service name
- DisplayName: Downstream Service Alias
Clients are array types that represent a list of all upstream clients managed by Identity Server
- ClientId: Client ID
- ClientSecrets: Client's corresponding key
- AllowedGrantTypes: The authentication mode supported by this client is currently supported as follows:
- Implicit
- ImplicitAndClientCredentials
- Code
- CodeAndClientCredentials
- Hybrid
- HybridAndClientCredentials
- ClientCredentials
- ResourceOwnerPassword
- ResourceOwnerPasswordAndClientCredentials
- DeviceFlow
- Implicit
- AllowedScopes: The list of downstream services that the client supports access must be registered in the ApiResources list
Create a new class to read the configuration of Identity Server 4
using IdentityServer4.Models;
using Microsoft.Extensions.Configuration;
using System;
using System.Collections.Generic;
using System.Linq;
using System.Threading.Tasks;

namespace IdentityServer
{
    public class SSOConfig
    {
        public static IEnumerable<ApiResource> GetApiResources(IConfigurationSection section)
        {
            List<ApiResource> resource = new List<ApiResource>();

            if (section != null)
            {
                List<ApiConfig> configs = new List<ApiConfig>();
                section.Bind("ApiResources", configs);
                foreach (var config in configs)
                {
                    resource.Add(new ApiResource(config.Name, config.DisplayName));
                }
            }

            return resource.ToArray();
        }
        /// <summary>
        /// Define trusted Client client
        /// </summary>
        /// <returns></returns>
        public static IEnumerable<Client> GetClients(IConfigurationSection section)
        {
            List<Client> clients = new List<Client>();

            if (section != null)
            {
                List<ClientConfig> configs = new List<ClientConfig>();
                section.Bind("Clients", configs);
                foreach (var config in configs)
                {
                    Client client = new Client();
                    client.ClientId = config.ClientId;
                    List<Secret> clientSecrets = new List<Secret>();
                    foreach (var secret in config.ClientSecrets)
                    {
                        clientSecrets.Add(new Secret(secret.Sha256()));
                    }
                    client.ClientSecrets = clientSecrets.ToArray();

                    GrantTypes grantTypes = new GrantTypes();
                    var allowedGrantTypes = grantTypes.GetType().GetProperty(config.AllowedGrantTypes);
                    client.AllowedGrantTypes = allowedGrantTypes == null ?
                        GrantTypes.ClientCredentials : (ICollection<string>)allowedGrantTypes.GetValue(grantTypes, null);

                    client.AllowedScopes = config.AllowedScopes.ToArray();

                    clients.Add(client);
                }
            }
            return clients.ToArray();
        }
    }

    public class ApiConfig
    {
        public string Name { get; set; }
        public string DisplayName { get; set; }
    }

    public class ClientConfig
    {
        public string ClientId { get; set; }
        public List<string> ClientSecrets { get; set; }
        public string AllowedGrantTypes { get; set; }
        public List<string> AllowedScopes { get; set; }
    }
}
Insert Identity Server Service into Startup.cs
public void ConfigureServices(IServiceCollection services)
{
    var section = Configuration.GetSection("SSOConfig");
    services.AddIdentityServer()
        .AddDeveloperSigningCredential()
        .AddInMemoryApiResources(SSOConfig.GetApiResources(section))
        .AddInMemoryClients(SSOConfig.GetClients(section));

    services.AddMvc().SetCompatibilityVersion(CompatibilityVersion.Version_2_2);
}
Using Identity Server Middleware
public void Configure(IApplicationBuilder app, IHostingEnvironment env)
{
if (env.IsDevelopment())
{
app.UseDeveloperExceptionPage();
}
app.UseIdentityServer();
app.UseMvc();
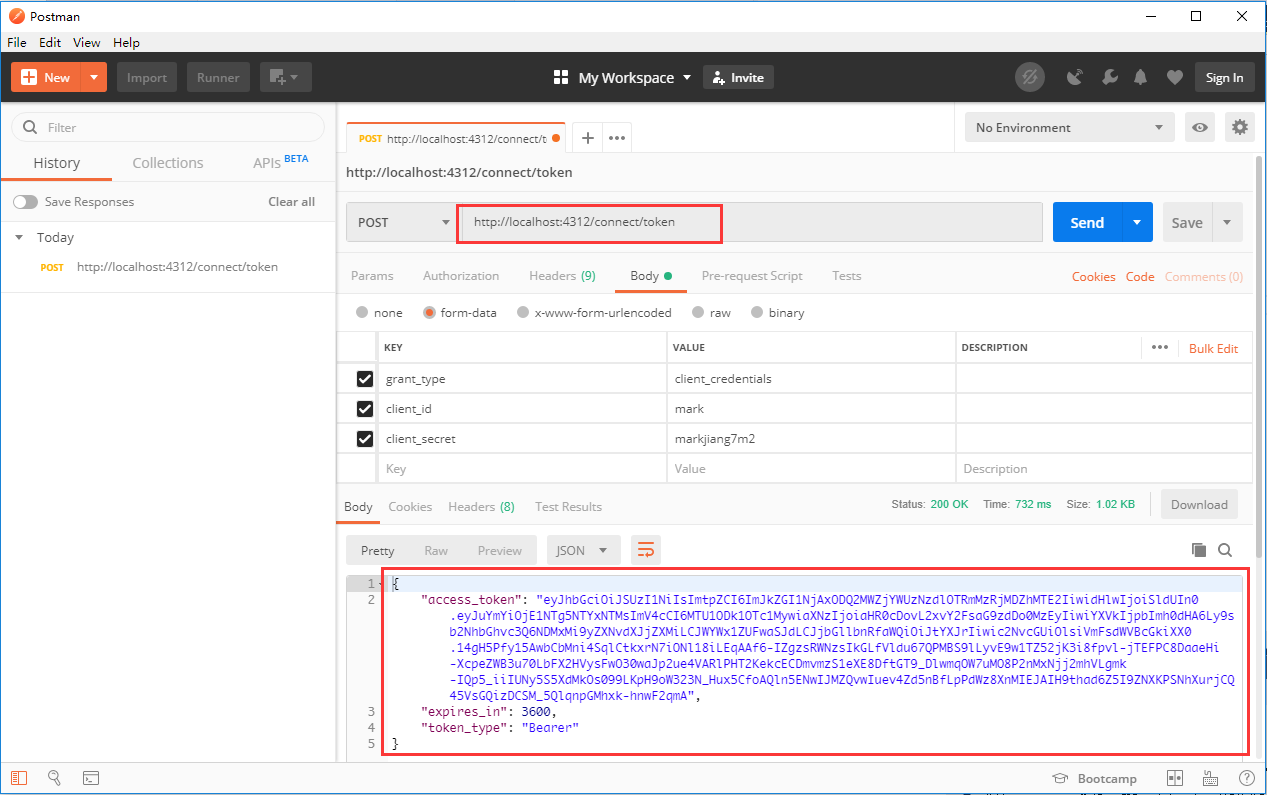
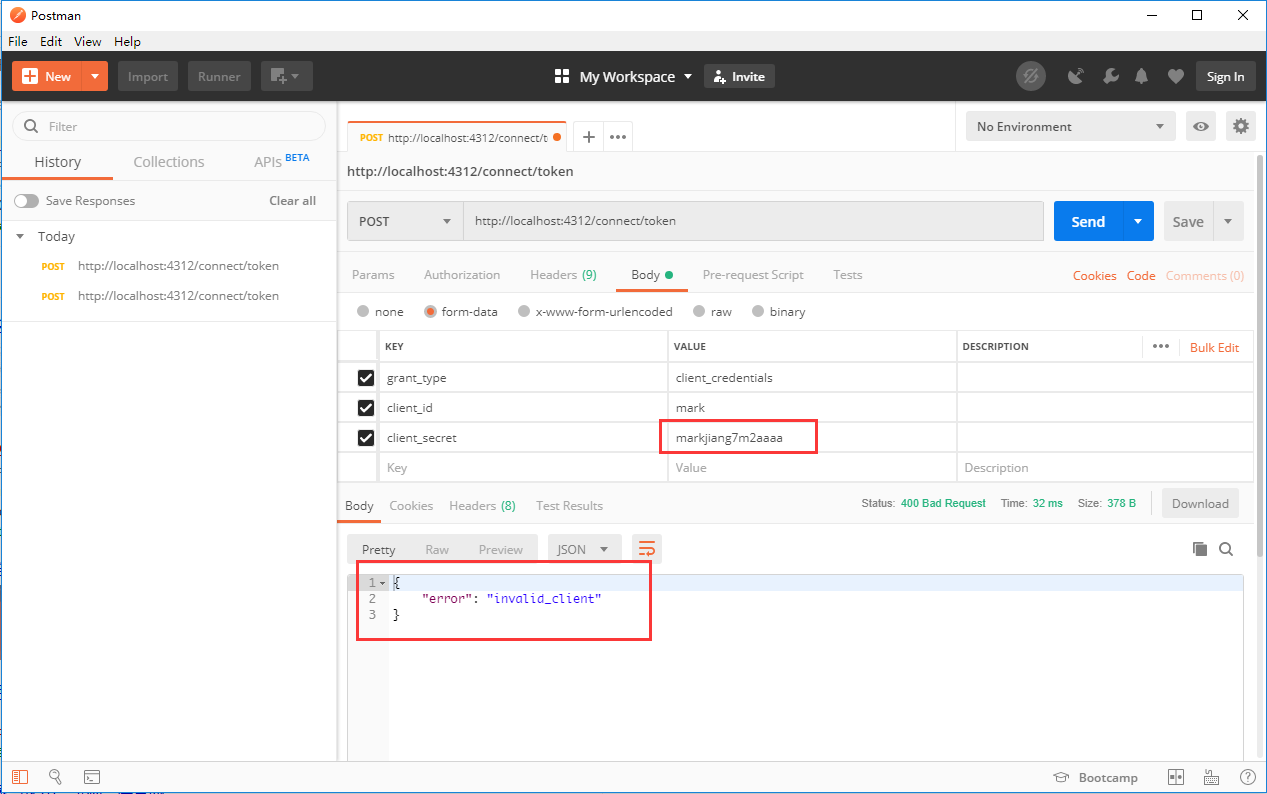
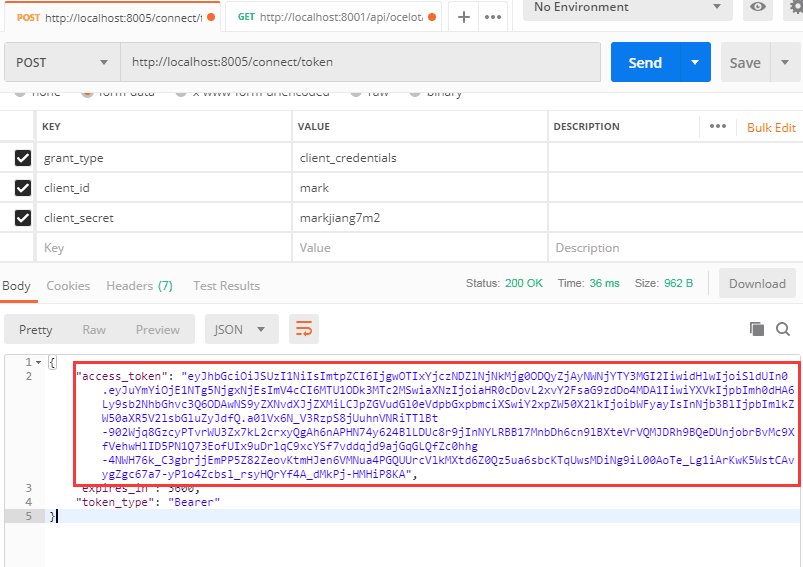
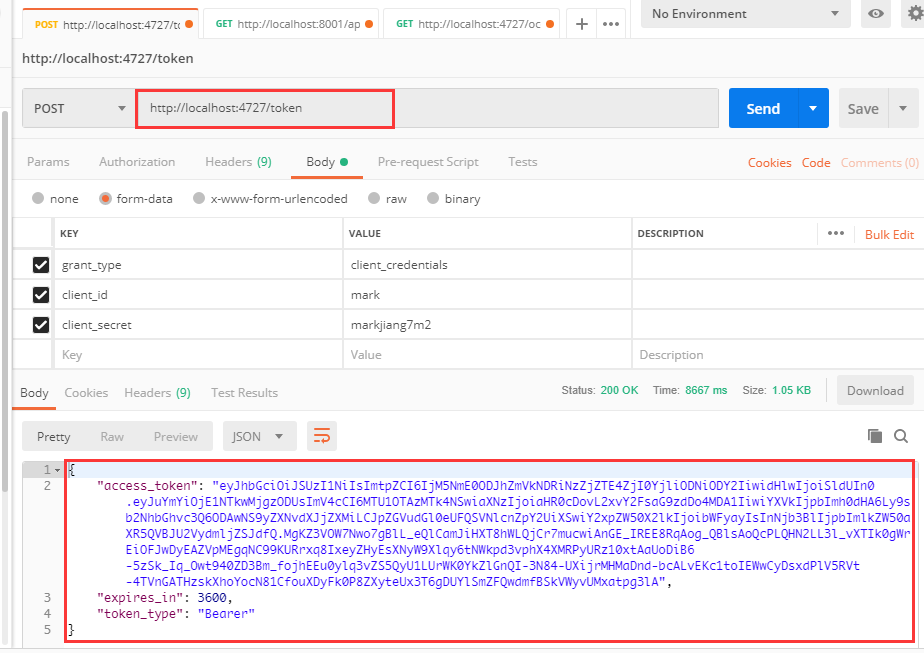
}Configuration is complete. Next, use Debug mode to see if Identity Server is available and try to authenticate Identity Server. Because we need to use post mode, and add authentication information to the body of authentication request, so I use this method here. Postman Tool completion.
Request path: <host>+/connect/token
If the authentication is correct, the following results will be obtained:
If the authentication fails, the following will be returned:
In this way, the simplest Identity Server service is configured. Of course, I just used Debug mode to quickly verify the success of Identity Server service. If I want to use it next, I will use it through IIS deployment. I will deploy Identity Server service to port 8005.
Downstream Service Access Authentication
In the OcelotDown API project, using NuGet to add the AccessTokenValidation package, you can use the NuGet package manager to search Identity Server 4. AccessTokenValidation for installation directly, or execute the following command line through PowerShell built in VS
Install-Package IdentityServer4.AccessTokenValidation
Add Identity Server service information to appsettings.json
"IdentityServerConfig": {
    "ServerIP": "localhost",
    "ServerPort": 8005,
    "IdentityScheme": "Bearer",
    "ResourceName": "identityAPIService"
}
The identity APIService here is one of the downstream services registered in the Identity Server server server configuration ApiResources list.
Read Identity Server service information in Startup.cs and add Identity Server validation
public void ConfigureServices(IServiceCollection services)
{
    IdentityServerConfig identityServerConfig = new IdentityServerConfig();
    Configuration.Bind("IdentityServerConfig", identityServerConfig);
    services.AddAuthentication(identityServerConfig.IdentityScheme)
        .AddIdentityServerAuthentication(options =>
        {
            options.RequireHttpsMetadata = false;
            options.Authority = $"http://{identityServerConfig.IP}:{identityServerConfig.Port}";
            options.ApiName = identityServerConfig.ResourceName;
        }
        );

    services.AddMvc().SetCompatibilityVersion(CompatibilityVersion.Version_2_2);
}

public void Configure(IApplicationBuilder app, IHostingEnvironment env)
{
    if (env.IsDevelopment())
    {
        app.UseDeveloperExceptionPage();
    }
    app.UseAuthentication();

    app.UseMvc();
}
Based on the previous configuration, we add a downstream service API that requires authorization
Note the addition of the attribute [Authorize]
Because I'm just demonstrating the authentication process of Identity Server here, I just add this attribute to one of the API interfaces. If there are other interfaces that need the whole authentication, I need to add this attribute to the other interfaces. If all the interfaces of this Controller need Identity Server authentication, I add this attribute directly before the class name.
using Microsoft.AspNetCore.Authorization;
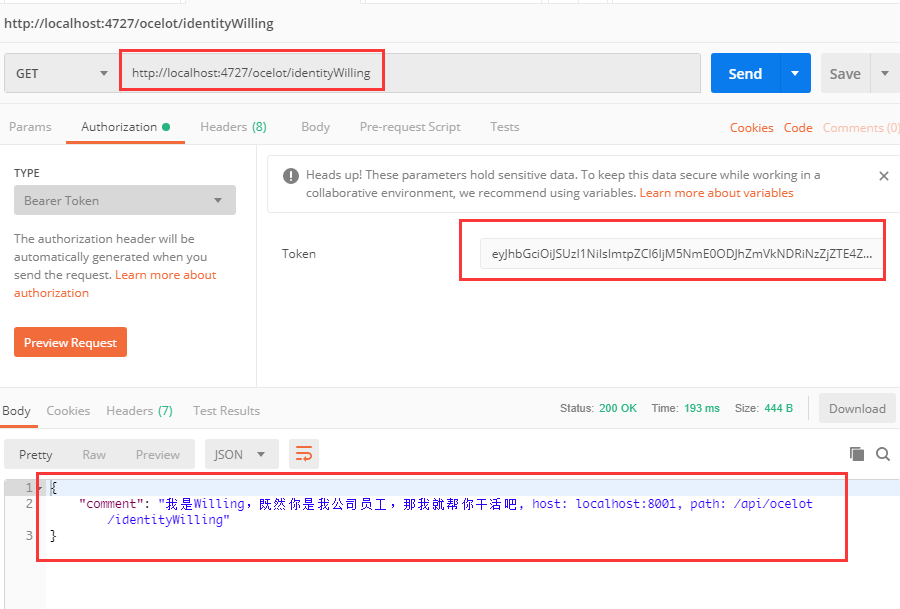
// GET api/ocelot/identityWilling
[HttpGet("identityWilling")]
[Authorize]
public async Task<IActionResult> IdentityWilling(int id)
{
    var result = await Task.Run(() =>
    {
        ResponseResult response = new ResponseResult()
        { Comment = $"I am Willing,Since you are an employee of our company, I'll help you with your work., host: {HttpContext.Request.Host.Value}, path: {HttpContext.Request.Path}" };
        return response;
    });
    return Ok(result);
}
Repackage the OcelotDown API project and publish it to port 8001.
First, ask the API directly as before, and get the following results:
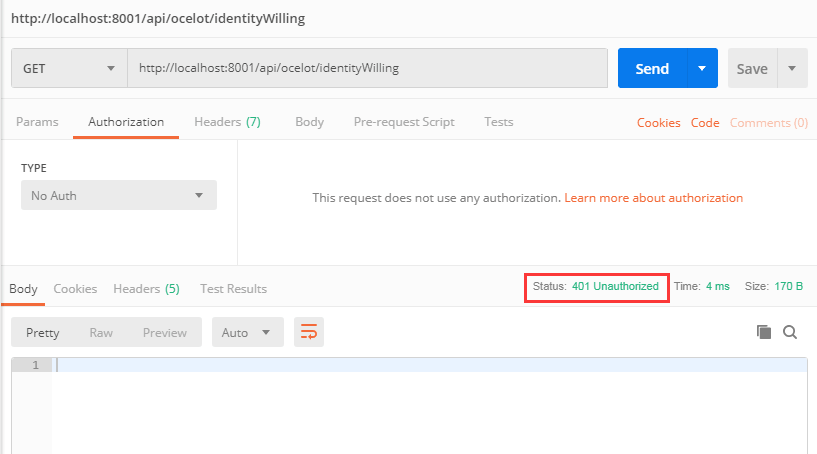
Get 401 status code, that is unauthorized.
Therefore, I must first request authentication and authorization from Identity Server
Then we add the resulting Token to the downstream service request in Bearer fashion, so that we can get the right result.
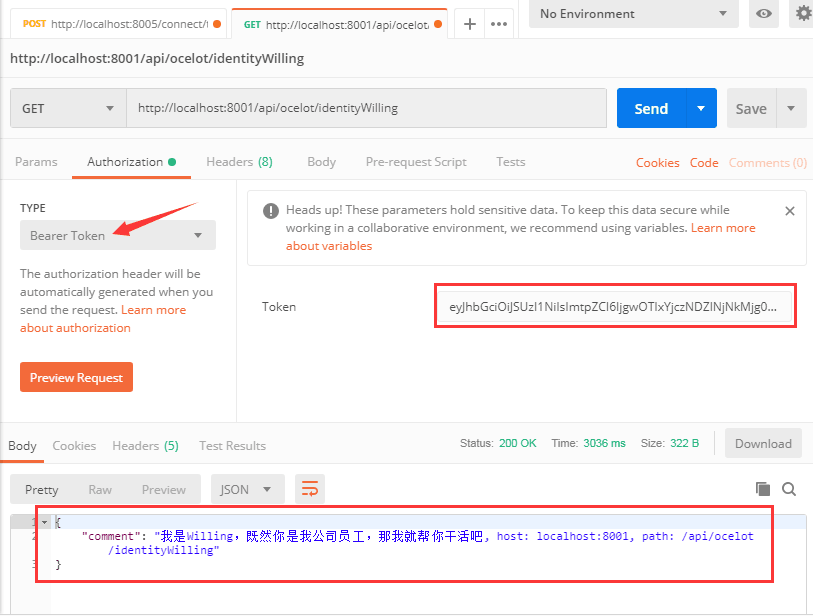
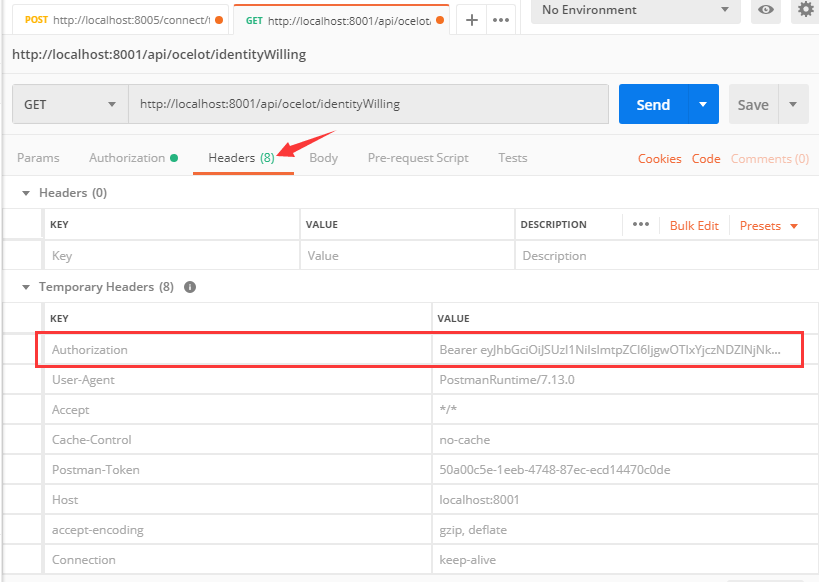
Maybe some friends will be a little confused here. In Postman, we add this Token in Authorization, but how do we add Token in our actual call?
In fact, friends familiar with Postman may know what's going on. Postman lists Authorization separately to make it easier for us to fill in Token information in the process of using it. In fact, it will eventually be added to the request header.
The Key of the request header is Authorization, and the corresponding value is Bearer + (space) + Token.
This is the authentication process of Identity Server without Ocelot gateway.
Case 5 Ocelot Integration Identity Server Service
In the example above, I directly expose downstream services to client calls. When accessing the Ocelot gateway, we need to achieve the characteristics of internal and external isolation, so we host Identity Server services to the Ocelot gateway, so that we can unify the access of authentication and service requests.
Thus, we can form the following flow chart:
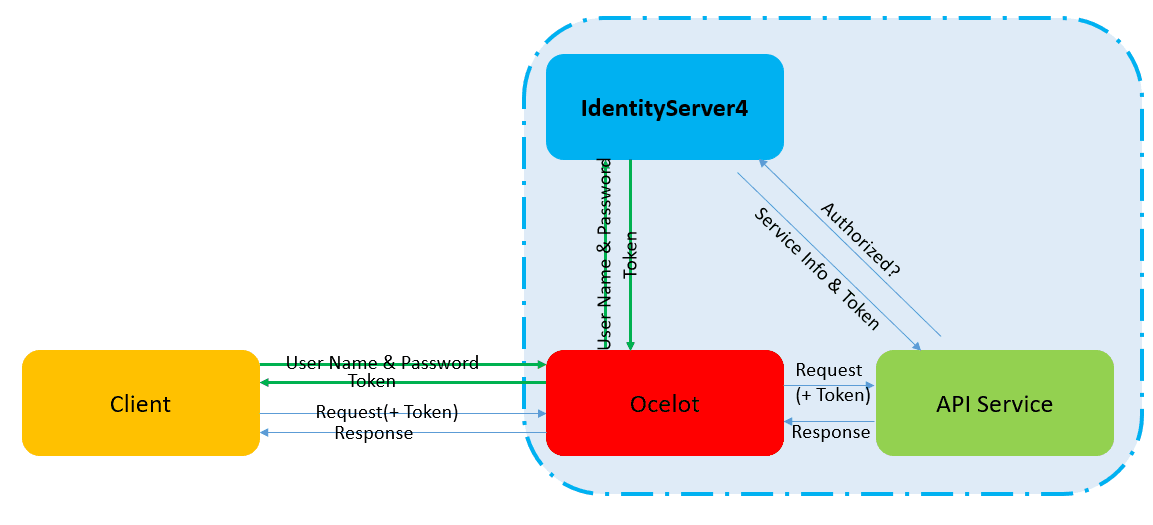
According to the flow chart, I added two sets of routes to Ocelot ReRoutes
{
    "DownstreamPathTemplate": "/connect/token",
    "DownstreamScheme": "http",
    "DownstreamHostAndPorts": [
    {
        "Host": "localhost",
        "Port": 8005
    }
    ],
    "UpstreamPathTemplate": "/token",
    "UpstreamHttpMethod": [ "Post" ],
    "Priority": 2
},
{
    "DownstreamPathTemplate": "/api/ocelot/identityWilling",
    "DownstreamScheme": "http",
    "DownstreamHostAndPorts": [
    {
        "Host": "localhost",
        "Port": 8001
    }
    ],
    "UpstreamPathTemplate": "/ocelot/identityWilling",
    "UpstreamHttpMethod": [ "Get" ],
    "Priority": 2
}
The first group hosts Identity Server services so that clients can access / token directly through the Ocelot Gateway and the second group hosts downstream services.
Then, following the steps of the previous example, we first authenticate with http://localhost:4727/token, and then add the resulting Token to the downstream service request in Bearer fashion.
The result is also consistent with what I expected, and can be authenticated according to such a process.
But!!! But!!! But!!!
When a casual person came outside and told the front desk that he wanted to do something for me, then the front desk directly told him my specific location, and let him come to the company to find me. Then when I received him, I found out that this person was actually doing something and refused his request. If there are dozens of people in a day, do I have to work normally?
This is obviously not in line with the practical application scenario. When an outside person (client) is in the front desk (Ocelot), he or she needs to be identified as an Identity Server. Only the person who has passed the certification can enter the company (route), and then I will come into contact with this person (response), which is called a special person to do a special job.
Therefore, the authentication process is changed to the following:
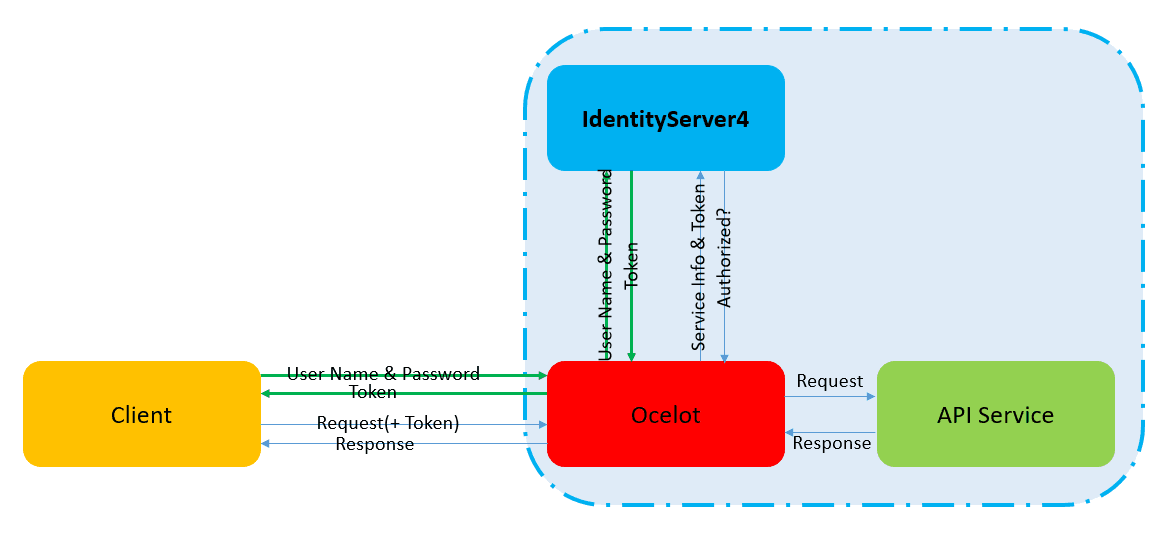
Preparing downstream services
To ensure that my case is consistent with the above authentication process, I removed the previous authentication configuration in downstream services. Moreover, in the actual production environment, the network between client and downstream services is disconnected, and the client can only make requests to downstream services through the forwarding of gateway.
OcelotDown API project
public void ConfigureServices(IServiceCollection services)
{
    //IdentityServerConfig identityServerConfig = new IdentityServerConfig();
    //Configuration.Bind("IdentityServerConfig", identityServerConfig);
    //services.AddAuthentication(identityServerConfig.IdentityScheme)
    //    .AddIdentityServerAuthentication(options =>
    //    {
    //        options.RequireHttpsMetadata = false;
    //        options.Authority = $"http://{identityServerConfig.IP}:{identityServerConfig.Port}";
    //        options.ApiName = identityServerConfig.ResourceName;
    //    }
    //    );

    services.AddMvc().SetCompatibilityVersion(CompatibilityVersion.Version_2_2);
}
public void Configure(IApplicationBuilder app, IHostingEnvironment env)
{
    if (env.IsDevelopment())
    {
        app.UseDeveloperExceptionPage();
    }
    //app.UseAuthentication();

    app.UseMvc();
}
At the same time, [Authorize] attributes in API interfaces are removed.
The OcelotDown API project is then repackaged and deployed on ports 8001 and 8002 as two separate downstream services.
Configure Identity Server
Back to appsettings.json of the Identity Server project, add two additional services to ApiResources
{
    "Name": "identityAPIService8001",
    "DisplayName": "identityAPIService8001Name"
},
{
    "Name": "identityAPIService8002",
    "DisplayName": "identityAPIService8002Name"
}
Add two Clients to Clients
{
    "ClientId": "markfull",
    "ClientSecrets": [ "markjiang7m2" ],
    "AllowedGrantTypes": "ClientCredentials",
    "AllowedScopes": [ "identityAPIService8001", "identityAPIService8002" ]
},
{
    "ClientId": "marklimit",
    "ClientSecrets": [ "123456" ],
    "AllowedGrantTypes": "ClientCredentials",
    "AllowedScopes": [ "identityAPIService8001" ]
}
Here I have deliberately assigned two different AllowedScopes in order to show you the effect of the permissible access scope.
Clients logged in with markfull can request identityAPIService8001 and identityAPIService8002 downstream services at the same time, while clients logged in with marklimit can only request identityAPIService8001 services.
Ocelot Integrated Identity Server Authentication
As in the previous example, to support Identity Server authentication, the OcelotDemo project needs to install the Identity Server 4. AccessTokenValidation package.
appsettings.json of OcelotDemo project adds Identity Server information
"IdentityServerConfig": {
    "IP": "localhost",
    "Port": 8005,
    "IdentityScheme": "Bearer",
    "Resources": [
      {
        "Key": "APIService8001",
        "Name": "identityAPIService8001"
      },
      {
        "Key": "APIService8002",
        "Name": "identityAPIService8002"
      }
    ]
}
Of course, the structure of this configuration item is arbitrary. What I configure here is the authentication of which services the Ocelot Gateway supports. Name is the name of the service, and it will only correspond to a Key.
To make it easier to read the Identity Server Config information, I defined a class with the same structure as it.
public class IdentityServerConfig
{
    public string IP { get; set; }
    public string Port { get; set; }
    public string IdentityScheme { get; set; }
    public List<APIResource> Resources { get; set; }
}

public class APIResource
{
    public string Key { get; set; }
    public string Name { get; set; }
}
Then come to the ConfigureServices method of Startup.cs, and you can quickly register Identity Server information.
var identityBuilder = services.AddAuthentication();
IdentityServerConfig identityServerConfig = new IdentityServerConfig();
Configuration.Bind("IdentityServerConfig", identityServerConfig);
if (identityServerConfig != null && identityServerConfig.Resources != null)
{
    foreach (var resource in identityServerConfig.Resources)
    {
        identityBuilder.AddIdentityServerAuthentication(resource.Key, options =>
        {
            options.Authority = $"http://{identityServerConfig.IP}:{identityServerConfig.Port}";
            options.RequireHttpsMetadata = false;
            options.ApiName = resource.Name;
            options.SupportedTokens = SupportedTokens.Both;
        });
    }
}
Add in Configure method
app.UseAuthentication();
Finally, configure the Ocelot.json file.
Adding two sets of routes to ReRoutes
{
    "DownstreamPathTemplate": "/api/ocelot/identityWilling",
    "DownstreamScheme": "http",
    "DownstreamHostAndPorts": [
    {
        "Host": "localhost",
        "Port": 8001
    }
    ],
    "UpstreamPathTemplate": "/ocelot/8001/identityWilling",
    "UpstreamHttpMethod": [ "Get" ],
    "Priority": 2,
    "AuthenticationOptions": {
    "AuthenticationProviderKey": "APIService8001",
    "AllowedScopes": []
    }
},
{
    "DownstreamPathTemplate": "/api/ocelot/identityWilling",
    "DownstreamScheme": "http",
    "DownstreamHostAndPorts": [
    {
        "Host": "localhost",
        "Port": 8002
    }
    ],
    "UpstreamPathTemplate": "/ocelot/8002/identityWilling",
    "UpstreamHttpMethod": [ "Get" ],
    "Priority": 2,
    "AuthenticationOptions": {
    "AuthenticationProviderKey": "APIService8002",
    "AllowedScopes": []
    }
}
Compared with other normal routes, both groups of routes have an Authentication Options attribute, in which the Authentication Provider Key is the key that we registered in the previous ConfigureServices method.
Let's smooth out this routing and authentication and authorization process. Take markfull's ID and the first set of routes here for example.
- The client authenticates Identity Server (http://localhost:4727/token) with the client ID of markfull, and gets a Token.
- The client carries this Token, so it has the identity of markfull, requesting the Url address http://localhost:4727/ocelot/8001/identity Willing
- The Ocelot Gateway receives the request and finds the authentication support keyword APIService8001 according to the routing table, thus obtaining the corresponding Identity Server service information: Identity Server service address is http://localhost:8005, downstream service name is identity APIService8001.
- Ocelot takes Token to pair with Identity Server (http://localhost:8005) to see if the access scope of markfull identity includes identity APIService8001 service.
- Ocelot authenticates that markfull is accessible and forwards requests to downstream services. According to the routing configuration, the downstream service address is http://localhost:8001/api/ocelot/identityWilling.
Next, I will run Ocelot and verify it through Postman.
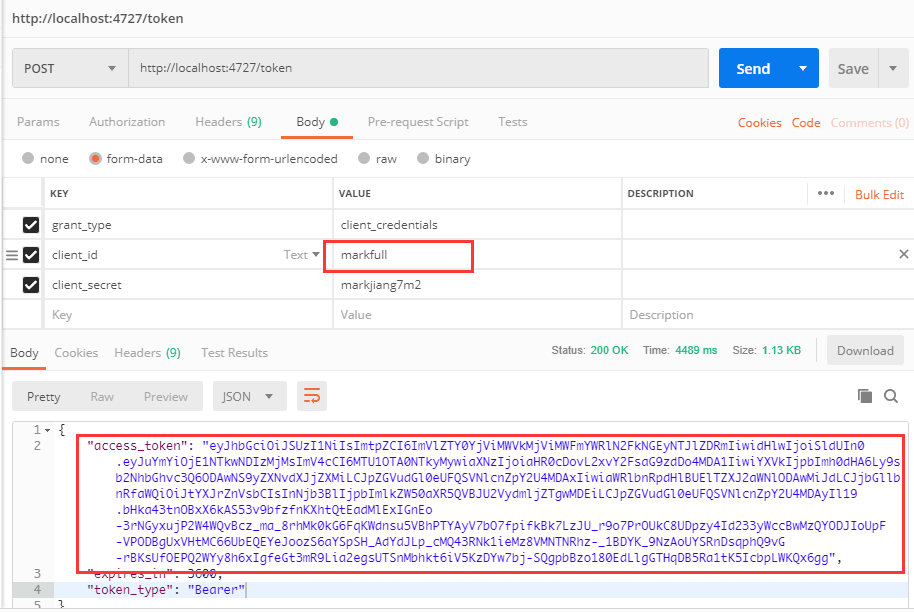
markfull authentication
Authenticate Identity Server with markfullClientId
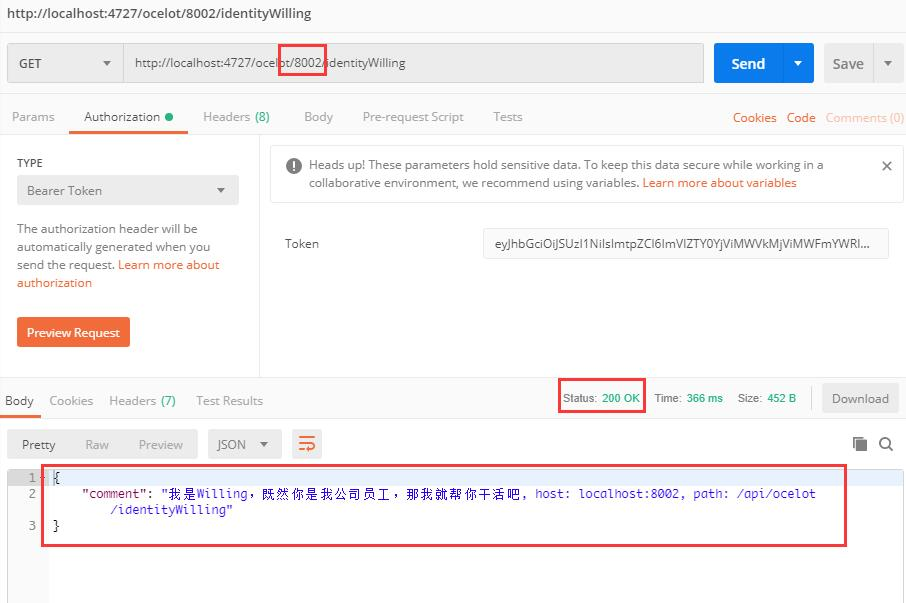
Request 8001
Add the resulting Token to the request and request the Url address http://localhost:4727/ocelot/8001/identityWilling to get the response result returned by the downstream service

Request 8002
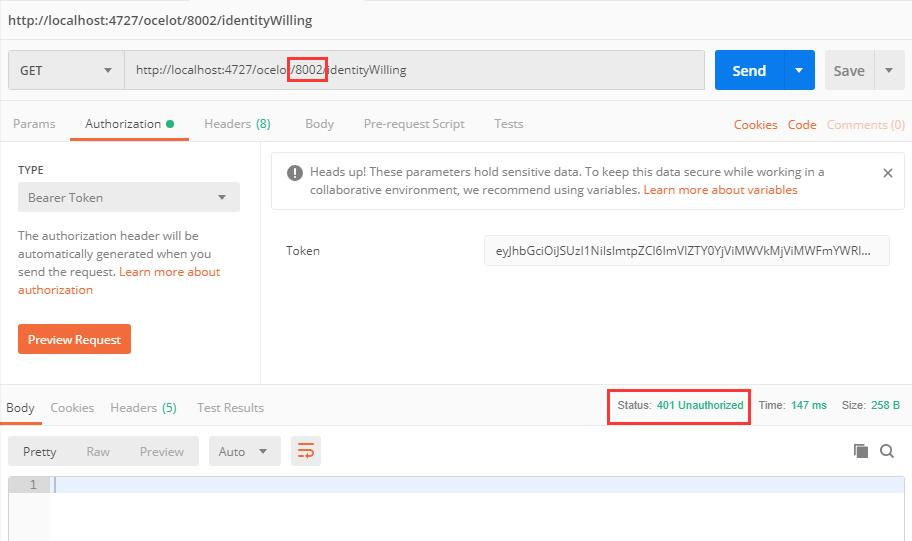
Add the resulting Token to the request and request the Url address http://localhost:4727/ocelot/8002/identity Willing to get the response result returned by the downstream service
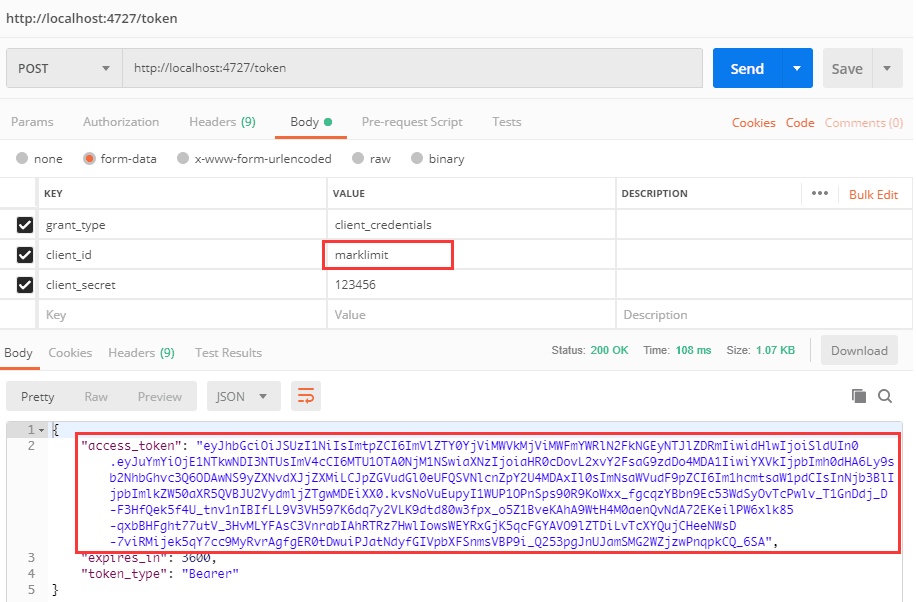
Then, change the marklimit identity and authenticate again
marklimit authentication
Authenticate Identity Server with marklimit ClientId
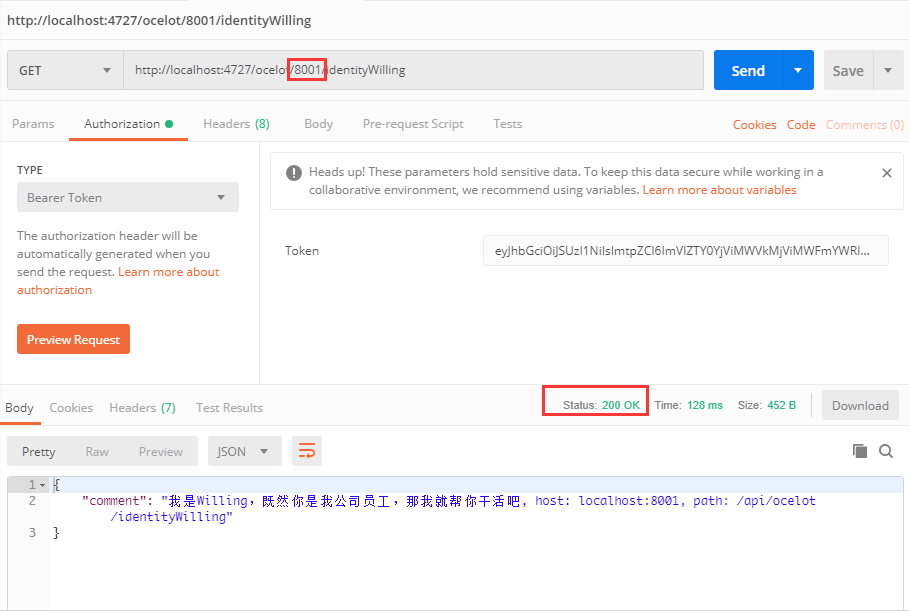
Request 8001
Add the resulting Token to the request and request the Url address http://localhost:4727/ocelot/8001/identityWilling to get the response result returned by the downstream service
Request 8002
Add the resulting Token to the request and request the Url address http://localhost:4727/ocelot/8002/identity Willing. At this point, we get the status code 401, that is, unauthorized.
summary
In this article, we introduce Ocelot authentication and authorization based on Identity Server 4 as authentication server, mainly through the practice of some cases to let you understand the process of Ocelot authentication for client identity, using the simplest client authentication mode in Identity Server, because there is no complex hierarchical relationship in Identity Server authentication under this mode. But usually in our actual development, it is more likely to authenticate through user password and other ways. After that, I will share with you as soon as possible how Identity Server uses other modes to authenticate. Today I'd like to introduce you here, and I hope you can continue to pay attention to us.