Nuxt.js Create Tourism Website Chapter 3 Writing of Login Page
Keywords:
PHP
Vue
Mobile
axios
Attribute
Key knowledge points:
1. Using vuex/store to manage data
2. Logic of login and registration
3.Nuxt Local Storage
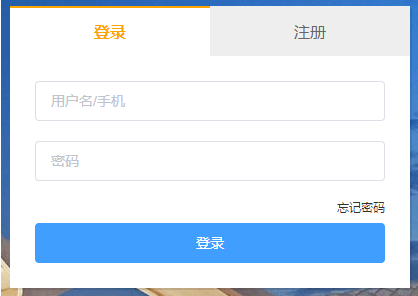
1. Login page
1.1 Login Page Layout
The code to replace pages/user/login.vue is as follows


<template>
    <div class="container">
        <!-- primary coverage -->
        <el-row
        type="flex"
        justify="center"
        align="middle"
        class="main">

            <div class="form-wrapper">
                <!-- Form Header tab -->
                <el-row type="flex" justify="center" class="tabs">
                    <span :class="{active: currentTab === index}"
                    v-for="(item, index) in [`Sign in`, `register`]"
                    :key="index"
                    @click="handleChangeTab(index)">
                        {{item}}
                    </span>
                </el-row>

                <!-- Login Function Component -->
                <LoginForm v-if="currentTab == 0"/>

                <!-- Registration Function Component -->
                <!-- <RegisterForm v-if="currentTab == 1"/> -->
            </div>
        </el-row>
    </div>
</template>

<script>
import LoginForm from '@/components/user/loginForm'
export default {
    components: {
      LoginForm
    },
    data(){
        return {
            currentTab: 0
        }
    },
    methods: {
        handleChangeTab(index){
            this.currentTab = index;
        },
    }
}
</script>

<style scoped lang="less">
.container{
    background:url(http://157.122.54.189:9095/assets/images/th03.jfif) center 0;
    height: 700px;
    min-width:1000px;

    .main{
        width:1000px;
        height: 100%;
        margin:0 auto;
        position: relative;

        .form-wrapper{
            width:400px;
            margin:0 auto;
            background:#fff;
            box-shadow: 2px 2px 0 rgba(0,0,0,0.1);
            overflow:hidden;

            .tabs{
                span{
                    display: block;
                    width:50%;
                    height: 50px;
                    box-sizing: border-box;
                    border-top:2px #eee solid;
                    background:#eee;
                    line-height: 48px;
                    text-align: center;
                    cursor: pointer;
                    color:#666;

                    &.active{
                        color:orange;
                        border-top-color: orange;
                        background:#fff;
                        font-weight: bold;
                    }
                }
            }
        }
    }
}
</style>
pages/user/login.vue
1.2 Login Function
Ideas:
1. Create a new loginForm.vue form component in components/user
2. Form components using Element-ui
3. Form data binding
4. Form validation
5. Login Interface
Implementation steps:
1. Create a new loginForm.vue form
Create a new loginForm.vue component in components/user, as follows
<template>
    <el-form
        :model="form"
        ref="form"
        :rules="rules"
        class="form">

        <el-form-item class="form-item">
            <el-input
            placeholder="User name/Mobile phone">
            </el-input>
        </el-form-item>

        <el-form-item class="form-item">
            <el-input
            placeholder="Password"
            type="password">
            </el-input>
        </el-form-item>

        <p class="form-text">
            <nuxt-link to="#">Forget password </nuxt-link>"
        </p>

        <el-button
        class="submit"
        type="primary"
        @click="handleLoginSubmit">
            //Sign in
        </el-button>
    </el-form>

</template>

<script>
export default {
    data(){
        return {
            // Form Data
            form: {},
            // Form rules
            rules: {},
        }
    },
    methods: {
        // Submit login
        handleLoginSubmit(){
           console.log(this.form)
        }
    }
}
</script>

<style scoped lang="less">
    .form{
        padding:25px;
    }

    .form-item{
        margin-bottom:20px;
    }

    .form-text{
        font-size:12px;
        color:#409EFF;
        text-align: right;
        line-height: 1;
    }

    .submit{
        width:100%;
        margin-top:10px;
    }
</style>
components/user/loginForm.vue
Note: After adding components, you can import them in pages/user/login.vue, import location, and remove the annotations of the components in the following section
<!-- Login Function Component -->
<!-- <LoginForm v-if="currentTab == 0"/> -->
2. Form data binding
Modify data form data, and then bind to the corresponding form field using v-model.
Edit components/user/loginForm.vue
// Other code...

data(){
    return {
        // Form Data
        form: {
            username: "",   // Username/Mobile phone
            password: ""    // Login password
        },
        // Other code...
    }
},

// Other code...
Binding to the corresponding form field using v-model
<!-- Other code... -->

<el-form-item class="form-item">
    <!-- Added v-model -->
    <el-input
              placeholder="User name/Mobile phone"
              v-model="form.username">
    </el-input>
</el-form-item>

<el-form-item class="form-item">
    <!-- Added v-model -->
    <el-input
              placeholder="Password"
              type="password"
              v-model="form.password">
    </el-input>
</el-form-item>

<!-- Other code... -->
3. Form validation
After two-way data is bound to the form field, we can now submit the form, but before submitting, we need to verify that the following form field is legal, such as not empty.
Continue editing components/user/loginForm.vue
// Other code...

data(){
    return {
        // Other code...

        // Form rules
        rules: {
            username: [
                {
                    required: true,
                    message: 'enter one user name',
                    trigger: 'blur'
                },
            ],
            password: [
                {
                    required: true,
                    message: 'Please input a password',
                    trigger: 'blur'
                },
            ],
        },
    }
},

// Other code...
Add prop attribute to el-form-item
<!-- Other code... -->

<!-- Added prop attribute -->
<el-form-item class="form-item" prop="username">
    <el-input
              placeholder="User name/Mobile phone"
              v-model="form.username">
    </el-input>
</el-form-item>

<!-- Added prop attribute -->
<el-form-item class="form-item" prop="password">
    <el-input
              placeholder="Password"
              type="password"
              v-model="form.password">
    </el-input>
</el-form-item>

<!-- Other code... -->
Now you can try to empty the value of the input input box, and the prompt content defined in rules will appear.
4. Login Interface
Next, we need to call the login interface to log in. If everything is normal, we can see the user information returned from the background. If the login fails, we need to deal with the wrong return in a unified way, which we will achieve in the end.
Modify submission login events for components/user/loginForm.vue:
// Other code...

// Submit login
methods: {
    handleLoginSubmit(){
        // validate form
        this.$refs['form'].validate((valid) => {
            // by true Represents no errors
            if (valid) {
                this.$axios({
                    url: "/accounts/login",
                    method: "POST",
                    data: this.form
                }).then(res => {
                    console.log(res.data);
                })
            }
        })
    }
}

// Other code...
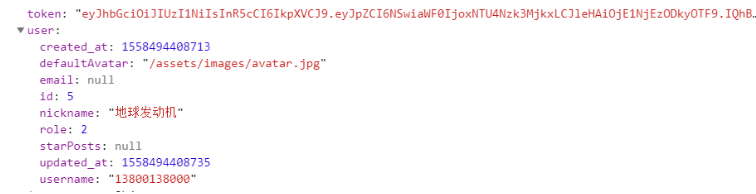
Now that the login interface can be accessed, the server provides us with a test account password.
Account number: 13800138000
Password: 123456
If the normal login should be able to see the printed user information in the control, then the login is successful.
5. Summary
-
Create a new loginForm.vue form component in components/user
-
Binding data and validating forms with form components of Element-ui
-
Call login interface
2. Use store to manage data
Ideas:
User login registration behavior and user information are managed by vuex.
1. Create new user.js under the store folder
2. Implement login in store/user.js and save data to store state
3. Display user information in header build
Implementation steps:
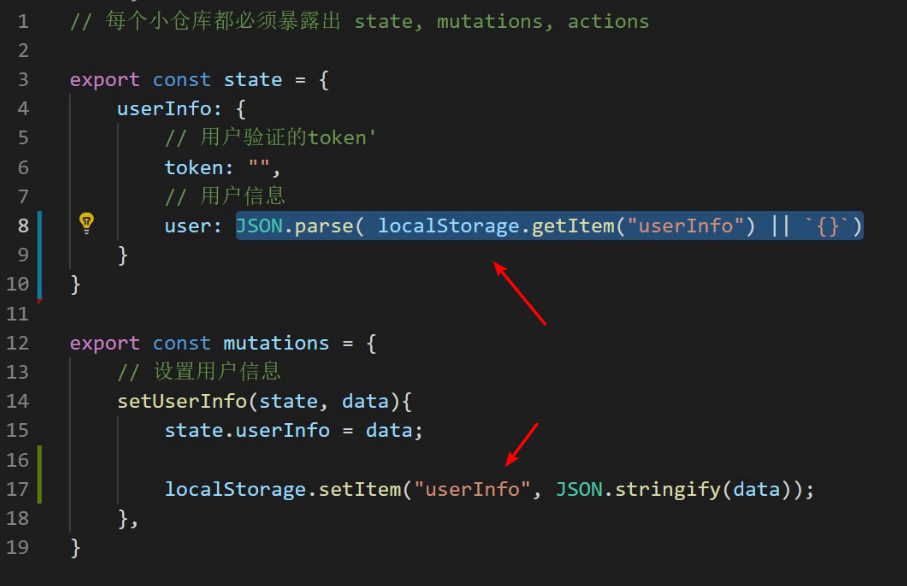
New status file
// Every small warehouse must expose state, mutations
export const state = {
userInfo: {
// token for user authentication
token: "",
// User Information
user: {
}
}
}
export const mutations = {
// Setting User Information
setUserInfo(state, data){
state.userInfo = data;
}
}
After the login request is sent successfully, the data input by the user is stored in the store warehouse of vuex.
        // Submit login
        handleLoginSubmit(){
          // validate form
          this.$refs['form'].validate((valid)=>{
            // by true Represents no errors
            if(valid){
              this.$axios({
                url: '/accounts/login',
                method: 'POST',
                data: this.form
              }).then(res=>{
                // 1.Save to vuex, Note the addition of namespaces when calling methods,That's the module where the method is located. user
                this.$store.commit('user/setUserInfo', res.data)
              })
            }
          })
        }
loginForm.vue
Display the user's login phone number in the page and replace the following code in the header.vue component.
<span class="el-dropdown-link">
              <img src="http://157.122.54.189:9095/assets/images/avatar.jpg" alt="">
              {{this.$store.state.user.userInfo.user.username}}
              <i class="el-icon-arrow-down el-icon--right"></i>
</span>
The use of store under nuxt
1. First, create a new module of data, a module is a file, the name of the file is the name of the module, such as a new user module, each module can expose three commonly used attributes.
// Every small warehouse must be exposed. state, mutations

export const state = {
  userInfo: {
    // User-authenticated token
    token: "",
    // User Information
    user: {

    }

  }
}

export const mutations = {
  // Setting User Information
  setUserInfo(state, data){
    state.userInfo = data;
  }
}
store/user.js
2. Read the user below user
{{ $store.state.user.userInfo.user.username }}
components/header.vue
3. The method under mutations must be called with the module name
// 1.Save to vuex
this.$store.commit("user/setUserInfo", res.data);
components/user/loginForm.vue
Store store data locally
Because this project is a Node.js project, you can't use the localStorage method to store it. Here you need to install a plug-in to solve this local storage problem.
Plug-in Address: https://github.com/robinvdvleuten/vuex-persistedstate
Installation dependency
Installation: yarn add vuex-persisted state
Configure nuxt.config.js and add the following configuration in plugins.
{ src: '~/plugins/localStorage.js', ssr: false }
Create a new localStorage.js in the plugins directory and add the following code.
// ~/plugins/localStorage.js

import createPersistedState from 'vuex-persistedstate'

export default ({store}) => {
  window.onNuxtReady(() => {
    createPersistedState({
        key: 'store'
    })(store)
  })
}
Using a third-party plug-in vuex-persisted state, store data is automatically saved to the local store through this plug-in, and local data is automatically reassigned to the store after the application is loaded.
3. Judging Display Page Information
When the locally saved data is cleared, the page will still display the avatar. The "Log in/Register" button should be displayed, and the following code can be modified.
<div>
        <div v-if="!$store.state.user.userInfo.token">
          <nuxt-link to="/user/login">Sign in / register</nuxt-link>
        </div>
        <div v-else>
          <el-dropdown>
            <span class="el-dropdown-link">
              <img
                :src="$axios.defaults.baseURL + $store.state.user.userInfo.user.defaultAvatar"
                alt
              />
              {{this.$store.state.user.userInfo.user.username}}
              <i
                class="el-icon-arrow-down el-icon--right"
              ></i>
            </span>
            <el-dropdown-menu slot="dropdown">
              <el-dropdown-item>Personal Center</el-dropdown-item>
              <el-dropdown-item>Sign out</el-dropdown-item>
            </el-dropdown-menu>
          </el-dropdown>
        </div>
      </div>
header.vue
4. Log out
Add an exit event to the exit button in the header.vue component
<! - Binding native events to elementUI components via native - >
<el-dropdown-item@click.native="handleLogout">exit </el-dropdown-item>
  methods: {
    // Log out and empty local user data
    handleLogout(){
      this.$store.commit('user/clearUserInfo');
    }
  }
Add a method to empty data in mutations of store/user.js module.
  // Set user data to null
  clearUserInfo(state){
    state.userInfo = {};
  }
After successful login, jump to the home page and add the following code in loginForm.vue.
// Jump to Home Page
this.$router.push("/");
5. Use of actions
actions are asynchronous modified warehouse data and rely on mutations.
mutations: Used to synchronously modify warehouse data.
actions: Used to modify warehouse data asynchronously, such as login.
Write the code to send the login request into the actions method for easy maintenance and invocation.
Add actions in store/user.js.
// Asynchronous Modification of Warehouse Data
export const actions = {
  // login(store, data){
  login({commit}, data){
    return this.$axios({
      url: "/accounts/login",
      method: "POST",
      data:data
    }).then(res => {
      // store.commit("setUserInfo", res.data)
      commit("setUserInfo", res.data)
      // 1.Save to vuex, Note the addition of namespaces when calling methods,That's the module where the method is located. user

      // The behavior after login should be executed by the calling page, which cannot be written to death, because the successful login operation of each page may be different.
      // this.$router.push("/");

    });
  }
}
In the loginForm.vue component, the code for the method of sending login requests is changed to:
  methods: {
    // Submit login
    handleLoginSubmit() {
      // validate form
      this.$refs["form"].validate(valid => {
        // by true Represents no errors
        if (valid) {
          this.$store.dispatch('user/login', this.form).then(res=>{
            this.$router.push('/');
          })
        }
      });
    }
  }
Action Summary
Under what circumstances can methods be encapsulated into actions?
When asynchronous methods need to be reused, consider encapsulating methods into actions, such as login.
How should actions be declared?
The first parameter of the method in actions is the store object, under which all store attributes (commit, dispatch, state...) can be accessed to modify state data with commit.
The second is optional, which is the parameter passed in.
How do I call the actions method?
this.$store.dispatch('user/login', this.form).then(res=>{ this.$router.push('/'); })
store summary
When will Vuex be used?
There is a lot of project data, and when multiple components are needed to share data, vuex can be used.
How do you use it?
state: Storing data
mutations: Setting up data to modify state
Action: Modify state data asynchronously and put reusable requests into actions (actions need to call mutations to modify data)
Problems to be noticed when using
Don't Write Wrong Words
Note that methods calling mutations and actions remember to add module names (namespaces)
Posted by tempa on Mon, 15 Jul 2019 15:48:20 -0700