
At present, the project uses Nuxt SSR to complete server rendering. In order to meet the needs of SEO, non-first-screen content is also requested and served directly, resulting in longer first-screen time (non-first-screen resource requests and component rendering will bring additional overhead). For a large number of users, a small number of crawler access requirements affect the access of normal users, resulting in a great contradiction between SEO and user experience improvement.
In order to solve this problem, we design and implement an adaptive SSR scheme to meet the needs of both scenarios. Today, we will share the technical details, design ideas and practical experience of some related sub-problems encountered in the implementation of this program. Welcome to share with us.
Sharing outline
- Source and background of the problem
- Thoughts on Problem Solving
- Introduction of Adaptive SSR Scheme
- Optimizing data before and after using adaptive SSR
- Vue SSR client side hydration trampling practice
- Practice of using SVG to generate skeleton screen to trample pits
Source and background of the problem
At present, the project uses Nuxt SSR to complete server rendering. In order to meet the needs of SEO, non-first-screen resources are also requested and servers are straight out, resulting in longer first-screen time (non-first-screen resource requests and component rendering will bring additional overhead).
Loading flow chart before optimization

At present, our Nuxt project uses fetch to achieve SSR data prefetching, which handles all critical and non-critical requests.
Nuxt Life Cycle Diagram
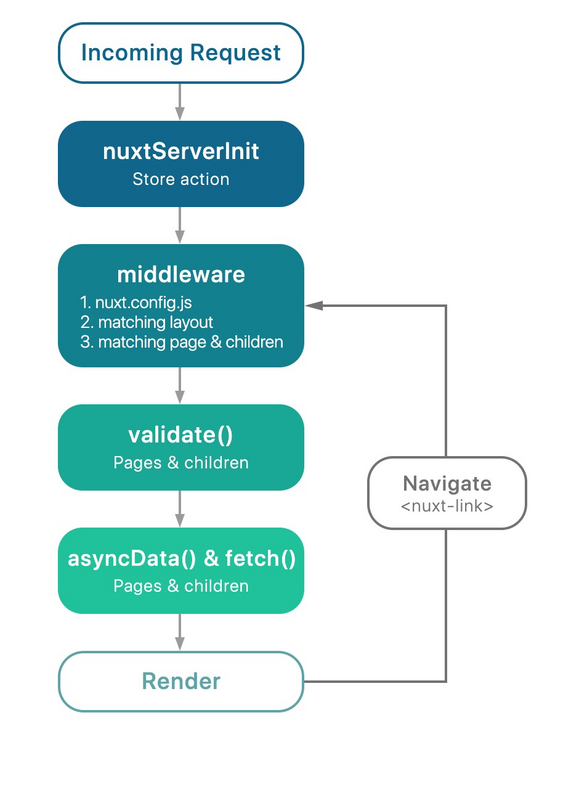
For a large number of users, a small number of crawler access requirements affect the access of normal users, resulting in a great contradiction between SEO and user experience improvement.
In order to solve this problem, we want to distinguish different scenarios for different straight-out, SEO scenarios are all straight-out, other scenarios are only straight out of the minimal first screen, non-critical requests are placed in the front asynchronous pull-out.
Solutions
The plan is to control data loading in a unified way, and the data loading is controlled by a special plug-in. The plug-in will selectively load data according to the conditions, while lazily loading part of the data.
- Judgment is SEO, fetch stage performs all data loading logic
- In non-SEO scenarios, the fetch stage only performs the smallest data loading logic, and then lazily loads another part of the data in some ways when the page's front screen is straight out.
Optimized Film Review Page Loading Flow Chart

Introduction of Adaptive SSR Scheme
Gitlab CI Pipeline

Self-developed Nuxt Fetch Pipeline
Drawing on the concept and process of Gitlab CI continuous integration, data requests are designed as different stages (Stages), each Stage performs different asynchronous tasks (Job s), and all stages constitute the Pipeline of data requests.
Preset Stage
- seoFetch: A set of job s for SEO rendering, generally requiring all data requests to render as much content as possible on the server side.
- minFetch: The smallest set of job s needed for first screen rendering
- Mounted: a collection of job s that are executed asynchronously in the mounted phase after the first screen is loaded
- Idle: job collection executed in idle time
Each page has an instance of Nuxt Fetch Pipeline to control. Nuxt Fetch Pipeline needs to configure the corresponding job and stage, and then adaptively determine the type of request, and deal with asynchronous data fetching specifically:
- If it is an SEO scenario, only the job set of the seoFetch stage will be executed
- If it is accessed by a real user, the job set of minFetch stage will be executed on the server and returned immediately. The client can see the content and skeleton screen of the first screen. After loading the first screen, the job set of mounted stage will be executed asynchronously in the mounted stage, and other jobs with lower priority will be executed asynchronously. The idle stage is executed when it is idle.
Nuxt Fetch Pipeline Use Example
Page page index.vue
import NuxtFetchPipeline, {
  pipelineMixin,
  adaptiveFetch,
} from '@/utils/nuxt-fetch-pipeline';
import pipelineConfig from './index.pipeline.config';

const nuxtFetchPipeline = new NuxtFetchPipeline(pipelineConfig);

export default {
  mixins: [pipelineMixin(nuxtFetchPipeline)],

  fetch(context) {
    return adaptiveFetch(nuxtFetchPipeline, context);
  },
};
Configuration file index.pipeline.config.js
export default { stages: { // job set for SEO rendering needs, the general requirement is all seoFetch: { type: 'parallel', jobs: [ 'task1' ] }, // Minimum job Set for First Screen Rendering minFetch: { type: 'parallel', jobs: [ ] }, // After the first screen is loaded, the job collection is executed asynchronously in the mounted phase mounted: { type: 'parallel', jobs: [ ] }, // job sets executed in idle time idle: { type: 'serial', jobs: [ ] } }, pipelines: { // Task 1 task1: { task: ({ store, params, query, error, redirect, app, route }) => { return store.dispatch('action', {}) } } } }
concurrency control
Stage performs parallel processing when Job supports parallel and serial Stage configuring type as parallel. It starts each job at the same time and waits for all jobs to complete. This stage completes the serial processing when Stage configures type as serial, and starts each job in turn. After the former job completes, the latter job does not. This stage is not completed until the last job is completed.
Job nesting
Some reusable job s can be defined as custom Stage s, and then referenced in other Stages in the following way to reduce coding costs
{
  seoFetch: {
    type: 'serial',
    jobs:
    [
      'getVideo',
      { jobType: 'stage', name: 'postGetVideo' }
    ]
  },
  postGetVideo: {
    type: 'parallel',
    jobs: [
      'anyjob',
      'anyjob2'
    ]
  }
}
Job's execution context
In order to facilitate coding and reduce the cost of changes, each job execution context is similar to Nuxt fetch, but accesses some states through a context parameter. Because there are no component instances in the fetch phase, in order to maintain uniformity, instances can not be accessed through this.
Nuxt contexts currently supported are
- app
- route
- store
- params
- query
- error
- redirect
The Idea of Stage Classification
| Stage | Suitable Job | Is it parallel? |
|---|---|---|
| seoFetch | All, the more SEO scenarios you pursue, the better | Best parallel |
| minFetch | Key, such as the first screen content, the data needed by the core process, the main core content of the page (e.g., the review page is the text of the review, the short video page is the short video information, and the post page is the body of the post) | Best parallel |
| mounted | Data on sub-critical content, such as sidebar, second screen, etc. | Consider Parallelism Based on Priority Chengdu |
| idle | Data of the most secondary content, such as the bottom of the page, the hidden part of the tab | Do it in batches as far as possible, without affecting user interaction |
Practice of using SVG to generate skeleton screen to trample pits
Because the server only pulls key data, some pages have no data, so skeleton screen is needed to improve the experience.


Use and Principle of Vue Content Loading
Example
<script>
  import VueContentLoading from 'vue-content-loading';

  export default {
    components: {
      VueContentLoading,
    },
  };
</script>

<template>
  <vue-content-loading :width="300" :height="100">
    <circle cx="30" cy="30" r="30" />
    <rect x="75" y="13" rx="4" ry="4" width="100" height="15" />
    <rect x="75" y="37" rx="4" ry="4" width="50" height="10" />
  </vue-content-loading>
</template>
Vue Content Loading Core Code
<template>
  <svg :viewBox="viewbox" :style="svg" preserveAspectRatio="xMidYMid meet">
    <rect
      :style="rect.style"
      :clip-path="rect.clipPath"
      x="0"
      y="0"
      :width="width"
      :height="height"
    />

    <defs>
      <clipPath :id="clipPathId">
        <slot>
          <rect x="0" y="0" rx="5" ry="5" width="70" height="70" />
          <rect x="80" y="17" rx="4" ry="4" width="300" height="13" />
          <rect x="80" y="40" rx="3" ry="3" width="250" height="10" />
          <rect x="0" y="80" rx="3" ry="3" width="350" height="10" />
          <rect x="0" y="100" rx="3" ry="3" width="400" height="10" />
          <rect x="0" y="120" rx="3" ry="3" width="360" height="10" />
        </slot>
      </clipPath>

      <linearGradient :id="gradientId">
        <stop offset="0%" :stop-color="primary">
          <animate
            attributeName="offset"
            values="-2; 1"
            :dur="formatedSpeed"
            repeatCount="indefinite"
          />
        </stop>

        <stop offset="50%" :stop-color="secondary">
          <animate
            attributeName="offset"
            values="-1.5; 1.5"
            :dur="formatedSpeed"
            repeatCount="indefinite"
          />
        </stop>

        <stop offset="100%" :stop-color="primary">
          <animate
            attributeName="offset"
            values="-1; 2"
            :dur="formatedSpeed"
            repeatCount="indefinite"
          />
        </stop>
      </linearGradient>
    </defs>
  </svg>
</template>

<script>
  const validateColor = color =>
    /^#([A-Fa-f0-9]{3}|[A-Fa-f0-9]{6})$/.test(color);
  export default {
    name: 'VueContentLoading',
    props: {
      rtl: {
        default: false,
        type: Boolean,
      },
      speed: {
        default: 2,
        type: Number,
      },
      width: {
        default: 400,
        type: Number,
      },
      height: {
        default: 130,
        type: Number,
      },
      primary: {
        type: String,
        default: '#f0f0f0',
        validator: validateColor,
      },
      secondary: {
        type: String,
        default: '#e0e0e0',
        validator: validateColor,
      },
    },
    computed: {
      viewbox() {
        return `0 0 ${this.width} ${this.height}`;
      },
      formatedSpeed() {
        return `${this.speed}s`;
      },
      gradientId() {
        return `gradient-${this.uid}`;
      },
      clipPathId() {
        return `clipPath-${this.uid}`;
      },
      svg() {
        if (this.rtl) {
          return {
            transform: 'rotateY(180deg)',
          };
        }
      },
      rect() {
        return {
          style: {
            fill: 'url(#' + this.gradientId + ')',
          },
          clipPath: 'url(#' + this.clipPathId + ')',
        };
      },
    },
    data: () => ({
      uid: null,
    }),
    created() {
      this.uid = this._uid;
    },
  };
</script>
SVG Animation Carton
After using Vue content loading as skeleton screen, it is found that when js is loaded and executed, the animation will be stuck, while CSS animation can be executed off the main thread in most cases, which can avoid jamming.
CSS animations are the better choice. But how? The key is that as long as the properties we want to animate do not trigger reflow/repaint (read CSS triggers for more information), we can move those sampling operations out of the main thread. The most common property is the CSS transform. If an element is promoted as a layer, animating transform properties can be done in the GPU, meaning better performance/efficiency, especially on mobile. Find out more details in OffMainThreadCompositing. https://developer.mozilla.org...
Test Demo Address
https://jsbin.com/wodenoxaku/...
It seems that the browser did not optimize the SVG animation in this respect. Finally, we changed the implementation of Vue content loading to use CSS animation to achieve the blinking loading effect.
<template>
  <div :style="style">
    <svg :viewBox="viewbox" preserveAspectRatio="xMidYMid meet">
      <defs :key="uid">
        <clipPath :id="clipPathId" :key="clipPathId">
          <slot>
            <rect x="0" y="0" rx="5" ry="5" width="70" height="70" />
            <rect x="80" y="17" rx="4" ry="4" width="300" height="13" />
            <rect x="80" y="40" rx="3" ry="3" width="250" height="10" />
            <rect x="0" y="80" rx="3" ry="3" width="350" height="10" />
            <rect x="0" y="100" rx="3" ry="3" width="400" height="10" />
            <rect x="0" y="120" rx="3" ry="3" width="360" height="10" />
          </slot>
        </clipPath>
      </defs>
    </svg>
  </div>
</template>

<script>
  const validateColor = color =>
    /^#([A-Fa-f0-9]{3}|[A-Fa-f0-9]{6})$/.test(color);

  export default {
    name: 'VueContentLoading',
    props: {
      rtl: {
        default: false,
        type: Boolean,
      },
      speed: {
        default: 2,
        type: Number,
      },
      width: {
        default: 400,
        type: Number,
      },
      height: {
        default: 130,
        type: Number,
      },
      primary: {
        type: String,
        default: '#F0F0F0',
        validator: validateColor,
      },
      secondary: {
        type: String,
        default: '#E0E0E0',
        validator: validateColor,
      },
      uid: {
        type: String,
        required: true,
      },
    },
    computed: {
      viewbox() {
        return `0 0 ${this.width} ${this.height}`;
      },
      formatedSpeed() {
        return `${this.speed}s`;
      },
      clipPathId() {
        return `clipPath-${this.uid || this._uid}`;
      },
      style() {
        return {
          width: `${this.width}px`,
          height: `${this.height}px`,
          backgroundSize: '200%',
          backgroundImage: `linear-gradient(-90deg, ${this.primary} 0, ${this.secondary} 20%, ${this.primary} 50%,  ${this.secondary} 75%,  ${this.primary})`,
          clipPath: 'url(#' + this.clipPathId + ')',
          animation: `backgroundAnimation ${this.formatedSpeed} infinite linear`,
          transform: this.rtl ? 'rotateY(180deg)' : 'none',
        };
      },
    },
  };
</script>

<style lang="scss">
  @keyframes backgroundAnimation {
    0% {
      background-position-x: 100%;
    }

    50% {
      background-position-x: 0;
    }

    100% {
      background-position-x: -100%;
    }
  }
</style>
Vue SSR client side hydration trampling practice
An example
<template>
  <div :id="id"> text: {{ id }}</div>
</template>
<script>
  export default {
    data () {
       return {
         id: Math.random()
       }
    }
  }
</script>
What is the result of client side hydration?
- A. id is the client random number, text is the client random number
- B. id is client-side random number and text is server-side random number
- C. id is server-side random number and text is client-side random number
- D. id is server-side random number and text is server-side random number
Why ask this question?
Vue content loading internally relies on this._uid as the id of clippath in svg defs. However, this._uid is not the same on the client side and the server side, which is actually similar to the example of random number above.
The result of client side hydration is C
That is to say, the id hasn't changed, and the resulting phenomenon in our scenario is that the skeleton screen flickers and disappears.
Why does this happen?
Initialize the whole process from Vue to final rendering
Source: https://ustbhuangyi.github.io...
Client activation refers to the process in which Vue takes over static HTML sent by server in browser and changes it into dynamic DOM managed by Vue.
In entry-client.js, we mount the application using the following line:
// Let's assume that the `id='app'of the root element of App.vue template`
app.$mount('#app');
Since the server has rendered HTML, we obviously don't need to discard it and recreate all DOM elements. Instead, we need to "activate" these static HTMLs and then make them dynamic (able to respond to subsequent data changes).
If you check the output of server rendering, you will notice that a special attribute has been added to the root element of the application:
<div id="app" data-server-rendered="true"></div>
Data-server-rendered special attribute, let client Vue know that this part of HTML is rendered by Vue on the server side, and should be mounted in activation mode. Note that instead of adding id="app", you add the data-server-rendered attribute: you need to add your own ID or other selector that can select the root element of the application, otherwise the application will not activate properly.
Note that on elements without data-server-rendered attributes, you can also pass true to the hydrating parameter position of the & dollar; mount function to enforce the use of hydration:
// Mandatory use of application activation mode
app.$mount('#app', true);
In development mode, Vue infers whether the virtual DOM tree generated by the client matches the DOM structure rendered from the server. If it does not match, it exits the hybrid mode, discards the existing DOM and starts rendering from scratch. In production mode, this detection is skipped to avoid performance loss.
vue does not handle attrs,class,staticClass,staticStyle,key
list of modules that can skip create hook during hydration because they are already rendered on the client or has no need
uid solution
Generate unique UUID s from components
- Converting props and slot s to strings
- hash algorithm
Too heavy, give up
Final solution
Let the user simply pass the ID
<vue-content-loading
  uid="circlesMediaSkeleton"
  v-bind="$attrs"
  :width="186"
  :height="height"
>
  <template v-for="i in rows">
    <rect
      :key="i + '_r'"
      x="4"
      :y="getYPos(i, 4)"
      rx="2"
      ry="2"
      width="24"
      height="24"
    />
    <rect
      :key="i + '_r'"
      x="36"
      :y="getYPos(i, 6)"
      rx="3"
      ry="3"
      width="200"
      height="18"
    />
  </template>
</vue-content-loading>
Optimization effect
- By reducing the task of data pulling in the fetch stage, the data pulling time is reduced.
- At the same time, it reduces the number and overhead of components rendered by server, and shortens the first byte time.
- Reducing the size of the first screen also shortens the time required to download the first screen.
Taken together, the first byte, the first screen time will be ahead of time, and the interactive time will be ahead of time.
Local data
| type | Service response time | Home page size not Gzip |
|---|---|---|
| Before Home Page Modification | 0.88s | 561 KB |
| Home page (minimizing fetch requests) | 0.58s | 217 KB |
In the local test, when the server renders the home page only requesting critical server interface requests, the service response time is reduced by 0.30 s, by 34%, and the html text size of the home page is reduced by 344 KB, by 60%.
Online data

The median visibility time of the front screen of the home page is reduced from 2-3s to about 1.1s, and the loading speed is increased by 100%.+
summary
This paper shares how to solve the contradiction between SEO and user experience improvement. It also introduces how to draw lessons from Gitlab CI's pipeline concept and give consideration to the minimization of the first screen and SEO when rendering on the server side. It also shares the technical details, design ideas and some problems encountered in the implementation of the adaptive SSR. The relevant sub-problems of the practical experience of trampling pits, I hope to inspire and help you.
About me
Biggg (Booker Zhao) @Tencent

- Successfully worked in Xunlei, Tencent and so on. Personal open source projects include mrn.js, etc.
- XNPM, an internal component warehouse of Xunlei, was founded and participated in the development of several front-end open source projects of Xunlei.
- Enthusiasm for optimization and efficiency is a lazy engineer who pursues "laziness makes progress"
Social data
- 🐙 GitHub: https://github.com/binggg
- Jian Shu: https://www.jianshu.com/u/60f22559b79f
- Nuggets: https://juejin.im/user/58d31f130ce4630057edb3ba
- (2) Microblogging: https://weibo.com/being99
- Think about it: https://segmentfault.com/u/binggg
- (ii) Blog Park: https://www.cnblogs.com/binggg/
- (ii) Open source China: https://my.oschina.net/u/4217267
- (viii) Jishu community: https://aijishu.com/u/binggg
- (iv) Today's headlines: https://www.toutiao.com/c/user/102306299647
- 📝CSDN: https://blog.csdn.net/weixin_42541867
Wechat Public Number Biggg_net, Welcome Attention