Source of problem
In the traditional architecture, for each request of the client, the server will create a new thread or reuse the thread pool to process a user's request, and then return it to the user's result. In the case of high concurrency, there will be a very serious performance problem: for each request of the user, it needs some memory to create a new thread. Frequent context switching between threads is also a huge overhead.
p.s: The complete example code covered in this article can be found in my GitHub Download above.
What is Selector
The core of NIO is Selector. If you understand Selector, you will understand the principle of asynchronous mechanism. Now let's briefly introduce what is Selector. Now, instead of creating a thread to process every request coming from the client, we take epool as an example. When an event is ready, we add the descriptor to the blocking queue through the callback mechanism. Next, we just need to process the corresponding event by traversing the blocking queue. Through this callback mechanism, the whole process does not need to deal with. Each request is processed separately by creating a thread. The above explanation is still abstract, and I'll explain it through specific code examples. Before that, let's look at two basic concepts in NIO, Buffer and Channel.
If you are completely unfamiliar with multiplexing IO, such as select/epool, I suggest you read my article first. Five IO Models under Linux :-)
Buffer
Taking ByteBuffer as an example, we can allocate n bytes of buffer through ByteBuffer.allocate(n), which has four important attributes:
- Capacity, the capacity of the buffer, is the n we specified above.
- position, where the current pointer points.
- mark, the former position, let's explain it later.
- limit, the location where you can read or write the most.
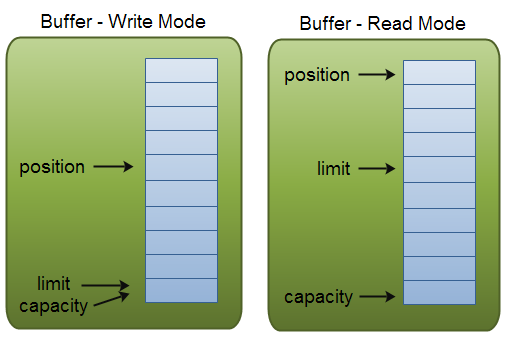
As shown in the figure above, Buffer is actually divided into two kinds, one for writing data and the other for reading data.
put
By reading the ByteBuffer source code directly, it is clear that the put method is to put a byte variable x into the buffer, and position plus 1:
public ByteBuffer put(byte x) {
    hb[ix(nextPutIndex())] = x;
    return this;
}

final int nextPutIndex() {
    if (position >= limit)
        throw new BufferOverflowException();
    return position++;
}
get
The get method reads a byte from the buffer, plus one position:
public byte get() {
    return hb[ix(nextGetIndex())];
}

final int nextGetIndex() {
    if (position >= limit)
        throw new BufferUnderflowException();
    return position++;
}
flip
If we want to change buffer from writing data to reading data, we can use flip directly:
public final Buffer flip() {
    limit = position;
    position = 0;
    mark = -1;
    return this;
}
mark and reset
mark is used to remember the current location, that is, to save the position value:
public final Buffer mark() {
    mark = position;
    return this;
}
If we call the mark method before we read and write to the buffer, we can call reset to reassign the mark value to position later when the position position changes.
public final Buffer reset() {
    int m = mark;
    if (m < 0)
        throw new InvalidMarkException();
    position = m;
    return this;
}
Channel
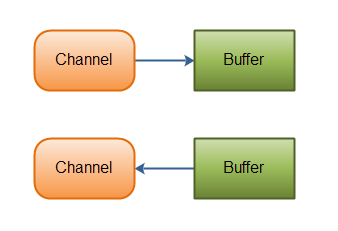
With NIO, when we read data, we first load it from buffer to channel, and when we write data, we first enter it into channel and then transfer it to buffer through channel. Channel gives us two ways: through channel.read(buffer), we can write the data in channel into buffer, and through channel.write(buffer), we can write the data in buffer into channel.
Channel's words fall into four categories:
- FileChannel reads and writes data from a file.
- Datagram Channel reads and writes data from the network in the form of UDP.
- Socket Channel reads and writes data from the network in the form of TCP.
- Server Socket Channel allows you to monitor TCP connections.
Because today's focus is Selector, let's look at the use of Socket Channel. The following code simulates a simple server-client program using SocketChannel.
The code of WebServer is as follows. It is not much different from the traditional sock program, but we introduce the concepts of buffer and channel.
ServerSocketChannel ssc = ServerSocketChannel.open();
ssc.socket().bind(new InetSocketAddress("127.0.0.1", 5000));
SocketChannel socketChannel = ssc.accept();

ByteBuffer readBuffer = ByteBuffer.allocate(128);
socketChannel.read(readBuffer);

readBuffer.flip();
while (readBuffer.hasRemaining()) {
    System.out.println((char)readBuffer.get());
}

socketChannel.close();
ssc.close();
The code for WebClient is as follows:
SocketChannel socketChannel = null;
socketChannel = SocketChannel.open();
socketChannel.connect(new InetSocketAddress("127.0.0.1", 5000));

ByteBuffer writeBuffer = ByteBuffer.allocate(128);
writeBuffer.put("hello world".getBytes());

writeBuffer.flip();
socketChannel.write(writeBuffer);
socketChannel.close();
Scatter / Gather
In the client program above, we can also put data from multiple buffer s into an array at the same time, and then unify it into the channel and pass it to the server:
ByteBuffer buffer1 = ByteBuffer.allocate(128);
ByteBuffer buffer2 = ByteBuffer.allocate(16);
buffer1.put("hello ".getBytes());
buffer2.put("world".getBytes());

buffer1.flip();
buffer2.flip();
ByteBuffer[] bufferArray = {buffer1, buffer2};
socketChannel.write(bufferArray);
Selector
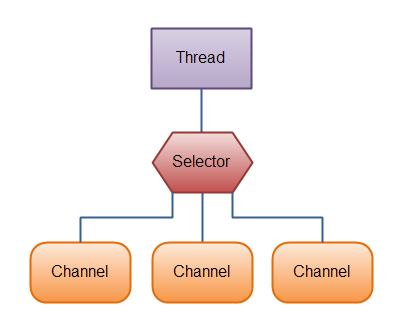
By using selector, we can manage multiple channel s simultaneously through one thread, eliminating the overhead of creating threads and context switching between threads.
Create a selector
By calling the static method open of the selector class, we can create a selector object:
Selector selector = Selector.open();
Register channel
To ensure that selector can monitor multiple channels, we need to register channel into selector:
channel.configureBlocking(false);
SelectionKey key = channel.register(selector, SelectionKey.OP_READ);
We can monitor four events:
- SelectionKey.OP_CONNECT: When the client attempts to connect to the server
- SelectionKey.OP_ACCEPT: When the server accepts requests from the client
- SelectionKey.OP_READ: When the server can read data from channel
- SelectionKey.OP_WRITE: When the server can write data to channel
The channel corresponding to the key can be obtained by calling the channel method for SelectorKey:
Channel channel = key.channel();
The listening events that key is interested in can also be obtained through interestOps:
int interestSet = selectionKey.interestOps();
Calling the selectedKeys() method on the selector gives us all the key s registered:
Set<SelectionKey> selectedKeys = selector.selectedKeys();
actual combat
The code of the server is as follows:
ServerSocketChannel ssc = ServerSocketChannel.open();
ssc.socket().bind(new InetSocketAddress("127.0.0.1", 5000));
ssc.configureBlocking(false);

Selector selector = Selector.open();
ssc.register(selector, SelectionKey.OP_ACCEPT);

ByteBuffer readBuff = ByteBuffer.allocate(128);
ByteBuffer writeBuff = ByteBuffer.allocate(128);
writeBuff.put("received".getBytes());
writeBuff.flip(); // make buffer ready for reading

while (true) {
    selector.select();
    Set<SelectionKey> keys = selector.selectedKeys();
    Iterator<SelectionKey> it = keys.iterator();

    while (it.hasNext()) {
        SelectionKey key = it.next();
        it.remove();

        if (key.isAcceptable()) {
            SocketChannel socketChannel = ssc.accept();
            socketChannel.configureBlocking(false);
            socketChannel.register(selector, SelectionKey.OP_READ);
        } else if (key.isReadable()) {
            SocketChannel socketChannel = (SocketChannel) key.channel();
            readBuff.clear(); // make buffer ready for writing
            socketChannel.read(readBuff);
            readBuff.flip(); // make buffer ready for reading
            System.out.println(new String(readBuff.array()));
            key.interestOps(SelectionKey.OP_WRITE);
        } else if (key.isWritable()) {
                writeBuff.rewind(); // sets the position back to 0
                SocketChannel socketChannel = (SocketChannel) key.channel();
                socketChannel.write(writeBuff);
                key.interestOps(SelectionKey.OP_READ);
        }
    }
}
The code of the client program is as follows. Readers can open several more programs under the terminal to simulate multiple requests at the same time. For programs with multiple clients, our server always uses only one thread to process multiple requests. A common application scenario is that multiple users upload files to the server at the same time. For each upload request, we can not create a single thread to process, but also use Executor/Future to return user results immediately without blocking the IO operation.
SocketChannel socketChannel = SocketChannel.open();
socketChannel.connect(new InetSocketAddress("127.0.0.1", 5000));

ByteBuffer writeBuffer = ByteBuffer.allocate(32);
ByteBuffer readBuffer = ByteBuffer.allocate(32);

writeBuffer.put("hello".getBytes());
writeBuffer.flip(); // make buffer ready for reading

while (true) {
    writeBuffer.rewind(); // sets the position back to 0
    socketChannel.write(writeBuffer); // hello
    readBuffer.clear(); // make buffer ready for writing
    socketChannel.read(readBuffer); // recieved
}
See Also
For those who are interested in asynchronous IO under Python, you can also expand on my article. Asyncio.
Contact
GitHub: https://github.com/ziwenxie
Blog: https://www.ziwenxie.site
Email: ziwenxiecat@gmail.com
This article is the author's original, reproduced in the obvious place at the beginning of the statement html :-)