Configure Nginx for Web Page Compression
Nginx's ngx_http_gzip_module compression module provides the ability to compress file content, allowing the Nginx server to compress output content before sending it to the client, saving bandwidth on the site and improving the user's access experience. It is installed by default.Compression performance can be optimized by adding appropriate compression function parameters to the configuration file.
Explanation of compression function parameters
- gzip on: turn on gzip compressed output
- gzip_min_length 1k: Sets the minimum number of bytes of pages that are allowed to compress
- gzip_buffers 4 16k: Indicates that four units of 16K memory are requested for the compression result stream cache. The default value is to request the same size of memory as the original data to store the gzip compression result
- zip_http_version 1.0: Used to set the recognition HTTP protocol version, default is 1.1. Most browsers currently support gzip decompression, but it is the slowest to process and consumes server CPU resources
- gzip_comp_level 2: used to specify gzip compression ratio, 1 compression ratio is the smallest, processing speed is the fastest; 9 compression ratio is the largest, transmission speed is fast, but processing speed is the slowest, use the default
- gzip_types text/plain: Compression type, which enables compression on which web documents
- Gzip_vary: Option lets the front-end cache server cache gzip-compressed pages
1. Turn off firewalls and enhance security
[root@localhost ~]# systemctl stop firewalld.service //close firewall
[root@localhost ~]# setenforce 0 //Turn off enhanced security features
[root@localhost ~]#
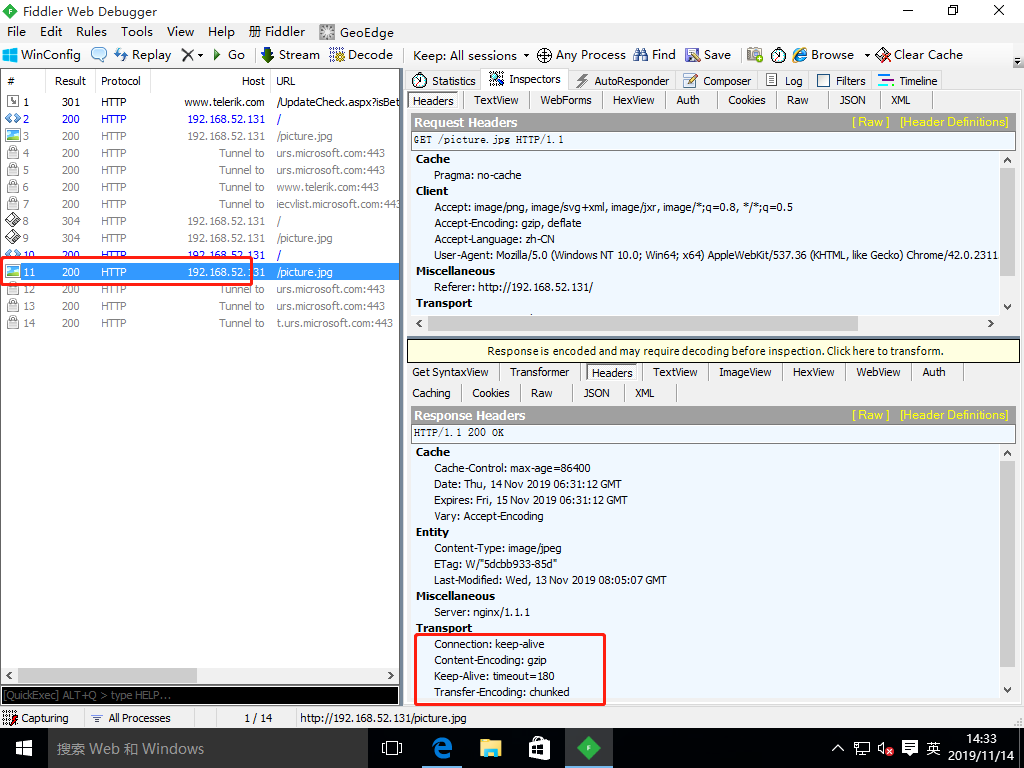
2. Access the nginx service with the win10 virtual machine and grab the package with the fiddler tool (compression not turned on)
3. Modify profile to turn compression on
[root@localhost ~]# vim /usr/local/nginx/conf/nginx.conf

    gzip  on;
    gzip_min_length 1k;
    gzip_buffers 4 16k;
    gzip_http_version 1.1;
    gzip_comp_level 6;
    gzip_types text/plain application/x-javascript text/css image/jpeg image/png image/gif application/xml text/javascript application/x-httpd-php application/javasrcipt application/json;
    gzip_disable "MSIE [1-6]\.";   //IE Browser Version 6+ Enable Compression
    gzip_vary on;
[root@localhost ~]# service nginx restart //restart service
[root@localhost ~]#
4. Access the nginx service again with the win10 virtual machine and grab the package with the fiddler tool (compression turned on)
Configure Nginx to implement anti-theft chain
- In the service of enterprise website, anti-theft chain should be configured to avoid illegal usurpation of website content and economic losses.
- Nginx anti-theft chains are also very powerful.By default, anti-theft chains can be handled by simple configuration
1. Copy site pictures and anti-theft chain pictures to site directory
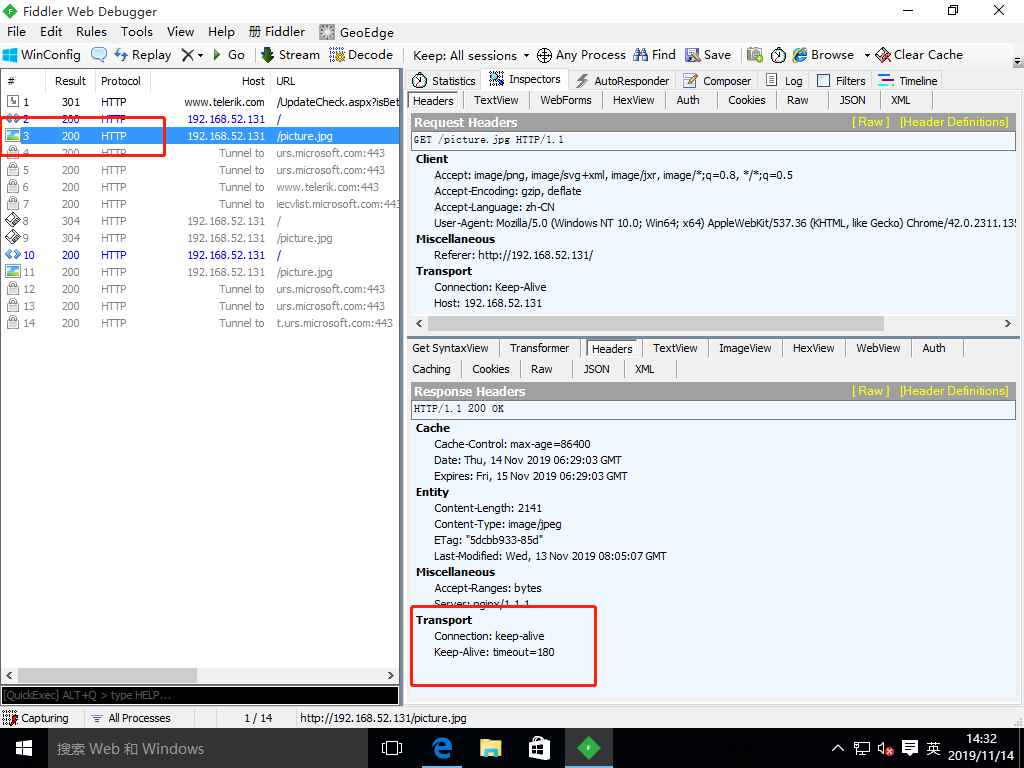
[root@localhost ~]# mkdir /mnt/tools
[root@localhost ~]# mount.cifs //192.168.100.50/tools /mnt/tools/
Password for root@//192.168.100.50/tools:
[root@localhost ~]# Cp/mnt/tools/forbid.png/usr/local/nginx/html/ //anti-theft chain picture
[root@localhost ~]# CP picture.jpg/usr/local/nginx/html/ //website picture
[root@localhost ~]# cd /usr/local/nginx/html/
[root@localhost html]# ls
50x.html  forbid.png  index.html  picture.jpg
[root@localhost html]#
2. Add picture references to the first page file
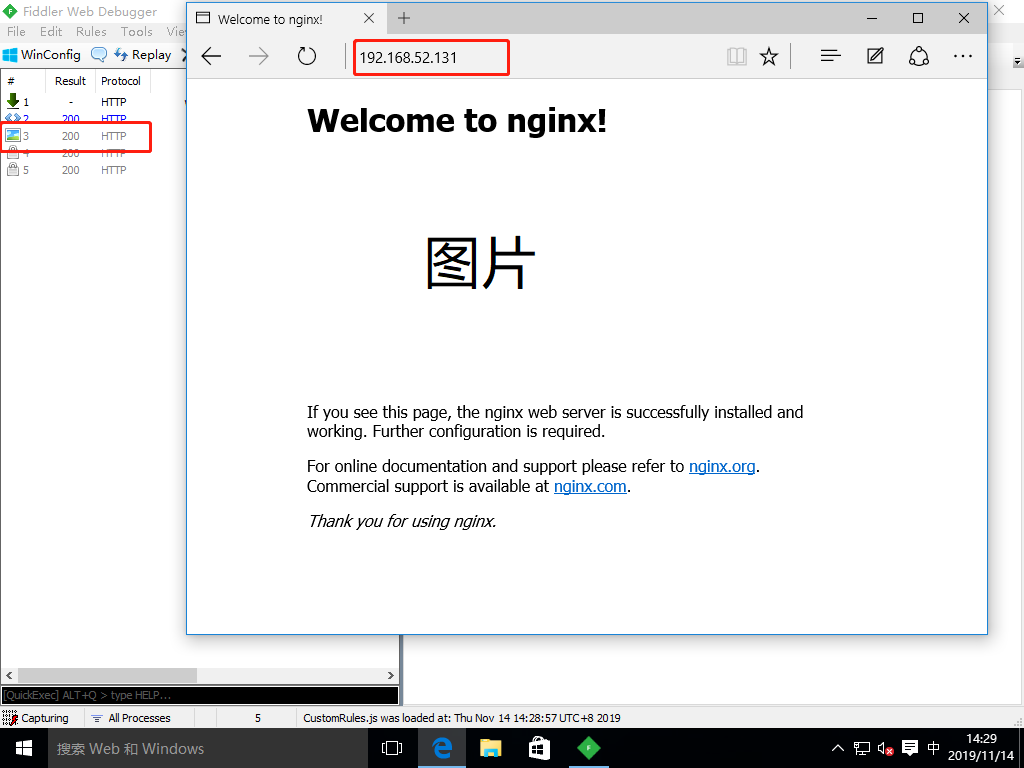
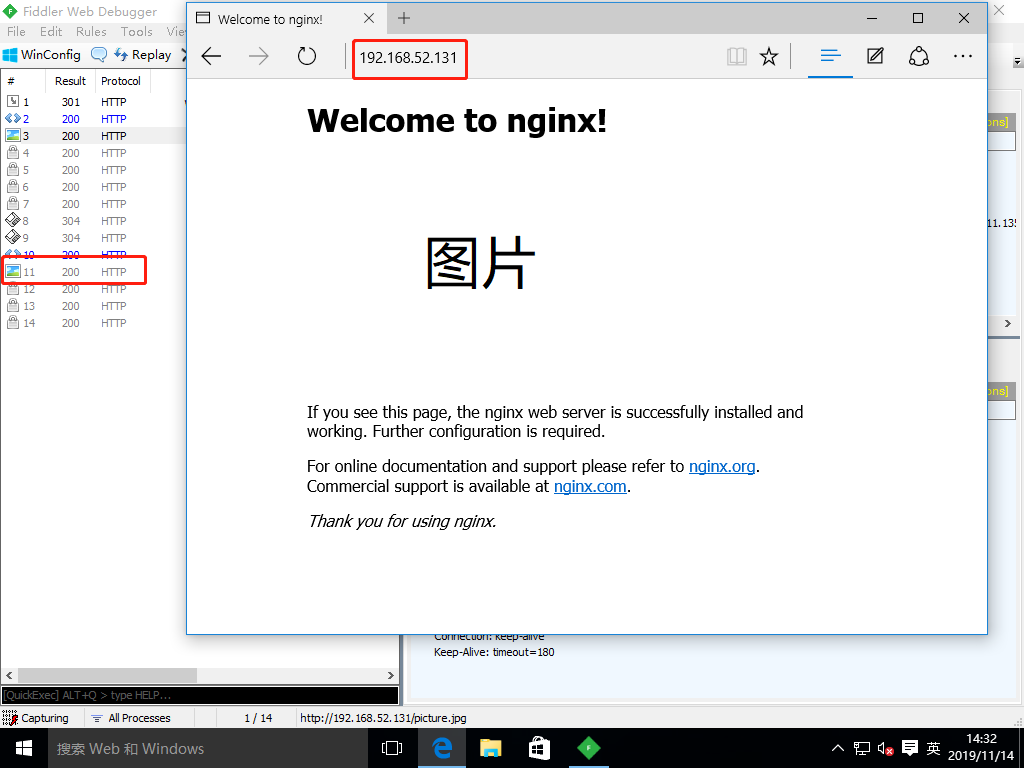
[root@localhost html]# vim index.html
<h1>Welcome to nginx!</h1>
<img src="picture.jpg"/>   //Add to
[root@localhost html]#
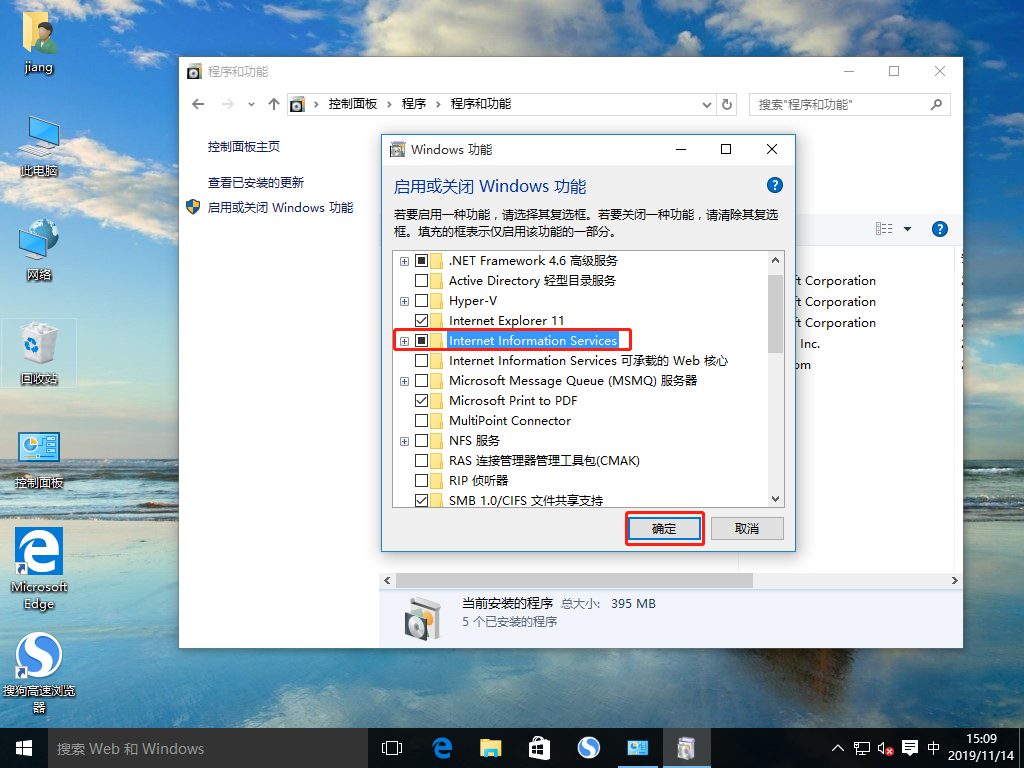
3. Install dns Service
[root@localhost html]# yum install bind -y
..........//Omit installation process
[root@localhost html]#
4. Modify the main profile
[root@localhost html]# vim /etc/named.conf
options {
        listen-on port 53 { any; };   //Change 127.0.0.1 to any
        listen-on-v6 port 53 { ::1; };
        directory       "/var/named";
        dump-file       "/var/named/data/cache_dump.db";
        statistics-file "/var/named/data/named_stats.txt";
        memstatistics-file "/var/named/data/named_mem_stats.txt";
        recursing-file  "/var/named/data/named.recursing";
        secroots-file   "/var/named/data/named.secroots";
        allow-query     { any; };   //Change localhost to any
[root@localhost html]#
5. Modify Zone Profile
[root@localhost html]# vim /etc/named.rfc1912.zones

zone "abc.com" IN {   //Add Area
type master;
file "abc.com.zone";
allow-update { none; };
};
[root@localhost html]#
6. Modify Zone Data Profile
[root@localhost html]# cd /var/named/
[root@localhost named]# ls
data dynamic named.ca named.empty named.localhost named.loopback slaves
[root@localhost named]# Cp-p named.localhost abc.com.zone //Copy a template and rename
[root@localhost named]#
$TTL 1D
@ IN SOA @ rname.invalid. (
0 ; serial
1D ; refresh
1H ; retry
1W ; expire
3H ) ; minimum
NS @
A 127.0.0.1
www IN A 192.168.52.131 //Add Resolved Address
[root@localhost named]# systemctl start named //start service
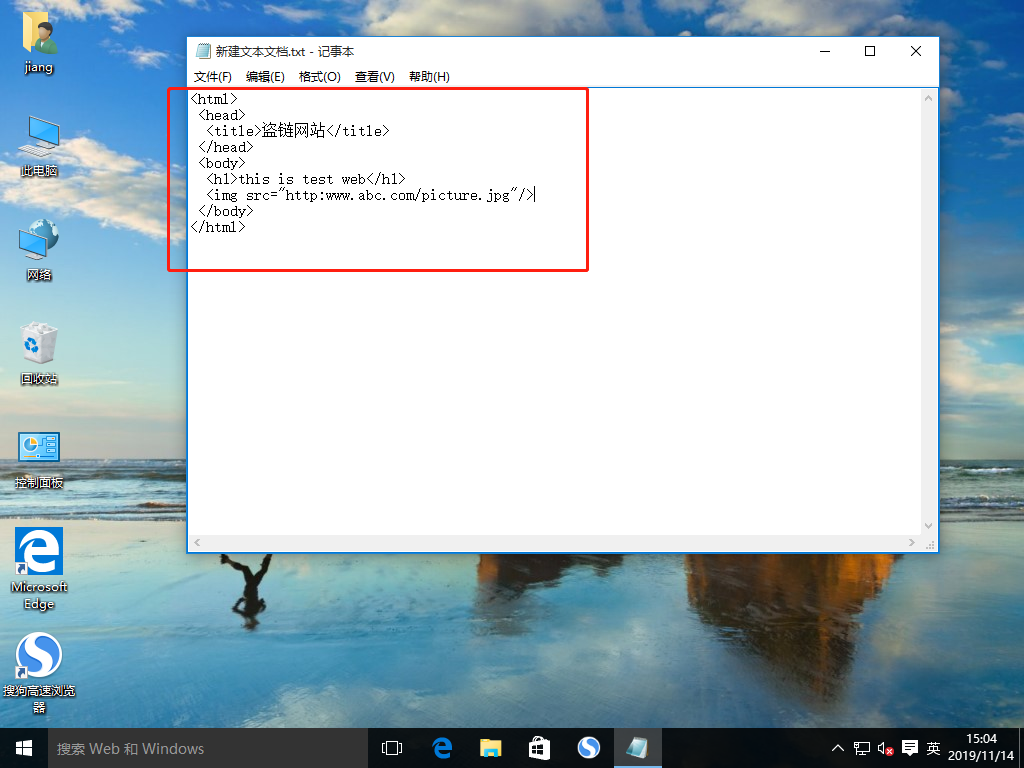
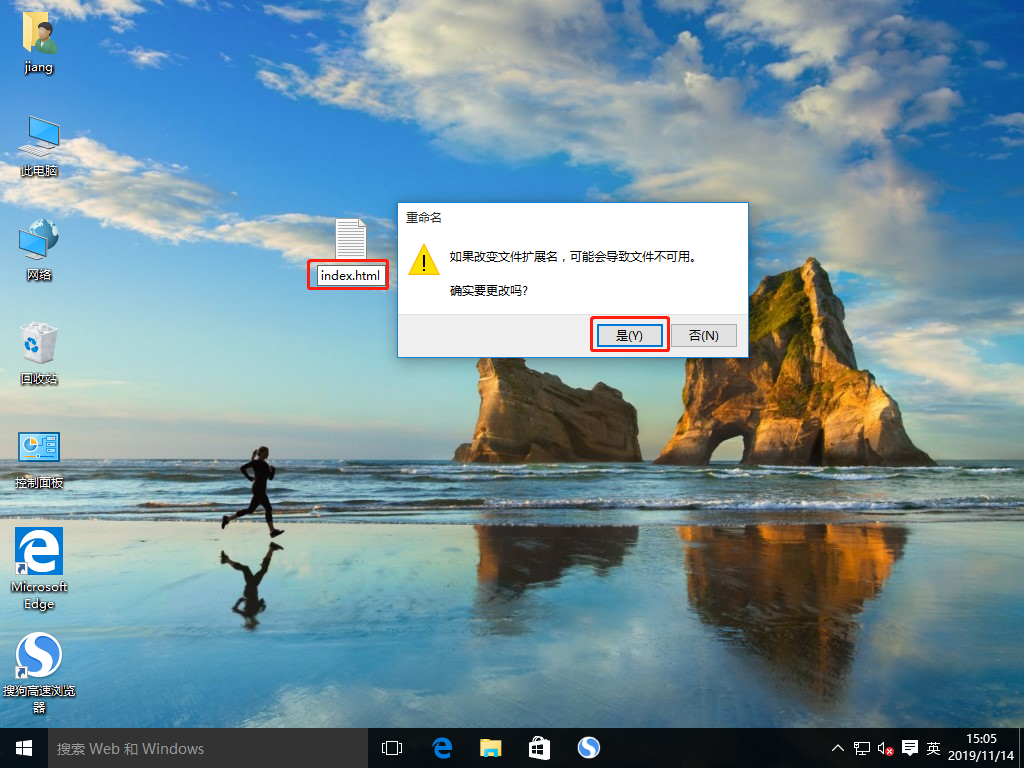
[root@localhost named]#7. Enter the following into a new text document on the win10-1 host and rename it index.html
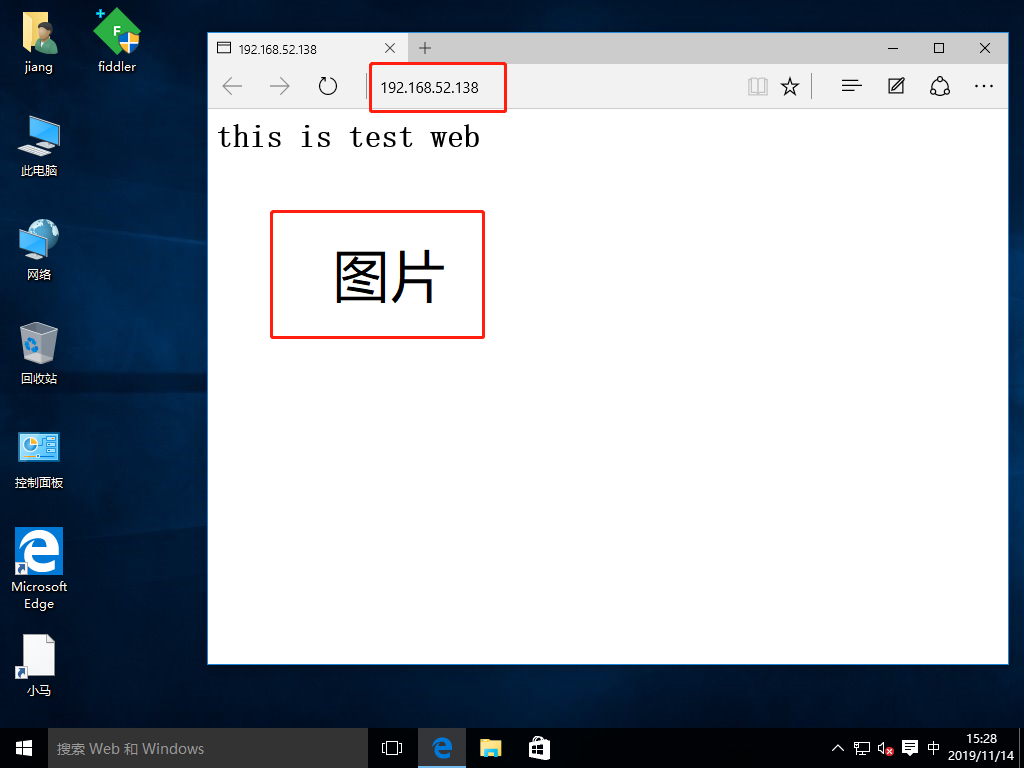
<html>
 <head>
  <title>Stolen Chain Website</title>
 </head>
 <body>
  <h1>this is test web</h1>
  <img src="http:www.abc.com/picture.jpg"/>   //Stolen link path
 </body>
</html>
8. Follow these steps to start the web service for the win10-1 system
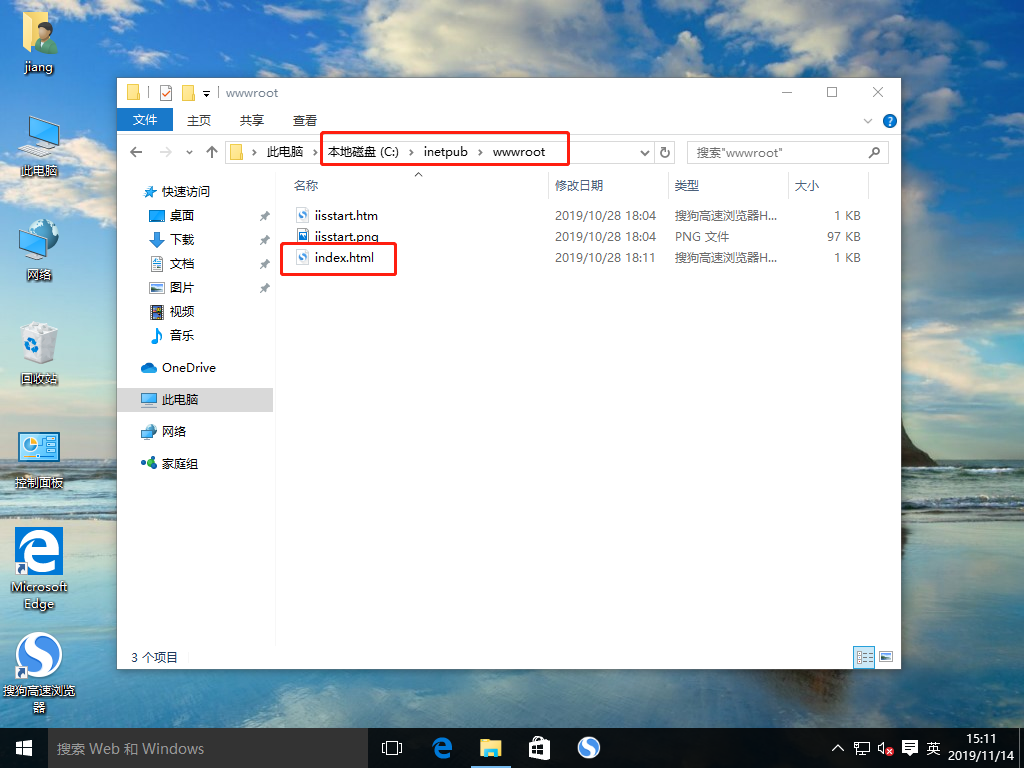
9. Move the file index.html to the subdirectory wwwroot of the inetpub directory on the C drive
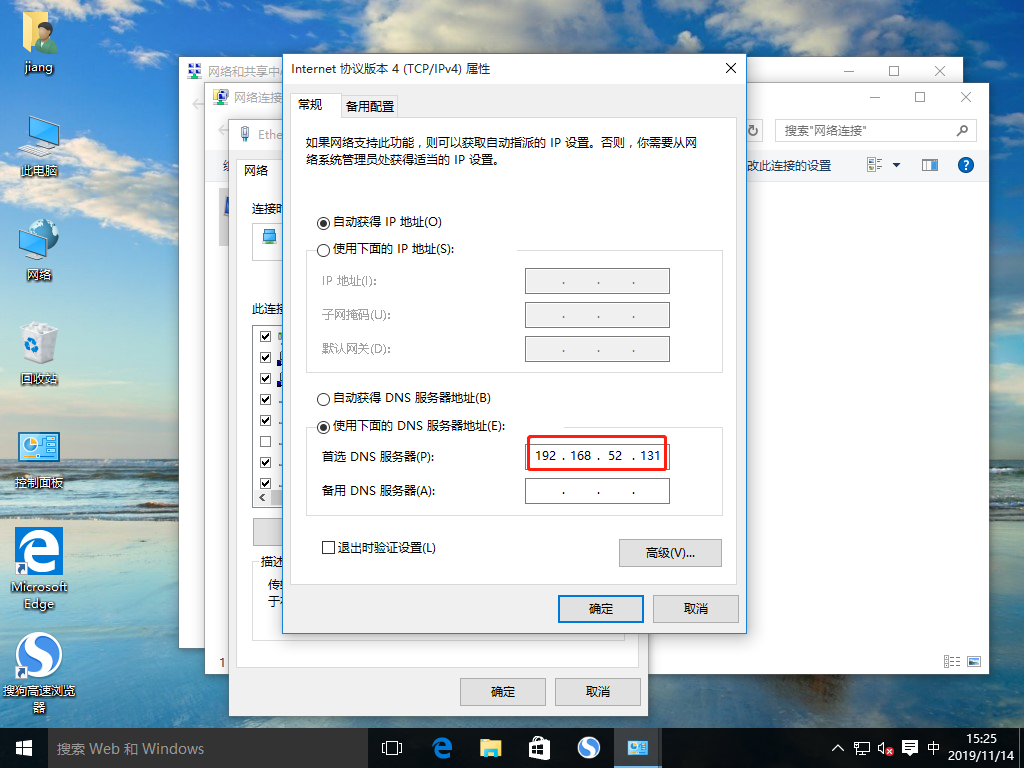
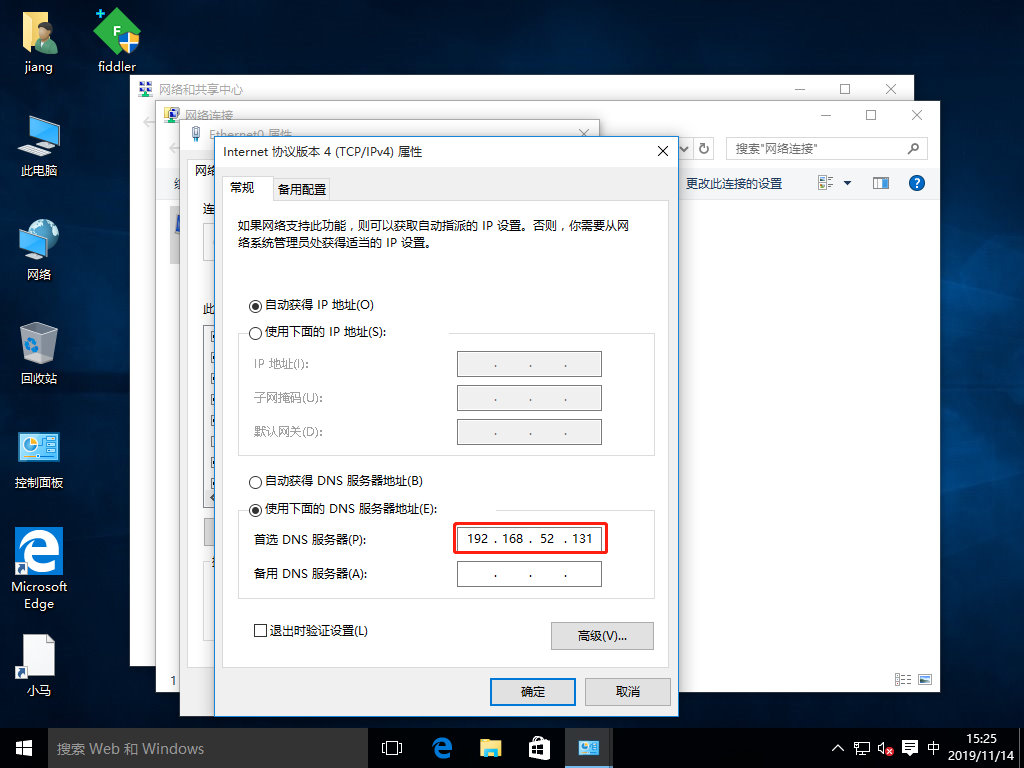
10. Change the dns addresses of win10-1 hosts and test hosts win10-2 that build stolen chain websites to Linux virtual machine addresses, respectively
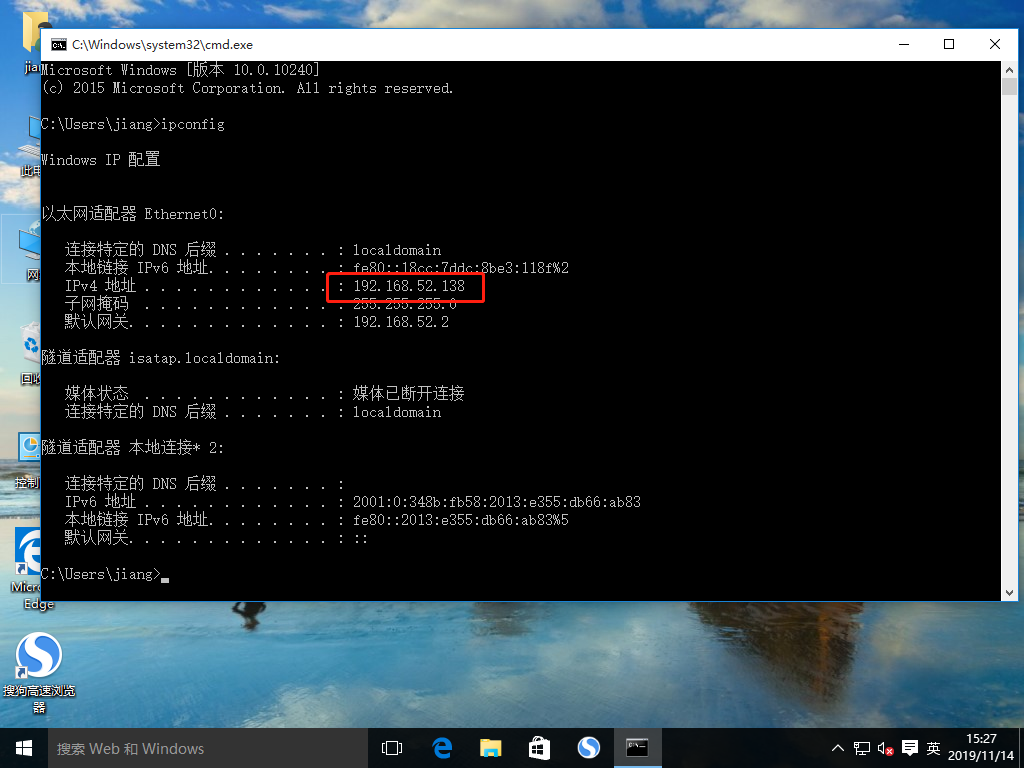
11. View the IP address of the win10-1 host
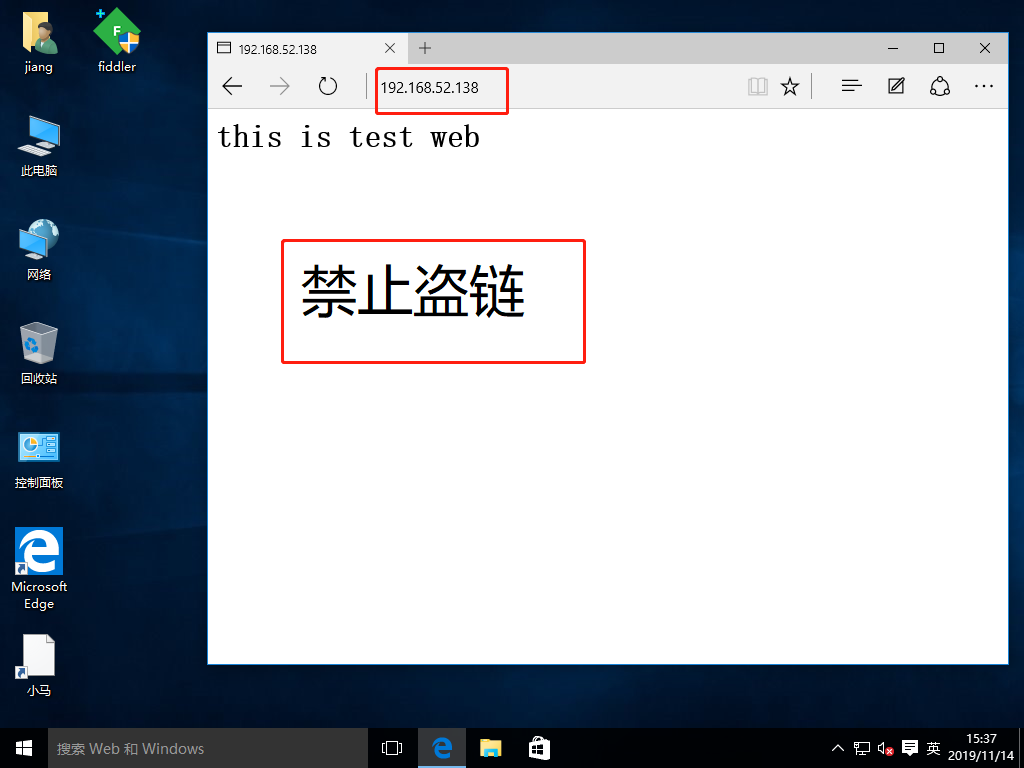
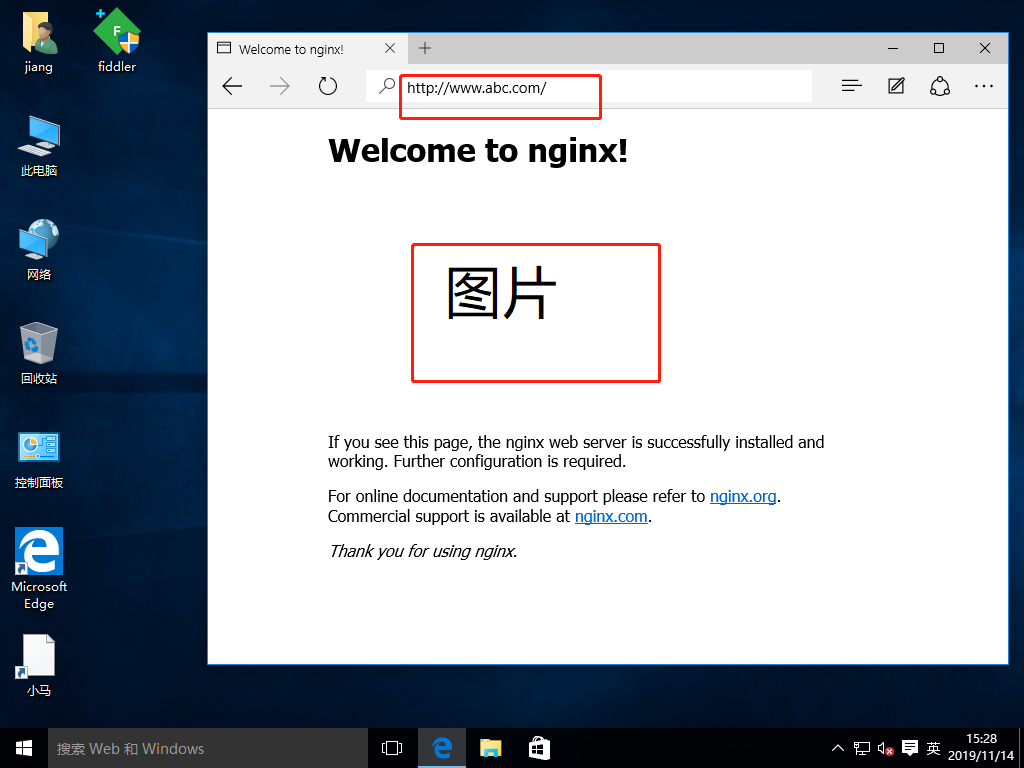
12. Use win10-2 host to access web services of nginx service site and win10-1 host respectively, successfully steal pictures of nginx service site
13. Modify nginx service configuration file to turn on anti-theft chain function
[root@localhost named]# vim /usr/local/nginx/conf/nginx.conf

        location ~*\.(jpg|gif|swf)$ {
                valid_referers none blocked *.abc.com abc.com;
                if ( $invalid_referer ) {
                   rewrite ^/ http://www.abc.com/forbid.png;
                }
        }
[root@localhost named]# service nginx restart
[root@localhost named]#
14. Use win10-2 host again to access the web services of nginx service site and win10-1 host respectively, and successfully open theft chain function