Bowen structure
Reverse Proxy
proxy cache
Reverse proxy (case)
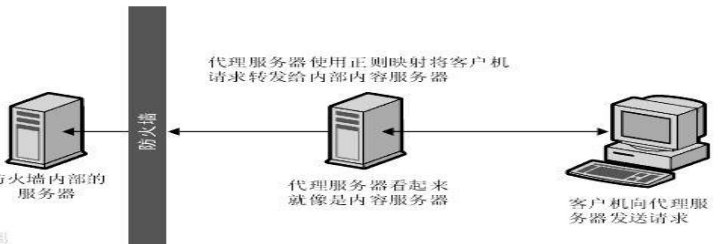
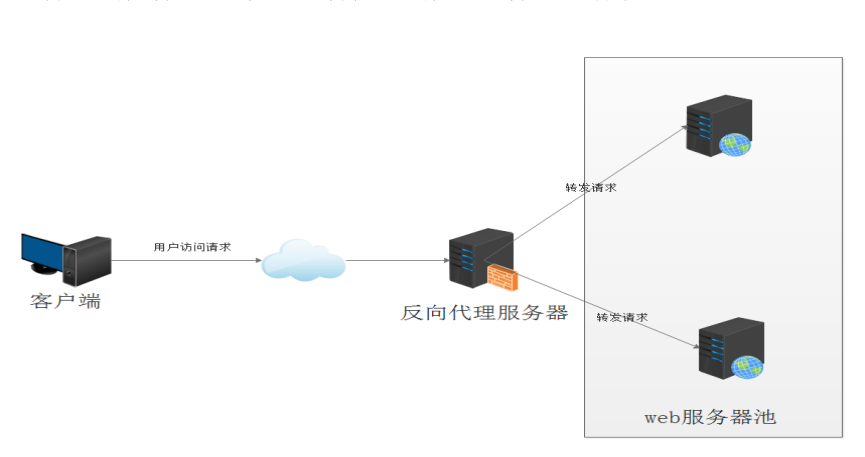
1. Reverse Proxy means that a proxy server accepts a client's connection request, then forwards the request to the web server on the network (possibly apache, nginx, tomcat, iis, etc.), and returns the result from the web server to the client requesting the connection. In this case, the proxy server is a server to the outside.
As you can see from the diagram, the reverse proxy server proxy Web server receives Http requests and forwards them.Moreover, as a reverse proxy server, nginx can forward requests to different web servers on the back end based on the content requested by the user, such as static separation, and then create multiple virtual hosts on nginx, which makes it successful to access different web servers or Web Clusters on the back end when entering different domain names (url s) in the browser.
2. Role of reverse proxy
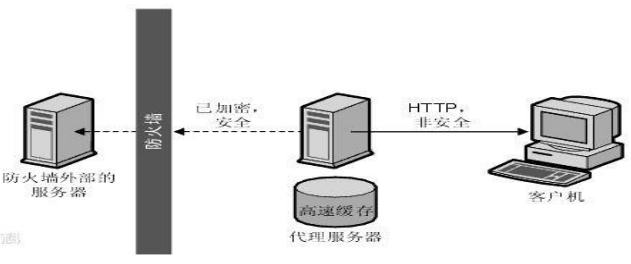
1. Secure Web Sites: Any request from the Internet must first go through a proxy server
(2) Accelerate Web requests by configuring caching capabilities: Some static resources on the real Web server can be cached, reducing the load on the real Web server
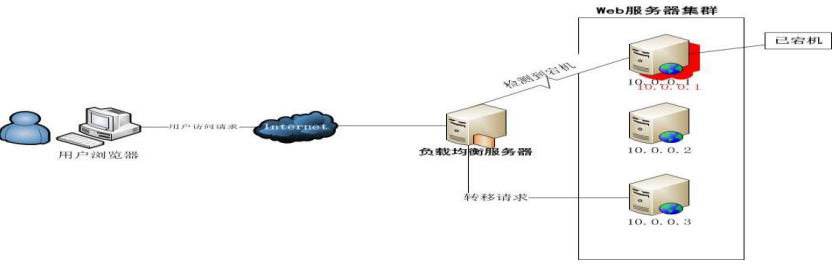
(3) Implement load balancing: act as a load balancing server to distribute requests equally and balance the load pressure on each server in the cluster;
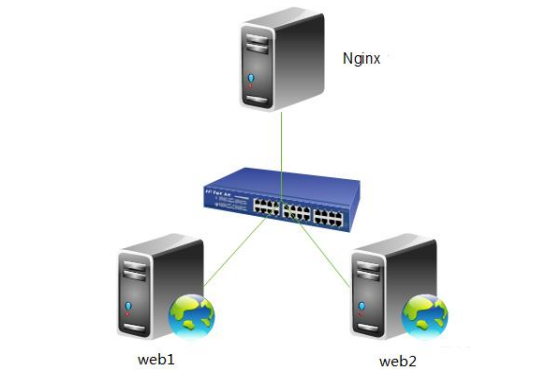
- Experimental environment
192.168.222.128 nginx server
192.168.222.129 web
192.168.222.130 web
- The nginx server operates as follows:
[root@localhost / ]#tar zxf ngx_cache_purge-2.3.tar.gz
[root@localhost / ]#unzip nginx-sticky-module.zip
[root@localhost / ]#tar zxf nginx-1.14.0.tar.gz
[root@localhost /]# yum -y install pcre-devel openssl-devel
[root@localhost /]#cd nginx-1.14.0/
[root@localhost nginx-1.14.0]#./configure --prefix=/usr/local/nginx   \
--user=nginx --group=nginx --with-http_stub_status_module --with-http_realip_module --with-http_ssl_module  \
--with-http_gzip_static_module --http-client-body-temp-path=/var/tmp/nginx/client  \
--http-fastcgi-temp-path=/var/tmp/nginx/fcgi  \
--with-pcre  --add-module=../ngx_cache_purge-2.3  \
--add-module=../nginx-sticky-module  \
--with-http_flv_module  \
[root@localhost nginx-1.14.0]# make && make install
[root@localhost nginx-1.14.0]# ln -s /usr/local/nginx/sbin/nginx  /usr/local/sbin/
[root@localhost nginx-1.14.0]# nginx -t
nginx: the configuration file /usr/local/nginx/conf/nginx.conf syntax is ok
nginx: [emerg] getpwnam("nginx") failed
\\You can see the error, no creation nginx user
[root@localhost nginx-1.14.0]# useradd -s /sbin/nologin -M nginx
[root@localhost nginx-1.14.0]# nginx -t
nginx: the configuration file /usr/local/nginx/conf/nginx.conf syntax is ok
nginx: [emerg] mkdir() "/var/tmp/nginx/client" failed (2: No such file or directory)
nginx: configuration file /usr/local/nginx/conf/nginx.conf test failed
\\Error Show No Directory Created
[root@localhost nginx-1.14.0]# mkdir -p /var/tmp/nginx/client
[root@localhost nginx-1.14.0]# nginx -t
nginx: the configuration file /usr/local/nginx/conf/nginx.conf syntax is ok
nginx: configuration file /usr/local/nginx/conf/nginx.conf test is successful
[root@localhost nginx-1.14.0]# nginx
[root@localhost ~]# netstat -anpt | grep nginx
tcp        0      0 0.0.0.0:80              0.0.0.0:           LISTEN      9886/nginx: master
[root@localhost ~]# vim /usr/local/nginx/conf/nginx.conf
\\stay http Add the following to
 upstream backend {
        sticky;
        server 192.168.222.129:80 weight=1 max_fails=2 fail_timeout=10s;
        server 192.168.222.130:80 weight=1 max_fails=2 fail_timeout=10s;
}
\\
weight :  Polling weights can also be used in ip_hash The default value is 1
max_fails : Allow requests to fail, defaulting to 1.When the maximum number of times is exceeded, return proxy_next_upstream Error in module definition.
fail_timeout :  There are two meanings, one is at 10 s Allow up to two failures in time; second, after two failures, 10 s No requests are allocated to this server in time.

\\stay location Add, you can add the previous localtion Comment out
 location / {
        proxy_pass http://backend;
}
[root@localhost /]# Nginx-s reload //overload nginx service- Module Interpretation
nginx-sticky-module: The function of this module is to send requests from the same client (browser) to the same back-end server by cookie pasting, which can solve the problem of session synchronization of multiple backend servers to some extent - since synchronization is no longer needed, RR polling mode must be considered by the operator and maintainer themselvesImplementation of session synchronization.
load-balance Other Scheduling Schedules:
-
Polling (default): Each request is assigned to a different back-end server one by one in a chronological order. If a back-end server is present, the failing system is automatically excluded, leaving user access unaffected.Weight specifies the polling weight value, and the larger the Weight value, the higher the probability of access allocated, mainly when the performance of each server on the back end is uneven.
ip_hash: Each request is assigned according to the hash result of accessing the IP, so that visitors from the same IP can access a back-end server permanently, effectively resolving the session sharing problem of dynamic web pages.Of course, if this node is unavailable, it will go to the next node, and if there is no session synchronization at this time, it will be logged out.
least_conn: The request is sent to the realserver with the fewest active connections currently.The value of weight is considered.
url_hash: This method assigns requests based on the hash result of accessing the url, directing each URL to the same back-end service
Can further improve the efficiency of the backend cache server.Nginx does not support url_hash by itself. If you need to use this scheduling algorithm, you must install nginx_upstream_hash, Nginx's hash package.
Fair: This is a smarter load balancing algorithm than the two above.This algorithm intelligently balances the load based on page size and load time, that is, allocates requests based on the response time of the back-end server and prioritizes those with short response time.Nginx does not support fairs per se. If you need to use this scheduling algorithm, you must download Nginx's upstream_fair module. - web
[root@localhost ~]# yum -y install httpd
[root@localhost ~]# echo aaaaaaaaaa > /var/www/html/index.html
[root@localhost ~]# systemctl start httpd
- Another web
[root@localhost ~]# yum -y install httpd
[root@localhost ~]# echo bbbbbbbbbbb > /var/www/html/index.html
[root@localhost ~]# systemctl start httpd
- The test results are as follows
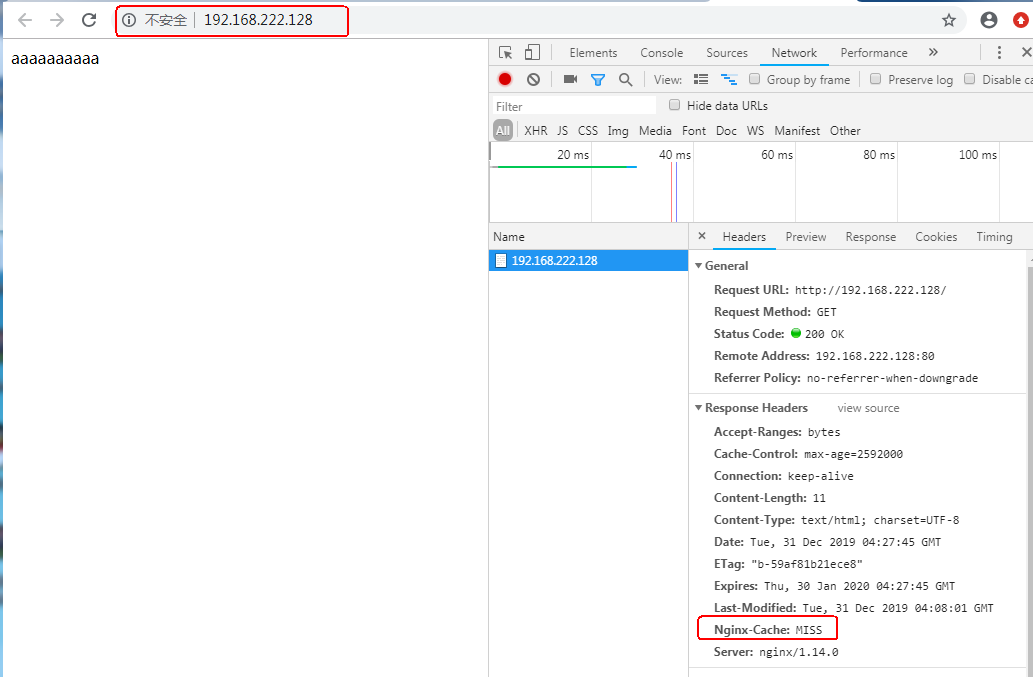
[root@localhost ~]# curl 127.0.0.1
aaaaaaaaaaaaaaa
[root@localhost ~]# curl 127.0.0.1
bbbbbbbbbbbb
[root@localhost ~]# curl 127.0.0.1
aaaaaaaaaaaaaaa
[root@localhost ~]# curl 127.0.0.1
bbbbbbbbbbbb
\\You can see nginx The server separates the requests to two servers web
- nginx startup script can be edited
[root@localhost ~]# vim /etc/init.d/nginx
#!/bin/bash
#chkconfig: 2345 99 20
#description: Nginx Service Control Script
PROG="/usr/local/nginx1.10/sbin/nginx"
PIDF="/usr/local/nginx1.10/logs/nginx.pid"
case "$1" in
        start)
           netstat -anplt |grep ":80" &> /dev/null && pgrep "nginx" &> /dev/null
           if [ $? -eq 0 ]
           then
              echo "Nginx service already running."
           else
              $PROG -t &> /dev/null
              if [ $? -eq 0 ] ; then
                $PROG
                echo "Nginx service start success."
              else
                $PROG -t
              fi
           fi
        ;;
        stop)
           netstat -anplt |grep ":80" &> /dev/null && pgrep "nginx" &> /dev/null
           if [ $? -eq 0 ]
           then
                kill -s QUIT $(cat $PIDF)
                echo "Nginx service stop success."
            else
                echo "Nginx service already stop"
            fi
        ;;
        restart)
                $0 stop
                $0 start
        ;;
        status)
           netstat -anplt |grep ":80" &> /dev/null && pgrep "nginx" &> /dev/null
           if [ $? -eq 0 ]
           then
                echo "Nginx service is running."
           else
                echo "Nginx is stop."
           fi
        ;;
        reload)
           netstat -anplt |grep ":80" &> /dev/null && pgrep "nginx" &> /dev/null
           if [ $? -eq 0 ]
           then
                $PROG -t &> /dev/null
              if [ $? -eq 0 ] ; then
                kill -s HUP $(cat $PIDF)
                echo "reload Nginx config success."
              else
                $PROG -t
              fi
           else
                echo "Nginx service is not run."
           fi
        ;;
        *)
                echo "Usage: $0 {start|stop|restart|reload}"
                exit 1
        esac
[root@localhost ~]#  chmod +x /etc/init.d/nginx
[root@localhost ~]# chkconfig --add nginx
[root@localhost ~]# service nginx start
Nginx service start success.
[root@localhost ~]# service nginx status
Nginx service is running.
2. nginx cache usage
Caching means caching static files such as js, css, image from the back-end server to the cache directory specified by nginx, which can lighten the load on the back-end server and speed up access, but such a timely cache cleanup has become a problem, so the module ngx_cache_purge is required to clean up the cache manually before the expiration time has elapsed.
The web caching functionality of nginx can only be accomplished by proxy_cache, fastcgi_cache instruction set, and related instruction sets:
proxy_cache: Responsible for the reverse proxy caching of the static content of the back-end server;
fastcgi_cache: mainly used to process fastcgi dynamic process cache;
- Add the following to the nginx main configuration file
[root@localhost ~]# vim /usr/local/nginx/conf/nginx.conf
............ //Omit some content
log_format main '$remote_addr - $remote_user [$time_local] "$request" '
'$status $body_bytes_sent "$http_referer" '
'"$http_user_agent" "$http_x_forwarded_for"'
'"$upstream_cache_status"'; //Record buffer hit ratio, note that this is an entire segment, so there is only a semicolon at the end
//The above already exists, just add the last line!
access_log logs/access.log main;
proxy_buffering on; //When proxying, turn on buffering the response of the back-end server
proxy_temp_path /usr/local/nginx/proxy_temp; //Define Cache Temporary Directory
proxy_cache_path /usr/local/nginx/proxy_cache levels=1:2 keys_zone=my-cache:100m inactive=600m max_size=2g;
//Define the cache directory, which is described outside the configuration file
............ //Omit some content
location ~/purge(/.*) { //Define Cache Cleanup Policy
allow 127.0.0.1;
allow 192.168.222.0/24;
deny all;
proxy_cache_purge my-cache $host$1$is_args$args;
}
location / {
proxy_pass http://lzj; //Request to go to the list of servers defined by lzj
proxy_redirect off; Specifies whether to modify the response header returned by the proxy server location Head Domain heel refresh Head field value
#For example:
//Set the replacement text for the back-end server "Location" and "Refresh" response headers.Assuming the backend server returns
//The response header is "Location: http://localhost:8000/two/some/uri/", then the command proxy_redirect
# http://localhost:8000/two/ http://frontend/one/; will rewrite the string to "Location:
# http://frontend/one/some/uri/".
proxy_set_header Host $host; //Allow redefinition or addition of request headers to back-end servers
#Host means the host name of the request. The nginx reverse proxy server sends the request to the back-end real server.
#And the host field in the request header overrides the server set for the proxy_pass directive.Because nginx acts as a reverse proxy
#Use if the real server on the back end has an anti-theft chain like this or is based on the host field in the http request header
#If the nginx of the reverse proxy layer does not override the host field in the request header, the request will fail if routing or judgment is enabled.
proxy_set_header X-Real-IP $remote_addr;
//The web server side gets the user's real ip, but to actually get the user's real ip, you can also use the X-Forward-For below
proxy_set_header X-Forwarded-For $proxy_add_x_forwarded_for;
#Back-end Web server can get user's real IP, X_Forward_For field through X-Forwarded-For
#Indicates who initiated this http request?If the reverse proxy server does not override the request header, then the backend
#Real servers will assume that all requests come from the reverse proxy server when they are processed, if the backend has a protection policy
#Then the machine is blocked.Therefore, there are generally two additional configurations in nginx that are configured to act as reverse proxies to modify the request header for http
proxy_next_upstream error timeout invalid_header http_500 http_502 http_503 http_504;
#Increase failover if the back-end server returns errors such as 502, 504, execution timeout,
#Automatically forward requests to another server in the upstream load balancing pool for failover.
proxy_cache my-cache;
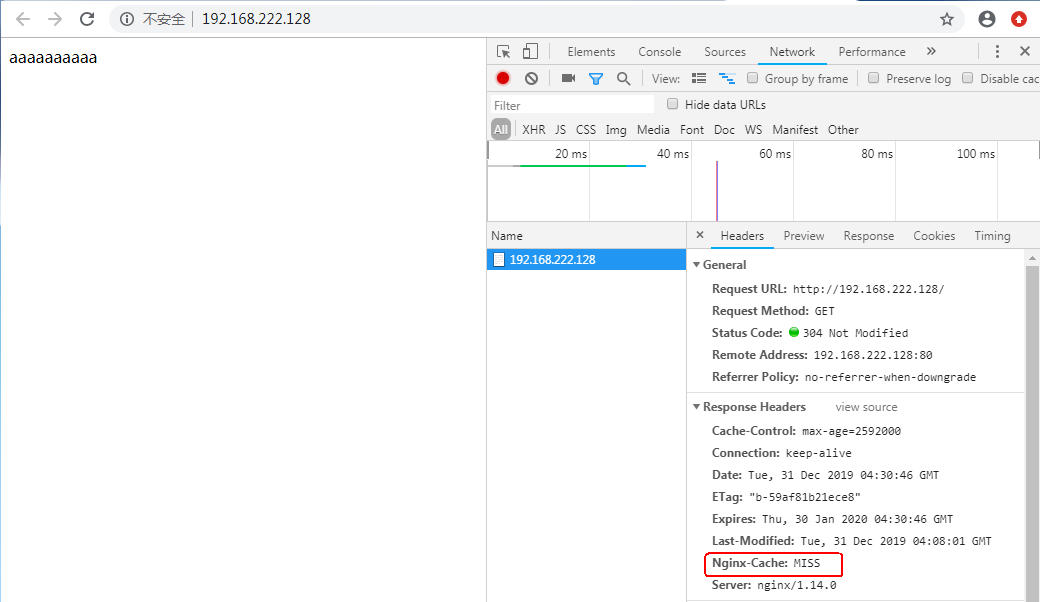
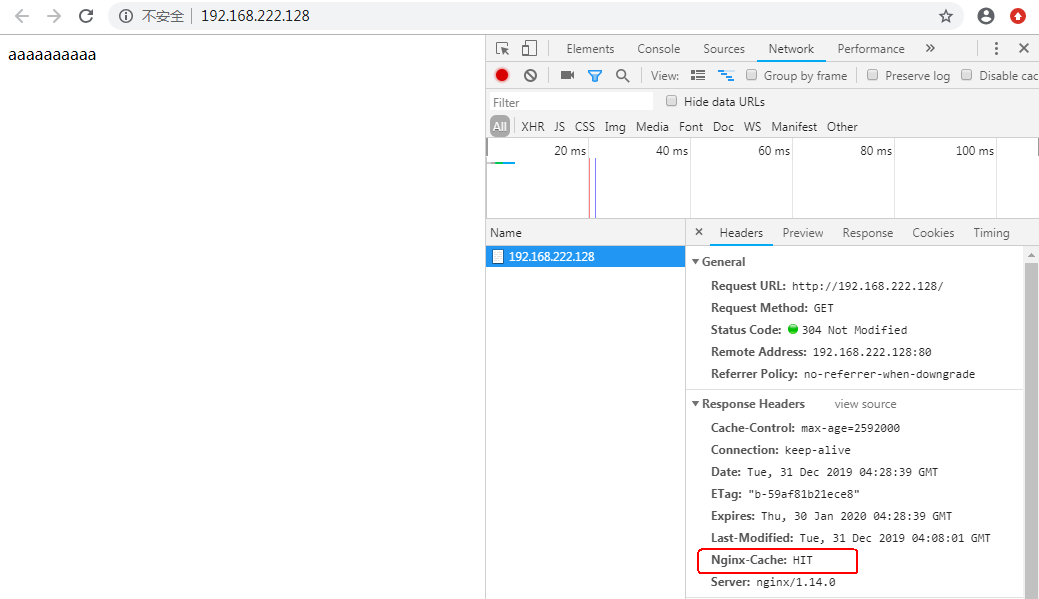
add_header Nginx-Cache $upstream_cache_status;
proxy_cache_valid 200 304 301 302 8h;
proxy_cache_valid 404 1m;
proxy_cache_valid any 1d;
proxy_cache_key $host$uri$is_args$args;
expires 30d;
}
[root@localhost ~]# nginx -t
nginx: the configuration file /usr/local/nginx/conf/nginx.conf syntax is ok
nginx: configuration file /usr/local/nginx/conf/nginx.conf test is successful
//Detect profile okay
[root@localhost ~]# Nginx-s reload //reload nginx configuration file- Visit as follows:
Refresh the display as follows:
- Clear Cache
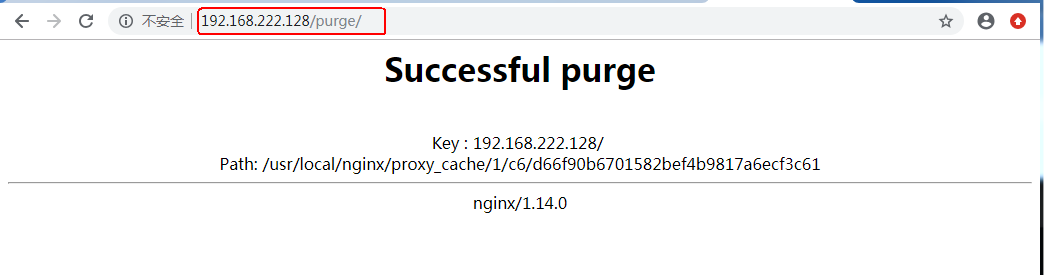
- When you revisit 192.168.222.128, you can see that the cache is clear