preface
Nginx module is a great advantage of nginx compared with apache. The module can provide more functions for nginx to meet the daily needs of operation and maintenance. When there are some requirements, we just need to compile a new module and restart nginx.
1, Common nginx web modules
1. Random Homepage_ index_ module
(1)mkdir /usr/share/nginx/html/random_index
touch /usr/share/nginx/html/random_index/{blue.html,green.html,red.html,yellow.html}

<html>

<head>

<title>color</title>

</head>

<body style="background-color:blue">

<h1>color!</h1>

</body>

</html>
(2)vim /etc/nginx/conf.d/liang.conf
server{

listen 192.168.93.136:8080;

server_name web.liang.com;

location /{

  #root /usr/share/nginx/html;

  #index liang.html;

  root /usr/share/nginx/random_index;

  random_index on;

}

}
(3) Visit 192.168.93.136:8080 and refresh to see the changes of the web page
2. Replace module sub_module
Syntax: sub_filter A B; # Replace a in the web page with B
Default: —
Context: http, server, location
Syntax: sub_filter_once on | off;
Default: sub_filter_once on;
Context: http, server, location
server{

listen 192.168.93.177:8080;

server_name web.kong.com;

location /{

  root /usr/share/nginx/html;

  index kong.html index.html;

  sub_filter kong '';         # Replace kong with empty

  #sub_filter_once on;        # Replace only the first kong that matches

  sub_filter_once off;        # replace all

}

}
3. File reading module ngx_http_core_module
Syntax: sendfile on | off; # Speed up network transmission
Default: sendfile off;
Context: http, server, location, if in location
sendfile network transfer procedure not used:
Hard disk > > kernel buffer > > user buffer > > kernel socket buffer > > protocol stack
Using sendfile network transmission process:
Hard disk > > kernel buffer > > protocol stack
Syntax: tcp_nopush on | off;
Default: tcp_nopush off;
Context: http, server, location
TCP is not used_ Nopush network resources:
tcp transmission data will take a 40 byte long packet header. Each operation of the application will send a packet, and each packet will add a packet header
Therefore, 4000% overload is generated, which can easily cause network congestion
Using tcp_nopush network resources:
One packet will not be sent every time, and multiple packets will be sent together, using only one packet header
Syntax: tcp_nodelay on | off;
Default: tcp_nodelay on;
Context: http, server, location
The data packet is sent immediately. Due to Nagle and DelayedACK, the confirmation information of the data packet needs to be accumulated for two hours before it is sent. In the case of long connection, odd packets will cause a delay of 40ms, so tcp_nodelay will send the ack immediately
4. File compression ngx_http_gzip_module
Start the module to compress the file before transmission and improve the transmission efficiency
Syntax: gzip on | off; # Turn the compression module on or off
Default: gzip off;
Context: http, server, location, if in location
Syntax: gzip_comp_level level; # Set compression level
Default: gzip_comp_level 1;
Context: http, server, location
Add in the http module of nginx.conf
gzip on;

gzip_http_version 1.1;

gzip_comp_level 2;

gzip_types text/plain application/javascript application/x-javascript text/css application/xml text/javascript application/x-httpd-php image/jpeg image/gif image/png;

gzip_static on;
The compression package and picture objects themselves have their own compression function. Therefore, the compression ratio is small and low. In the compression test of text objects, the compression ratio is superior.
5. Status access statistics ngx_http_stub_status_module
server{

  location ~ /status {          # Start the module

    stub_status on;

    access_log off;

  }

  }
status page:
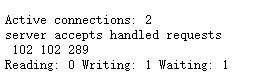
102 is the total number of connections, 102 is the number of successful connections, and 289 is the number of requests processed together
Reading: 0 reads the number of information request headers from the client Header
Writing: 1 the number of information returned to the client's header response header
Waiting: 1 the number of requests waiting. keepalive is enabled. This value is equal to active - (reading + writing)
keepalive_timeout
httpd daemon, because every time a web page is accessed, tcp needs to shake hands three times to establish a connection, then http establishes a request page, and finally tcp waves to disconnect four times
keepalive_ The timeout setting is to wait for a period of time instead of immediately disconnecting when tcp establishes a connection
Prevent the waste of resources caused by frequent connection between client and server
vim /etc/nginx/nginx.conf

keepalive_timeout 65;    # The default parameter is waiting for 65s

Replace with: keepalive_timeout 0;
When you visit the status page again after changing the configuration, you will find that the times of Reading, Writing and Waiting are the same, indicating that nginx will disconnect every time it processes a request.
6. Anti theft chain ngx_http_referer_module
Syntax: valid_referers none | blocked | server_names | string ...;
Default: —
Context: server, location
(1) Chain theft simulation
Create two virtual hosts kong.conf liang.conf
server{

listen 80;

server_name web.kong.com;

location /{

  access_log  /var/log/nginx/kong.access.log  main;    # Accessing this interface will generate a log

  root /usr/share/nginx/html;

  index kong.html index.html;

  }

}

server{

listen 80;

server_name web.liang.com;

location /{

  access_log  /var/log/nginx/liang.access.log  main;

  root /;

  index liang.html;

  }

}


vim kong.html

<img src='timg.jpg' />

vim liang.html

<img src='http://Web. kong. COM / timg. JPG '/ > # use the connection to steal timg.jpg of the kong site. The liang site has no pictures but can see them
Visit two sites to view two logs
When visiting web.kong.com The log of kong.access.log displays normally
When visiting web.liang.com The liang.access.log log is displayed normally, but the kong.access.log will also see the refresh
And can be downloaded from $http_referer can see which connection jumped from, indicating that the website was stolen
192.168.93.136 - - [17/Nov/2018:16:39:14 +0800] "GET /timg.jpg HTTP/1.1" 200 27361 "http://web.liang.com/" "Mozilla/5.0 (X11; Linux x86_64; rv:60.0) Gecko/20100101 Firefox/60.0" "-"
(2) Open the anti-theft chain
Method 1
stay location add to

valid_referers none blocked *.kong.com;  # web.kong.com opens the anti-theft chain. At this time, web.liang.com cannot see the picture

  if ($invalid_referer) {

    return 403;

  }
Method 2
location ~* \.(gif|jpg|png|bmp)$ {

root /usr/share/nginx/html;             # Be sure to redefine the website root directory, otherwise the picture will not be displayed

valid_referers none blocked *.kong.com server_names ~\.liangfaqi\.;

if ($invalid_referer) {

  return 403;

  #rewrite .* http://web.kong.com/1.jpg;

}

}
7. User access restrictions
1. Connection frequency limit ngx_http_limit_conn_module
For large traffic malicious attack access, it will bring waste of bandwidth, server pressure and affect business. It is often considered to limit the number of connections and concurrency of the same ip.
Syntax: limit_conn_zone key zone=name:size;
Default: —
Context: http
Turn on the connection frequency limit, example:
Set a cache to store the status of different keys, with a size of 10m. Use the remote IP as the key to limit the number of links per source IP
http {

  limit_conn_zone $binary_remote_addr zone=one:10m;   # Defined inside http and outside server

}

server {

  location / {

    ...

    limit_conn one 2;     # Define the number of concurrent connections for each IP. Note that the maximum can only be limited to 2, which is invalid

  }

}


# test

yum install -y httpd-tools       # Pressure test tool

ab -n 100 -c 10 http://web.kong.com / # visit 100 times and visit 10 times

Time taken for tests:   0.026 seconds

Complete requests:      100

Failed requests:        0
2. Request frequency limit ngx_http_limit_req_module
Syntax: limit_req_zone key zone=name:size rate=rate;
Default: —
Context: http
Start request frequency limit, example:
Set a cache reqps to store the status of different key s, with a size of 10m. The status here refers to the current number of excessive requests.
http {     # It is defined in http and outside the server

  ...

  limit_req_zone  $binary_remote_addr  zone=reqps:10m rate=5r/s;   # Define the number of requests per second for each IP. Limit 5 connection requests per second without delay

}

server {

  location / {

    ...

    limit_req zone=reqps;                      # quote

    # burst=5 indicates that the maximum number of delayed requests is not greater than 5. If too many requests are limited and the delay is unnecessary, the nodelay parameter needs to be used, and the server will immediately return 503 status code.

    limit_req zone=reqps burst=5;              # Reference limit, but there are 5 token buckets. There is a delay. Slow speed

    limit_req zone=reqps burst=5 nodelay;      # Reference limit, but there are 5 token buckets. No delay. Fast speed

  }

}

yum install -y httpd-tools       # Pressure test tool

ab -n 100 -c 10 http://web.kong.com # visit 100 times and visit 10 times

Time taken for tests:   0.041 seconds

Complete requests:      100

Failed requests:        99
To view the error log:
2018/11/17 17:55:48 [error] 10697#10697: *100 limiting requests, excess: 0.800 by zone "reqps", client: 192.168.93.136, server: web.kong.com, request: "GET / HTTP/1.0", host: "web.kong.com"
8. User access control
1. Host based ngx_http_access_module
Syntax: allow address | CIDR | unix: | all;
Context: http, server, location, limit_except
server {

allow 10.18.47.64;    # Hosts allowed to access

deny all;

}
2. Based on user ngx_http_auth_basic_module
htpasswd -cm /etc/nginx/conf.d/passwd user1    # Create user1 and create the passwd file - c only the first time there is no file

htpasswd -m /etc/nginx/conf.d/passwd user2     # Create user2

location /{

  access_log  /var/log/nginx/kong.access.log  main;

  root /usr/share/nginx/html;

  index kong.html index.html;

  auth_basic "nginx access test!";

  auth_basic_user_file /etc/nginx/conf.d/passwd;

  }

  visit web.kong.com View results
2, nginx new module
- View nginx installed modules
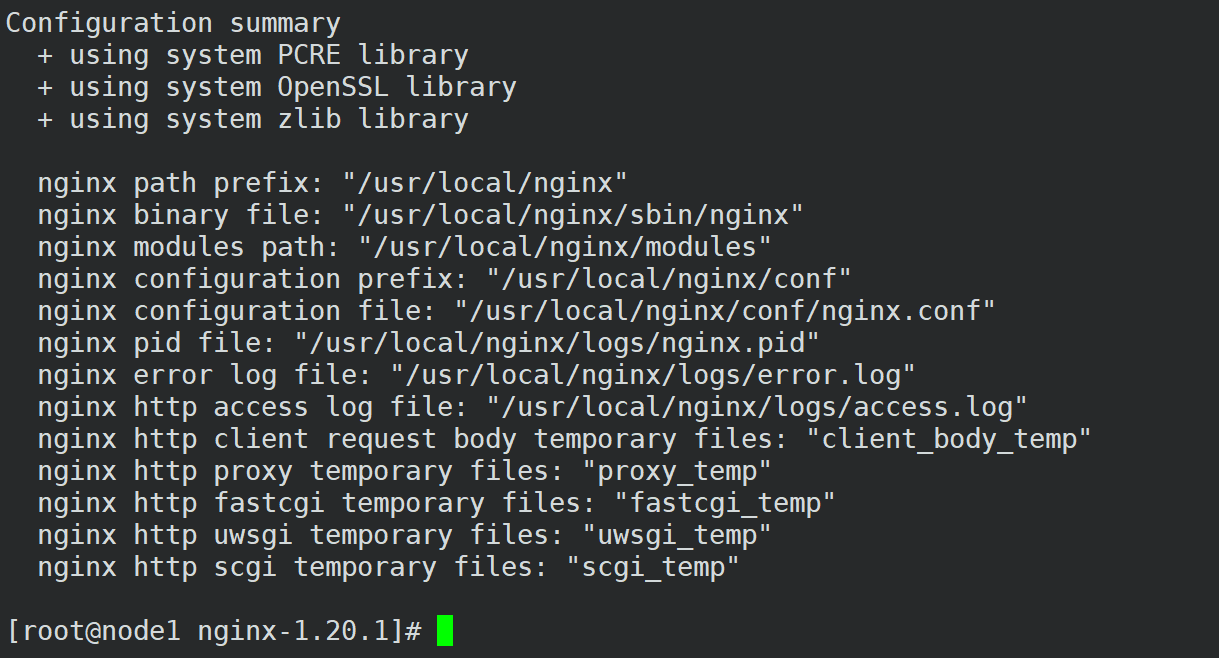
./sbin/nginx  -V
nginx version: nginx/1.20.1
built by gcc 4.8.5 20150623 (Red Hat 4.8.5-44) (GCC)
built with OpenSSL 1.0.2k-fips  26 Jan 2017
TLS SNI support enabled
configure arguments: --user=nginx --group=nginx --prefix=/usr/local/nginx --with-http_stub_status_module --with-http_ssl_module
- Download the modules to be installed. Take nginx module VTS module as an example
git clone git://github.com/vozlt/nginx-module-vts.git

pwd
/root/nginx-1.20.1/nginx-module-vts

ls
Changes  config  LICENSE  README.md  share  src  t  util
- Back up old nginx binaries
pwd
/usr/local/nginx/sbin

mv nginx nginx.bak
- Recompile add new module - add module
./configure --user=nginx --group=nginx --prefix=/usr/local/nginx --with-http_stub_status_module --with-http_ssl_module --add-module=/root/nginx-1.20.1/nginx-module-vts
5. After compiling, copy the newly generated binary file to nginx directory
make

*Note: do not execute here make install,We just need to pass make Compile the new module to generate a new binary file objs Directory. Never execute make instlall ,make install Will be reinstalled nginx,Cover original nginx

pwd
/root/nginx-1.20.1/objs

ls
addon         Makefile  nginx.8            ngx_auto_headers.h  ngx_modules.o
autoconf.err  nginx     ngx_auto_config.h  ngx_modules.c       src

cp nginx /usr/local/nginx/sbin/
- Check the module and restart nginx
/usr/local/nginx/sbin/nginx -V
nginx version: nginx/1.20.1
built by gcc 4.8.5 20150623 (Red Hat 4.8.5-44) (GCC)
built with OpenSSL 1.0.2k-fips  26 Jan 2017
TLS SNI support enabled
configure arguments: --user=nginx --group=nginx --prefix=/usr/local/nginx --with-http_stub_status_module --with-http_ssl_module --add-module=/root/nginx-1.20.1/nginx-module-vts
- Test the newly installed module
newly added nginx to configure:
http {
    vhost_traffic_status_zone;

    ...

    server {
        location /status {
            listen 81;
            vhost_traffic_status_display;
            vhost_traffic_status_display_format html;
        }
    }
}

restart nginx
/usr/local/nginx/sbin/nginx -s reload
