Nginx (engine x) is a lightweight HTTP server software. It has the advantages of good stability, rich function sets, simple configuration files and low consumption of system resources. It occupies less memory and has strong concurrency (a single physical server can support 30000 ~ 50000 concurrent requests). Compared with nginx, apache's concurrency is not as high as that of nginx. apache's concurrency is about 20000
Application scenarios (or functions) of Nginx
Static processing: either httpd or nginx can only process static pages by default
Reverse proxy: instead of directly processing the client's request, it forwards the request to other servers
Load balancing: combined with reverse proxy, it is responsible for forwarding client requests to other servers with less pressure
Resource cache: cache the data frequently accessed by the client, so as to speed up the access speed of the client
Safety protection: nginx has certain protective measures for itself
Access restrictions: similar to apache's order deny,allow
Access authentication: add user name and password to the visited website
I Introduction to I/O
Each I/O goes through two stages:
1. Load the data from the disk file to the kernel space (buffer) first, and wait for the data preparation to complete, which takes a long time
2. It takes a short time to copy data from the kernel buffer to the memory of the user space process
Synchronous / asynchronous concerns are the callee message communication mechanism
Synchronization: the caller waits for the callee to return a message before proceeding
For example, when your boss assigns you a task and keeps asking you whether it has been completed, and the boss does the next thing, this communication mechanism becomes synchronization
Asynchrony: the callee actively notifies the callee of the running status through the status, notification or callback mechanism
For example, when the boss assigns you tasks, you will report the task progress status to the boss. The boss does his own things and won't ask you for the results
| The difference between synchronous and asynchronous | |
| synchronization | The callee will not return to the status of the task, and the caller needs to keep asking |
| asynchronous | The callee will return the status of the task to the caller, and there is no need for the caller to keep asking |
Blocking / non blocking: focus on the caller's state before waiting for the result to return
blocking: I/O operation needs to be completely completed before returning to user space. Before the result is returned, the caller is suspended.
For example: hand washing clothes, you are occupied before you finish washing.
Non blocking (nobloking): refers to the I/O operation immediately returned to a user state after being invoked, without waiting for 1O operation to complete. Before the final call result is returned, the caller will not be suspended.
For example, the full-automatic washing machine does not need to occupy your time. After washing, you will be notified. During this period, you have not been occupied by washing clothes
I/O models include synchronous blocking, synchronous non blocking, asynchronous blocking (IO multiplexing select), asynchronous semi blocking (signal driven apache), and asynchronous non blocking (asynchronous IO model nginx)
2, nginx mode
nginx has two working modes: master worker mode and single process mode
Master worker: in this mode, after nginx is started successfully, there will be one master process and at least one worker process. The master process is responsible for processing system signals, loading configuration, and managing worker processes (starting, killing, monitoring, sending messages / signals, etc.)
| Advantages of mode | |
| 1. High stability. Services can be provided as long as there are still worker processes alive, and a worker process hangs up the master The process will immediately start a new worker process to ensure that the number of worker processes remains unchanged and reduce the probability of service interruption | |
| 2. With the cpu affinity configuration of linux, you can make full use of the advantages of multi-core cpu and improve performance | |
| 3. Signal processing / configuration reloading / upgrading can be done with as little or no interruption of service as possible |
Single process mode: after nginx is started, there is only one process, and this process is responsible for all the work of nginx. Because there is only one process, you can easily use tools such as gdb for debugging. This mode does not support the smooth upgrade function of nginx, any signal processing may cause service interruption, and because it is a single process, after the process hangs, the service cannot be restarted without external monitoring. Therefore, this mode is generally only used in the development stage and debugging, and will not be used in the production environment
3, Installation of nginx
Installation method 1: network installation
Ensure that you can ping the Internet
[root@C7--01 ~]# ping www.baidu.com
PING www.a.shifen.com (183.232.231.174) 56(84) bytes of data.
64 bytes from ptr.cq.chinamobile.com (183.232.231.174): icmp_seq=1 ttl=51 time=380 ms
64 bytes from ptr.cq.chinamobile.com (183.232.231.174): icmp_seq=2 ttl=51 time=114 ms
64 bytes from ptr.cq.chinamobile.com (183.232.231.174): icmp_seq=3 ttl=51 time=106 ms
64 bytes from ptr.cq.chinamobile.com (183.232.231.174): icmp_seq=4 ttl=51 time=108 ms
In: nginx: Lenox bag The website can be installed using network yum :
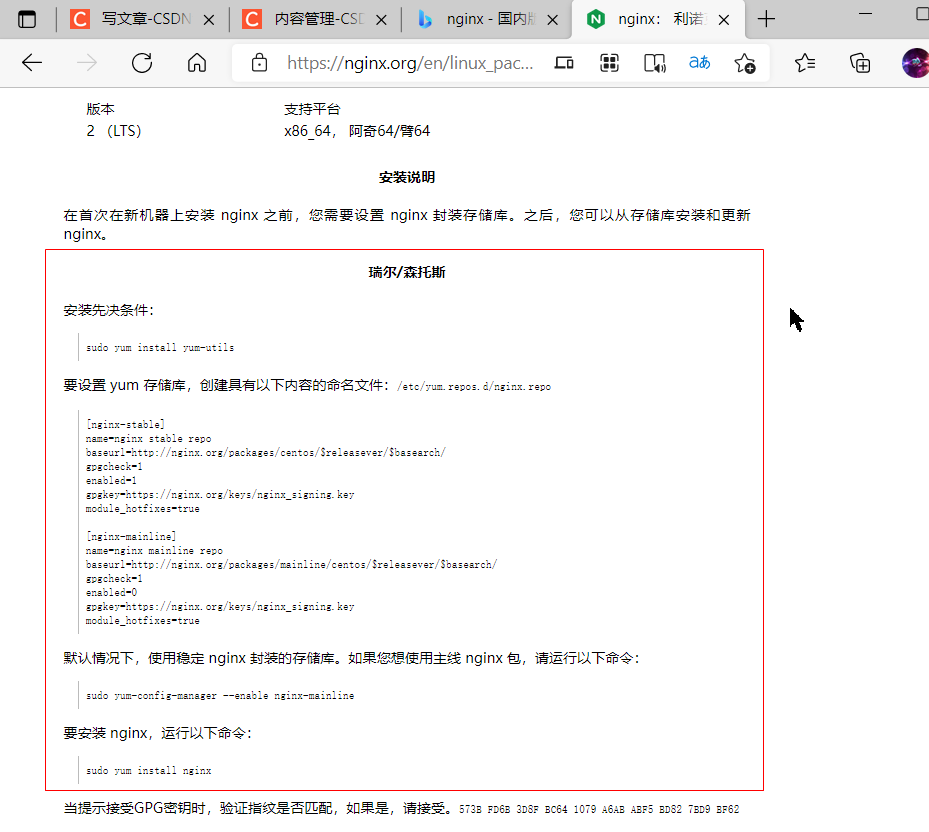
The installation process can be completed according to the above steps
Start command : nginx
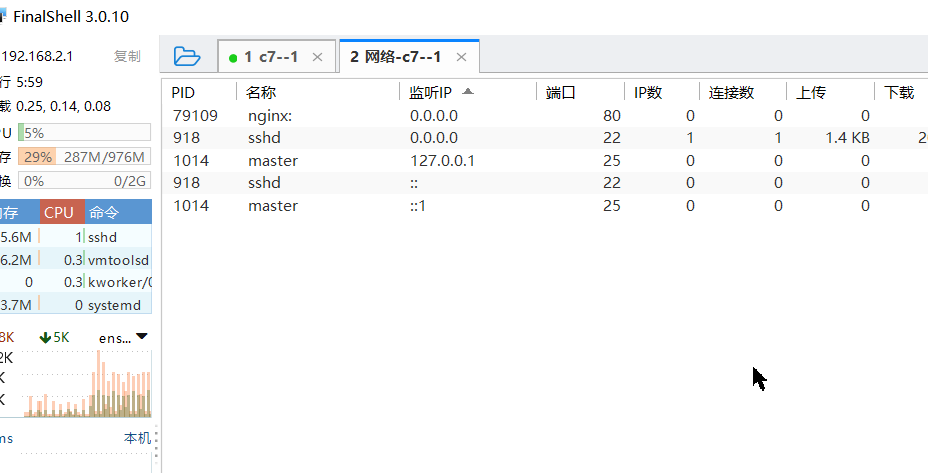
View ports after installation
Installation method 2: source code installation; Download nginx package on the official website
Official website path: nginx: Downloadnginx: downloadnginx: Download
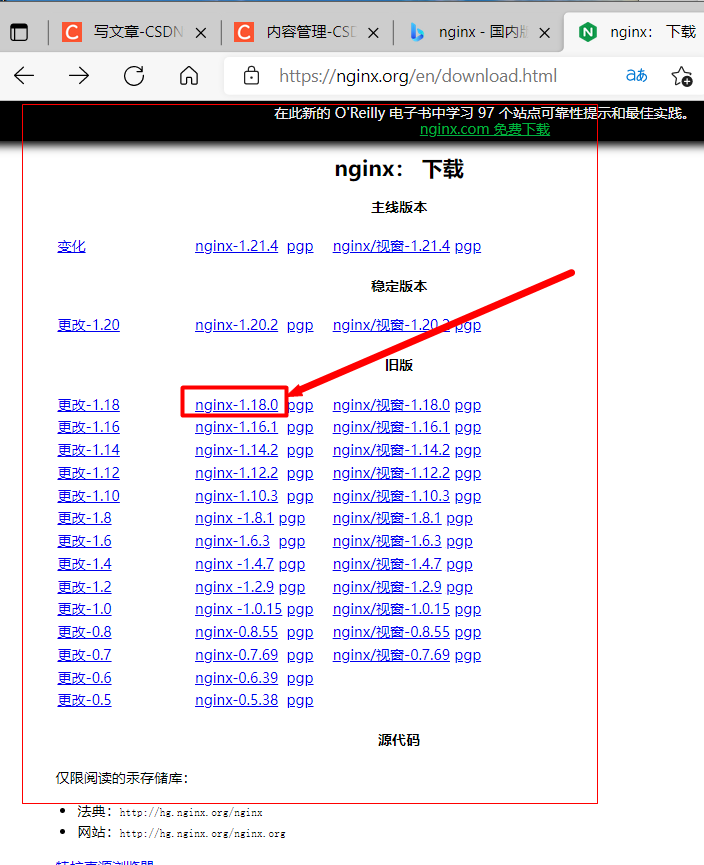
Download nginx-1.18.0 this time
upload nginx-1.18.0.tar.gz software package
[root@C7--01 ~]# ls
anaconda-ks.cfg  nginx-1.18.0.tar.gz  yum.sh
[root@C7--01 ~]# tar -zxvf /root/nginx-1.18.0.tar.gz -C /usr/src
......
...
[root@C7--01 ~]# cd /usr/src/nginx-1.18.0/
[root@C7--01 nginx-1.18.0]# ./configure --prefix=/usr/local/nginx
........
....
[root@C7--01 nginx-1.18.0]# make && make install
....
..
.
[root@C7--01 nginx-1.18.0]# /usr/local/nginx/sbin/nginx -t       #Test for successful installation
nginx: the configuration file /usr/local/nginx/conf/nginx.conf syntax is ok
nginx: configuration file /usr/local/nginx/conf/nginx.conf test is successful

[root@C7--01 nginx-1.18.0]# /usr/local/nginx/sbin/nginx          #start-up
visit
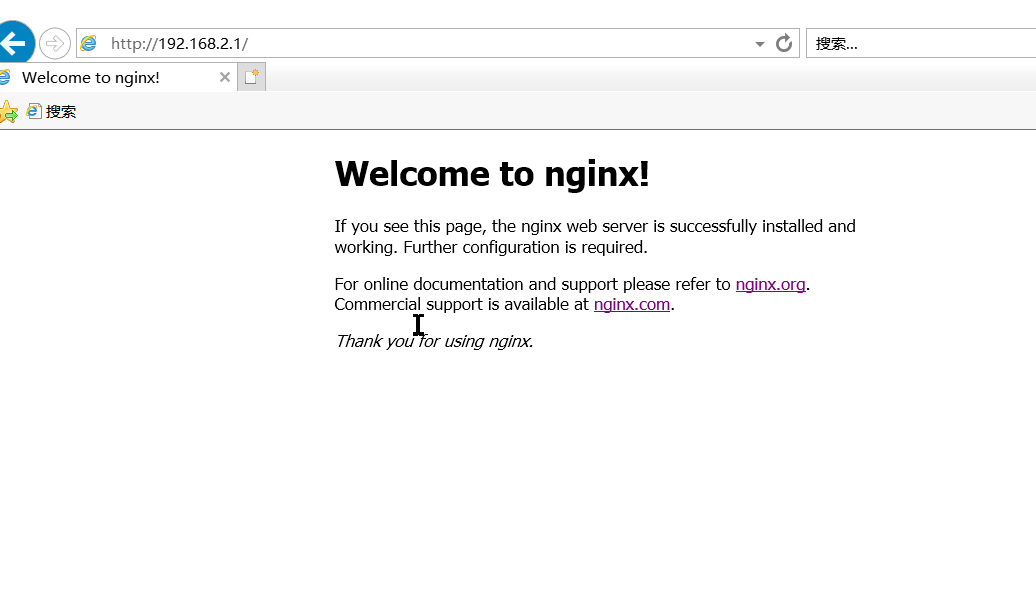
installation is complete
4, Introduction and operation of nginx configuration file
Note: different installation methods and paths are also different
1. Profile introduction
| modular | function |
|---|---|
| Main (global settings) | The set command will affect all other settings |
| events(nginx working mode) | Set working mode and number of connections |
| http(http settings) | Set timeout, etc |
| Sever (host settings) | Mainly used to specify host and port |
| location(URL matching) | Used to match page location |
1.Main is located at the top level of nginx.conf configuration file
2. There can be Event and HTTP layers under the main layer
3. Multiple Server layers are allowed under the HTTP layer to configure different websites
4. Multiple locations are also allowed in the server layer
[root@C7--01 ~]# vim /usr/local/nginx/conf/nginx.conf            #Enter configuration file

----------------------------The following is the global configuration side( main)


  1
  2 #user  nobody;                                  #Set the user and user group under which the worker process from fork runs after the master process is started; it is run by the nobody account by default
  3 worker_processes  1;                            #Specify the number of work derived processes (generally equal to the total number of cores of the CPU or twice the total number of cores)
    worker_cpu_affinity 0001 0010 0100 1000         #Bind the Nginx work process to the specified CPU core. By default, Nginx does not bind the process
  4 worker_cpu_affinity auto                        #Auto bind settings

  5 #error_log  logs/error.log;                     #Specify the path where the error log is stored
  6 #error_log  logs/error.log  notice;             #Error logging level
  7 #er  nobody;
  8 #  3 worker_processes  1;
  9 #    4
 10 #    rror_log  logs/error.log  info;
 11
 12 #pid        logs/nginx.pid;                     #Specifies the storage file location for the process pid
 13
 14 worker_rlimit_nofile 512000;                    #Maximum open files for worker process
 15 events {                                        #Event module
 16     use epoll;                                  #For the network I/O model used, epoll mode is recommended for Linux; it is epoll mode by default
 17     worker_connections  1024;                   #Used to define the maximum number of connections per process of Nginx. The default is 1024
 18 }
 19
 20 http {
 21     include       mime.types;                  #Import supported file types
 22     default_type  application/octet-stream;    ##Set the default type, and you will be prompted to download files of mismatched types
 23
 24     #Log_format main '$remote_addr - $remote_user [$time_local] "$request"' log_format is the HttpLog module instruction of Nginx, which is used to specify the output format of Nginx log. Main is the name of the log output format, which can be referenced in the following access_log instruction
 25     #                  '$status $body_bytes_sent "$http_referer" '
 26     #                  '"$http_user_agent" "$http_x_forwarded_for"';
 27
 28     #access_log  logs/access.log  main;
 29
 30     sendfile        on;                                                  #Used to turn on efficient file transfer mode. tcp_nopush and TCP_ The nodelay two instructions are set to on to prevent network congestion
 31     #tcp_nopush     on;                                                  #When sendfile is enabled, the merge request is sent to the client uniformly
 32
 33     #keepalive_timeout  0;
 34     keepalive_timeout  65;                                               #Set the timeout for the client connection to remain active. After this time, the server will close the connection; The unit is seconds
 35
 36     #gzip  on;                                                            #Turn on file compression
 37
38 server { #There can be more than one attribute defined as a web server
39 listen 80; #Listening port
40 server_name localhost; #Set server name. You can write multiple names separated by spaces. Regular expressions are supported, such as *. aaa.com, www.aaa. * ~ ^ www \ D + \. AAA \. Com $default_ server
41
42 #charset koi8-r; #Set the encoding format. The default format is Russian, which can be changed to utf-8
43
44 #access_log logs/host.access.log main; #Device access log
45
 46         location / {                                 #To define the properties of a virtual host, all web services must be defined as a virtual host
 47             root   html;                             #Specify site directory
 48             index  index.html index.htm;             #Specifies the default web page file, which is specified by ngx_http_index_module module provides
 49         }
 50
 51         #error_page  404              /404.html;
 52
 53         # redirect server error pages to the static page /50x.html
 54         #
 55         error_page   500 502 503 504  /50x.html;     #A predefined URI (relative path) can be displayed when an error occurs
 56         location = /50x.html {
 57             root   html;
 58         }
 59
2. Related operations of nginx
nginx -h                 # View help information

nginx -v                 # View nginx version

start nginx              # start nginx

nginx -s quit            # Close nginx, stop nginx completely and orderly, and save relevant information

nginx -s stop            # Close nginx and stop nginx quickly. Relevant information may not be saved

nginx -s reload          # Reload nginx, which is used when the configuration information needs to be reloaded

nginx -t -c filename     # Test whether the nginx configuration file is correct

nginx -s reopen          # Reopen the log file
3. Path and location of nginx installed using yum
[root@C7--01 ~]# rpm -ql nginx                               #View all nginx paths
/etc/logrotate.d/nginx
/etc/nginx
/etc/nginx/conf.d
/etc/nginx/conf.d/default.conf
/etc/nginx/fastcgi_params
/etc/nginx/mime.types
/etc/nginx/modules
/etc/nginx/nginx.conf
/etc/nginx/scgi_params
/etc/nginx/uwsgi_params
/usr/lib/systemd/system/nginx-debug.service
/usr/lib/systemd/system/nginx.service
/usr/lib64/nginx
/usr/lib64/nginx/modules
/usr/libexec/initscripts/legacy-actions/nginx
/usr/libexec/initscripts/legacy-actions/nginx/check-reload
/usr/libexec/initscripts/legacy-actions/nginx/upgrade
/usr/sbin/nginx
/usr/sbin/nginx-debug
/usr/share/doc/nginx-1.21.4
/usr/share/doc/nginx-1.21.4/COPYRIGHT
/usr/share/man/man8/nginx.8.gz
/usr/share/nginx
/usr/share/nginx/html
/usr/share/nginx/html/50x.html
/usr/share/nginx/html/index.html
/var/cache/nginx
/var/log/nginx
Source code: you can use the above command to view the files wherever they are installed