I. Installation of Nginx
On the basic concepts of Nginx, in previous blogs: https://blog.51cto.com/14227204/2464167
With a detailed introduction, this blog post starts directly from the installation.
Environmental preparation:
- Three centos 7.5, one running Nginx and two running simple web services, are designed to test the effectiveness of the Nginx reverse proxy.
- Download the package I provided to install Nginx for optimizations such as caching and compression:
*https://pan.baidu.com/s/1AJlDAkgdUd4uV1Bfjm46oA Extraction Code: gnlb
.
Note (The effect is as follows):
- Combining proxy and upstream modules to achieve back-end web load balancing;
- Use proxy module to implement static file caching;
- Combining ngx_http_proxy_module and ngx_http_upstream_module, which come with nginx by default, to check the health of the back-end server, or using the third-party module nginx_upstream_check_module;
- Maintain session using nginx-sticky-module extension;
- Use ngx_cache_purge for more powerful cache cleanup;
- Use ngx_brotli module to compress web page files.
Both of the modules mentioned above belong to third-party extensions and need to be source-coded well in advance (which I included in the previous download link) and installed at compile time with--add-moudle=src_path.
1. Install Nginx
[root@nginx nginx-1.14.0]# yum -y erase httpd     #Uninstall the system's default httpd service to prevent port conflicts
[root@nginx nginx-1.14.0]# yum -y install openssl-devel pcre-devel    #Installation Dependencies
[root@nginx src]# rz          #rz command to upload required source packages
[root@nginx src]# ls          #Confirm Uploaded Source Package
nginx-sticky-module.zip    ngx_brotli.tar.gz
nginx-1.14.0.tar.gz  ngx_cache_purge-2.3.tar.gz
#Unzip the uploaded source package
[root@nginx src]# tar zxf nginx-1.14.0.tar.gz
[root@nginx src]# unzip nginx-sticky-module.zip
[root@nginx src]# tar zxf ngx_brotli.tar.gz
[root@nginx src]# tar zxf ngx_cache_purge-2.3.tar.gz
[root@nginx src]# cd nginx-1.14.0/        #Switch to nginx directory
[root@nginx nginx-1.14.0]#  ./configure --prefix=/usr/local/nginx1.14 --user=www --group=www --with-http_stub_status_module  --with-http_realip_module  --with-http_ssl_module --with-http_gzip_static_module  --http-client-body-temp-path=/var/tmp/nginx/client --http-proxy-temp-path=/var/tmp/nginx/proxy  --http-fastcgi-temp-path=/var/tmp/nginx/fcgi --with-pcre  --add-module=/usr/src/ngx_cache_purge-2.3  --with-http_flv_module --add-module=/usr/src/nginx-sticky-module && make && make install
#Compile and install and load the required modules using the'--add-module'option
#Note that the ngx_brotli module is not loaded above to show later how to add modules after the nginx service has been installed
The above compilation options are explained as follows:
- --with-http_stub_status_module: Monitor the status of nginx through a web page;
- --with-http_realip_module: Get the real IP address of the client;
- --with-http_ssl_module: Turn on encrypted transmission of nginx;
- --with-http_gzip_static_module: turn compression on;
- --http-client-body-temp-path=/var/tmp/nginx/client: temporary storage path for client access data (path for cache storage);
- --http-proxy-temp-path=/var/tmp/nginx/proxy: Same as above;
- --http-fastcgi-temp-path=/var/tmp/nginx/fcgi: Same as above;
- --with-pcre: supports regular match expressions;
- --add-module=/usr/src/ngx_cache_purge-2.3: Add a third-party module of nginx, syntax: --add-module=third-party module path;
- --add-module=/usr/src/nginx-sticky-module: Same as above;
- --with-http_flv_module: supports flv video streaming.
2. Start the Nginx service
[root@nginx nginx-1.14.0]# ln -s /usr/local/nginx1.14/sbin/nginx /usr/local/sbin/
#Create a soft connection to the nginx command so that you can use it directly
[root@nginx nginx-1.14.0]# useradd -M -s /sbin/nologin www
[root@nginx nginx-1.14.0]# mkdir -p /var/tmp/nginx/client
[root@nginx nginx-1.14.0]# nginx -t      #Check nginx Profile
nginx: the configuration file /usr/local/nginx1.14/conf/nginx.conf syntax is ok
nginx: configuration file /usr/local/nginx1.14/conf/nginx.conf test is successful
[root@nginx nginx-1.14.0]# nginx       #Start nginx service
[root@nginx nginx-1.14.0]# netstat -anpt | grep ":80"    #See if port 80 is listening
tcp   0   0 0.0.0.0:80      0.0.0.0:*        LISTEN      7584/nginx: master
2. Nginx Service Implements Reverse Proxy
Before you implement this reverse proxy, let me just say, what is a reverse proxy?What is a forward proxy?
1. Forward Agent
Used to proxy internal network connection requests to the Internet (such as NAT), clients specify a proxy server, and HTTP requests originally sent directly to the target Web server are sent to the proxy server first, then the proxy server accesses the Web server and returns the information returned by the Web server to the client. In this case, the proxy server is a forward proxy.
2. Reverse Proxy
Contrary to a forward proxy, if the LAN provides resources to the Internet and allows other users on the Internet to access resources within the LAN, you can also set up a proxy server, which provides a service called a reverse proxy. The reverse proxy server accepts connections from the Internet, forwards requests to servers on the internal network, and returns information from the web server to the proxy server
Clients on the Internet requesting a connection.
In a word: the object of forward proxy is the client, instead of the client, to access the web server; the object of reverse proxy is the web server, and the proxy web server responds to the client.
3. Nginx Configuration Reverse Proxy
You can configure nginx as a reverse proxy and load balancing, and use its caching capabilities to cache static pages in nginx to reduce the number of backend server connections and check the health of the backend web server.
The environment is as follows:
- A Nginx server acts as a reverse proxy;
- Two back-end web servers form a pool of web servers;
- Clients accessing the Nginx proxy server can refresh the page multiple times to get the pages returned by different back-end web servers.
Start configuring the Nginx server:
[root@nginx ~]# cd /usr/local/nginx1.14/conf/      #Switch to specified directory
[root@nginx conf]# vim nginx.conf           #Edit Main Profile
             ........................#Omit some content
http{
             ........................#Omit some content
upstream backend {
        sticky;
        server 192.168.20.2:80 weight=1 max_fails=2 fail_timeout=10s;
        server 192.168.20.3:80 weight=1 max_fails=2 fail_timeout=10s;
    }
            ........................#Omit some content
server {
location / {
            #root   html;                            #Comment out the original root directory
            #index  index.html index.htm;        #Comment out line changes
            proxy_pass http://Backend; #The "backend" specified here must correspond to the web pool name above.
        }
   }
}
#When the edit is complete, save and exit.
[root@nginx conf]# nginx -t            #Check the configuration file to make sure it is correct
[root@nginx conf]# nginx -s reload        #Restart nginx service for effect
In the configuration of the web server pool mentioned above, there is a "sticky" configuration item, which actually loads the nginx-sticky module. The function of this module is to send requests from the same client (browser) to the same back-end server by cookie pasting, which can solve the problem of session synchronization of multiple backend servers (so-called)Session synchronization, which is the concept of a session, is like accessing a page once, without having to login again for a certain period of time. The RR polling mode must allow the maintenance personnel to consider the implementation of session synchronization themselves.In addition, the built-in ip_hash can distribute requests based on client IP, but it can easily cause load imbalances. If nginx is preceded by access from the same LAN, it receives the same client IP, which can easily cause load imbalances.Cookies of nginx-sticky-module expire when the default browser is closed.
This module is not suitable for browsers that do not support cookies or manually disable cookies, in which case the default sticky will switch to RR.It cannot be used with ip_hash.
sticky is only one of the scheduling algorithms that Nginx supports. Here are the other scheduling algorithms supported by Nginx's load balancing module:
- Polling (default, RR): Each request is assigned to a different back-end server one by one in a chronological order. If one of the back-end servers goes down, the failing system is automatically excluded and user access is unaffected.Weight specifies the polling weight value, and the larger the Weight value, the higher the probability of access allocated, mainly when the performance of each server on the back end is uneven.
- ip_hash: Each request is assigned according to the hash result of accessing the IP, so that visitors from the same IP can access a back-end server permanently, effectively resolving the session sharing problem of dynamic web pages.Of course, if this node is unavailable, it will go to the next node, and if there is no session synchronization at this time, it will be logged out.
- least_conn: The request is sent to the realserver with the fewest active connections currently.The value of weight is considered.
- Url_hash: This method further improves the efficiency of the backend cache server by assigning requests based on the hash results of accessing the URLs so that each URL is directed to the same backend server.Nginx does not support url_hash by itself. If you need to use this scheduling algorithm, you must install nginx_upstream_hash, Nginx's hash package.
-
Fair: This is a smarter load balancing algorithm than the two above.This algorithm intelligently balances the load based on page size and load time, that is, allocates requests based on the response time of the back-end server and prioritizes those with short response time.Nginx does not support fairs per se. If you need to use this scheduling algorithm, you must download Nginx's upstream_fair module.
.
Interpretation of the configuration after the IP address of the web server in the web pool in the above configuration file: - Weight: The polling weight can also be used in ip_hash with a default value of 1;
- max_fails: Allows requests to fail, defaulting to 1.When the maximum number of times is exceeded, an error is returned from the proxy_next_upstream module definition.
- fail_timeout: There are two meanings: one is to allow up to two failures in 10 seconds; the other is to not allocate requests to this server in 10 seconds after two failures.
The server configuration in the web server pool is as follows (for reference only, here is a simple httpd service set up for testing):
[root@web01 ~]# yum -y install httpd            #Install httpd service
[root@web01 ~]# echo "192.168.20.2" > /var/www/html/index.html  #Two web servers prepare different web page files
[root@web01 ~]# systemctl start httpd      #Start a web service
The second web server does the same thing as above, just be careful to prepare different web page files to test the load balancing effect.
Client access validation is now possible, but it is important to note that the nginx proxy server must be able to communicate with two wbe servers.
Access your own tests on the nginx proxy server (you can see that you are polling the web server in the web server pool):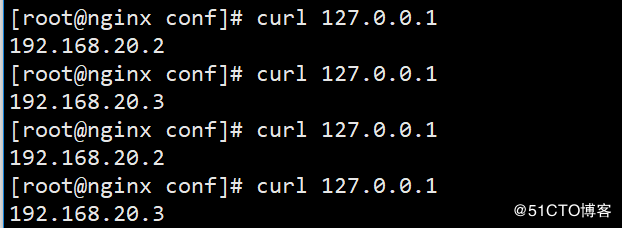
If you use a Windows client for access testing, because of the "sticky" configuration in the configuration file, each refresh request will be forwarded to the same web server, and the effect of load balancing cannot be tested. Just comment out the "sticky" line to test the effect of load balancing.
3. Nginx Service Optimization
In addition to controlling its worker threads, there are several more important concepts, namely, caching and web page compression. Because there are so many configuration items involved, I will write the configuration file for the complete http {} field below with a comment that will include an uncommented http {} field at the end of my post.
Before optimizing, it seems that when I compiled and installed Nginx, I intentionally omitted a module that was not loaded to show how to load it if the required module was not loaded?
The configuration is as follows:
[root@nginx conf]# cd /usr/src/nginx-1.14.0/     #Switch to Nginx Source Package
[root@nginx nginx-1.14.0]# nginx -V    #Execute "Nginx-V" to view loaded modules
nginx version: nginx/1.14.0
built by gcc 4.8.5 20150623 (Red Hat 4.8.5-11) (GCC)
built with OpenSSL 1.0.2k-fips  26 Jan 2017
TLS SNI support enabled
configure arguments: --prefix=/usr/local/nginx1.14 --user=www --group=www --with-http_stub_status_module --with-http_realip_module --with-http_ssl_module --with-http_gzip_static_module --http-client-body-temp-path=/var/tmp/nginx/client --http-proxy-temp-path=/var/tmp/nginx/proxy --http-fastcgi-temp-path=/var/tmp/nginx/fcgi --with-pcre --add-module=/usr/src/ngx_cache_purge-2.3 --with-http_flv_module --add-module=/usr/src/nginx-sticky-module
[root@nginx nginx-1.14.0]# ./configure --prefix=/usr/local/nginx1.14 --user=www --group=www --with-http_stub_status_module --with-http_realip_module --with-http_ssl_module --with-http_gzip_static_module --http-client-body-temp-path=/var/tmp/nginx/client --http-proxy-temp-path=/var/tmp/nginx/proxy --http-fastcgi-temp-path=/var/tmp/nginx/fcgi --with-pcre --add-module=/usr/src/ngx_cache_purge-2.3 --with-http_flv_module --add-module=/usr/src/nginx-sticky-module --add-module=/usr/src/ngx_brotli && make
#Copy the loaded modules found above, recompile them, and add the modules you need to add
#If I added a third-party module above "--add-module=/usr/src/ngx_brotli"
[root@nginx nginx-1.14.0]# mv /usr/local/nginx1.14/sbin/nginx /usr/local/nginx1.14/sbin/nginx.bak
#Change the name of the original Nginx control file and back it up
[root@nginx nginx-1.14.0]# cp objs/nginx /usr/local/nginx1.14/sbin/
#Move the newly generated Nginx command to the appropriate directory
[root@nginx nginx-1.14.0]# ln -sf /usr/local/nginx1.14/sbin/nginx /usr/local/sbin/
#Make a soft connection to the new nginx command
[root@nginx ~]# nginx -s reload                  #nginx restart the service
At this point, the new module is added.
1. Use of proxy cache for Nginx
Caching means caching static files such as js, css, image from the back-end server to the cache directory specified by nginx, which can lighten the load on the back-end server and speed up access, but such a timely cache cleanup has become a problem, so the module ngx_cache_purge is required to clean up the cache manually before the expiration time has elapsed.
Common instructions in proxy modules are proxy_pass and proxy_cache.
The web caching function of nginx is mainly accomplished by proxy_cache, fastcgi_cache instruction set and related instruction set. The proxy_cache instruction is responsible for reverse proxy caching the static content of the back-end server. The fastcgi_cache is mainly used to process FastCGI dynamic process caching (caching dynamic pages is not recommended in production environments).
The configuration is as follows:
http {
 include       mime.types;
    default_type  application/octet-stream;
    upstream backend {
        sticky;
        server 192.168.20.2:80 weight=1 max_fails=2 fail_timeout=10s;
        server 192.168.20.3:80 weight=1 max_fails=2 fail_timeout=10s;
    }
   log_format  main  '$remote_addr - $remote_user [$time_local] "$request" '
                      '$status $body_bytes_sent "$http_referer" '
                      '"$http_user_agent" "$http_x_forwarded_for"'     #Note to delete the semicolon after this line.
                        '"$upstream_cache_status"';    #Increase this line to log cache hits
    access_log  logs/access.log  main;

        #Add the following lines of configuration
    proxy_buffering on;   #When proxying, turn on buffering the response of the back-end server
    proxy_temp_path /usr/local/nginx1.14/proxy_temp;
    proxy_cache_path /usr/local/nginx1.14/proxy_cache levels=1:2 keys_zone=my-cache:100m inactive=600m max_size=2g;
# The server field is configured as follows:
server {
        listen       80;
        server_name  localhost;
        #charset koi8-r;
        #access_log  logs/host.access.log  main;
        location ~/purge(/.*) {    #This purge field is used to manually clear the cache
        allow 127.0.0.1;
        allow 192.168.20.0/24;
        deny all;
        proxy_cache_purge my-cache $host$1$is_args$args;
        }
        location / {
            proxy_pass http://backend;
    #Add the following configuration to this'/'field to configure cache-related
            proxy_redirect off;
            proxy_set_header Host $host;
            proxy_set_header X-Real-IP $remote_addr;
            proxy_set_header X-Forwarded-For $proxy_add_x_forwarded_for;
            proxy_next_upstream error timeout invalid_header http_500 http_502 http_503 http_504;
            proxy_cache my-cache;
            add_header Nginx-Cache $upstream_cache_status;
            proxy_cache_valid 200 304 301 302 8h;
            proxy_cache_valid 404 1m;
            proxy_cache_valid any 1d;
            proxy_cache_key $host$uri$is_args$args;
            expires 30d;
        }
}
#When editing is complete, save and exit
[root@nginx conf]# nginx -t        #Check Profile
nginx: the configuration file /usr/local/nginx1.14/conf/nginx.conf syntax
nginx: [emerg] mkdir() "/usr/local/nginx1.10/proxy_temp" failed (2: No suc
nginx: configuration file /usr/local/nginx1.14/conf/nginx.conf test failed
#Prompt that the corresponding directory was not found
[root@nginx conf]# mkdir -p /usr/local/nginx1.10/proxy_temp    #Then create the appropriate directory.
[root@nginx conf]# nginx -t      #Check again, OK
nginx: the configuration file /usr/local/nginx1.14/conf/nginx.conf syntax  is ok
nginx: configuration file /usr/local/nginx1.14/conf/nginx.conf test is successful
[root@nginx conf]# nginx -s reload         #Restart the Nginx service
Client Access Test (using Google Browser, press F12 before accessing):
Press "F5" to refresh: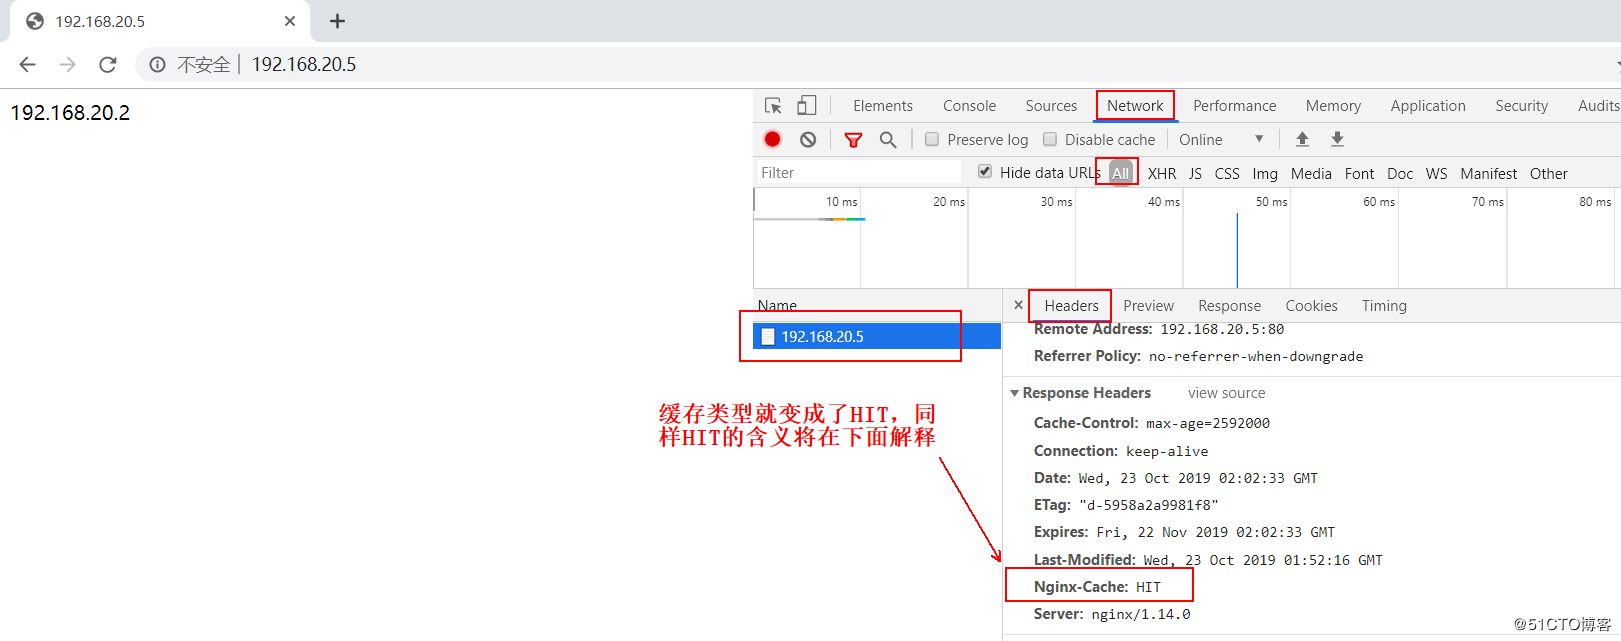
MISS indicates a miss and the request is sent to the back end; HIT cache hits (because the Nginx server does not have a cache for the corresponding web page on the first visit, it is sent to the back-end web, and when refreshed the second time, Nginx has a cache locally, so it is "HIT", cache hits).
View the access log for Nginx, as well as caching-related information for records:
[root@nginx conf]# tail ../logs/access.log #View Access Log

Clients accessing the following addresses (they must be within the allowed segment of location ~/purge(/. *) can manually clear the cache on the Nginx server before the cache fails (if unsuccessful, first clear the cache on the client browser manually):
I have the wrong picture here. Sorry, if you need to clean up the cache manually, if the URL specified when accessing is "192.168.20.5/index.html", then when clearing the cache, the URL you need to specify is "192.168.20.5/purge/index.html". If the URL specified when accessing is "192.168.20.5", then the URL you need to specify when clearing the cache manually is "192.168.20.html"5/purge/"
The explanations for the above configurations are as follows:
- Proxy_buffering [on | off]; when proxy is on, turn on or off the response from the buffer back-end server. When buffer is on, nginx receives the response from the proxy server as quickly as possible and stores it in the buffer.
- proxy_temp_path: Cache temporary directory.Instead of returning the response directly to the client, the response from the back end is written to a temporary file and then cached by rename in proxy_cache_path.Temp and cache directories are allowed on different file systems (partitions) after version 0.8.9, but it is recommended to have them on one file system in order to reduce performance losses.
- proxy_cache_path: Sets the cache directory where the file name is the MD5 value of cache_key.
- levels=1:2 keys_zone=my-cache:50m indicates a two-level directory structure. The first level directory has only one character and is set by levels=1:2. The total number of two levels of directory is two characters. The subdirectory name is composed of two characters.The Web cache is named my-cache and has a memory cache size of 100 MB. This buffer zone can be used multiple times.The cache file name seen on the file system is similar to/usr/local/nginx1.10/proxy_cache/c/29/b7f54b2df7773722d382f4809d65029c.
- inactive=600 max_size=2g means that 600 minutes of inaccessible content is automatically cleaned up, and the maximum cache space on the hard disk is 2GB, beyond which the least recently used data is cleared.
- proxy_cache: Refers to the previously defined cache my-cache.
- proxy_cache_key: Defines how to generate the key for the cache, sets the key value for the web cache, and nginx stores the cache based on the key value md5 hash.
- proxy_cache_valid: Set different cache times for different response status codes, such as 200, 302, etc. normal results can be cached for a longer time, while 404, 500, etc. are shorter, and the file will expire at that time, regardless of whether it has just been accessed.
- The add_header directive sets the response header, syntax: add_header name value.
- The variable $upstream_cache_status shows the status of the cache, and we can add an http header to the configuration to show the status.
- ################$upstream_cache_status contains the following states: ####################
- MISS missed, request sent to back end;
- HIT cache hits;
- EXPIRED cache expired requests were sent to the back end;
- UPDATING is updating the cache and will use the old reply;
- The STALE backend will get an expired response;
- Expires: Set Expires: or Cache-Control:max-age in the response header to return the browser cache expiration time to the client.
2. Optimize compression capabilities of Nginx services
Change the configuration file as follows (see the end of the blog for explanations):
http {
    include       mime.types;
    default_type  application/octet-stream;
    brotli on;
    brotli_types text/plain text/css text/xml application/xml application/json;
    brotli_static off;       #Whether to allow searching for preprocessed compressed files ending in.br, optional values are on, off, always.
    brotli_comp_level 11;        #Compression level, range is "1~14". The larger the value, the higher the compression ratio
    brotli_buffers 16 8k;      #Number and size of read buffers
    brotli_window 512k;       #Slide window size
    brotli_min_length 20;    #Specify the minimum bytes of compressed data
    gzip  on;        #Turn on gzip compression output to reduce network transmission.
    gzip_comp_level 6;     # gzip compression ratio, 1 compression is the fastest than the minimum processing speed, 9 compression is the largest but processing speed is the slowest (transmission is fast but consumes cpu).
    gzip_http_version 1.1;    #To identify the version of the HTTP protocol, earlier browsers did not support Gzip compression and users would see garbage, so this option was added to support earlier versions. If you used Nginx's reverse proxy and expected Gzip compression to also be enabled, since end communication is the http/1.1 protocol, set it to 1.1.
    gzip_proxied any;     #Nginx is enabled when acting as a reverse proxy, and gzip compression is enabled in response to proxy requests based on certain requests and responses. Compression depends on the "Via" field in the request header. Instructions can specify several different parameters at the same time, which means the following:
# Off - Turn off compression of all proxy result data
# expired - Enable compression if the header header contains "Expires" header information
# no-cache – Enable compression if header The header contains " Cache-# Control:no-cache header information
# No-store - Enable compression if header header contains "Cache-Control:no-store" header information
# Private - Enable compression if header header contains "Cache-Control:private" header information
# no_last_modified - Enable compression if the header header does not contain "Last-Modified" header information
# no_etag - Enable compression if the header header does not contain "ETag" header information
# auth - Enable compression if the header header contains "Authorization" header information
# any - unconditionally enable compression
    gzip_min_length 1k;
    gzip_buffers 16 8k;
    gzip_types text/plain text/css text/javascript application/json application/javascript application/x-javascript application/xml;
    gzip_vary on;      #Related to http header, add vary header for proxy server, some browsers support compression, some do not support it, so avoid wasting unsupported also compression, so judge whether compression is needed based on the HTTP header of client
    client_max_body_size 10m;     #Maximum number of single file bytes allowed for client requests.If you have a large file to upload, set its limit
    client_body_buffer_size 128k;    #Buffer Agent Buffers Maximum Bytes of Client Requests
        server_tokens off;     #Hide nginx's version number
        #The following is the http_proxy module:
    proxy_connect_timeout 75;      #nginx connection timeout with back-end server (proxy connection timeout)
    proxy_send_timeout 75;
    proxy_read_timeout 75;    #Defines a timeout for reading the response from the back-end server.This timeout refers to the longest time interval between two adjacent read operations, not the longest time the entire response transmission has completed.If the back-end server does not transmit any data within the timeout period, the connection will be closed.
    proxy_buffer_size 4k;    #Set the size of the buffer to size.When nginx reads a response from the proxy server, it uses the buffer to save the beginning of the response.This section usually contains a small response header.The buffer size defaults to the size of a buffer set by the proxy_buffers directive, but it can also be set to a smaller size.
    proxy_buffers 4 32k;     #Syntax: proxy_buffers the_number is_size; set the number of buffers per connection to number, and the size of each buffer to size.These buffers are used to hold responses read from the proxied server.Each buffer is equal by default to the size of one memory page.Whether this value is 4K or 8K depends on the platform.
#Attachment:[root@nginx ~]# getconf PAGESIZE     #View the size of the Linux memory page
#4096

    proxy_busy_buffers_size 64k;    #Buffer size under heavy load (default size is twice the size of a single block set by the proxy_buffers directive)
    proxy_temp_file_write_size 64k;    #This option limits the size of each temporary file written when the server whose cache is proxied responds to it.
    proxy_buffering on;
    proxy_temp_path /usr/local/nginx1.14/proxy_temp;
    proxy_cache_path /usr/local/nginx1.14/proxy_cache levels=1:2 keys_zone=my-cache:100m inactive=600m max_size=2g;
    upstream backend {
       sticky;
        server 192.168.20.2:80 weight=1 max_fails=2 fail_timeout=10s;
        server 192.168.20.3:80 weight=1 max_fails=2 fail_timeout=10s;
    }

    log_format  main  '$remote_addr - $remote_user [$time_local] "$request" '
                      '$status $body_bytes_sent "$http_referer" '
                      '"$http_user_agent" "$http_x_forwarded_for"'
                      '"$upstream_cache_status"';
    access_log  logs/access.log  main;
    sendfile        on;     #Turn on efficient file transfer mode.
    #tcp_nopush     on;

    #keepalive_timeout  0;
    keepalive_timeout  65;        #Long connection timeout, in seconds, can reduce the cost of reconstructing a connection when a long connection requests a large number of small files. If the setup time is too long, there are too many users, and maintaining the connection for a long time will consume a lot of resources.
    server {
        listen       80;
        server_name  localhost;
        #charset koi8-r;
        #access_log  logs/host.access.log  main;
        location ~/purge(/.*) {
        allow 127.0.0.1;
        allow 192.168.20.0/24;
        deny all;
        proxy_cache_purge my-cache $host$1$is_args$args;
        }
        location / {
            proxy_pass http://Backend; #Request to go to the list of servers defined by backend, the reverse proxy, corresponding to the upstream load balancer.You can also proxy_pass http://ip:port.
            proxy_redirect off;     #Specifies whether to modify the location header and refresh header values in the response header returned by the proxy server
#For example:
# Set the replacement text for the back-end server "Location" and "Refresh" response headers.Assuming the backend server returns
# The response header is "Location: http://localhost:8000/two/some/uri/", then the command proxy_redirect
# http://localhost:8000/two/ http://frontend/one/; will rewrite the string to "Location:
# http://frontend/one/some/uri/".
            proxy_set_header Host $host;  #Allows redefinition or addition of request headers to back-end servers.
#Host means the host name of the request. The nginx reverse proxy server sends the request to the back-end real server.
#And the host field in the request header overrides the server set for the proxy_pass directive.Because nginx acts as a reverse proxy
#Use if the real server on the back end has an anti-theft chain like this or is based on the host field in the http request header
#If the nginx of the reverse proxy layer does not override the host field in the request header, the request will fail if routing or judgment is enabled.
            proxy_set_header X-Real-IP $remote_addr;
#The web server side gets the user's real ip, but to actually get the user's real ip, you can also use the X-Forward-For below
            proxy_set_header X-Forwarded-For $proxy_add_x_forwarded_for;
#Back-end Web server can get user's real IP, X_Forward_For field through X-Forwarded-For
#Indicates who initiated this http request?If the reverse proxy server does not override the request header, then the backend
#Real servers will assume that all requests come from the reverse proxy server when they are processed, if the backend has a protection policy
#Then the machine is blocked.Therefore, there are generally two additional configurations in nginx that are configured to act as reverse proxies to modify the request header for http
          #The following two are the request headers for modifying http:
            proxy_set_header Host $host;
                        proxy_set_header X-Forward-For $remote_addr;
            proxy_next_upstream error timeout invalid_header http_500 http_502 http_503 http_504;
#Increase failover if the back-end server returns errors such as 502, 504, execution timeout,
#Automatically forward requests to another server in the upstream load balancing pool for failover.
            proxy_cache my-cache;
            add_header Nginx-Cache $upstream_cache_status;
            proxy_cache_valid 200 304 301 302 8h;
            proxy_cache_valid 404 1m;
            proxy_cache_valid any 1d;
            proxy_cache_key $host$uri$is_args$args;
            expires 30d;
                }
   location /nginx_status {
                stub_status on;
                access_log off;
                allow 192.168.31.0/24;
                deny all;
            }
          ....................#Omit some content
}
#Save and exit when changes are complete
[root@nginx nginx1.14]# nginx -t     #Check Profile
nginx: the configuration file /usr/local/nginx1.14/conf/nginx.conf syntax is ok
nginx: configuration file /usr/local/nginx1.14/conf/nginx.conf test is successful
[root@nginx nginx1.14]# nginx -s reload        #Restart the Nginx service
Verification:
1. Visit the following address to view the status statistics page of the Nginx server:

2. Check if the GZIP function is on: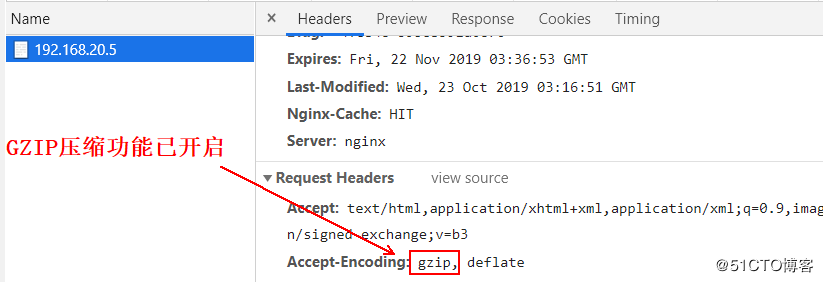
3. Test if br compression is on (command line access is required):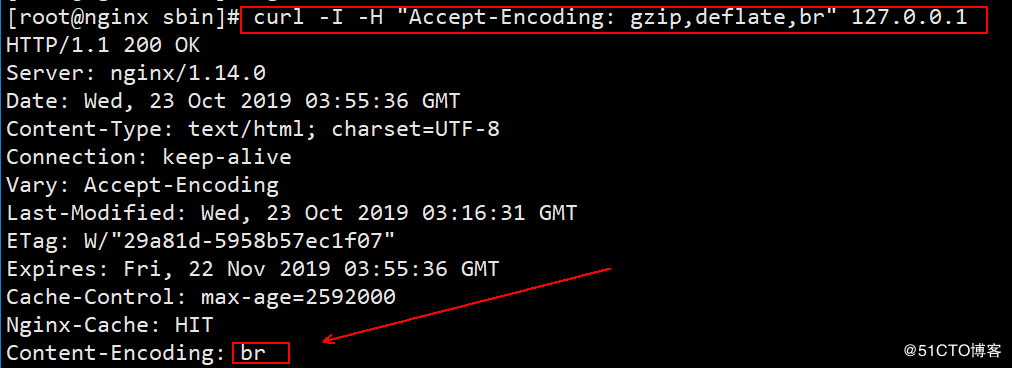
Additional: The uncommented configuration files for the http {} and server {} fields are as follows:
http {
    include       mime.types;
    default_type  application/octet-stream;
    brotli on;
    brotli_types text/plain text/css text/xml application/xml application/json;
    brotli_static off;
    brotli_comp_level 11;
    brotli_buffers 16 8k;
    brotli_window 512k;
    brotli_min_length 20;
    gzip  on;
    gzip_comp_level 6;
    gzip_http_version 1.1;
    gzip_proxied any;
    gzip_min_length 1k;
    gzip_buffers 16 8k;
    gzip_types text/plain text/css text/javascript application/json application/javascript application/x-javascript application/xml;
    gzip_vary on;
    client_max_body_size 10m;
    client_body_buffer_size 128k;
    server_tokens off;
    proxy_connect_timeout 75;
    proxy_send_timeout 75;
    proxy_read_timeout 75;
    proxy_buffer_size 4k;
    proxy_buffers 4 32k;
proxy_busy_buffers_size 64k;
    proxy_temp_file_write_size 64k;
    proxy_buffering on;
    proxy_temp_path /usr/local/nginx1.14/proxy_temp;
    proxy_cache_path /usr/local/nginx1.14/proxy_cache levels=1:2 keys_zone=my-cache:100m inactive=600m max_size=2g;
    upstream backend {
       sticky;
        server 192.168.20.2:80 weight=1 max_fails=2 fail_timeout=10s;
        server 192.168.20.3:80 weight=1 max_fails=2 fail_timeout=10s;
    }

    log_format  main  '$remote_addr - $remote_user [$time_local] "$request" '
                      '$status $body_bytes_sent "$http_referer" '
                      '"$http_user_agent" "$http_x_forwarded_for"'
                      '"$upstream_cache_status"';
    access_log  logs/access.log  main;
    sendfile        on;
    #tcp_nopush     on;

    #keepalive_timeout  0;
    keepalive_timeout  65;

    #gzip  on;
   server {
        listen       80;
        server_name  localhost;
        #charset koi8-r;
        #access_log  logs/host.access.log  main;
        location ~/purge(/.*) {
        allow 127.0.0.1;
        allow 192.168.20.0/24;
        deny all;
        proxy_cache_purge my-cache $host$1$is_args$args;
        }
        location / {
            proxy_pass http://backend;
            proxy_redirect off;
            proxy_set_header Host $host;
            proxy_set_header X-Real-IP $remote_addr;
            proxy_set_header X-Forwarded-For $proxy_add_x_forwarded_for;
            proxy_next_upstream error timeout invalid_header http_500 http_502 http_503 http_504;
            proxy_cache my-cache;
            add_header Nginx-Cache $upstream_cache_status;
            proxy_cache_valid 200 304 301 302 8h;
            proxy_cache_valid 404 1m;
            proxy_cache_valid any 1d;
            proxy_cache_key $host$uri$is_args$args;
            expires 30d;
        }
            location /nginx_status {
                stub_status on;
                access_log off;
                allow 192.168.20.0/24;
                deny all;
            }

        location = /50x.html {
            root   html;
        }
     }
}