About the configuration file and explanation of the reverse seven layer agent
Nginx official website: https://www.nginx.com/
Centos yum install nginx
yum install nginx -y
so, let's ask you a question, what? Why do we use Nginx to implement the seven layer agent? What is the seven layer agent?
1. Difference between nginx proxy and not
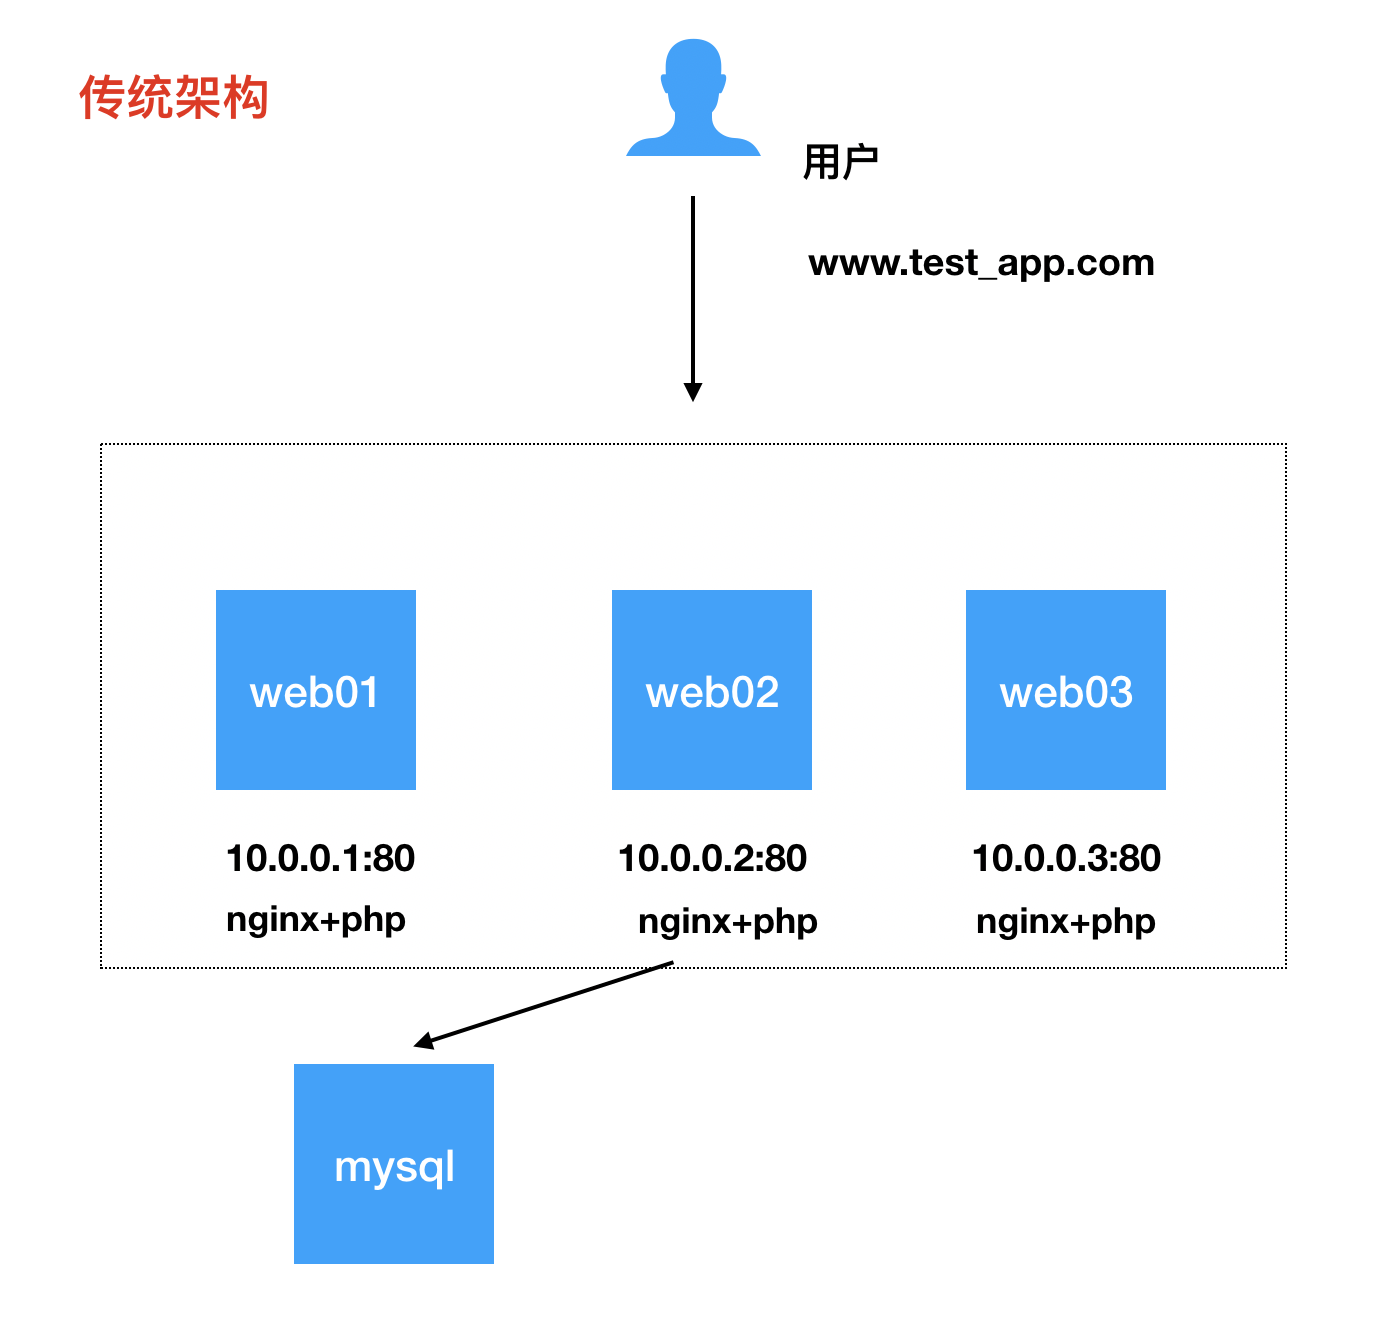
Traditional nginx free web architecture:
Look at the following picture:

First of all, we have a domain name www.test_app.com. There are three servers on the back end, all running PHP+Nginx services. If we want to realize that all three servers provide website services, we need to have the following conditions (disadvantages).
1. Each web server needs to have a fixed public IP address (high cost)
2. A domain name needs to correspond to multiple public IP addresses (poor scalability)
3. Every web server added needs to use dns configuration and purchase fixed public IP (poor flexibility)
so, the disadvantages are obvious
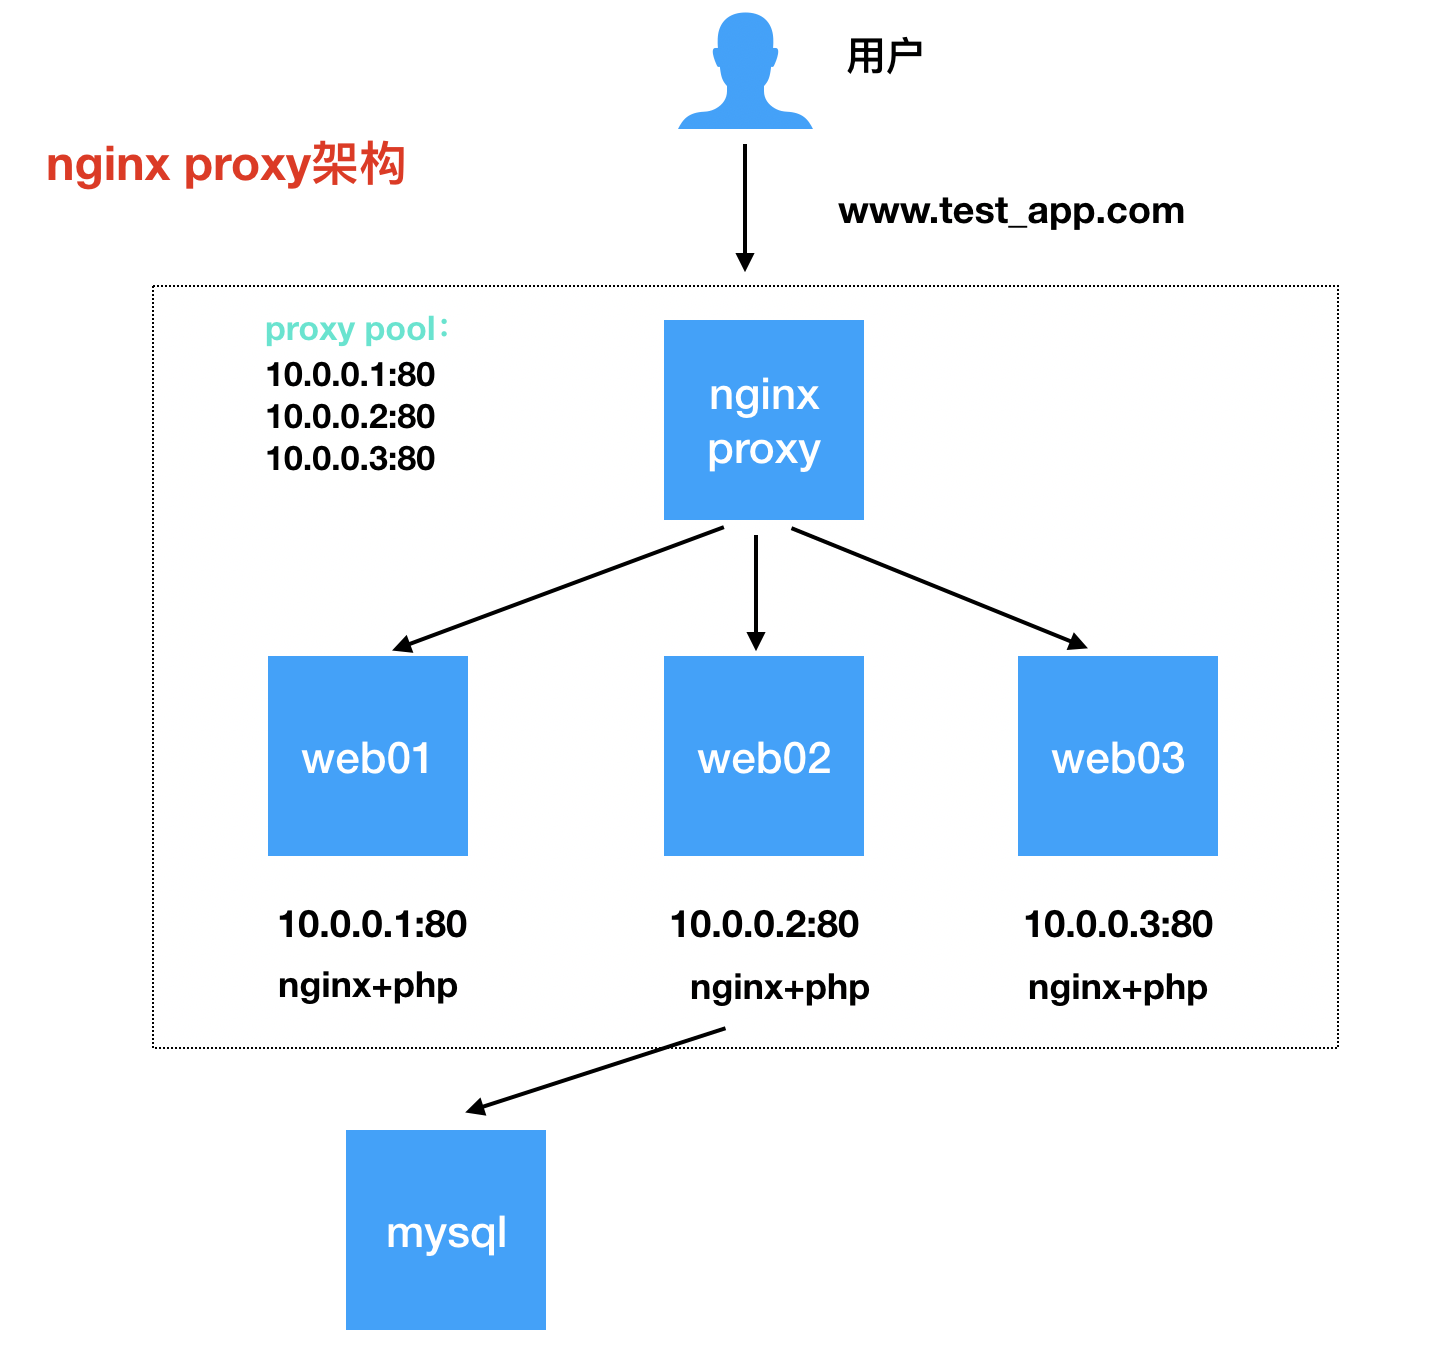
nginx proxy architecture:

At this time, we can deploy a nginx proxy (reverse proxy) in the front end to solve the problem mentioned above. You can configure a proxy pool, called a proxy pool, in which you can fill in the IP:PORT of the back-end web node. Each time you expand a web node, you only need to add the IP:PORT in the proxy pool, and then reload the nginx proxy Only a fixed public IP is needed. DNS only needs to bind the public IP
2. About Nginx Proxy
The load balancing function of Nginx depends on the NGX ﹣ http ﹣ upstream ﹣ module. The supported proxy methods include proxy ﹣ pass, fastcgi ﹣ pass, memcached ﹣ pass and so on. The new version of Nginx software supports more ways. This article focuses on proxy pass.
NGX ﹣ http ﹣ Upstream ﹣ module allows Nginx to define one or more groups of node server groups. When it is used, it can send the request of the website to the name of the corresponding Upstream group defined in advance through proxy ﹣ pass proxy ﹣ http: / / www ﹣ server ﹣ pools, where www ﹣ server ﹣ pools is the name of an Upstream node server group.
Description of some parameters of the internal server tag of the upstream module:
| Module parameter | Explain |
|---|---|
| server | RS address after load balancing, domain name or IP |
| weight | Server weight: the larger the weight number, the more requests. The default value is 1 |
| max_fils | The number of failed attempts to connect to the backend node, default is 1 |
| backup | Represents a node as a backup server |
| fail_timeout | After the number of times defined by Max failed fails, the interval between next checks |
3. Nginx Proxy scheduling algorithm
Static scheduling algorithm:
| algorithm | Explain |
|---|---|
| rr | Polling, the default scheduling algorithm, assigns requests to different back-end nodes in order |
| wrr | The higher the weight value, the more requests the backend node accepts |
| ip_hash | Session persistence, each request allocates back-end nodes according to the Hash result of the client's IP |
Dynamic scheduling algorithm:
| algorithm | Explain |
|---|---|
| fair | Response time, allocating requests based on the response time of the backend node |
| least_conn | The minimum number of connections. Requests are allocated according to the number of connections of the back-end nodes |
| url_hash | The web cache node allocates the request according to the hash result of the visited URL |
Note that only one scheduling algorithm can be used
nginx proxy common configuration file (multi domain name):
worker_processes  1;
events {
    worker_connections  1024;
}
http {
    include       mime.types;
    default_type  application/octet-stream;
    sendfile        on;
    keepalive_timeout  65;
    # This is the agent pool. The pool name is blog server pools. Add the IP:PORT / domain name of the web node here
    upstream blog_server_pools {
                    server 172.16.1.7:80 weight=3 max_fils=3 fail_timeout=5;
                    server 172.16.1.8:80 weight=2 max_fils=3 fail_timeout=5;
                    server 172.16.1.9:80 weight=1 backup max_fils=3 fail_timeout=5;
           }

      upstream www_server_pools {
                     # Using the scheduling algorithm: ip_hash
                     ip_hash
                     server 172.16.1.10:80  max_fils=3 fail_timeout=5;
                     server 172.16.1.11:80 max_fils=3 fail_timeout=5;
                     server 172.16.1.12:80 weight=1 backup max_fils=3 fail_timeout=5;
           }

    server {
        listen       80;
        server_name  blog.youngboy.org;
        location / {
        # Call the corresponding proxy pool through proxy pass
        proxy_pass http://blog_server_pools;
        # proxy optimization parameters (explained below)
        proxy_redirect default;
        proxy_set_header Host $http_host;
        proxy_set_header X-Real-IP $remote_addr;
        proxy_set_header X-forwarded-for $proxy_add_x_forwarded_for;
        proxy_connect_timeout 60;
        proxy_send_timeout 60;
        proxy_read_timeout 60;
        proxy_buffer_size 32k;
        proxy_buffers 4 128k;
        proxy_busy_buffers_size 256k;
        proxy_temp_file_write_size 256k;

                   }
       }
    server {
        listen       80;
        server_name  www.youngboy.org;
        location / {
        proxy_pass http://www_server_pools;
        proxy_redirect default;
        proxy_set_header Host $http_host;
        proxy_set_header X-Real-IP $remote_addr;
        proxy_set_header X-forwarded-for $proxy_add_x_forwarded_for;
        proxy_connect_timeout 60;
        proxy_send_timeout 60;
        proxy_read_timeout 60;
        proxy_buffer_size 32k;
        proxy_buffers 4 128k;
        proxy_busy_buffers_size 256k;
        proxy_temp_file_write_size 256k;

                   }
       }
}
We'll find out. Every time you add a server tag (a site), you need to paste the nginx proxy parameter once, which will cause configuration redundancy
We can write the proxy optimization parameter configuration to a file
# vim /etc/nginx/conf.d/http.proxy
proxy_redirect default;
proxy_set_header Host $http_host;
proxy_set_header X-Real-IP $remote_addr;
proxy_set_header X-forwarded-for $proxy_add_x_forwarded_for;
proxy_connect_timeout 60;
proxy_send_timeout 60;
proxy_read_timeout 60;
proxy_buffer_size 32k;
proxy_buffers 4 128k;
proxy_busy_buffers_size 256k;
proxy_temp_file_write_size 256k;
Under the nginx http tag, use include to import the proxy file you just created
....
http {
    include       mime.types;
    default_type  application/octet-stream;
    sendfile        on;
    keepalive_timeout  65;
        include /etc/nginx/conf.d/http.proxy;
....
}
Restart nginx smoothly
nginx -s reload
4. Nginx Proxy optimization parameters
# Set http request header item to send to backend server node
proxy_set_header

# Used to specify the client request principal buffer size
client_body_buffer_size

# Indicates the timeout time for the reverse agent to connect to the backend node server, that is, the timeout time for initiating handshake and waiting for response
proxy_connect_timeout

# Indicates the data return time of the proxy backend server, that is, the server must complete all data transmission within the specified time, otherwise, Nginx will disconnect this connection
proxy_sed_simeout

# Set the time for Nginx to obtain information from the proxy backend server, which means that after the connection is established successfully, Nginx waits for the response time of the backend server, which is actually the time for Nginx to wait for processing in the backend party
proxy_read_timeout

# Set the buffer size, which is equal to the size set by the instruction proxy buffer by default
proxy_buffer_size

# Set the number and size of buffers. The response information obtained by Nginx from the server at the back end of the proxy prevents the buffer
proxy_buffers

# It is used to set the proxy buffer size that can be used when the system is very busy. The officially recommended size is proxy buffer * 2
proxy_busy_buffers_size

# Specifies the size of the proxy cache temporary file
proxy_temp_file_write_size