Welcome to NestJs Learning Tour Series

Traditional Web applications to detect user login, privilege judgment and so on are done in the controller layer or middleware layer. In the current recommended modular and component architecture, functional recommendations of different responsibilities are split into different class files.
NestJs has done a good job in this respect. In traditional express/koa applications, developers need to think about the project structure and code organization. NestJs does not need you to do so, which reduces the development cost and unifies the development style.
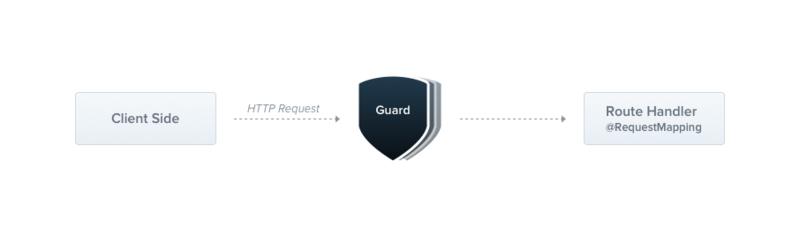
Route Guard
Partners familiar with Vue and React should be familiar with the concept, which is to call back a handler before accessing a specified route. If the function returns true or calls next(), the current access will be released, otherwise the current access will be blocked.
The same is true of routing guards in NestJs, which can define a routing guard by inheriting the CanActive interface.
import { CanActivate, ExecutionContext, Injectable } from '@nestjs/common';
import { Observable } from 'rxjs';

@Injectable()
class AppGuard implements CanActivate {
  canActivate(context: ExecutionContext): boolean | Promise<boolean> | Observable<boolean> {
    return true;
  }
}
Routing Guard and Middleware
Difference
Routing guard is also a kind of Middleware in essence. Interface authentication in koa or express development is based on middleware. If the current request is not allowed, the current middleware will not call the subsequent middleware to block the request.
However, the responsibilities of middleware are not clear. Middleware can do anything (data validation, format transformation, response volume compression, etc.). This leads to middleware identification only by name. After project iteration for a long time, it has higher maintenance costs.
contact
Because of the single responsibility relationship, the routing guard can only return true and false to decide to release/block the current request, and can not modify the request/response object, because once the principle of single responsibility is broken, the problem of investigation is more troublesome.
If you need to modify the request object, you can use it in conjunction with middleware.
The routing guard starts execution after all middleware execution has been completed.
Here is an example of a combination of routing guards and middleware.
// auth.middleware.ts
// Middleware responsibilities: Read the request header Authorization and, if it exists and is valid, set the user object into the request
import { Injectable, NestMiddleware } from '@nestjs/common';
import { Request, Response } from 'express';

@Injectable()
export class AuthMiddleware implements NestMiddleware<Request|any, Response> {
  constructor(private readonly userService: UserService) {}
  async use(req: Request|any, res: Response, next: Function) {

    const token = req.header('authorization');
    if(!token) {
      next();
      return;
    }
    const user = await this.userService.getUserByToken(token);
    if(!user) {
      next();
      return;
    }
    request.user = user;
    next();
  }
}
// user.guard.ts
import { CanActivate, ExecutionContext, Injectable } from '@nestjs/common';
import { Observable } from 'rxjs';
import { Request } from 'express';

@Injectable()
export class UserGuard implements CanActivate {
  canActivate(context: ExecutionContext): boolean | Promise<boolean> | Observable<boolean> {
    const request = context.switchToHttp().getRequest<Request | any>();
    // Direct detection of user objects, because no user object proves no token or no token invalid
    return !!request.user;
  }
}
The above example is a method commonly used by the author, so that the responsibilities are clear, and user objects can be read in other middleware.
Use routing guards to protect our applications
NestJs uses the @UseGuards() decorator to inject routing guards. Support global guard, controller level guard and method level guard.
Here is a practical example to illustrate the routing guard's working process.
Login process
- The user enters the account password and logs in. If the login succeeds, the Token will be issued.
- The client adds the Token issued in step 1 to the request header Authorization to make the request.
- The routing guard reads the Authorization information of the current request and compares it with the database. If it succeeds, it releases it, otherwise the request is blocked.
Define token validation business class
// user.service.ts
@Injetable()
export class UserService {
  // Simulated verification, which returns true directly, can be implemented by itself in actual development.
  validateToken(token: string) {
    return true;
  }
}
Define routing guards
// user.guard.ts
@Injetable()
export class UserGuard implements CanActive {
  constructor(private readonly userService: UserService) {}

  canActivate(context: ExecutionContext): boolean | Promise<boolean> | Observable<boolean> {
    const request = context.switchToHttp().getRequest<Request>();
    // Read token
    const authorization = request.header('authorization');
    if (!authorization) {
      return false;
    }
    return this.userService.validateToken(authorization);
  }
}
Define Controller
@Controller('user')
export class UserController {
  // Request login
  @Post('login')
    login() {
        return {token:'fake_token'}; // To send token directly, you need to verify your account password in real-world scenarios
  }

  // View current user information
  @Get('info')
  @UseGuards(UserGuard) // Method-level routing guard
  info() {
    return {username: 'fake_user'};
  }
}
A complete example of routing guard application has come out. Although our routing guard has no logic which is directly released, but the actual development is based on this idea, but the logic of verification is different.
Routing guard level
Controller Level
This level will take effect on all routing methods of the decorated controller.
@Controller('user')
@UseGuards(UserGuard)
export class UserController {
  // View current user information
  @Get('info')
  info() {
    return {username: 'fake_user'};
  }
}
Method Level
This level only works for the decorated method.
@Get('info')
@UseGuards(UserGuard)
info() {
  return {username: 'fake_user'};
}
Global level
Similar to global exception filters, this level takes effect on all routing methods of all controllers. This method will not work for WebSocket and GRPC as well as global exception filters.
async function bootstrap() {
  const app = await NestFactory.create(AppModule);
  // Since the dependency injection container is not initialized when main.ts is started, dependencies must be passed in manually. Generally, global guard is not recommended because dependency injection has to be solved by itself.
  app.useGlobalGuards(new UserGuard(new UserService()));
  await app.listen(3000);
}

bootstrap();
Execution context
In the method of CanActive interface, there is an ExecutionContext object, which is a request context object defined as follows:
export interface ExecutionContext extends ArgumentsHost {
  getClass<T = any>(): Type<T>;
  getHandler(): Function;
}
You can see that ArgumentHost inherits from ArgumentHost, which has been mentioned in previous exception handling articles, and is not covered here.
- GetClass < T >() Gets the currently accessed Controller object (not an instance), T being the generic parameter of the specific controller object passed in at the time of invocation.
- getHandler() Method for Getting Current Access Routes
For example, when accessing / user/info, getClass() returns the UserController object (not an instance), and getHandler() returns a reference to the info() function.
What does this feature do?
Reflection can be used in NestJs to get custom attributes defined on methods, attributes, classes, and so on, which is somewhat similar to Java annotations.
Reflective Examples - Role-based Authentication of Rights (RBAC)
Define role decorators
When accessed by a controller or method decorated with a role decorator, the routing guard reads the current user's role and matches the role incoming from the decorator. If the match fails, the request will be blocked or the request will be released.
// roles.decorator.ts
import { SetMetadata } from '@nestjs/common';

export const Roles = (...roles: string[]) => SetMetadata('roles', roles);
Define Controller
Suppose we have an interface for creating users that only admins can access:
@Post('create')
@Roles('admin')
async create(@Body() createUserDTO: CreateUserDTO) {
  this.userService.create(createUserDTO);
}
Define routing guards
// role.guard.ts
import { Injectable, CanActivate, ExecutionContext } from '@nestjs/common';
import { Observable } from 'rxjs';
import { Reflector } from '@nestjs/core';

@Injectable()
export class RolesGuard implements CanActivate {
  constructor(private readonly reflector: Reflector) {}

  canActivate(context: ExecutionContext): boolean {
    // Get roles metadata, roles is consistent with the first parameter of SetMetadata() in roles.decorator.ts
    const roles = this.reflector.get<string[]>('roles', context.getHandler());
    if (!roles) { // Not decorated by ornaments, let go directly
      return true;
    }
    const request = context.switchToHttp().getRequest();
    const user = request.user; // Read the user of the request object, which can be set by middleware (as shown earlier in this article)
    const hasRole = () => user.roles.some((role) => roles.includes(role));
    return user && user.roles && hasRole();
  }
}
Above is an example of developing RBAC by reading custom decorator data. It is simple to write, but the principle is the same. If the amount of code is small, it is easy to understand the core.
exception handling
When the routing guard returns to false, the framework throws ForbiddenException. The default response received by the client is as follows:
{
  "statusCode": 403,
  "message": "Forbidden resource"
}
If you need to throw other exceptions, such as Unauthorized Exception, you can throw them directly in the routing guard's canActive() method.
In addition, the exception thrown here can be captured and processed by the exception filter, so we can customize the exception type and output custom response data.
Ending
In addition to routing guard, another important knowledge of this article is the use of custom metadata decorator, based on which many amazing functions can be developed, which depends on the realization of your officers.
If you feel you have gained something, please share it with more friends who need it. Thank you.
If you want to exchange more knowledge about NestJs, welcome to join the discussion!