Welcome to NestJs Learning Tour Series

The Conduit
Partners familiar with Linux commands should be familiar with "pipe operators".
ls -la | grep demo
"|" is the pipe operator, which passes the output of the left command as input to the right command and supports cascading, so that complex commands can be alternated by the pipe operator.
Pipes in NestJs have similar functions and can process data cascading. The NestJs pipeline is decorated with @Injectable() decorator and needs to implement the PipeTransform interface.
The main responsibilities of pipelines in NestJs are as follows:
- Data Conversion Converts Input Data to Required Output
- Data validation receives parameters submitted by the client, continues to pass if validation is passed, and prompts errors if validation is not passed
Execution order
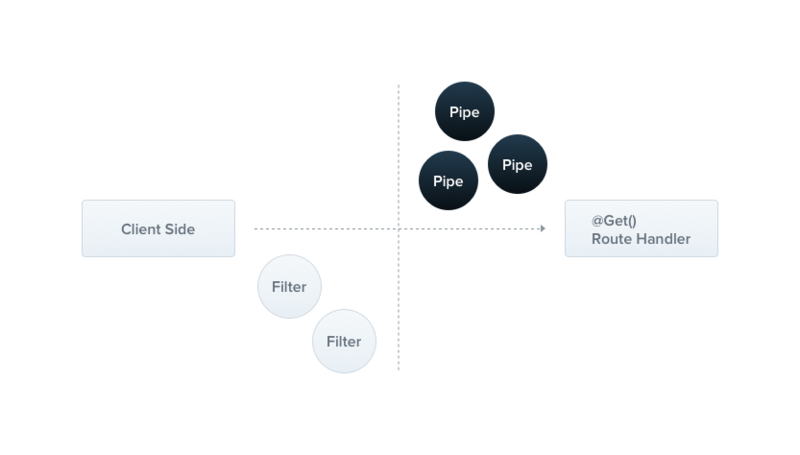
In the previous article, we discussed middleware, controllers, routing guards. Combined with the pipeline discussed in this question, some readers may question the execution order of these components: What is the execution order of these things?
The order of execution does not need to look for information. I can add a log to the execution of these components. I draw the following conclusions:
Client Request - > Middleware - > Routing Guard - > Pipeline - > Controller Method
Pipeline development
Pipelines for data conversion classes are not explained in detail:
Give you a value and metadata, and your return value is the converted value.
NestJs has built-in Validation Pipe, ParseIntPipe and ParseUUIDPipe. To better understand how they work, we take Validation Pipe (Validation Pipe) as an example to demonstrate the use of pipes.
PipeTransform
This is the interface that the pipeline must implement. The interface is defined as follows:
export interface PipeTransform<T = any, R = any> {
    transform(value: T, metadata: ArgumentMetadata): R;
}
- Value < T > Input parameter, T is input parameter type
- Metadata < ArgumentMetadata > value metadata, including parameter source, parameter type, etc.
- < R > Output parameter, R is output parameter type
ArgumentMetadata
The metadata interface used to describe the current processing value is defined as follows:
export interface ArgumentMetadata {
  readonly type: 'body' | 'query' | 'param' | 'custom';
  readonly metatype?: Type<any>;
  readonly data?: string;
}
This interface may not be clear to you. Never mind, there will be specific examples to interpret it later.
- Source of input data for type < string >
- Type of data injected by metatype < Type < any >
- Data < string | undefined > The data type passed to the decorator
For example, the following controller method:
@Post()
login(@Query('type') type: number) { // Type is a login type parameter, similar to mobile phone login 1, account login 2 example

}
The metadata of the above examples are as follows:
- The type query@Query decorator reads GET parameters
- Type symbol of metatype Number type
- The parameter passed by data type to the @Query decorator is "type"
Verifier example
The use of the verifier pipeline is illustrated by verifying the account password when the user logs in. The rules are as follows:
- Account must be a string, 6-20 in length
- Password cannot be empty
DTO Definition
DTO is Data Transfer Object in Java, which is simply a layer of data wrapping. We use this in NestJs to prevent illegal field submission and IDE auto-prompting (snickering).
class-validator and class-transformer need to be installed to use the rule decorator:
npm i --save class-validator class-transformer
The login form is defined as follows:
// userLogin.dto.ts
export class UserLoginDto {
  @IsString()
  @Length(6, 20, { message: 'Illegal length' })
  readonly username: string;
  @Length(1)
  readonly password: string;
}
Pipeline Definition
Because our pipeline is universal, that is, to verify what content is determined by the outside, the pipeline is only responsible for "you give me data and rules, I will verify". So we need to use decorator metadata.
// validate.pipe.ts
import { ArgumentMetadata, BadRequestException, Injectable, PipeTransform } from '@nestjs/common';
import { plainToClass } from 'class-transformer';
import { validate } from 'class-validator';

@Injectable()
export class ValidatePipe implements PipeTransform {

  async transform(value: any, { metatype }: ArgumentMetadata): Promise<any> {
    if (!metatype || !this.toValidate(metatype)) { // If it is not injected data and does not require validation, skip processing directly
      return value;
    }
    // Data Format Conversion
    const object = plainToClass(metatype, value);
    // Call validation
    const errors = await validate(object);
    // If the error length is greater than 0, 400 errors need to be thrown to prove the error.
    if (errors.length > 0) {
      throw new BadRequestException(errors);
    }
    return value;
  }

  /**
   * Data types to be validated
   * @param metatype
   */
  private toValidate(metatype: any): boolean {
    const types = [String, Boolean, Number, Array, Object];
    return !types.includes(metatype);
  }
}
Controller Definition
Today's protagonist is the pipeline, so the controller layer does not write logic.
// user.controller.ts
@Post('login')
@UsePipes(ValidatePipe)
login(@Body() userLoginDto: UserLoginDTO) {
  return {errcode:0, errmsg: 'ok'};
}
Operating project
The NestJs project can be run by executing the following commands in the project root directory:
npm run start
Postman can be used to validate the project after it runs.
Request data 1
{

}
Response data 1
{
    "statusCode": 400,
    "error": "Bad Request",
    "message": [
        {
            "target": {},
            "property": "username",
            "children": [],
            "constraints": {
                "length": "Illegal length",
                "isString": "username must be a string"
            }
        },
        {
            "target": {},
            "property": "password",
            "children": [],
            "constraints": {
                "length": "password must be longer than or equal to 1 characters"
            }
        }
    ]
}
Request data 2
{
    "username":"xialeistudio"
}
Response data 2
{
    "statusCode": 400,
    "error": "Bad Request",
    "message": [
        {
            "target": {
                "username": "xialeistudio"
            },
            "property": "password",
            "children": [],
            "constraints": {
                "length": "password must be longer than or equal to 1 characters"
            }
        }
    ]
}
Request data 3
{
    "username":"xialeistudio",
    "password":"111111"
}
Response data 3
[]
Matters needing attention
The implementation of ValidatePipe is demonstrated above. The production environment can use the Validation Pipe provided by NestJs directly. We can use global pipelines in main.ts.
async function bootstrap() {
  const app = await NestFactory.create(AppModule);
  app.useGlobalPipes(new ValidationPipe());
  await app.listen(3000);
}
bootstrap();
Ending
Comparing with the verification framework in SpringBoot used by the author, it is found that the function of NestJs verification pipeline is no worse than SpringBoot. It seems that the official "Next Generation Node.js Full Stack Development Framework" is not really covered!
If you feel you have gained something, please share it with more friends who need it. Thank you.
If you want to exchange more knowledge about NestJs, welcome to join the discussion!
