This article is a translation with the original address: https://kamilmysliwiec.com/nest-final-release-is-here-node-js-framework-built-top-of-typescript Author, @Kamil My liwiec
The address of the last article is: https://segmentfault.com/a/1190000009560532
Middlewares
Middleware is a function that is called before a routing handler. Middleware functions can access request and response objects, so they can be modified. They can also serve as a barrier, and if the middleware function does not call next(), requests will never be processed by the routing handler.

Let's build a virtual authorization middleware. We will use the X-Access-Token HTTP header to provide the user name (which is a strange idea, but not important).
import { UsersService } from './users.service';
import { HttpException } from '@nestjs/core';
import { Middleware, NestMiddleware } from '@nestjs/common';

@Middleware()
export class AuthMiddleware implements NestMiddleware {
    constructor(private usersService: UsersService) {}

    resolve() {
        return (req, res, next) => {
            const userName = req.headers["x-access-token"];
            const users = this.usersService.getUsers();

            const user = users.find((user) => user.name === userName);
            if (!user) {
                throw new HttpException('User not found.', 401);
            }
            req.user = user;
            next();
        }
    }
}
Some facts are as follows:
You should use the @Middleware() annotation to tell Nest that this class is a middleware.
You can use the Nest Middleware interface, which forces you to use the resolve() method.
Middleware (like components) can inject dependencies through its constructors (dependencies must be part of a module).
The middleware must have a resolve() method, which must return another function (higher-order function). Why? Because there are many third-party plug-ins ready to use express middleware, you can simply use it in Nest, thanks to this solution.
Well, we have middleware ready, but we don't use it anywhere. Let's set it up:
import { Module, MiddlewaresConsumer } from '@nestjs/common';

@Module({
    controllers: [ UsersController ],
    components: [ UsersService ],
    exports: [ UsersService ],
})
export class UsersModule {
    configure(consumer: MiddlewaresConsumer) {
        consumer.apply(AuthMiddleware).forRoutes(UsersController);
    }
}
As shown above, modules can have other methods, configure(). This method takes the MiddlewaresConsumer object as a parameter, which can help us configure the middleware.
This object has the apply() method, which receives innumerable middleware (this method uses extension operators, so it can pass multiple comma-separated classes). The apply() method returns the object in two ways:
forRoutes(): We use this method to separate controllers or objects (with path and method attributes) by commas.
with(): We use this method to pass custom parameters to the resolve() middleware method.
How does it work?
When you pass UsersController in the forRoutes method, Nest will set middleware for each route in the controller:
GET: users
GET: users/:id
POST: users
But you can also directly define which path middleware should be used, just like this:
consumer.apply(AuthMiddleware).forRoutes({
    path: '*', method: RequestMethod.ALL
});
Chaining
You can simply call the apply() chain.
consumer.apply(AuthMiddleware, PassportMidleware)
    .forRoutes(UsersController, OrdersController, ClientController);
    .apply(...)
    .forRoutes(...);
order
Middleware is called in the same order as arrays. The middleware configured in the sub-module will be invoked after the parent module is configured.
Gateways Real-time Applications
Nest has a special component called gateway. Gateway helps us create real-time network applications. They are some encapsulated socket.io functions that are adapted to the framework.
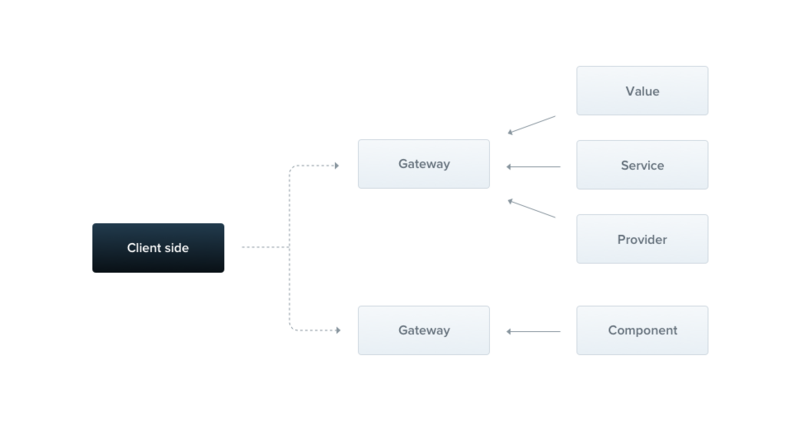
Gateway is a component, so it can inject dependencies through constructors. Gateway can also be injected into another component.
import { WebSocketGateway } from '@nestjs/websockets';

@WebSocketGateway()
export class UsersGateway {}
By default, the server runs on port 80 and uses the default namespace. We can easily change these settings:
@WebSocketGateway({ port: 81, namespace: 'users' })Of course, the server runs only when Users Gateway is in the component array, so we have to put it there:
@Module({
    controllers: [ UsersController ],
    components: [ UsersService, UsersGateway ],
    exports: [ UsersService ],
})
By default, gateways have three useful events:
afterInit, as a local server socket.io object parameter,
handleConnection and handleDisconnect are the socket.io object parameters of the local client.
There are special interfaces, OnGateway Init, OnGateway Connection and OnGateway Disconnect to help us manage the life cycle.
What is a message?
In the gateway, we can simply subscribe to the messages sent out:
import { WebSocketGateway, SubscribeMessage } from '@nestjs/websockets';

@WebSocketGateway({ port: 81, namespace: 'users' })
export class UsersGateway {
    @SubscribeMessage('drop')
    handleDropMessage(sender, data) {
        // sender is a native socket.io client object
    }
}
The client receives the following:
import * as io from 'socket.io-client';
const socket = io('http://URL:PORT/');
socket.emit('drop', { msg: 'test' });
@WebSocketServer()
If you want to assign the selected socket.io local server instance properties, you can simply decorate with the @WebSocketServer() decorator.
import { WebSocketGateway, WebSocketServer } from '@nestjs/websockets';

@WebSocketGateway({ port: 81, namespace: 'users' })
export class UsersGateway {
    @WebSocketServer() server;

    @SubscribeMessage('drop')
    handleDropMessage(sender, data) {
        // sender is a native socket.io client object
    }
}
The server will be assigned values after initialization.
Gateway Middleware
Gateway middleware is almost the same as router middleware. Middleware is a function that is called before the gateway message user. Gateway middleware functions can access local socket objects. They are like barriers. If the middleware function does not call next(), the message will never be processed by the user.
For example:
@Middleware()
export class AuthMiddleware implements GatewayMiddleware {
    public resolve(): (socket, next) => void {
        return (socket, next) => {
            console.log('Authorization...');
            next();
        };
    }
}
Some facts about gateway middleware:
You should use the @Middleware() annotation to tell Nest that this class is a middleware.
You can use the Gateway Middleware interface, which forces you to implement the resolve() method.
Middleware (like components) can inject dependencies through its constructors (dependencies must be part of a module).
The middleware must be a solution () method, which must return another function (higher-order function).
Well, we're ready for middleware, but we don't use it anywhere. Let's set it up:
@WebSocketGateway({
    port: 2000,
    middlewares: [ ChatMiddleware ],
})
export class ChatGateway {}
As shown above, @WebSocketGateway() accepts the additional tuple attribute - middlewares, which is a middleware array. These middleware will be invoked before the message handler.
Reactive Streams
Nest Gateway is a simple component that can be injected into another component. This feature makes it possible for us to choose how we will react to messages.
Of course, only if necessary can we inject components into the gateway and invoke its appropriate methods.
But there is another solution, Gateway Reactive Streams. You can be at Here Read more about them.
Microservices support
Converting Nest applications to Nest microservices is very simple.
Let's see how to create a Web application:
const app = NestFactory.create(ApplicationModule);
app.listen(3000, () => console.log('Application is listening on port 3000'));
Now switch to Microsoft:
const app = NestFactory.createMicroservice(ApplicationModule, { port: 3000 });
app.listen() => console.log('Microservice is listening on port 3000'));
This is it!
Communicate through TCP
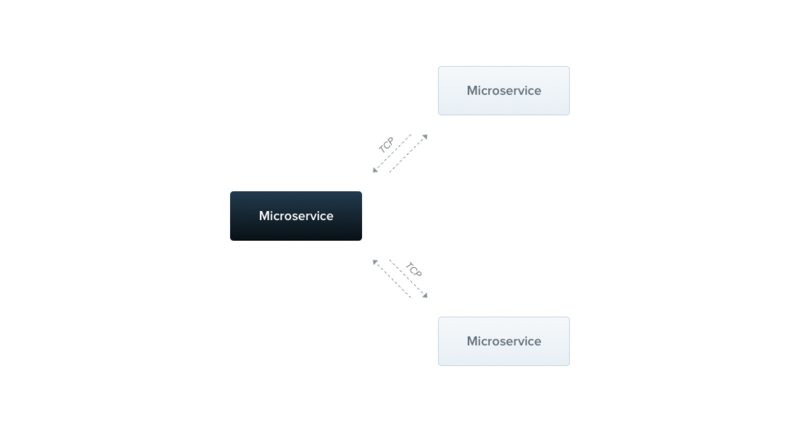
By default, Nest microservices listen for messages through the TCP protocol. This means that @RequestMapping() and @Post(), @Get() and so on are not useful now because it maps HTTP requests. So how do micro services identify messages? Just by mode.
What is a pattern? Nothing special. It's an object, string or number (but that's not a good idea).
Let's create MathController:
import { MessagePattern } from '@nestjs/microservices';

@Controller()
export class MathController {
    @MessagePattern({ cmd: 'add' })
    add(data, respond) {
        const numbers = data || [];
        respond(null, numbers.reduce((a, b) => a + b));
    }
}
You may see that if you want to create a message handler, you have to decorate it with @Message Pattern. In this example, I chose {cmd:'add'} as the pattern.
The handler method receives two parameters:
Data, which is a data variable sent from another microserver (or just a Web application)
Respons, a function that receives two parameters (error and response).
Client
You already know how to receive messages. Now let's see how to send them from another microserver or Web application.
Before you start, Nest must know the location of the mail you want to send. Simply, you just need to create an @Client object.
import { Controller } from '@nestjs/common';
import { Client, ClientProxy, Transport } from '@nestjs/microservices';

@Controller()
export class ClientController {
    @Client({ transport: Transport.TCP, port: 5667 })
    client: ClientProxy;
}
@ Client() Decorator receives objects as parameters. This object can have three attributes:
transport, in this way, you can decide which method to use, TCP or Redis (default is TCP)
url, only for Redis parameters (default redis://localhost:6379)
Port, port, default 3000.
Using Client
Let's create a custom path to test our communication.
import { Controller, Get } from '@nestjs/common';
import { Client, ClientProxy, Transport } from '@nestjs/microservices';

@Controller()
export class ClientController {
    @Client({ transport: Transport.TCP, port: 5667 })
    client: ClientProxy;

    @Get('client')
    sendMessage(req, res) {
        const pattern = { command: 'add' };
        const data = [ 1, 2, 3, 4, 5 ];

        this.client.send(pattern, data)
            .catch((err) => Observable.empty())
            .subscribe((result) => res.status(200).json({ result }));
    }
}
As you can see, in order to send messages, you have to use the send method, which receives message patterns and data as parameters. This method follows Rxjs The package returns an Observable.
This is a very important feature because Observables provides a surprising set of operations to handle, such as combine, zip, retryWhen, timeout, and so on.
Of course, if you want to use Promise instead of Observables, you can use the toPromise() method directly.
That's it.
Now, when someone sends a / test request (GET), how should it be applied (if both microservices and web applications are available):
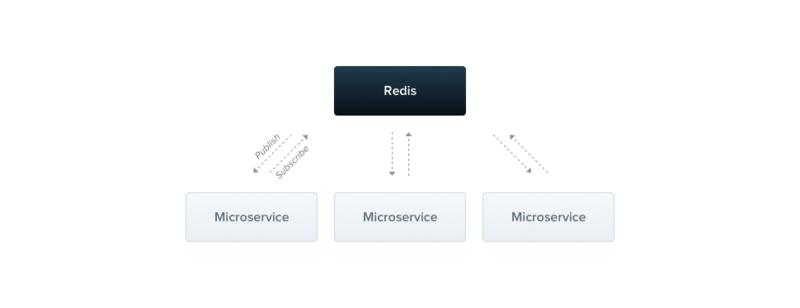
{
    "result": 15
}
Redis
There is another way to work with Nest microservices. We can use Redis's publish/subscribe functionality instead of direct TCP communication.
You must install Redis before using it.
Creating Redis Micro Services
To create a Redis microservice, you have to pass other configurations in the NestFactory.createMicroservice() method.
const app = NestFactory.createMicroservice(
    MicroserviceModule,
    {
        transport: Transport.REDIS,
        url: 'redis://localhost:6379'
    }
);
app.listen(() => console.log('Microservice listen on port:', 5667 ));
That's it. Now, your microservice will subscribe to messages posted through Redis. Other approaches remain the same, such as schema and error handling.
Redis client
Now let's see how to create a client. Previously, your client configuration was as follows:
@Client({ transport: Transport.TCP, port: 5667 })
client: ClientProxy;
We want to use Redis instead of TCP, so we have to change these configurations:
@Client({ transport: Transport.REDIS, url: 'redis://localhost:6379' })
client: ClientProxy;
It's easy, isn't it? This is it. Other functions are the same as those in TCP communication.
Sharing module
Nest module can export other components. This means that we can easily share component instances between them.
The best way to share instances between two or more modules is to create shared modules.
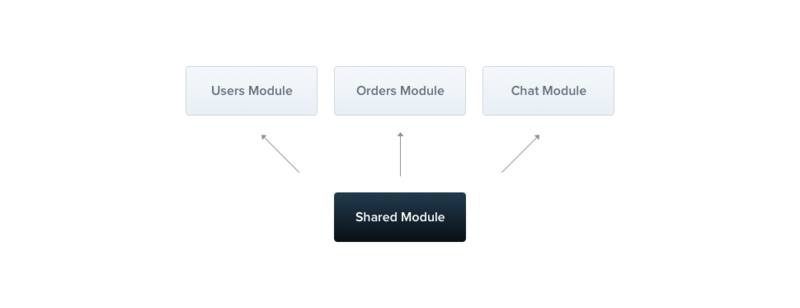
For example, if we want to share ChatGateway components throughout the application, we can do this:
import { Module, Shared } from '@nestjs/common';

@Shared()
@Module({
    components: [ ChatGateway ],
    exports: [ ChatGateway ]
})
export class SharedModule {}
Then, we just need to import this module into another module, which should share component instances:
@Module({
    modules: [ SharedModule ]
})
export class FeatureModule {}
That's it.
Note that the scope of shared modules can also be defined directly. Learn more details.
Dependency Injection
Dependency injection is a powerful mechanism that can help us manage our class dependencies easily. It is a very popular language, such as C# and Java.
In Node.js, these functions are not important because we already have a magical module loading system, such as the ease of sharing instances between files.
Module loading system is sufficient for small and medium-sized applications. As code grows, it becomes more difficult to smoothly organize dependencies between layers. One day it will explode.
It is more intuitive than the DI constructor. That's why Nest has its own DI system.
Custom Components
As you've learned, it's very easy to add components to the selected module.
@Module({
    controllers: [ UsersController ],
    components: [ UsersService ]
})
Yes, there are other cases where Nest allows you to use it.
Use value:
const value = {};
@Module({
    controllers: [ UsersController ],
    components: [
        { provide: UsersService, useValue: value }
    ],
})
When:
You want to use specific values. Now, in this pattern, Nest will associate value with the UsersService metatype.
You want to use unit tests.
Use class:
@Component()
class CustomUsersService {}

@Module({
    controllers: [ UsersController ],
    components: [
        { provide: UsersService, useClass: CustomUsersService }
    ],
})
When:
You just want to use the more specific classes selected in this module.
Use factories
@Module({
    controllers: [ UsersController ],
    components: [
        ChatService,
        {
            provide: UsersService,
            useFactory: (chatService) => {
                return Observable.of('value');
            },
            inject: [ ChatService ]
        }
    ],
})
When:
If you want to provide a value, it must be calculated using other components (or custom package features).
You need to provide asynchronous values (return only Observable or Promise), such as database connections.
Remember:
If components in a module are to be used, they must be passed to the injection array. Nest will pass instances as parameters in the same order.
Customized providers
@Module({
    controllers: [ UsersController ],
    components: [
        { provide: 'isProductionMode', useValue: false }
    ],
})
When:
You want to provide a selected key value.
Please note that:
You can use various types of useValue, useClass and useFactory.
How do you use it?
Using the selected key to inject custom providers / values, you have to tell Nest, like this:
import { Component, Inject } from '@nestjs/common';

@Component()
class SampleComponent {
    constructor(@Inject('isProductionMode') isProductionMode: boolean) {
        console.log(isProductionMode); // false
    }
}
`
ModuleRef
Sometimes you may want to get component instances directly from module references. For Nest, it's not a big deal. You just need to inject ModuleRef into the class:
export class UsersController {
    constructor(
        private usersService: UsersService,
        private moduleRef: ModuleRef) {}
}
ModuleRef provides a method:
Get < T > (key), which returns the equivalent key instance (mainly metatype). For example, moduleRef. get < UsersService > (UsersService) returns an instance of the UsersService component from the current module
For example:
moduleRef.get<UsersService>(UsersService)
It returns an instance of the UsersService component from the current module.
test
Nest provides you with a set of testing tools that can be used to provide the testing process. There are two ways to test your components and controllers, isolate testing and use a dedicated Nest test tool.
Isolation test
Nest's controllers and components are simple JavaScript classes. This means that you can easily create them yourself:
const instance = new SimpleComponent();If your class has other dependencies, you can use test doubles, for example Jasmine or Sinon Library:
const stub = sinon.createStubInstance(DependencyComponent);
const instance = new SimpleComponent(stub);
Special Nest Testing Tool
Another way to test application building blocks is to use a dedicated Nest test tool.
These test tools are placed in the static Test class (@nestjs/testing module).
import { Test } from '@nestjs/testing';This class provides two approaches:
CreateTesting Module (metadata: ModuleMetadata), which receives simple module metadata as a parameter (the same as Module() class). This method creates a test module (the same as the actual Nest application) and stores it in memory.
Get < T > (metatype: Metatype < T >), which returns the selected instance (metatype passed as a parameter), the controller / component (null if it is not part of the module).
For example:
Test.createTestingModule({
    controllers: [ UsersController ],
    components: [ UsersService ]
});
const usersService = Test.get<UsersService>(UsersService);
`
Mocks, spies, stubs
Sometimes you may not want to use an instance of a component/controller. You can choose to use test doubles or customize values / objects.
const mock = {};
Test.createTestingModule({
    controllers: [ UsersController ],
    components: [
        { provide: UsersService, useValue: mock }
    ]
});
const usersService = Test.get<UsersService>(UsersService); // mock
Exception Filters
Using Nest, exception handling logic can be moved to a special class called Exception Filters.
How does it work?
Let's look at the following code:
@Get('/:id')
public async getUser(@Response() res, @Param('id') id) {
    const user = await this.usersService.getUser(id);
    res.status(HttpStatus.OK).json(user);
}
Imagine that the usersService.getUser(id) method throws a UserNotFoundException exception. We need to catch exceptions in the routing handler:
@Get('/:id')
public async getUser(@Response() res, @Param('id') id) {
    try {
        const user = await this.usersService.getUser(id);
        res.status(HttpStatus.OK).json(user);
    }
    catch(exception) {
        res.status(HttpStatus.NOT_FOUND).send();
    }
}
In summary, we must add try... catch blocks to every routing processing where exceptions may occur. Is there any other way? Yes, Exception Filters.
Let's create NotFoundException Filter:
import { Catch, ExceptionFilter, HttpStatus } from '@nestjs/common';

export class UserNotFoundException {}
export class OrderNotFoundException {}

@Catch(UserNotFoundException, OrderNotFoundException)
export class NotFoundExceptionFilter implements ExceptionFilter {
    catch(exception, response) {
        response.status(HttpStatus.NOT_FOUND).send();
    }
}
`
Now, we just need to tell our Controller to use this filter:import { ExceptionFilters } from '@nestjs/common'; @ExceptionFilters(NotFoundExceptionFilter) export class UsersController {}So if usersService.getUser(id) throws UserNotFoundException, the NotFoundException Filter will capture it.
More exception filters
Each controller may have an infinite number of exception filters (separated only by commas).
@ExceptionFilters(NotFoundExceptionFilter, AnotherExceptionFilter)Dependency Injection
Exception filters are the same as components, so dependencies can be injected through constructors.
HttpException
Note: It is mainly used for REST applications.
Nest has an error handling layer that captures all unhandled exceptions.
If somewhere, in your application, you throw an exception that is not HttpException (or inherited), Nest will process it and return it to the following user's json object (500 status code):
{
    "message": "Unkown exception"
}
Exception hierarchy
In an application, you should create your own Exceptions Hierarchy. All HTTP exceptions should inherit from the built-in HTTP Exception.
For example, you can create NotFoundException and UserNotFoundException classes:
import { HttpException } from '@nestjs/core';

export class NotFoundException extends HttpException {
    constructor(msg: string | object) {
        super(msg, 404);
    }
}

export class UserNotFoundException extends NotFoundException {
    constructor() {
        super('User not found.');
    }
}
Then, if you throw UserNotFoundException somewhere in your application, Nest will respond to the user status code 404 and the following json objects:
{
    "message": "User not found."
}
It allows you to focus on logic and make your code easier to read.
Useful reference