Last article How to label each anchor box is described in. Will you be able to train immediately after the labeling? Don't worry, there are still some preparations to be completed
1, Data enhancement
VOC dataset Although there are so many images in the data set, the training effect is not so good if the enhancement processing is not done. First, do simple things, including turning left and right, turning up and down, turning left and right up and down together. As for rotation deformation, you can handle it yourself. Just pay attention to that the labels should be processed together when the data is enhanced
# Data enhancement functions, including left and right, up and down, left and right, up and down
# data_ pair: data_ set_ Data element returned by path
# train_num: number of anchor s for one parameter training
def data_augment(data_pair, train_num):
    augmented = [] # Return enhanced data

    img_src = cv.imread(data_pair[0])
    img_new, scale = new_size_image(img_src, SHORT_SIZE)
    feature_size = (img_new.shape[0] // FEATURE_STRIDE, img_new.shape[1] // FEATURE_STRIDE)
    anchors = create_train_anchors(feature_size, base_anchors, FEATURE_STRIDE)

    # Original image and label------------------------------------------------------
    ground_truth = get_ground_truth(data_pair[1], data_pair[2], CATEGORIES)
    # ground_truth needs to scale accordingly
    for gt in ground_truth:
        gt[0][0] = round(gt[0][0] * scale)
        gt[0][1] = round(gt[0][1] * scale)
        gt[0][2] = round(gt[0][2] * scale)
        gt[0][3] = round(gt[0][3] * scale)

    rpn_cls_label, gt_boxes = get_rpn_cls_label(img_new.shape, anchors, ground_truth, train_num = train_num)
    augmented.append([img_new, rpn_cls_label, gt_boxes])
    # Original image and label------------------------------------------------------

    # Flip left and right and label------------------------------------------------------
    # Copy a copy, and the following operations are performed on the backup
    gt_copy = copy.deepcopy(ground_truth)
    x_flip = cv.flip(img_new, 1) # Flip image left and right
    for gt in gt_copy: # Flip labels left and right
        gt[0][0] = x_flip.shape[1] - 1 - gt[0][0]
        gt[0][2] = x_flip.shape[1] - 1 - gt[0][2]
        gt[0][0], gt[0][2] = gt[0][2], gt[0][0]

    rpn_cls_label, gt_boxes = get_rpn_cls_label(x_flip.shape, anchors, gt_copy, train_num = train_num)
    augmented.append([x_flip, rpn_cls_label, gt_boxes])
    # Flip left and right and label------------------------------------------------------

    # Flip up and down and label------------------------------------------------------
    # Copy a copy, and the following operations are performed on the backup
    gt_copy = copy.deepcopy(ground_truth)
    y_flip = cv.flip(img_new, 0) # Flip image left and right
    for gt in gt_copy: # Flip labels up and down
        gt[0][1] = y_flip.shape[0] - 1 - gt[0][1]
        gt[0][3] = y_flip.shape[0] - 1 - gt[0][3]
        gt[0][1], gt[0][3] = gt[0][3], gt[0][1]

    rpn_cls_label, gt_boxes = get_rpn_cls_label(y_flip.shape, anchors, gt_copy, train_num = train_num)
    augmented.append([y_flip, rpn_cls_label, gt_boxes])
    # Flip up and down and label------------------------------------------------------

    # Flip left and right up and down and label--------------------------------------------------
    # Copy a copy, and the following operations are performed on the backup
    gt_copy = copy.deepcopy(ground_truth)
    xy_flip = cv.flip(img_new, -1) # Flip image left and right
    for gt in gt_copy: # Flip labels left and right up and down
        gt[0][0] = xy_flip.shape[1] - 1 - gt[0][0]
        gt[0][1] = xy_flip.shape[0] - 1 - gt[0][1]
        gt[0][2] = xy_flip.shape[1] - 1 - gt[0][2]
        gt[0][3] = xy_flip.shape[0] - 1 - gt[0][3]

        gt[0][0], gt[0][2] = gt[0][2], gt[0][0]
        gt[0][1], gt[0][3] = gt[0][3], gt[0][1]

    rpn_cls_label, gt_boxes = get_rpn_cls_label(xy_flip.shape, anchors, gt_copy, train_num = train_num)
    augmented.append([xy_flip, rpn_cls_label, gt_boxes])
    # Flip left and right up and down and label--------------------------------------------------

    return augmented
Now enhance an image to see the effect
# Test data_augment
titles = ["original", "x_filip", "y_flip", "xy_flip"]
plt.figure("augmented", figsize = (12, 8))

print(train_set[idx]) # idx is the random number generated in fast r-cnn II implemented by nanny Keras
augmented = data_augment(train_set[idx], train_num = 32)

for i, data in enumerate(augmented):
    img_copy = data[0].copy()
    feature_size = (img_copy.shape[0] // FEATURE_STRIDE, img_copy.shape[1] // FEATURE_STRIDE)
    anchors = create_train_anchors(feature_size, base_anchors, FEATURE_STRIDE)

    for j, a in enumerate(anchors):
        if POS_VAL == data[1][j]:
            gt = data[2][j]
            # Test get_ rpn_ cls_ Is the gt brought out by label correct
            cv.rectangle(img_copy, (gt[0], gt[1]), (gt[2], gt[3]), (255, 55, 55), 2)
            cv.rectangle(img_copy, (a[0], a[1]), (a[2], a[3]), (0, 255, 0), 2)
        # Negative sample side observations are not shown here
        elif NEG_VAL == data[1][j]:
            cv.rectangle(img_copy, (a[0], a[1]), (a[2], a[3]), (0, 0, random.randint(128, 256)), 1)

    plt.subplot(2, 2, i + 1)
    plt.title(titles[i], color = 'gray')
    plt.imshow(img_copy[..., : : -1]) # The channel here should be displayed in reverse to be normal
plt.show()
('data_set\\007152.jpg', 'data_set\\007152.xml', 'xml')
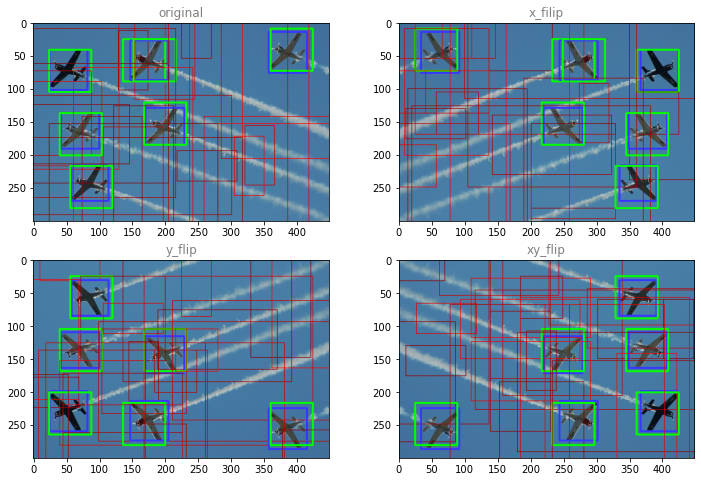
Because there are many negative samples and they are randomly generated, negative samples are not symmetrical. There are few positive samples and they will be taken every time, so they are symmetrical
2, Read in training data Generator
Data enhancement has been completed. It's time to consider how to send training data to the network
VOC dataset There are still a lot of data set images, and some enhancement processing needs to be done. If you read the memory at once, your machine may not be able to stand the training. Therefore, you need to use the Generator to read the training data, and you need to read as much as you need. Secondly, if you want to understand the Generator, you must first understand and master the magic keyword yield
# Network input data generator
# data_set: training or test data list
# categories: category list
# train_num: number of anchor s participating in training
# batch_size: enter the number of training images at one time
# augment_fun: data enhancement function
# train_mode: True: training mode, False: test mode
# shuffle_enable: scramble tag
# Return images and labels
def input_reader(data_set, categories, batch_size = 1, train_num = TRAIN_NUM,
                 augment_fun = None, train_mode = True, shuffle_enable = True):
    assert(isinstance(data_set, tuple) or isinstance(data_set, list))

    stop_now = False
    data_nums = len(data_set)
    index_list = [x for x in range(data_nums)] # Use this list serial number to disrupt the data_set sort

    while False == stop_now:
        if train_mode and shuffle_enable:
            shuffle(index_list)

        x = []     # Return image
        y_cls = [] # Return category label

        max_rows = 0 # Record the maximum number of lines of an image in a batch
        max_cols = 0 # Record the maximum number of columns of an image in a batch

        for i in index_list:
            if train_mode:
                augmented = augment_fun(data_set[i], train_num)
                for data in augmented:
                    x.append(data[0])
                    y_cls.append(data[1])
                    max_rows = max(max_rows, x[-1].shape[0])
                    max_cols = max(max_cols, x[-1].shape[1])

                    if len(x) >= batch_size:
                        # Different sizes of images in a batch cannot be trained together, so they should be unified to the same size
                        # If the number of rows is less than the maximum number of rows, fill 0 at the bottom of the image, and if the number of columns is less than the maximum number of columns, fill 0 at the right of the image
                        # When the image is filled, the label is also filled
                        new_shape = (max_rows // FEATURE_STRIDE, max_cols // FEATURE_STRIDE)

                        for j, img in enumerate(x):
                            # Dimension of feature drawing corresponding to original drawing
                            old_shape = (img.shape[0] // FEATURE_STRIDE, img.shape[1] // FEATURE_STRIDE)
                            # Here, use x[j] before the = sign, not img
                            x[j] = cv.copyMakeBorder(img,
                                                     0, max_rows - img.shape[0], 0, max_cols - img.shape[1],
                                                     cv.BORDER_CONSTANT, (0, 0, 0))

                            # Fill data in row direction
                            if new_shape[0] - old_shape[0] > 0:
                                pad_num = (new_shape[0] - old_shape[0]) * old_shape[1] * ANCHOR_NUM
                                y_pad = [NEUTRAL] * pad_num
                                y_cls[j].extend(y_pad)

                            # Column direction fill
                            # Row direction is directly added at the end, while column direction is discontinuous, so row by row is added at the end
                            if new_shape[1] - old_shape[1] > 0:
                                pad_pos = old_shape[1] * ANCHOR_NUM

                                pad_num = (new_shape[1] - old_shape[1]) * ANCHOR_NUM
                                y_pad = [NEUTRAL] * pad_num
                                for r in range(new_shape[0]):
                                    # You can't use the insert function here. Insert will put y_pad as a whole as an element
                                    y_cls[j][pad_pos: pad_pos] = y_pad
                                    pad_pos += (pad_num + old_shape[1] * ANCHOR_NUM)

                        # Return data
                        x = np.array(x).astype(np.float32) / 255.0
                        y_cls = np.array(y_cls).astype(np.float32)
                        y_cls = y_cls.reshape((-1, new_shape[0], new_shape[1], ANCHOR_NUM))
                        yield x, y_cls
                        x = []
                        y_cls = []
                        max_rows = 0
                        max_cols = 0
            else: # If it's not training mode, put batch_size defaults to 1
                img_src = cv.imread(data_set[i][0])
                img_new, scale = new_size_image(img_src, SHORT_SIZE)
                feature_size = (img_new.shape[0] // FEATURE_STRIDE, img_new.shape[1] // FEATURE_STRIDE)
                x.append(img_new)

                if 3 == len(data_set[i]): # Indicates that the label is attached
                    anchors = create_train_anchors(feature_size, base_anchors, FEATURE_STRIDE)
                    ground_truth = get_ground_truth(data_set[i][1], data_set[i][2], CATEGORIES)
                    # ground_truth needs to scale accordingly
                    for gt in ground_truth:
                        gt[0][0] = round(gt[0][0] * scale)
                        gt[0][1] = round(gt[0][1] * scale)
                        gt[0][2] = round(gt[0][2] * scale)
                        gt[0][3] = round(gt[0][3] * scale)

                    rpn_cls_label, gt_boxes = get_rpn_cls_label(img_new.shape, anchors,
                                                                ground_truth, train_num = train_num)
                    y_cls.append(rpn_cls_label)

                else: # Only images, no labels
                    y_cls.append([NETRAL] * feature_size[0] * feature_size[1])

                x = np.array(x).astype(np.float32) / 255.0
                y_cls = np.array(y_cls).astype(np.float32)
                y_cls = y_cls.reshape((-1, feature_size[0], feature_size[1], ANCHOR_NUM))

                yield x, y_cls
                x = []
                y_cls = []

        if False == train_mode:
            stop_now = True
input_ The key point to note in the reader is when batch_ When size > 4, the size of the read image is not necessarily the same, so fill it to the same size, and fill the label accordingly. Combined with the following test, the output image is easier to understand
# Test input_reader
# Here it is set to display in 32 directions, otherwise there are dense boxes
show_reader = input_reader(train_set, CATEGORIES, batch_size = 8, train_num = 32,
                           augment_fun = data_augment)
# Test input_reader
x, y = next(show_reader)
batch_size = x.shape[0]
print("train image shape: ", x.shape)
print("label shape: ", y.shape)

SHOW_COLUMNS = 4
SHOW_ROWS = max(1, batch_size // SHOW_COLUMNS) + 1
plt.figure("batch_images", figsize = (12, SHOW_ROWS * 3))

for i in range(batch_size):
    feature_size = (x[0].shape[0] // FEATURE_STRIDE, x[0].shape[1] // FEATURE_STRIDE)
    anchors = create_train_anchors(feature_size, base_anchors, FEATURE_STRIDE)

    if 0 == i:
        print("\nanchrors in single image: ", len(anchors))

    positives = 0
    idxs = tf.where(K.not_equal(y[i], NEUTRAL))
    for idx in idxs:
        idx = (i, int(idx[0]), int(idx[1]), int(idx[2]))
        rgb = (0, 255, 0) if POS_VAL == y[idx] else (0, 0, 255)
        positives = positives + 1 if POS_VAL == y[idx] else positives

        idx = int(idx[1] * feature_size[1] * ANCHOR_NUM + idx[2] * ANCHOR_NUM + idx[3])
        a = anchors[idx]
        cv.rectangle(x[i], (a[0], a[1]), (a[2], a[3]), rgb, 2)

    plt.subplot(SHOW_ROWS, SHOW_COLUMNS, i + 1)
    plt.title("positive = " + str(positives), color = 'gray')
    plt.imshow(x[i][..., : : -1])
plt.show()
train image shape:  (8, 400, 400, 3)
label shape:  (8, 25, 25, 9)

anchrors in single image:  5625
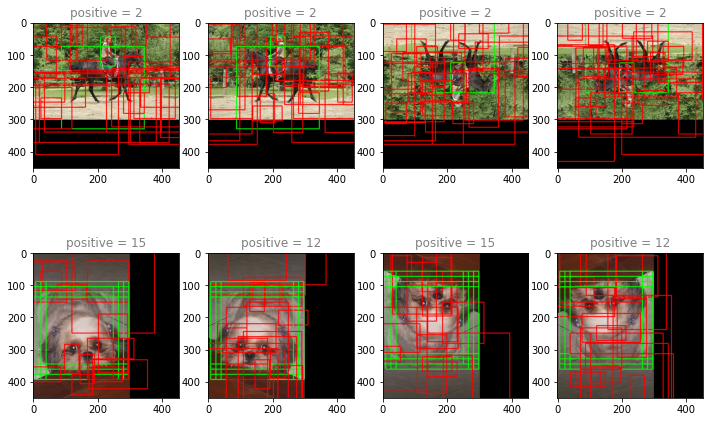
The output image is filled only at the bottom and right, which is convenient for label processing. Of course, you can fill all four sides with obsessive-compulsive disorder
One problem here is that the anchor box is drawn to the filled black area, because we regenerate the anchor box in the test cycle without rounding or truncation, which is not available during real training
Previous: Nanny level Keras realizes fast r-cnn III
Next: Nanny Keras realizes fast r-cnn five