concept
What is Mysql/Mariadb master-slave replication?
Mysql/Mariadb Master-slave replication: when the Master database changes, the changes will be synchronized to the slave database in real time;
Similar to: Samba shared file (C/S), NFS network file share (C/S), when the Server changes, the client data content will change according to the Server;
benefit
- Expand the load capacity of the database horizontally. After the backup database and the main database server fail, they can switch to the slave database to continue working;
- Fault tolerance, high availability, slave database can be used for backup, data statistics and other work, so as not to affect the performance of the main database;
- Data distribution;
- Data backup;
Realization principle
On the master machine, master-slave synchronization events are written to a special log file (binary log);
There are three types of master-slave synchronization events: statement, row, and mixed.
 Statement: writes the sql statement of the database operation to the binlog.
 row: write the changes of each piece of data to binlog.
 mixed: a mix of statement and row. Mysql determines when to write the statement format and when to write the binlog in row format.
As a whole, there are three steps for replication:
- The master records the changes to the binary log (these records are called binary log events);
- slave copies the binary log events of the master to its relay log;
- slave redoes the events in the relay log, changing the data that reflects itself.
The following figure can explain its principle in detail:
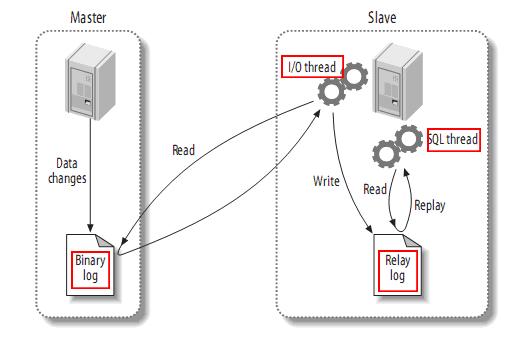
To put it simply:
When the Master database is added, deleted, modified or created, Slave will quickly accept these data and object operations, so as to realize Master-Slave data replication and ensure data consistency.
actual combat
I remember when I was learning PHP development, the teacher often said that: Study for half an hour, practice for one minute;
Well, then it's time for us to fight. Listen carefully!!!
Environment introduction
System environment: basically, the system is almost the same. Generally, there are many Linux platforms and Windows platforms. No matter what kind of system environment, it has little impact on the actual operation. I use the CentOS operating system created by Docker. Of course, you can choose Ubuntu, RedHat and Windows systems, which will not affect the large operation;
The system version I use here:
[root@master /]# cat /etc/redhat-release
CentOS Linux release 8.0.1905 (Core)
Two servers will be used here: one is MasterIP172.18.0.2, and the other is slaveIP172.18.0.3.
Database version: (Mariadb I use here, you can use mysql database)
[root@master /]# mysql --version
mysql  Ver 15.1 Distrib 10.3.11-MariaDB, for Linux (x86_64) using readline 5.1
Configure Master database
1. Change Master profile
Locate the following file:
mysql Database:/etc/mysql/mysql,conf.d/mysqld.cnf
mariadb Database:/etc/my.cnf.d/mariadb.cnf
Note: I use yum for installation here, so the default configuration file is under / etc. it is recommended to back up the configuration file before modifying the above two files
Modify the following configuration:
Bind address = 172.18.0.2 \ \ specify Master address
 Server id = 1 \ \ specify a unique serverid some versions do not need to be written manually
 Log bin = / var / log / MariaDB / mariadb-bin.log \ \ some versions of binlog do not need to be written manually
Note: the log bin field needs to be determined according to the actual situation. You need to find the log file of the database. The default value is / var/log
2. Restart the database
[root@master my.cnf.d]# systemctl restart mariadb \ \ centos7, centos8, ubuntu restart mode
[root@master my.cnf.d]# Server MariaDB restart \ \ centos6 and below use this restart mode
mysql restart:
[root@master my.cnf.d]# systemctl restart mysqld \ \ centos7, centos8, ubuntu restart mode
[root@master my.cnf.d]# Server mysqld restart \ \ centos6 and below use this restart mode
3. Initialize the database
[root@master my.cnf.d]# mysql_secure_installation

NOTE: RUNNING ALL PARTS OF THIS SCRIPT IS RECOMMENDED FOR ALL MariaDB
      SERVERS IN PRODUCTION USE!  PLEASE READ EACH STEP CAREFULLY!

In order to log into MariaDB to secure it, we'll need the current
password for the root user.  If you've just installed MariaDB, and
you haven't set the root password yet, the password will be blank,
so you should just press enter here.

Enter current password for root (enter for none): 					//Knock back here
OK, successfully used password, moving on...

Setting the root password ensures that nobody can log into the MariaDB
root user without the proper authorisation.

Set root password? [Y/n] y						//This is to set the root password, which is not required
New password: 					//New password
Re-enter new password: 			//Old password
Password updated successfully!
Reloading privilege tables..
 ... Success!


By default, a MariaDB installation has an anonymous user, allowing anyone
to log into MariaDB without having to have a user account created for
them.  This is intended only for testing, and to make the installation
go a bit smoother.  You should remove them before moving into a
production environment.

Remove anonymous users? [Y/n] y
 ... Success!

Normally, root should only be allowed to connect from 'localhost'.  This
ensures that someone cannot guess at the root password from the network.

Disallow root login remotely? [Y/n] y
 ... Success!

By default, MariaDB comes with a database named 'test' that anyone can
access.  This is also intended only for testing, and should be removed
before moving into a production environment.

Remove test database and access to it? [Y/n] y
 - Dropping test database...
 ... Success!
 - Removing privileges on test database...
 ... Success!

Reloading the privilege tables will ensure that all changes made so far
will take effect immediately.

Reload privilege tables now? [Y/n] y
 ... Success!

Cleaning up...

All done!  If you've completed all of the above steps, your MariaDB
installation should now be secure.

Thanks for using MariaDB!
[root@master my.cnf.d]#
4. Create the user of master-slave synchronization
 [root@master ~]# mysql -u root -p \ \ login database
Enter password: 			\\input root Password
Welcome to the MariaDB monitor.  Commands end with ; or \g.
Your MariaDB connection id is 18
Server version: 10.3.11-MariaDB-log MariaDB Server

Copyright (c) 2000, 2018, Oracle, MariaDB Corporation Ab and others.

Type 'help;' or '\h' for help. Type '\c' to clear the current input statement.

MariaDB [(none)]> GRANT REPLICATION SLAVE on *.* to 'slave'@'%' IDENTIFIED BY 'redhat';
\\Create users and set corresponding permissions
	\\here%It means that it is allowed to use this account for login from any place (except local), and it is recommended to specific to a host in the formal environment IP
Query OK, 0 rows affected (0.000 sec)			\\Express sql Statement executed successfully
5. Update Slave user permissions
 MariaDB [(none)]> flush privileges;		\\Use this every time you modify user permissions sql Statement to update
Query OK, 0 rows affected (0.000 sec)
6. Export all data in the database (this step depends on the permission of slave)
[root@master ~]# mysqldump -u root -p --all-databases --master-data > mariadb.bat.sql
	--all-databases		\\This parameter means to back up all databases
	--master-data		\\This parameter indicates that binary information is written to the output file, where it is written to the backup sql In file
Enter password:
7. Check the master replication log location
 MariaDB [(none)]> show master status;
+--------------------+----------+--------------+------------------+
| File               | Position | Binlog_Do_DB | Binlog_Ignore_DB |
+--------------------+----------+--------------+------------------+
| mariadb-bin.000002 |     1974 |              |                  |
+--------------------+----------+--------------+------------------+
1 row in set (0.000 sec)
Configure the Slave database
1. Change the Slave profile
File location is consistent with Master location
mysql Database:/etc/mysql/mysql,conf.d/mysqld.cnf
mariadb Database:/etc/my.cnf.d/mariadb.cnf
Note: I use yum for installation here, so the default configuration file is under / etc. it is recommended to back up the configuration file before modifying the above two files
Modify the following configuration:
Bind address = 172.18.0.3 \ \ specify Master address
 Server id = 2 \ \ specify a unique serverid some versions do not need to be written manually
 Log bin = / var / log / MariaDB / mariadb-bin.log \ \ some versions of binlog do not need to be written manually
Note: the log bin field needs to be determined according to the actual situation. You need to find the log file of the database. The default value is / var/log
2. Restart the database
[root@master my.cnf.d]# systemctl restart mariadb \ \ centos7, centos8, ubuntu restart mode
[root@master my.cnf.d]# Server MariaDB restart \ \ centos6 and below use this restart mode
Restart mysql:
[root@master my.cnf.d]# systemctl restart mysqld \ \ centos7, centos8, ubuntu restart mode
[root@master my.cnf.d]# Server mysqld restart \ \ centos6 and below use this restart mode
3. Initialize the database
[root@master my.cnf.d]# mysql_secure_installation

NOTE: RUNNING ALL PARTS OF THIS SCRIPT IS RECOMMENDED FOR ALL MariaDB
      SERVERS IN PRODUCTION USE!  PLEASE READ EACH STEP CAREFULLY!

In order to log into MariaDB to secure it, we'll need the current
password for the root user.  If you've just installed MariaDB, and
you haven't set the root password yet, the password will be blank,
so you should just press enter here.

Enter current password for root (enter for none): 					//Knock back here
OK, successfully used password, moving on...

Setting the root password ensures that nobody can log into the MariaDB
root user without the proper authorisation.

Set root password? [Y/n] y						//This is to set the root password, which is not required
New password: 					//New password
Re-enter new password: 			//Old password
Password updated successfully!
Reloading privilege tables..
 ... Success!


By default, a MariaDB installation has an anonymous user, allowing anyone
to log into MariaDB without having to have a user account created for
them.  This is intended only for testing, and to make the installation
go a bit smoother.  You should remove them before moving into a
production environment.

Remove anonymous users? [Y/n] y
 ... Success!

Normally, root should only be allowed to connect from 'localhost'.  This
ensures that someone cannot guess at the root password from the network.

Disallow root login remotely? [Y/n] y
 ... Success!

By default, MariaDB comes with a database named 'test' that anyone can
access.  This is also intended only for testing, and should be removed
before moving into a production environment.

Remove test database and access to it? [Y/n] y
 - Dropping test database...
 ... Success!
 - Removing privileges on test database...
 ... Success!

Reloading the privilege tables will ensure that all changes made so far
will take effect immediately.

Reload privilege tables now? [Y/n] y
 ... Success!

Cleaning up...

All done!  If you've completed all of the above steps, your MariaDB
installation should now be secure.

Thanks for using MariaDB!
[root@master my.cnf.d]#
4. Copy the database backup from the Master to the slave server
[root@slave my.cnf.d]# scp jia@172.18.0.2:/opt/mariadb.bat.sql /opt/
jia@172.18.0.2's password:
mariadb.bat.sql
5. Restore the backup data to the slave database
[root@slave my.cnf.d]# mysql -u root -p < /opt/mariadb.bat.sql
 Enter password:
6. Connect slave to master
[root@slave my.cnf.d]# mysql -u root -p
Enter password:
ERROR 1045 (28000): Access denied for user 'root'@'localhost' (using password: YES)
[root@slave my.cnf.d]# mysql -u root -p
Enter password:
Welcome to the MariaDB monitor.  Commands end with ; or \g.
Your MariaDB connection id is 22
Server version: 10.3.11-MariaDB-log MariaDB Server

Copyright (c) 2000, 2018, Oracle, MariaDB Corporation Ab and others.

Type 'help;' or '\h' for help. Type '\c' to clear the current input statement.

MariaDB [(none)]> stop slave;
Query OK, 0 rows affected, 1 warning (0.000 sec)

MariaDB [(none)]> CHANGE MASTER TO
    -> MASTER_HOST = '172.18.0.2',		\\Appoint Master Database address
    -> MASTER_USER = 'slave',			\\Specify the primary and secondary replication user name
    -> MASTER_PASSWORD = 'redhat',			\\Specify the master-slave replication user password
    -> MASTER_LOG_FILE = 'mariadb-bin.000002',		\\Appoint Master Database binlog file name
    -> MASTER_LOG_POS=1974;
Query OK, 0 rows affected (0.290 sec)

MariaDB [(none)]> start slave;			\\Turn on copy function
Query OK, 0 rows affected (0.019 sec)

MariaDB [(none)]>
Note: the values of lmaster'log'file ='mariadb-bin.000002 and master'log'pos = 1974 are obtained from SHOW MASTER STATUS above.
Now it's possible to do master-slave replication. Let's test it
Verify that the database is synchronized
The test method is very simple. You only need to create a database on the master database or add a record to test whether the master-slave replication configuration is successful
MariaDB [(none)]> show  databases;
+--------------------+
| Database           |
+--------------------+
| information_schema |
| mysql              |
| performance_schema |
+--------------------+
3 rows in set (0.018 sec)

MariaDB [(none)]> create database a;			\\Create in master database a data base
Query OK, 1 row affected (0.063 sec)
MariaDB [(none)]> show databases;
+--------------------+
| Database           |
+--------------------+
| a                  |
| information_schema |
| mysql              |
| performance_schema |
+--------------------+
4 rows in set (0.000 sec)
Let's see if there is a database on the database
MariaDB [(none)]> show databases;
+--------------------+
| Database           |
+--------------------+
| a                  |
| information_schema |
| mysql              |
| performance_schema |
+--------------------+
4 rows in set (0.075 sec)
We will find that we have a database