MySQL highly available KeepAlived dual hosts
In the production environment, one MySQL host has a single point of failure, so we need to ensure the high availability of MySQL, that is, two MySQL servers. If one of the MySQL servers hangs up, the other can take over immediately.
MySQL's high availability schemes are generally as follows: keepalived + dual master, MHA, PXC, MMM, Heartbeat+DRBD, etc., and keepalived + dual master, MHA and PXC are more commonly used.
This paper mainly introduces how to use keepalived to realize high availability of MySQL database. To implement MySQL-HA, we must ensure that the data of the two MySQL databases are exactly the same.
Basic thinking
The two MySQL databases are the master-slave relationship. Virtual IP is configured by keeping alive. When one MySQL database goes down, the application can automatically switch to the other MySQL database to ensure the high availability of the system.
Environmental Science
Mysql Edition: mysql 5.7
Keepalived: keepalived-1.2.20
| Host | operating system | mysql-VIP | IP address |
|---|---|---|---|
| mysql-master01 | CentOS 7 | 192.168.10.100 | 192.168.1.1 |
| mysql-master02 | CentOS 7 | 192.168.10.100 | 192.168.1.8 |
1, Configure the primary and primary synchronization of two servers
The first part of the process is the master logging binary logs. Before each transaction updates the data, the master records these changes in the binary log. MySQL writes transactions to the binary log. After the event is written to the binary log, the master notifies the storage engine to commit the transaction. The next step is to copy the master's binary log to its own relay log. First, slave starts a worker thread, the I/O thread. The I/O thread opens a normal connection on the master, and then starts the binlog dump process. Binlog dump process reads events from the binary log of the master. If the master has been synchronized, it will sleep and wait for the master to generate new events. The I/O thread writes these events to the relay log. SQL slave thread (SQL slave thread) handles the last step of the process. The SQL thread reads the events from the relay log, replays them, and updates the data of the slave to make it consistent with the data in the master. As long as the thread is consistent with the I/O thread, the relay log is usually located in the OS cache, so the overhead of the relay log is very small. Master master synchronization refers to the relationship between two machines, and writes on any one machine will be synchronized. If the MySQL host has turned on the firewall, you need to turn off the firewall or create rules.
1. To modify MySQL configuration files, binlog logging function should be enabled for both mysql.
Opening method: on MySQL configuration file[MySQLd]Paragraph plus log-bin=MySQL-bin Options, two MySQL Of server-ID Can't be the same. By default, two MySQL Of serverID Both of them need to be changed from 1 to 2.

mysql-master01:
[root@mysql-master01 ~]# vim /etc/my.cnf
[mysqld]
basdir=/usr/local/mysql
datadir=/usr/local/mysql/data
pid-file=/usr/local/mysql/data/mysqld.pid
log-error=/usr/local/mysql/data/mysql.err
socket=/tmp/mysql.sock
log-bin=mysql-bin   //Binary log
server-id=1
relay-log=relay-bin         //Relay log, which stores all binlog events from the TP of the main database
relay-log-index=relay-bin.index
auto_increment_increment=2
auto_increment_offset=1
[root@mysql-master01 ~]# systemctl restart mysqld

mysql-master02:
[root@mysql-master02 ~]# vim /etc/my.cnf
[mysqld]
basdir=/usr/local/mysql
datadir=/usr/local/mysql/data
pid-file=/usr/local/mysql/data/mysqld.pid
log-error=/usr/local/mysql/data/mysql.err
socket=/tmp/mysql.sock
log-bin=mysql-bin
server-id=2
relay-log=relay-bin
relay-log-index=relay-bin.index
auto_increment_increment=2
auto_increment_offset=2
[root@mysql-master02 ~]# systemctl restart mysqld
PS: only server ID is different between master1 and master2, and auto increment offset is different
There are self growth fields in mysql. When performing the primary and primary synchronization of the database, you need to set two related configurations for self growth: Auto increment offset and auto increment increment.
Auto increment increment indicates the amount of each increment of the self growing field, and its default value is 1. Its value should be set to the total number of servers in the whole structure. In this case, two servers are used, so the value is set to 2.
Auto increment offset is used to set the starting point (i.e. initial value) of automatic growth in the database. Because the two servers have set an automatic growth value of 2, their starting points must be different, so as to avoid primary key conflict during data synchronization between the two servers. Primary key auto increase: to prevent data conflict due to network problems
2. Set mysql-master01 as the master server of mysql-master02 to create the authorization account on the mysql-master01 host, and allow the connection on the mysql-master02(192.168.1.8) host
[root@mysql-master01 ~]# mysql -uroot -p123.com
mysql> grant replication slave on *.* to rep@'192.168.1.%' identified by '123';
mysql> flush privileges;
View the current binlog status information of master1
mysql> show master status;

stay mysql-master02 General mysql-master01 Set as your own primary server and turn it on slave Function.
[root@mysql-master02 ~]# mysql -uroot -p123.com
mysql> change master to master_host='192.168.1.1',master_user='rep',master_password='123',master_log_file='mysql-bin.000001',master_log_pos=608;
Query OK, 0 rows affected, 2 warnings (0.01 sec)

mysql> start slave;
Query OK, 0 rows affected (0.00 sec)

//Firewall rules for MySQl:
    //Set rules:
        #iptables I INPUT –p tcp –dport 3306 –j ACCEPT
        #service iptables save
    //Or turn off the firewall
        #systemctl stop firewalld
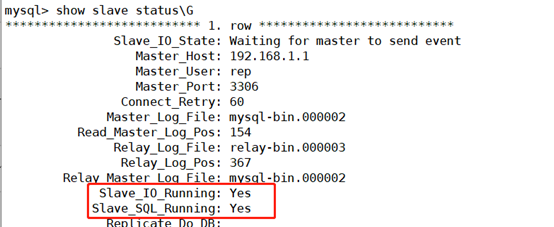
View the status of the slave. The following two values must be yes, which means that the slave server can connect to the master server normally
PS: if it is a clone, an error message with the same UUID will be reported, resulting in a slave ﹣ IO ﹣ running of NO. in this case, it will go directly to the / usr/local/mysql/data/auto.cnf file of any host, delete the UUID in it, and restart the mysql service.
mysql> show slave status\G
3. Set mysql-master02 as the master server of mysql-master01 to create the authorization account on the mysql-master02 host, and allow the connection on the mysql-master01(192.168.1.1) host
mysql-master02:
mysql>  grant replication slave on *.* to rep@'192.168.1.%' identified by '123';
Query OK, 0 rows affected, 1 warning (0.01 sec)

mysql> flush privileges;
Query OK, 0 rows affected (0.00 sec)
View the current binlog status information of mysql-master02
mysql> show master status;

In mysql-master01, set mysql-master02 as its own master server and enable the slave function.
mysql> change master to master_host='192.168.1.8',master_user='rep',master_password='123',master_log_file='mysql-bin.000001',master_log_pos=608;
Query OK, 0 rows affected, 2 warnings (0.01 sec)

mysql> start slave;
Query OK, 0 rows affected (0.00 sec)
The firewall is the same as above.
View the status of the slave. The following two values must be yes, which means that the slave server can connect to the master server normally
mysql> show slave status\G

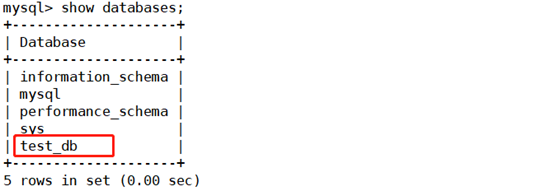
4. Test primary primary synchronization create the database to be synchronized on mysql-master01, such as test dB, and create a test table in test dB, such as tab1
mysql> create database test_db;
mysql> use test_db;
mysql> create table tab1(id int);
Check whether the mysql-master02 host synchronizes the data changes on mysql-master01
mysql> show databases;
mysql> use test_db;
mysql> show tables;

Insert data into the tab1 table on the mysql-master02 host to check whether mysql-master01 synchronizes the data
mysql> insert into tab1 values(1);
mysql> select * from tab1;
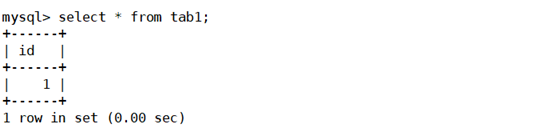
Use mysql-master01 to view:
mysql> select * from tab1;

Dual master synchronization complete
PS: if the primary MYSQL server already exists, the secondary MYSQL server will be built only later. Before setting up data synchronization, copy the database to be synchronized from the primary MYSQL server to the secondary MYSQL server (for example, backup the database on the primary MYSQL first, and then restore it from the MYSQL server)
2, Installation configuration of keepalived to achieve high availability
The next step is to complete the high availability of keepalived. Keepalived is a software solution to ensure the high availability of clusters in cluster management. Its function is similar to heartbeat, which is used to prevent single point of failure. Keepalived is based on VRRP protocol. The full name of VRRP is virtual route redundancy protocol, that is, virtual route redundancy protocol. Virtual routing redundancy protocol can be considered as a protocol to achieve high availability of routers, that is, N routers providing the same function form a router group, in which there is a master and multiple backups, and there is a vip on the master that provides external services, and the master will send multicast (the multicast address is 224.0.0.18). When the backup fails to receive VRRP packets, it is considered that the master is down, At this time, you need to select a backup as the master according to the priority of VRRP. In this way, the high availability of the router can be guaranteed. Keepalived has three modules: core, check and VRRP. The core module is the core of keepalived, which is responsible for the start-up and maintenance of the main process as well as the loading and parsing of the global configuration file. Check is responsible for health inspection, including various common inspection methods. VRRP module is to implement VRRP protocol.
1. Install the package keepalived on mysql-master01 and mysql-master02. Installation of keepalived package and service control before compiling and installing Keepalived, kernel-devel, openssl-devel, popt-devel and other support libraries must be installed.
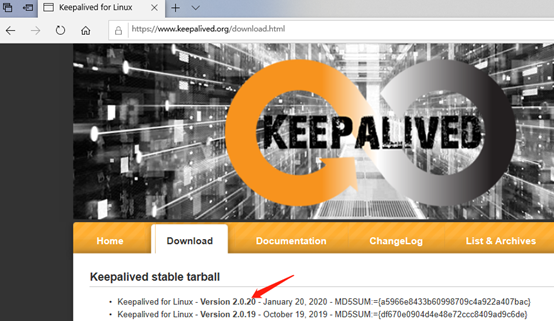
[root@mysql-master01 ~]# yum install kernel-devel openssl-devel popt-devel
[root@mysql-master02 ~]# yum install kernel-devel openssl-devel popt-devel
//Download the keepalived package:
https://www.keepalived.org/


Build and install:
[root@mysql-master01 ~]#  tar zxf keepalived-2.0.20.tar.gz
[root@mysql-master01 ~]#  cd keepalived-2.0.20/
[root@mysql-master01 keepalived-2.0.20]# ./configure --prefix=/ && make && make install
###The second one is omitted
PS: if you don't know which dependent packages are needed by keepalived, you can go to the download source decompression directory to view the contents of the INSTALL file. After the makeinstall operation, the / etc/init.d/keepalived script file will be generated automatically. However, it needs to be added manually as a system service, so you can use the service and chkconfig tools to manage the keepalived service program.
In the light of keepalived Firewall rules for:
        //Add rule:
            # firewall-cmd --direct --permanent --add-rule ipv4 filter OUTPUT 0 --in-interfaceenp0s3 --destination 224.0.0.18 --protocol vrrp -j ACCEPT
            # firewall-cmd --direct --permanent --add-rule ipv4 filter INPUT 0 --in-interfaceenp0s3 --destination 224.0.0.18 --protocol vrrp -j ACCEPT
            # firewall-cmd --reload
        //Turn off firewall:
            # systemctl stop firewalld
2. Modifying the keepalived configuration file keepalived has only one configuration file keepalived.conf, which mainly includes the following configuration areas, namely global_defs, vrrp_instance and virtual_server
global_defs: it is mainly used to configure the notification object and machine identification when the fault occurs.
vrrp_instance: it is used to define the VIP area and its related attributes for external services.
Virtual server: definition of virtual server
Modify the keepalived.conf file on the mysql-master01 host:
[root@mysql-master01 ~]# vim /etc/keepalived/keepalived.conf

! Configuration File for keepalived     //Notes

global_defs {
   router_id mysql-master01     //An identity of the keepalived server
}

vrrp_instance VI_1 {
    state BACKUP        //Specify the role of keepalived. Both configurations here are BACKUP. If it is set to BACKUP, the master or slave will be determined according to the priority
    interface ens33     //Specify the interface of HA monitoring network
virtual_router_id 51    //The virtual routing ID is a number (the value is between 0-255, which is used to distinguish VRRP multicast of multiple instances). The same VRRP instance uses a unique ID to ensure that it is the same as master2. This item must be different for different clusters in the same network, or there will be a conflict.
priority 100    //The value range of this item is 1-255 (it will be recognized as the default value of 100 outside the range) to be the master for selecting the master. Here, it is set to 50 on the master 2
nopreempt   //Do not preempt, that is, allow a node with a lower priority to be the master, even if there is a node with a higher priority to start
advert_int 1    //The time interval between sending VRRP packages, i.e. how often to conduct master election (it can be considered as the time interval of health inspection)
    authentication {    //Authentication area, authentication types are PASS and HA (IPSEC), PASS is recommended (only the first 8 digits are recognized by password)
        auth_type PASS
        auth_pass 1111
    }
    virtual_ipaddress {     //VIP area, specify VIP address
        192.168.1.100
    }
}

virtual_server 192.168.1.100 3306 { //To set up a virtual server, you need to specify the virtual IP address and service port, which are separated by spaces
    delay_loop 6    //Set the operation check time in seconds
    lb_algo rr      //Set the backend scheduling algorithm, which is set as rr, that is, polling algorithm
    lb_kind DR      //Set LVS to realize load balancing mechanism, including NAT, TUN and DR modes
    persistence_timeout 50  //Session hold time, in seconds. This option is very useful for dynamic web pages and provides a good solution for session sharing in cluster system. With this session persistence function, the user's request will be distributed to a service node until the session's retention time is exceeded.
    protocol TCP    //Specifies the type of forwarding protocol, including TCP and UDP
    real_server 192.168.1.1 3306 {  //To configure service node 1, you need to specify the real IP address and port of the real server, which are separated by spaces
    notify_down /etc/keepalived/bin/mysql.sh
        weight 1    //Configure the weight of the service node, which is represented by numbers. The larger the number is, the higher the weight is. Set the weight size to distinguish servers with different performance
    notify_down /etc/keepalived/bin/mysql.sh    //Script executed after mysql service down of realserver is detected
        TCP_CHECK {
            connect_port 3306   //Health check port
            connect_timeout 3   //Connection timeout
            retry 3 //Reconnection times
            delay_before_retry 3    //Reconnection interval
        }
    }
}
The specific configuration of keepalived.conf on mysql-master01 is as follows:
! Configuration File for keepalived

global_defs {
   router_id mysql-master01
}

vrrp_instance VI_1 {
    state BACKUP
    interface ens33
    virtual_router_id 51
    priority 100
    nopreempt
    advert_int 1
    authentication {
        auth_type PASS
        auth_pass 1111
    }
    virtual_ipaddress {
        192.168.1.100
    }
}

virtual_server 192.168.1.100 3306 {
    delay_loop 6
    lb_algo rr
    lb_kind DR
    persistence_timeout 50
    protocol TCP
    real_server 192.168.1.1 3306 {
    notify_down /etc/keepalived/bin/mysql.sh
        weight 1
        TCP_CHECK {
            connect_port 3306
            connect_timeout 3
            retry 3
            delay_before_retry 3
        }
    }
}
Write the corresponding script in the script file and start the service
[root@mysql-master01 ~]# mkdir /etc/keepalived/bin/
[root@mysql-master01 ~]# vim /etc/keepalived/bin/mysql.sh
#!/bin/bash
pkill keepalived
[root@mysql-master01 ~]# chmod +x /etc/keepalived/bin/mysql.sh
//Add execution permission. Otherwise, if you do not have permission to execute the script, you cannot close keepalived
[root@mysql-master01 ~]# systemctl start keepalived.service
Modify the keepalived.conf file on mysql-master02 host:
[root@mysql-master01 ~]# scp /etc/keepalived/keepalived.conf 192.168.1.8:/etc/keepalived/
[root@mysql-master02 ~]# vim /etc/keepalived/keepalived.conf
! Configuration File for keepalived

global_defs {
   router_id mysql-master02
}

vrrp_instance VI_1 {
    state BACKUP
    interface ens33
    virtual_router_id 51
    priority 50
    nopreempt
    advert_int 1
    authentication {
        auth_type PASS
        auth_pass 1111
    }
    virtual_ipaddress {
        192.168.1.100
    }
}

virtual_server 192.168.1.100 3306 {
    delay_loop 6
    lb_algo rr
    lb_kind DR
    persistence_timeout 50
    protocol TCP
    real_server 192.168.1.8 3306 {
    notify_down /etc/keepalived/bin/mysql.sh
        weight 1
        TCP_CHECK {
            connect_port 3306
            connect_timeout 3
            retry 3
            delay_before_retry 3
        }
    }
}
Script and start the service
[root@mysql-master02 ~]# mkdir /etc/keepalived/bin/
[root@mysql-master02 ~]# vim /etc/keepalived/bin/mysql.sh
#!/bin/bash
pkill keepalived
[root@mysql-master02 ~]# chmod +x /etc/keepalived/bin/mysql.sh
[root@mysql-master02 ~]# systemctl start keepalived.service
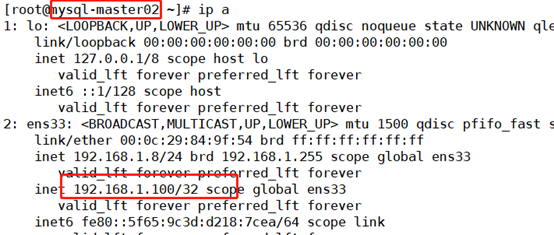
3. Test the control right of mysql-master01 and mysql-master02 to VIP (cluster virtual IP) by executing commands respectively in mysql-master01 and mysql-master02.
mysql-master01:
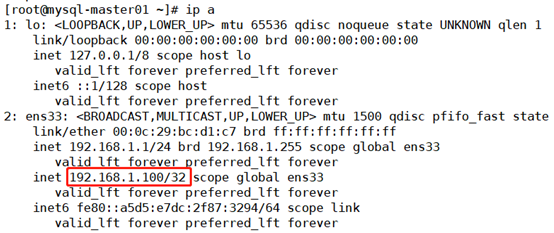
[root@mysql-master01 ~]# ip a
mysql-master02:
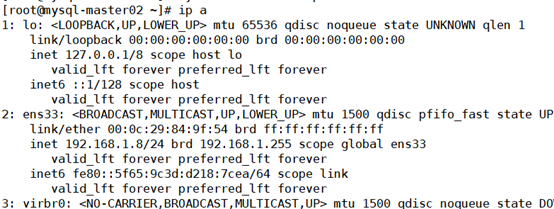
[root@mysql-master02 ~]# ip a
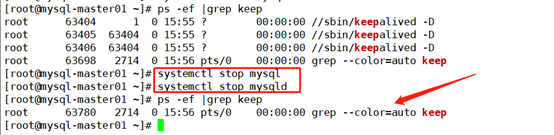
Simulate the downtime of mysql-master01, check whether the keepalived service will be automatically shut down, and shift the address to mysql-master02
[root@mysql-master01 ~]# ps -ef |grep keep
mysql-master02:
[root@mysql-master02 ~]# ip a
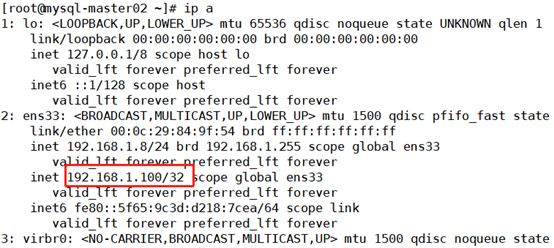
Because the configuration files of both keepalived computers are closed and preemptive, even if mysql-master01 service is started again, the drift address is still on mysql-master02.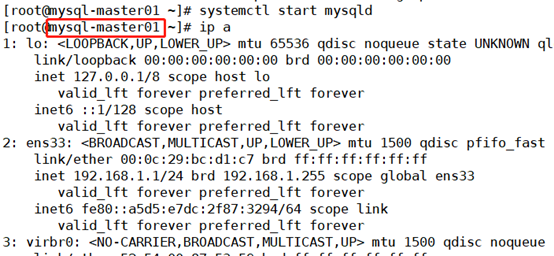
Conclusion:
Generally speaking, in small and medium-sized scale, it is the most convenient to adopt this architecture. After the failure of the master node, the high availability mechanism of keepalived is used to quickly switch to the standby node.
In this scheme, attention should be paid to:
1. When keepalived is adopted as the high availability scheme, it is better to set the two nodes to BACKUP mode to avoid being caused by the fact that the two nodes write the same data to the two nodes due to mutual preemption under unexpected circumstances (for example, brain crack (monitor the status of the other party through the heartbeat mechanism, if the heartbeat fails, each computer thinks that the other party has failed, so as to give priority to itself, resulting in data inconsistency)) Conflict;
2. Set the auto increment and auto increment offset of the two nodes to different values. Its purpose is to avoid that when the master node goes down unexpectedly, some binlog s may not be copied to the slave in time for application, which will lead to the conflict between the self increment of newly written data of the slave and the original master, so it will be staggered at the beginning; however, if there is a proper fault-tolerant mechanism to solve the conflict of the self increment ID of the master and slave, it can also not do so;
3. The server configuration of the slave node should not be too poor, otherwise it is more likely to cause replication delay. As the slave server of the hot standby node, the hardware configuration cannot be lower than that of the master node;
4. If you are very sensitive to latency, you can consider using the MariaDB branch version, or go online directly to MySQL 5.7 latest version, which can greatly reduce the replication latency by using multi-threaded replication;