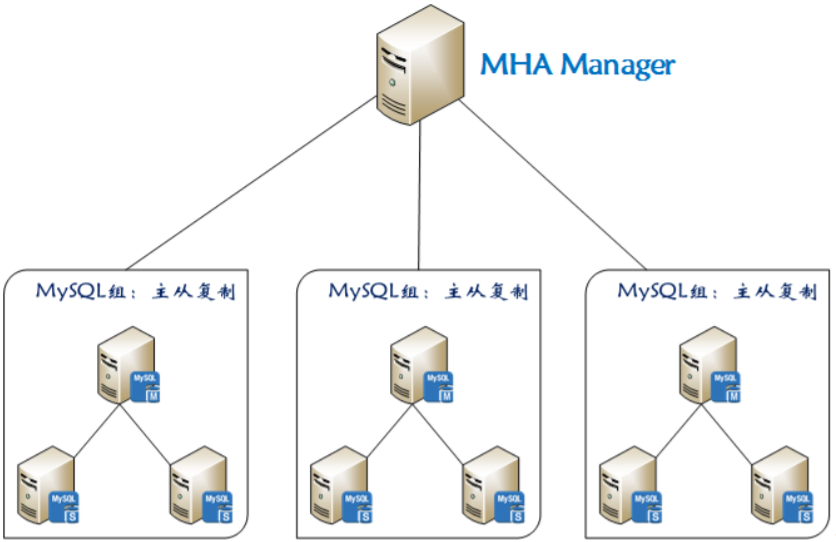
At present, MHA (Master High Availability) is a relatively mature solution in the aspect of MySQL high availability. In the process of MySQL failover, MHA can automatically complete the database failover operation within 0-30 seconds, and in the process of failover, MHA can guarantee the consistency of data to the greatest extent, so as to achieve the real sense of high availability. There are two roles in MHA, one is MHA Node and the other is MHA Manager. MHA Manager can be deployed on a single machine to manage multiple master slave clusters, or on a slave node. The MHA Node runs on each MySQL server, and the MHA Manager will regularly detect the master node in the cluster. When the master fails, it can automatically promote the slave of the latest data to the new master, and then point all other slave to the new master again. The entire failover process is completely transparent to the application.
The schematic diagram of MHA working structure is as follows:
In the MHA architecture, semi synchronous replication can be used to ensure the maximum consistency of data. In the master-slave replication of MySQL, asynchronous is used as the master-slave replication by default, but there are some disadvantages of asynchronous. Here is a brief introduction to asynchronous and semi synchronous:
- Asynchronous and semi synchronous: by default, MySQL replication is asynchronous. After all the update operations on the master are written to Binlog, they do not ensure that all the updates are copied to the Slave. Although asynchronous operation is efficient, there is a high risk of data asynchrony or even data loss when Master/Slave fails. MySQL 5.5 introduces the semi synchronous replication function to ensure that the data of at least one Slave is complete when the master fails. In case of timeout, it can also be temporarily transferred to asynchronous replication to ensure the normal use of business. After a salve catches up, it can continue to switch to semi synchronous mode.
Compared with other HA software, MHA aims to maintain the high availability of the master database in MySQL replication. Its biggest feature is that it can repair the difference logs between multiple Slavs, and finally make all Slavs keep the data consistent. Then choose one of them to act as the new master, and point other Slavs to it.
The general process is as follows:
1. Save binary log events from the down master;
2. Identify the slave with the latest update;
3. Apply different relay log s to other slave s;
4. Apply binary log events saved from the master;
5. Upgrade a slave to a new master;
6. Connect other slave to the new master for replication.
At present, MHA mainly supports the architecture of one master and many slaves. To build an MHA, there are at least three database nodes in a MySQL Cluster, one master and two slaves, that is, one serves as the master, one serves as the standby master, and the other serves as the slave.
The main characteristics of MHA are as follows:
1. MHA switching does not depend on the instance using the storage engine and BINLOG format;
2. MHA does not increase the performance overhead of MySQL server, and no additional servers are needed except MHA management node;
3. The deployment of MHA data nodes on MySQL server will not affect the operation of the current instance;
4. MHA can realize automatic failover or manually trigger online switchover;
5. MHA can realize second level failover;
6. MHA can promote any slave to the master, or specify the master candidate node when switching;
7. MHA provides an extended interface that allows user-defined scripts to be executed at specific points in time during MHA switching.
MHA support and limitations:
1. Only BINLOG V4 is supported, MySQL 5.0 or higher is required.
2. The log bin parameter must be enabled for the candidate master node. If all slave nodes are enabled, no failover will occur.
3. Multiple master mode is not supported before MHA version 0.52
4. MHA does not support multi-level master-slave replication by default. Modify the configuration file and set the multi tier slave parameter
1, Environmental preparation
| OS | IP address | Host name & role | type |
|---|---|---|---|
| Centos 7.5 | 192.168.20.2 | master | master (write operation) |
| Centos 7.5 | 192.168.20.3 | slave1 | From (standby) mysql (read operation) |
| Centos 7.5 | 192.168.20.4 | slave2 | From mysql (read operation) |
| Centos 7.5 | 192.168.20.5 | manager | Management node |
In the above environment, the master provides external write services and the slave provides read operations. Once the Master goes down, one of the slave (I will specify the standby master here) will be promoted to a new master. The slave also points to the new master and manager as the management server.
1. Configure the hosts file, and the hosts can parse each other
The following operations can be performed on one of the nodes.
#Write host file
[root@master ~]# cat >> /etc/hosts << EOF
> 192.168.20.2    master
> 192.168.20.3    slave1
> 192.168.20.4    slave2
> 192.168.20.5    manager
> EOF
> #Distribute the written hosts file to other nodes
[root@master ~]# for i in master slave1 slave2 manager;do scp /etc/hosts $i:/etc/;done
2. Configure ssh password free login
Note: all hosts in the cluster need to ensure that they can log in to each other without password.
Execute the following two commands on all nodes once to complete the password free login between hosts
# Create key pair
[root@master ~]# ssh-keygen -t rsa
#Distribute public key to other nodes
[root@master ~]# for i in master slave1 slave2 manager;do ssh-copy-id $i;done
When all nodes execute the above two commands, you can use the following commands to verify whether the password free login is successful:
#If you execute the following commands on each host, you can obtain the host names of all hosts without entering a password, indicating that the password free login configuration is correct
[root@master ~]# for i in master slave1 slave2 manager;do ssh $i hostname;done
master
slave1
slave2
manager
3. Dependencies required to configure epel and install MHA
Note: the following commands need to be executed on all nodes.
#Configure Alibaba's epel source (to speed up the installation). If it is not a domestic environment, execute Yum - y install epel release to configure it
[root@master ~]# wget -O /etc/yum.repos.d/epel.repo http://mirrors.aliyun.com/repo/epel-7.repo
[root@master ~]# yum makecache           #Build metadata cache
# Installation dependency
[root@master ~]# yum -y install perl-DBD-MySQL perl-Config-Tiny perl-Log-Dispatch perl-ParallelForkManager perl-Config-IniFiles ncftp perl-Params-Validate perl-CPAN perl-TestMock-LWP.noarch perl-LWP-Authen-Negotiate.noarch perl-devel perl-ExtUtils-CBuilder perl-ExtUtils-MakeMaker
2, Master-slave replication based on semi synchronization
Note: all next operations, if not specified, need to be performed on all database servers.
1. Find plug-ins for semi synchronization
mysql> show variables like '%plugin_dir%';    #Find the directory where the plug-in is located (each DB server may be different)
+---------------+------------------------------+
| Variable_name | Value                        |
+---------------+------------------------------+
| plugin_dir    | /usr/local/mysql/lib/plugin/ |
+---------------+------------------------------+
1 row in set (0.01 sec)
mysql> show variables like '%have_dynamic%';       #Check whether dynamic detection is supported
+----------------------+-------+
| Variable_name        | Value |
+----------------------+-------+
| have_dynamic_loading | YES   |
+----------------------+-------+
1 row in set (0.01 sec)

[root@master ~]# ls /usr/local/mysql/lib/plugin/ | egrep 'master|slave'
#Make sure that the plug-in directory has the following two files (after the database is installed by default)
semisync_master.so
semisync_slave.so
2. Install plug-ins
# Semisync? Master.so and semisync? Slave.so are the plug-in names queried above
mysql> install plugin rpl_semi_sync_master SONAME 'semisync_master.so';
mysql> install plugin rpl_semi_sync_slave SONAME 'semisync_slave.so';
3. Check that the Plugin is installed correctly:
mysql> show plugins;
# perhaps
mysql> select * from information_schema.plugins;
After show plugins is executed, the following results are returned, indicating that there is no problem:

4. View information about semi synchronization
mysql> show variables like '%rpl_semi_sync%';
+-------------------------------------------+------------+
| Variable_name                             | Value      |
+-------------------------------------------+------------+
| rpl_semi_sync_master_enabled              | OFF        |
| rpl_semi_sync_master_timeout              | 10000      |
| rpl_semi_sync_master_trace_level          | 32         |
| rpl_semi_sync_master_wait_for_slave_count | 1          |
| rpl_semi_sync_master_wait_no_slave        | ON         |
| rpl_semi_sync_master_wait_point           | AFTER_SYNC |
| rpl_semi_sync_slave_enabled               | OFF        |
| rpl_semi_sync_slave_trace_level           | 32         |
+-------------------------------------------+------------+
You can see that the semi synchronous plug-in is still in the off state, so you need to modify my.cnf configuration file as follows:
The complete configuration file of the master is as follows:
[root@master ~]# cat /etc/my.cnf
[mysqld]
basedir=/usr/local/mysql
datadir=/usr/local/mysql/data
port=3306
server_id=1
socket=/usr/local/mysql/mysql.sock
log-error=/usr/local/mysql/data/mysqld.err
log-bin=mysql-bin
binlog_format=mixed
rpl_semi_sync_master_enabled=1
rpl_semi_sync_master_timeout=1000
rpl_semi_sync_slave_enabled=1
relay_log_purge=0
relay-log = relay-bin
relay-log-index = slave-relay-bin.index
Note:
- RPL? Semi? Sync? Master? Enabled = 1:1 table is enabled, 0 means closed
- RPL ﹣ semi ﹣ sync ﹣ master ﹣ timeout = 1000: millisecond unit. After the master server waits for the confirmation message for 10 seconds, it no longer waits, and becomes asynchronous.
The complete configuration file of slave1 host is as follows:
[root@slave1 ~]# cat /etc/my.cnf
[mysqld]
basedir=/usr/local/mysql
datadir=/usr/local/mysql/data
port=3306
server_id=2
socket=/usr/local/mysql/mysql.sock
log-error=/usr/local/mysql/data/mysqld.err
log-bin=mysql-bin
binlog_format=mixed
rpl_semi_sync_master_enabled=1
rpl_semi_sync_master_timeout=1000
rpl_semi_sync_slave_enabled=1
relay_log_purge=0
relay-log = relay-bin
relay-log-index = slave-relay-bin.index
The complete configuration file of the slave 2 host is as follows:
[root@slave2 ~]# cat /etc/my.cnf
[mysqld]
basedir=/usr/local/mysql
datadir=/usr/local/mysql/data
port=3306
server_id=3
socket=/usr/local/mysql/mysql.sock
log-error=/usr/local/mysql/data/mysqld.err
log-bin = mysql-bin
relay-log = relay-bin
relay-log-index = slave-relay-bin.index
read_only = 1
rpl_semi_sync_slave_enabled=1
#Since slave2 is only used as a slave host, it is not necessary to turn on the master's semi synchronization
In the configuration of master-slave replication, since the parameter relay log purge = 0 is set on the master and the standby hosts (it means that the relay log is not automatically cleared), the slave node needs to delete the relay log regularly. It is recommended that the time for each slave node to delete the relay log is staggered.
corntab -e
0 5 * * * /usr/local/bin/purge_relay_logs - -user=root --password=pwd123 --port=3306 --disable_relay_log_purge >> /var/log/purge_relay.log 2>&1
After changing the configuration file, you need to execute the following command to restart MySQL.
[root@master ~]# systemctl restart mysqld
Check the semi synchronization status and confirm that it is turned on:
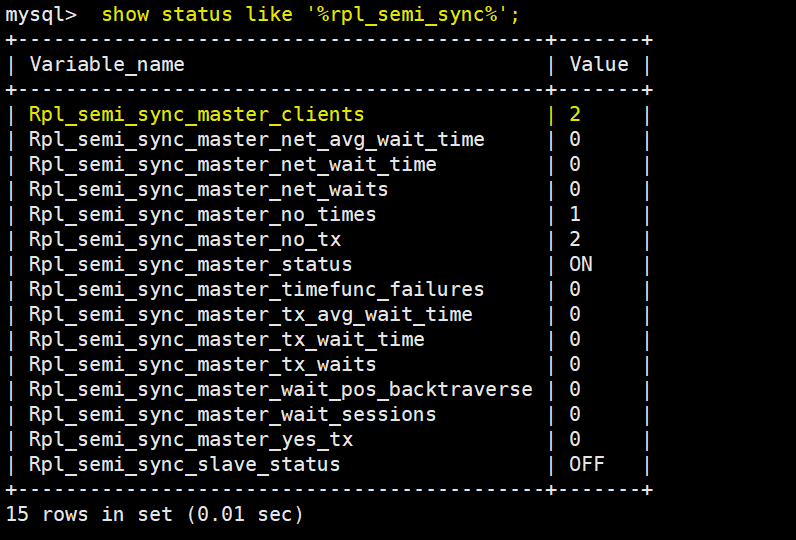
mysql> show variables like '%rpl_semi_sync%';       #Check whether the semi synchronization is on
+-------------------------------------------+------------+
| Variable_name                             | Value      |
+-------------------------------------------+------------+
| rpl_semi_sync_master_enabled              | ON         |    #This value should be ON
| rpl_semi_sync_master_timeout              | 1000       |
| rpl_semi_sync_master_trace_level          | 32         |
| rpl_semi_sync_master_wait_for_slave_count | 1          |
| rpl_semi_sync_master_wait_no_slave        | ON         |
| rpl_semi_sync_master_wait_point           | AFTER_SYNC |
| rpl_semi_sync_slave_enabled               | ON         |    #This value should also be ON.
| rpl_semi_sync_slave_trace_level           | 32         |
+-------------------------------------------+------------+
8 rows in set (0.00 sec)

mysql> show status like '%rpl_semi_sync%';
+--------------------------------------------+-------+
| Variable_name                              | Value |
+--------------------------------------------+-------+
| Rpl_semi_sync_master_clients               | 0     |
| Rpl_semi_sync_master_net_avg_wait_time     | 0     |
| Rpl_semi_sync_master_net_wait_time         | 0     |
| Rpl_semi_sync_master_net_waits             | 0     |
| Rpl_semi_sync_master_no_times              | 0     |
| Rpl_semi_sync_master_no_tx                 | 0     |
| Rpl_semi_sync_master_status                | ON    |
| Rpl_semi_sync_master_timefunc_failures     | 0     |
| Rpl_semi_sync_master_tx_avg_wait_time      | 0     |
| Rpl_semi_sync_master_tx_wait_time          | 0     |
| Rpl_semi_sync_master_tx_waits              | 0     |
| Rpl_semi_sync_master_wait_pos_backtraverse | 0     |
| Rpl_semi_sync_master_wait_sessions         | 0     |
| Rpl_semi_sync_master_yes_tx                | 0     |
| Rpl_semi_sync_slave_status                 | OFF   |
+--------------------------------------------+-------+
15 rows in set (0.00 sec)
#As for the information seen in the last command, there are several statuses that deserve attention, which will be written down below.
- RPL? Semi? Sync? Master? Status: displays whether the primary service is in asynchronous or semi synchronous replication mode, and ON is semi synchronous;
- RPL? Semi? Sync? Master? Clients: shows how many slave servers are configured for semi synchronous replication mode;
- RPL? Semi? Sync? Master? Yes? TX: displays the number of successful submissions confirmed from the server
- RPL? Semi? Sync? Master? No? TX: displays the number of unsuccessful submissions confirmed from the server
- RPL? Semi? Sync? Master? TX? AVG? Wait? Time: the average additional waiting time required for a transaction to open semi? Sync
- RPL? Semi? Sync? Master? Net? AVG? Wait? Time: the average waiting time to the network after a transaction enters the waiting queue
5. Create related users
1) The master operation is as follows:
# Create users for synchronization
mysql> grant replication slave on *.* to mharep@'192.168.20.%' identified by '123.com';
Query OK, 0 rows affected, 1 warning (1.00 sec)
# Users who create manager monitoring for user mha
mysql> grant all on *.* to manager@'192.168.20.%' identified by '123.com';
Query OK, 0 rows affected, 1 warning (0.00 sec)
# View master binary related information
mysql> show master status\G
*************************** 1. row ***************************
             File: mysql-bin.000001
         Position: 744
     Binlog_Do_DB:
 Binlog_Ignore_DB:
Executed_Gtid_Set:
1 row in set (0.00 sec)
2) The slave1 host operation is as follows:
# Create users for synchronization
mysql> grant replication slave on *.* to mharep@'192.168.20.%' identified by '123.com';
Query OK, 0 rows affected, 1 warning (1.00 sec)
# Users who create manager monitoring for user mha
mysql> grant all on *.* to manager@'192.168.20.%' identified by '123.com';
Query OK, 0 rows affected, 1 warning (0.00 sec)
3) The slave2 host operation is as follows:
Because slave2 does not need to be a standby master, it is not necessary to create an account for synchronizing data
#Create manager monitoring account
mysql> grant all on *.* to manager@'192.168.20.%' identified by '123.com';
Query OK, 0 rows affected, 1 warning (0.00 sec)
6. Configure master-slave replication
The following operations need to be performed on slave1 and slave2 hosts respectively to synchronize the data of the master host.
#Specify information about the master host
mysql> change master to
    -> master_host='192.168.20.2',
    -> master_port=3306,
    -> master_user='mharep',
    -> master_password='123.com',
    -> master_log_file = 'mysql-bin.000001',     #This is the binary log name viewed on the master host
    -> master_log_pos=744;     #As above, this is the position of the binary log
Query OK, 0 rows affected, 2 warnings (0.01 sec)

mysql> start slave;      #start slave
Query OK, 0 rows affected (0.00 sec)
Finally, check the status of the slave host:
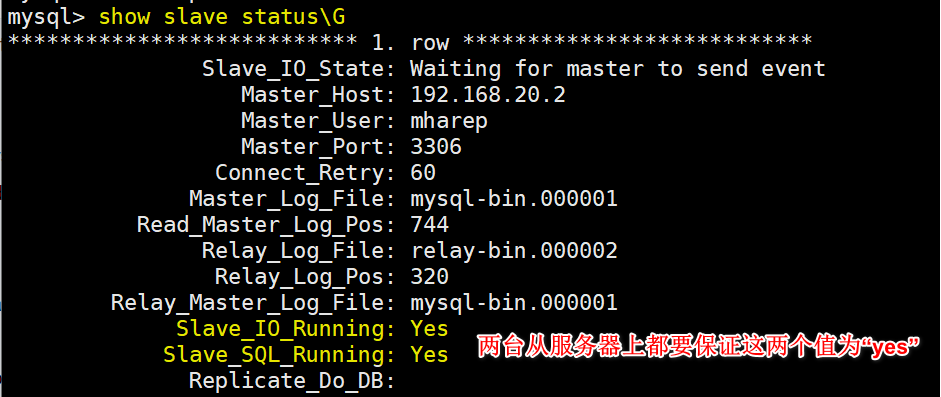
When viewing the semi synchronization related information on the master, you will find that the synchronized client has become 2, as follows:
7. Install MHA node
Note: MHA node is required to be installed on all nodes (including manager host node)
#Download package
[root@master src]# wget https://github.com/yoshinorim/mha4mysql-node/releases/download/v0.58/mha4mysql-node-0.58.tar.gz
#install
[root@master src]# tar zxf mha4mysql-node-0.58.tar.gz
[root@master src]# cd mha4mysql-node-0.58/
[root@master mha4mysql-node-0.58]# perl Makefile.PL
[root@master mha4mysql-node-0.58]# make && make install
Note: all the following operations, if not specifically noted, only need to be performed on the manager host node.
8. Install MHA Manager
#Download package
[root@manager src]# wget https://github.com/yoshinorim/mha4mysql-manager/releases/download/v0.58/mha4mysql-manager-0.58.tar.gz
#install
[root@manager src]# tar zxf mha4mysql-manager-0.58.tar.gz
[root@manager src]# cd mha4mysql-manager-0.58/
[root@manager mha4mysql-manager-0.58]# perl Makefile.PL
[root@manager mha4mysql-manager-0.58]# make && make install
9. Create corresponding directory and copy required files
[root@manager mha4mysql-manager-0.58]# mkdir /etc/masterha
[root@manager mha4mysql-manager-0.58]# mkdir -p /masterha/app1
[root@manager mha4mysql-manager-0.58]# mkdir /scripts
[root@manager mha4mysql-manager-0.58]# pwd
/usr/src/mha4mysql-manager-0.58     #Determine the current directory
[root@manager mha4mysql-manager-0.58]# cp samples/conf/* /etc/masterha/[root@manager mha4mysql-manager-0.58]# cp samples/scripts/* /scripts/
10. Modify the MHA manager configuration file
Note: there are two main configuration files for manager, one is general default and the other is separate. You need to clear the contents of the default general configuration file as follows:
#Clear default profile
[root@manager masterha]# > /etc/masterha/masterha_default.cnf
Then modify the individual profile:
[root@manager ~]# cat /etc/masterha/app1.cnf   #Amend to read:
[server default]
manager_workdir=/masterha/app1    #assign work directory
manager_log=/masterha/app1/manager.log     #Specify log file
user=manager           #Specifies the user name used by the manager to manage the database nodes
password=123.com       #Corresponding to the password of the above user
ssh_user=root        #Specify the system user configured with ssh password free login
repl_user=mharep    #Specify the user name used to synchronize data
repl_password=123.com    #Corresponding to the password of the above synchronization user
ping_interval=1        #Set the monitoring main database and the time interval for sending ping packets. The default is 3 seconds. Switch automatically when there is no response for three times

[server1]
hostname=192.168.20.2
port=3306
master_binlog_dir=/usr/local/mysql/data     #Specify the path for master to save binary logs so that MHA can find master's logs
candidate_master=1     #Set as candidate master. After setting this parameter, the master-slave switch will promote this library to the master library

[server2]
hostname=192.168.20.3
port=3306
master_binlog_dir=/usr/local/mysql/data
candidate_master=1      #Set as candidate master

[server3]
hostname=192.168.20.4
port=3306
master_binlog_dir=/usr/local/mysql/data
no_master=1      #Not set as alternative main library
The complete uncommented configuration file is as follows:
[root@manager ~]# cat /etc/masterha/app1.cnf
[server default]
manager_workdir=/var/log/masterha/app1
manager_log=/var/log/masterha/app1/manager.log
user=manager
password=123.com
ssh_user=root
repl_user=mharep
repl_password=123.com
ping_interval=1

[server1]
hostname=192.168.20.2
port=3306
master_binlog_dir=/usr/local/mysql/data
candidate_master=1

[server2]
hostname=192.168.20.3
port=3306
master_binlog_dir=/usr/local/mysql/data
candidate_master=1

[server3]
hostname=192.168.20.4
port=3306
master_binlog_dir=/usr/local/mysql/data
no_master=1
11. Test before startup
Verify SSH validity:
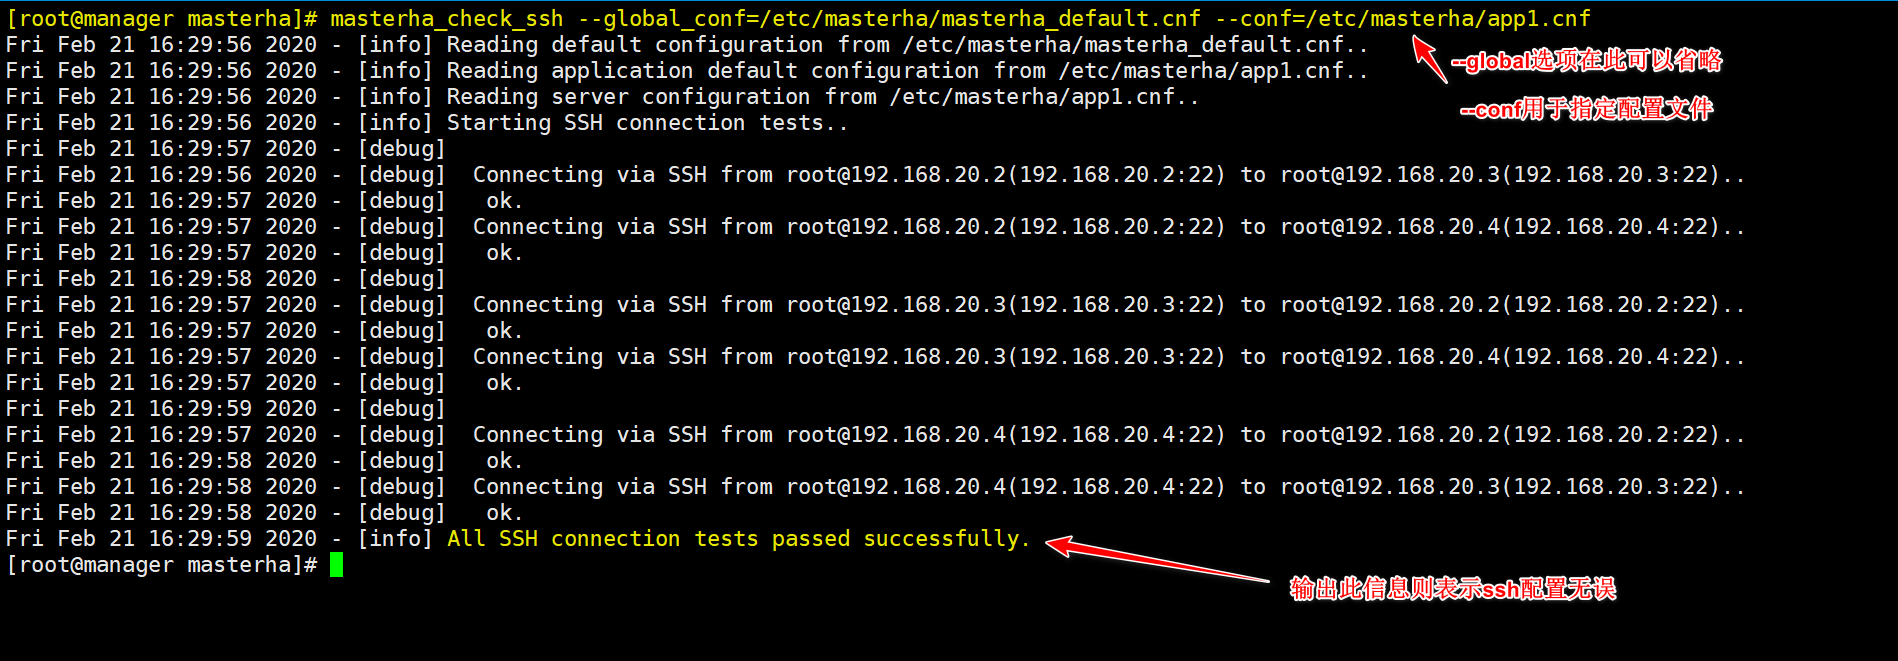
Verify the validity of cluster replication (MySQL must be started), as follows:
[root@manager masterha]# masterha_check_repl --global_conf=/etc/masterha/masterha_default.cnf --conf=/etc/masterha/app1.cnf
Execution of the above command may result in an error as follows:
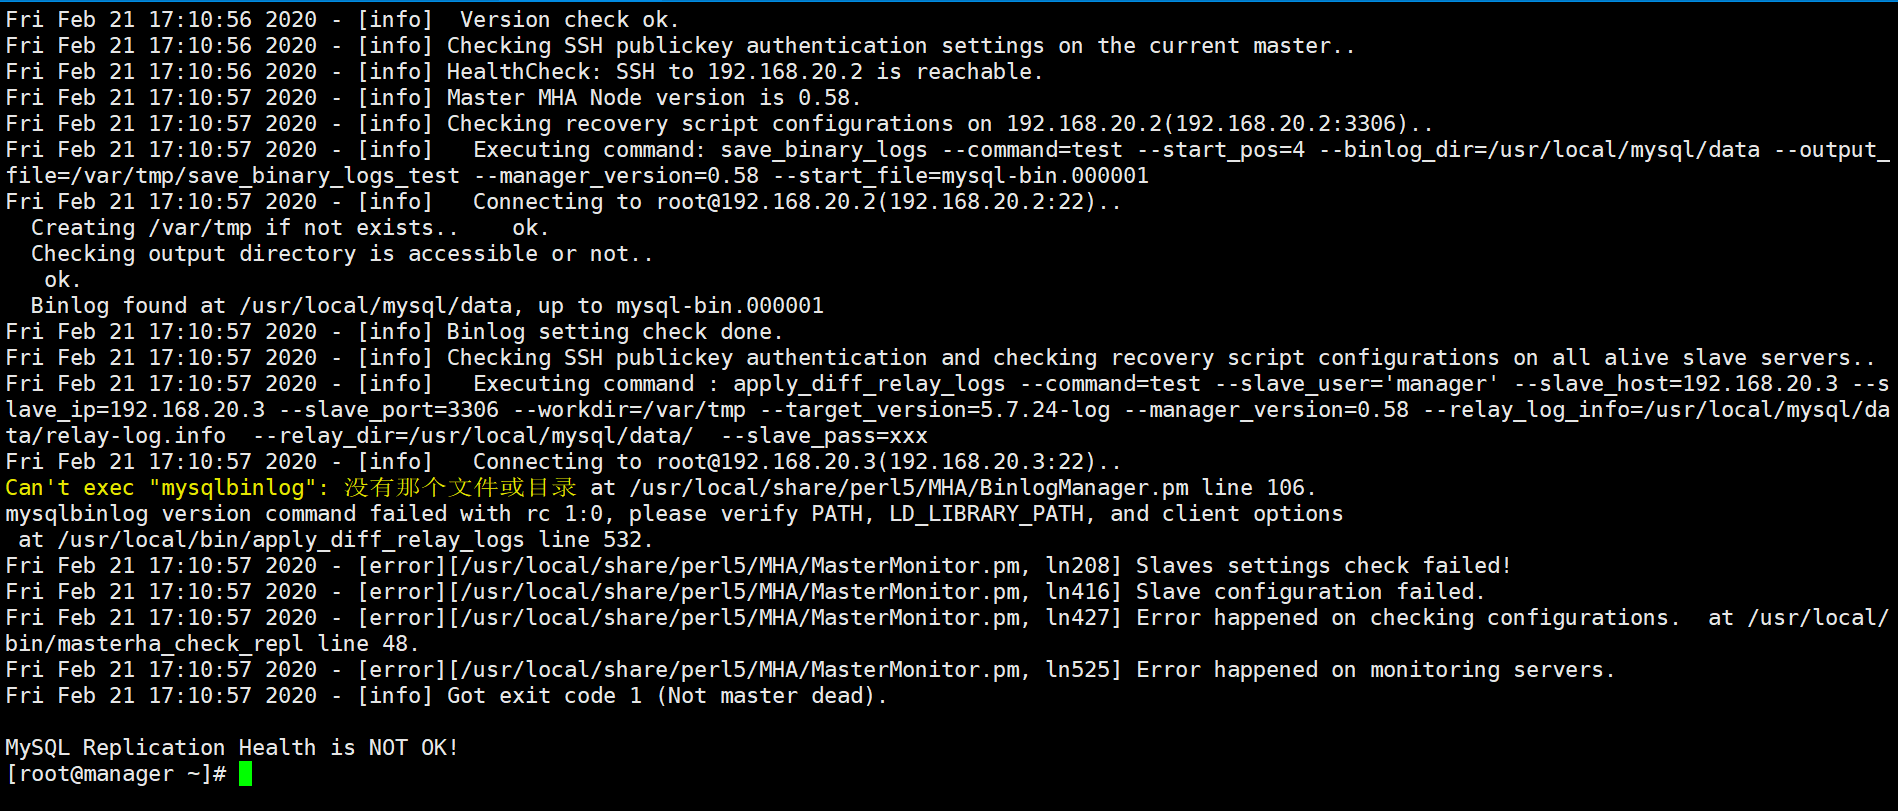
This is because the command mysqlbinlog is not found on the MySQL node. You only need to execute the following commands on all MySQL host nodes to create a soft connection, as follows:
#Note: the following commands are executed at all nodes
[root@master ~]# ln -s /usr/local/mysql/bin/* /usr/local/bin/
I hereby execute the order again and report an error as follows: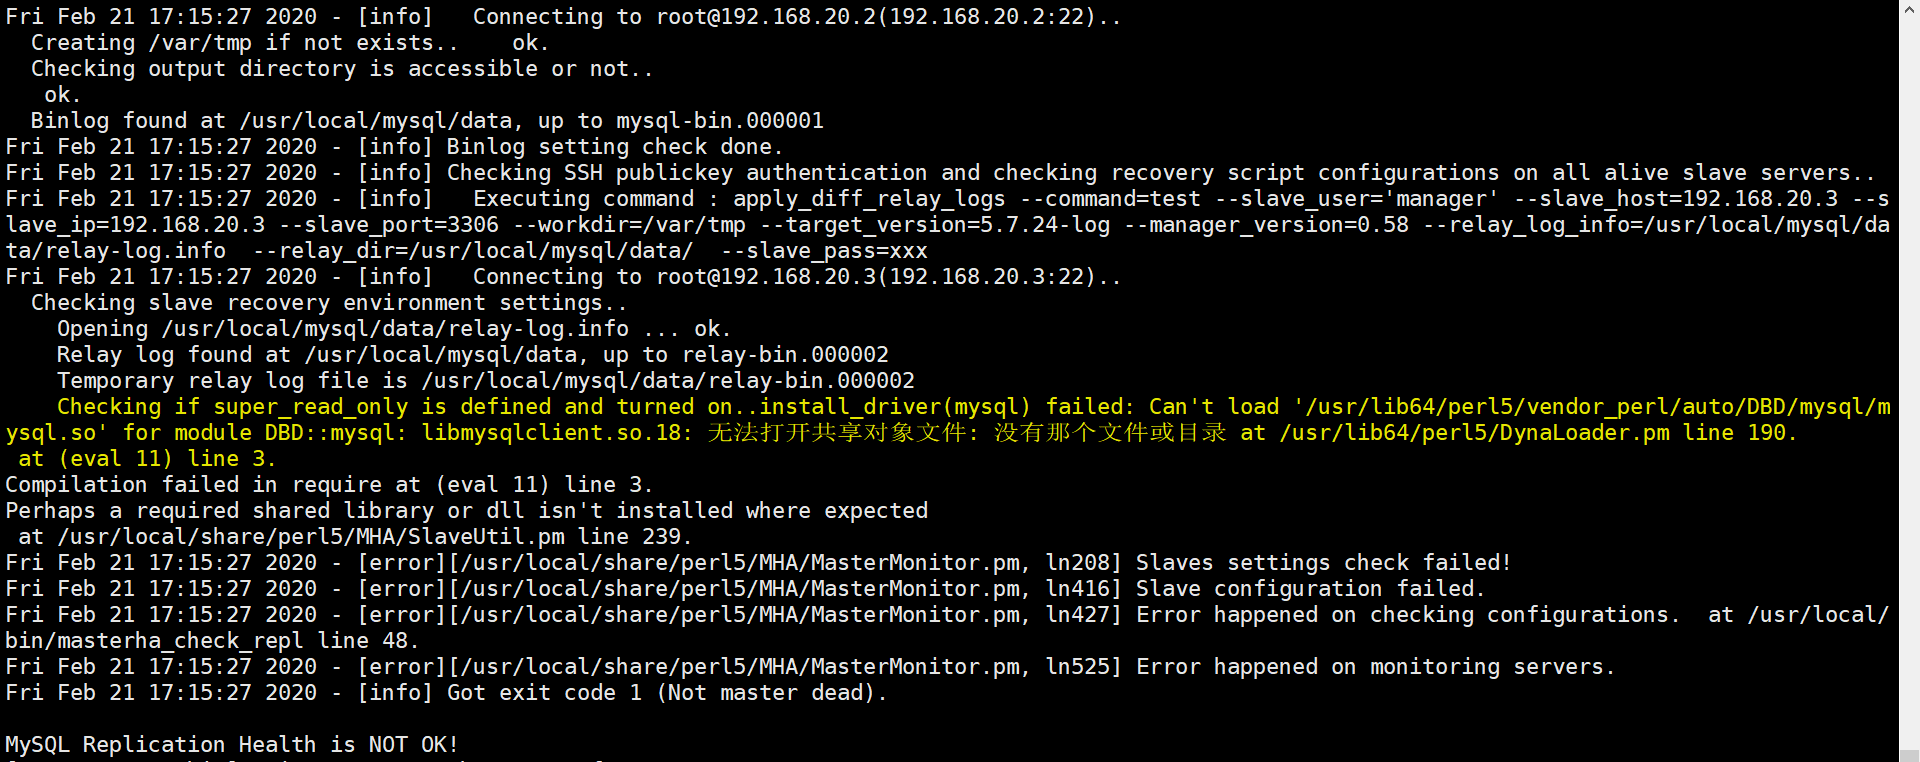
terms of settlement:
[root@master ~]# rpm -qa |grep -i dbd       #Find the following packages
perl-DBD-MySQL-4.023-6.el7.x86_64
perl-DBD-SQLite-1.39-3.el7.x86_64
#Uninstall the following packages
[root@master ~]# rpm -e --nodeps perl-DBD-MySQL-4.023-6.el7.x86_64
[root@master ~]# yum -y install perl-DBD-MySQL    #Error reporting can be resolved by installing again yum
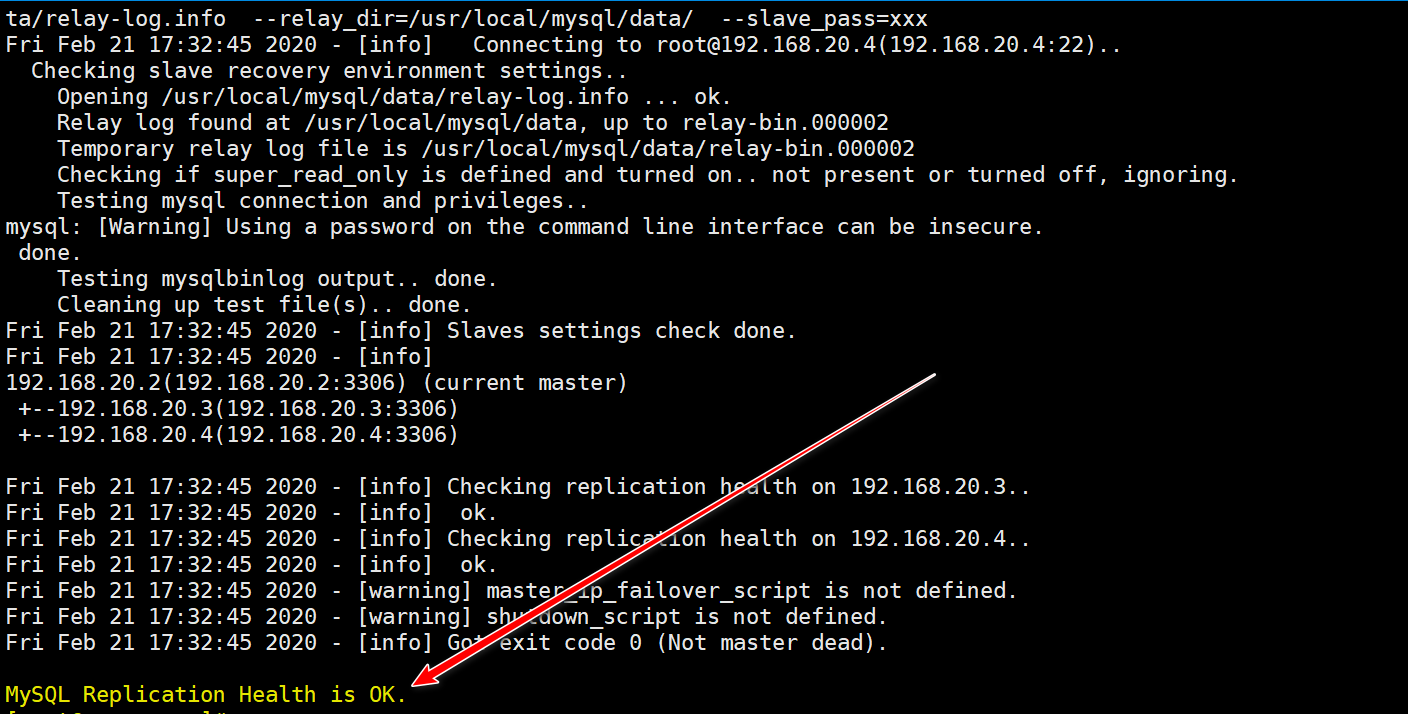
Finally, check that the command is executed successfully, as follows:
[root@manager ~]# masterha_check_repl --global_conf=/etc/masterha/masterha_default.cnf --conf=/etc/masterha/app1.cnf
Return the following information to indicate no error:
12. Start manager
[root@manager ~]# nohup masterha_manager --conf=/etc/masterha/app1.cnf &> /var/log/mha_manager.log &
Note: the above command can be executed multiple times, and different app.cnf configuration files can be specified to monitor multiple MySQL clusters. I have only one MySQL Cluster here, so I only need to execute the above command.
13. Verify failover
You can view which server is the current master in the current MySQL Cluster by yourself. Here, the master in the MySQL Cluster is as follows:
Now simulate the master failure, and then check which master is in the cluster, as follows:
# Stop MySQL service on the master
[root@master ~]# systemctl stop mysqld
# Check the current master on the slave 2 host again?
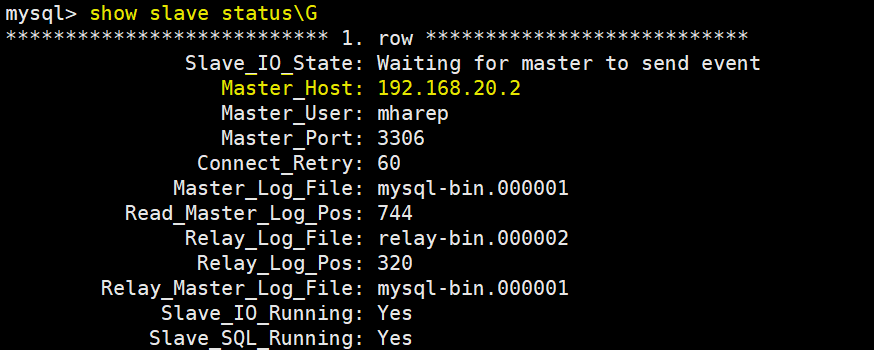
mysql> show slave status\G
*************************** 1. row ***************************
Slave_IO_State: Waiting for master to send event
Master_Host: 192.168.20.3 # You can see that the current master is slave 1, the standby master
Master_User: mharep
Master_Port: 3306
Connect_Retry: 60
Master_Log_File: mysql-bin.000001
Read_Master_Log_Pos: 744
Relay_Log_File: relay-bin.000002
Relay_Log_Pos: 3203, Daily maintenance of MHA Manager
1) Check if there are the following files, delete if there are
After the master-slave switch occurs to the MHA manager service, the MHA manager service will automatically stop and generate the app1.failover.complete file under the manager ﹣ workdir (/ masterha/app1 /). To start the MHA again, you must first ensure that there is no such file. If there is the app1.failover.complete or app1.failover.error file, an error will be reported as follows:

Just delete this file and point the master to the new master (that is, slave1) to start the manager service successfully, as follows:
# delete
[root@manager app1]# rm -rf /masterha/app1/app1.failover.complete
# View the information of the specified master in the log of the manager service, as follows:
[root@manager app1]# cat /masterha/app1/manager.log | grep MASTER
#If the service has been running for a long time, it must be the last message. The log has recorded the instructions to be executed for the new master
#But I need to write the password myself
Fri Feb 21 17:57:37 2020 - [info]  All other slaves should start replication from here. Statement should be: CHANGE MASTER TO MASTER_HOST='192.168.20.3', MASTER_PORT=3306, MASTER_LOG_FILE='mysql-bin.000001', MASTER_LOG_POS=744, MASTER_USER='mharep', MASTER_PASSWORD='xxx';
Fri Feb 21 17:57:38 2020 - [info]  Executed CHANGE MASTER.
# Execute the following command on the master to specify slave 2 as the master:
mysql> CHANGE MASTER TO MASTER_HOST='192.168.20.3', MASTER_PORT=3306, MASTER_LOG_FILE='mysql-bin.000001', MASTER_LOG_POS=744, MASTER_USER='mharep', MASTER_PASSWORD='123.com';
#Start the slave function
mysql> start slave;

#Start the manager service again
[root@manager app1]#  nohup masterha_manager --conf=/etc/masterha/app1.cnf &> /var/log/mha_manager.log &
[1] 16130
# If the status is "running" through jobs -l, it indicates that the manager is running again successfully
[root@manager app1]# jobs -l
[1]+ 16130 In operation               nohup masterha_manager --conf=/etc/masterha/app1.cnf &>/var/log/mha_manager.log &
2) Check MHA replication
[root@manager ~]# masterha_check_repl --conf=/etc/masterha/app1.cnf
3) Stop MHA
[root@manager ~]# masterha_stop --conf=/etc/masterha/app1.cnf
4) Start MHA
[root@manager ~]# nohup masterha_manager --conf=/etc/masterha/app1.cnf &>/tmp/mha_manager.log &
When a slave node is down, the manager service cannot be started. It is recommended to temporarily comment out the information of the down node in the configuration file, and then cancel the comment after the repair.
5) Check status
[root@manager ~]# masterha_check_status --conf=/etc/masterha/app1.cnf   #The status when manager is not started is as follows
app1 is stopped(2:NOT_RUNNING).
#Start the manager service and check as follows
[root@manager ~]# nohup masterha_manager --conf=/etc/masterha/app1.cnf &>/tmp/mha_manager.log &
[1] 19651
[root@manager ~]# masterha_check_status --conf=/etc/masterha/app1.cnf
app1 (pid:19651) is running(0:PING_OK), master:192.168.20.3