First: experimental environment
Operating System: CentOS release 6.5 (Final)
mysql dual master replication + keepalive achieves high availability:
master1:10.192.203.201
master2:10.192.203.202
vip 10.192.203.203
Virtual ip is currently on master 1. The program writes vip.
2. Experimental steps
2.1 Upgrade Master 2
2.1.1 Backup Mas2
show databases; see which libraries are available
mysqldump --single-transaction -u root -p-A > /download/bak/all.bak_20161125
Check backup files to make sure they are correct.
2.1.2 Record binlog location
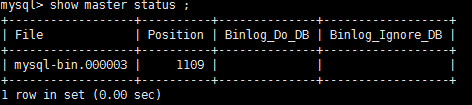
# Add a read lock to Master 1 to record the File and Postion that Master 1 writes at this moment:
flush tables with read lock; # lock master 1, not allowed to write
show master status ;
# Stop slave of master 2:
stop slave;
Show slave status G; record the binlog location of read and executed
# unlock tables on master 1;
The reason for the above steps is to upgrade master2, import the backup data and know where to start copying, so as to be consistent with master1.
2.1.3 Unload Master 2
Unload script contents such as:
-
mysqldir='/data/mysql'
-
basedir='/usr/local/mysql'
-
cnf=/etc/my.cnf
-
password='123456'
-
-
#1: Close the database.
-
mysqladmin -u root -p$password shutdown
-
killall -u mysql
-
-
#2: Delete users and groups
-
userdel mysql
-
groupdel mysql
-
-
#3: Delete directories
-
rm -rf $mysqldir
-
rm -rf $basedir
-
-
#4: Cancel boot-up automatic start-up.
-
rm -rf /etc/rc.d/init.d/mysql
-
chkconfig --del mysql
-
-
#5: Delete PATH
-
#root user
-
sed -i'/^PATH=/s/:\/usr\/local\/mysql\/bin//' /root/.bash_profile
-
source /root/.bash_profile
-
#mysql user
-
sed -i'/^PATH=/s/:\/usr\/local\/mysql\/bin//' /home/mysql/.bash_profile
-
source /home/mysql/.bash_profile
-
-
#6: Cancel Firewall Port
-
#Modify the file / etc/sysconfig/iptables
-
#Delete - A INPUT - m state - state NEW - m tcp - p tcp - dport 3306 - j ACCEPT
-
sed -i '/-A INPUT -m state --state NEW -mtcp -p tcp --dport 3306 -j ACCEPT/d' /etc/sysconfig/iptables
-
-
service iptables restart
2.1.4 Install version 5.6.33 mysql
2.1.4.1 Installation script content
-
#Remember to upload the mysql installation package to the $dir directory first.
-
#Configuration file my.cnf uploads master 2-sample-my.cnf and modifies the value of innodb_buffer_pool_size according to the actual situation. Remember to modify the value of log-bin,relay-log,relay-log-index,log-bin according to the actual installation directory.
-
#Note that if mysqldir is not / data/mysql and changes to other directories (such as / database/mysql), you need to modify the line sed - i'47s / dataDir = / dataDir = \ database\ MySQL / G'/ etc / rc. D / mysqld in the script.
-
-
#Define Catalogue
-
basedir='/usr/local/mysql'
-
-
mysqldir='/data/mysql'
-
-
datadir=$mysqldir
-
#binlogdir=$mysqldir/binlog
-
-
cnf=/etc/my.cnf
-
-
dir='/download/'
-
-
socket='/tmp/mysql.sock'
-
-
port='3306'
-
-
filename='mysql-5.6.33-linux-glibc2.5-x86_64'
-
-
password='123456'
-
-
password2=\'$password\'
-
-
date=`date "+%y%m%d"`
-
-
#Modify the configuration file
-
mv /etc/my.cnf /etc/my.cnf_bak_$date
-
mv $dir'master2-sample-my.cnf' /etc/my.cnf
-
-
#Build User
-
groupadd mysql
-
useradd -g mysql mysql
-
-
#Install dependency packages
-
yum install libaio -y
-
-
#Decompression
-
cd $dir
-
if ( test -s $filename )
-
then
-
echo 'Undecompressed, no need to repeat decompression'
-
else
-
tar -xvf $filename.tar.gz
-
fi
-
-
#Copy the decompressed mysql directory to the system's local software directory:
-
cp $filename $basedir -r
-
-
#New Directory
-
#mkdir -p $datadir
-
#mkdir -p $binlogdir
-
mkdir -p $mysqldir
-
chown -R mysql:mysql $basedir
-
chown -R mysql:mysql $mysqldir
-
-
#Establishment of a basic database
-
$basedir/scripts/mysql_install_db--defaults-file=$cnf --user=mysql --basedir=$basedir --datadir=$datadir
-
#Set the boot-up auto-start.
-
cp $basedir'/support-files/mysql.server''/etc/rc.d/init.d/mysqld'
-
#Modify the file datadir
-
#You already know that datadir = is on line 47.
-
sed -i '47s/datadir=/datadir=\/data\/mysql/g' /etc/rc.d/init.d/mysqld
-
-
chmod +x /etc/rc.d/init.d/mysqld
-
-
chkconfig --add mysqld
-
-
chkconfig mysqld on
-
-
#Configure PATH
-
#root user
-
sed -i'/^PATH=/s/$/:\/usr\/local\/mysql\/bin/' /root/.bash_profile
-
source /root/.bash_profile
-
-
#mysql user
-
sed -i '/^PATH=/s/$/:\/usr\/local\/mysql\/bin/'/home/mysql/.bash_profile
-
source /home/mysql/.bash_profile
-
#Start the database.
-
-
service mysqld start
-
-
#Open Firewall Port
-
#Open port 3306 and insert it behind the line - AINPUT-m state -- state NEW-m tcp-p TCP -- dport 22-j ACCEPT.
-
sed -i '/-A INPUT -m state --state NEW -mtcp -p tcp --dport 22 -j ACCEPT/s/$/\n-A INPUT -m state --state NEW -m tcp -ptcp --dport 3306 -j ACCEPT/' /etc/sysconfig/iptables
-
-
service iptables restart
-
#The company's firewall is closed, so the port is not open here.
-
-
#Modify mysql root password
-
#Modify it to $password based on the final output of the script ('Establish the base library'root password). It needs to be executed interactively.
-
#mysql 5.6.33 default password is empty
-
mysqladmin -u root password $password
-
-
-
#To create a new user for remote access, the password is the same as the local user.
-
$basedir/bin/mysql -u root -p$password -e"grant all privileges on *.* to 'root'@'%' identified by $password2"
2.1.4.2 Configuration file master 2-sample-my.cnf content
Since it is upgraded from version 5.5 to version 5.6, errors occur when low versions copy high versions of master libraries from slave libraries:
-
Got fatal error 1236 from master when reading data from binary log: 'Slave can not handle replication events with the checksum that master is configured to log;
You need to ensure that you add parameters to the configuration file: binlog_checksum=none
The content of master 2-sample-my.cnf file:
-
[client]
-
port =3306
-
socket =/tmp/mysql.sock
-
[mysqld]
-
port =3306
-
socket =/tmp/mysql.sock
-
binlog_checksum=none
-
innodb_buffer_pool_size = Set it to the appropriate value G
-
server-id = 2
-
max_connections = 5000
-
max_connect_errors = 300
-
max_allowed_packet = 64M
-
binlog_format=row
-
slow_query_log
-
long_query_time = 2
-
sync_binlog=1
-
innodb_support_xa=1
-
innodb_file_per_table=1
-
replicate-ignore-db = mysql
-
replicate-ignore-db = information_schema
-
relay-log=/data/mysql/master2-relay-bin
-
relay-log-index=/data/mysql/master2-relay-bin.index
-
log-bin=/data/mysql/master2-mysql-bin
-
log_slave_updates
-
[mysqldump]
-
# Do not buffer the whole result set inmemory before writing it to
-
# file. Required for dumping very largetables
-
quick
-
-
max_allowed_packet = 64M
-
-
[mysql]
-
no-auto-rehash
-
-
# Only allow UPDATEs and DELETEs that usekeys.
-
#safe-updates
-
-
[myisamchk]
-
key_buffer_size = 512M
-
sort_buffer_size = 512M
-
read_buffer = 8M
-
write_buffer = 8M
-
-
[mysqlhotcopy]
-
interactive-timeout
-
-
[mysqld_safe]
-
open-files-limit = 8192
2.1.5 Data recovery
Import backup data
mysql -u root -p < all.bak_20161125
2.1.6 Manufacturing Test Data
Insert several test data on master 1
-
mysql> use sds;
-
Database changed
-
mysql> show tables;
-
Empty set (0.00 sec)
-
-
mysql> create table t(id int);
-
Query OK, 0 rows affected (0.06 sec)
-
-
mysql> insert into t(id)values(1),(2),(3);
-
Query OK, 3 rows affected (0.02 sec)
-
Records: 3 Duplicates: 0 Warnings: 0
-
-
mysql> select * from t;
-
+
-
| id |
-
+
-
| 1 |
-
| 2 |
-
| 3 |
-
+
-
3 rows in set (0.02 sec)
2.1.7 Points Master 2 to master 1
Master_log_file, master_log_pos need and show master status in step 2.1.2; the results are consistent:
-
change master tomaster_log_file='mysql-bin.000003',master_log_pos=1109,master_host='10.192.203.201',master_user='RepUser',master_password='beijing',master_port=3306;
-
mysql> start slave;
-
Query OK, 0 rows affected (0.03 sec)
-
-
show slave status \G;Check under Slave_IO_Running,Slave_SQL_Running Are they all Yes.
-
-
#Verify that the difference data is synchronized.
-
mysql> use sds;
-
Database changed
-
mysql> show tables;
-
+
-
| Tables_in_sds |
-
+
-
| t |
-
+
-
1 row in set (0.00 sec)
-
-
mysql> select * from t;
-
+
-
| id |
-
+
-
| 1 |
-
| 2 |
-
| 3 |
-
+
-
3 rows in set (0.01 sec)
The Master 2 synchronization is successful.
2.2 Upgrade Master 1
2.2.1 drift vip to master 2 machine
Since I have configured mysql timing tasks on my own machine (monitoring mysql status once a minute, killing the heartbeat process on that machine if mysql goes down), upgrading Master 2 will definitely result in heartbeat being shut down. Therefore, the heartbeat process of Master 2 needs to be started first:
service heartbeat start
# Close the master 1 process:
service heartbeat stop
# Use the ip addr command on maser2 to verify that the virtual IP drift is successful.
-
[root@slave2 download]# ip addr
-
1: lo: <LOOPBACK,UP,LOWER_UP> mtu16436 qdisc noqueue state UNKNOWN
-
link/loopback 00:00:00:00:00:00 brd 00:00:00:00:00:00
-
inet 127.0.0.1/8 scope host lo
-
inet6 ::1/128 scope host
-
valid_lft forever preferred_lft forever
-
2: eth0:<BROADCAST,MULTICAST,UP,LOWER_UP> mtu 1500 qdisc pfifo_fast state UP qlen1000
-
link/ether 08:00:27:04:05:16 brd ff:ff:ff:ff:ff:ff
-
inet 10.192.203.202/24 brd 10.192.203.255 scope global eth0
-
inet 10.192.203.203/24 brd 10.192.203.255 scope global secondary eth0
-
inet6 fe80::a00:27ff:fe04:516/64 scope link
-
valid_lft forever preferred_lft forever
-
3: eth1:<BROADCAST,MULTICAST,UP,LOWER_UP> mtu 1500 qdisc pfifo_fast state UP qlen1000
-
link/ether 08:00:27:3a:ec:3c brd ff:ff:ff:ff:ff:ff
-
inet 10.0.0.2/24 brd 10.0.0.255 scope global eth1
-
inet6 fe80::a00:27ff:fe3a:ec3c/64 scope link
-
valid_lft forever preferred_lft forever
We see vip: 10.192.203.203, which indicates that the drift is successful.
2.2.2 Backup Master 1
slightly
2.2.3 Record binlog location
Refer to 2.1.2 for logical steps.

2.2.4 Unload master 1
The content of the uninstall script is the same as "2.1.3 uninstall master 2".
2.2.5 Install 5.6.33 version of mysql
2.2.5.1 Installation script content
Note: There is only one difference between installing Master 2 scripts:
mv $dir'master2-sample-my.cnf' /etc/my.cnf
mv $dir'master1-sample-my.cnf' /etc/my.cnf
The following is the installation script content:
-
#Remember to upload the mysql installation package to the $dir directory first.
-
#Configuration file my.cnf uploads master 1-sample-my.cnf and modifies the value of innodb_buffer_pool_size according to the actual situation. Remember to modify the value of log-bin,relay-log,relay-log-index,log-bin according to the actual installation directory.
-
#Note that if mysqldir is not / data/mysql and changes to other directories (such as / database/mysql), you need to modify the line sed - i'47s / dataDir = / dataDir = \ database\ MySQL / G'/ etc / rc. D / mysqld in the script.
-
-
#Define Catalogue
-
basedir='/usr/local/mysql'
-
-
mysqldir='/data/mysql'
-
-
datadir=$mysqldir
-
#binlogdir=$mysqldir/binlog
-
-
cnf=/etc/my.cnf
-
-
dir='/download/'
-
-
socket='/tmp/mysql.sock'
-
-
port='3306'
-
-
filename='mysql-5.6.33-linux-glibc2.5-x86_64'
-
-
password='123456'
-
-
password2=\'$password\'
-
-
date=`date "+%y%m%d"`
-
-
#Modify the configuration file
-
mv /etc/my.cnf /etc/my.cnf_bak_$date
-
mv $dir'master1-sample-my.cnf' /etc/my.cnf
-
-
#Build User
-
groupadd mysql
-
useradd -g mysql mysql
-
-
#Install dependency packages
-
yum install libaio -y
-
-
#Decompression
-
cd $dir
-
if ( test -s $filename )
-
then
-
echo 'Undecompressed, no need to repeat decompression'
-
else
-
tar -xvf $filename.tar.gz
-
fi
-
-
#Copy the decompressed mysql directory to the system's local software directory:
-
cp $filename $basedir -r
-
-
#New Directory
-
#mkdir -p $datadir
-
#mkdir -p $binlogdir
-
mkdir -p $mysqldir
-
chown -R mysql:mysql $basedir
-
chown -R mysql:mysql $mysqldir
-
-
#Establishment of a basic database
-
$basedir/scripts/mysql_install_db--defaults-file=$cnf --user=mysql --basedir=$basedir --datadir=$datadir
-
#Set the boot-up auto-start.
-
cp $basedir'/support-files/mysql.server''/etc/rc.d/init.d/mysqld'
-
#Modify the file datadir
-
#You already know that datadir = is on line 47.
-
sed -i '47s/datadir=/datadir=\/data\/mysql/g' /etc/rc.d/init.d/mysqld
-
-
chmod +x /etc/rc.d/init.d/mysqld
-
-
chkconfig --add mysqld
-
-
chkconfig mysqld on
-
-
#Configure PATH
-
#root user
-
sed -i'/^PATH=/s/$/:\/usr\/local\/mysql\/bin/' /root/.bash_profile
-
source /root/.bash_profile
-
-
#mysql user
-
sed -i'/^PATH=/s/$/:\/usr\/local\/mysql\/bin/' /home/mysql/.bash_profile
-
source /home/mysql/.bash_profile
-
#Start the database.
-
-
service mysqld start
-
-
#Open Firewall Port
-
#Open port 3306 and insert it behind the line - AINPUT-m state -- state NEW-m tcp-p TCP -- dport 22-j ACCEPT.
-
sed -i '/-A INPUT -m state --state NEW -mtcp -p tcp --dport 22 -j ACCEPT/s/$/\n-A INPUT -m state --state NEW -m tcp -ptcp --dport 3306 -j ACCEPT/' /etc/sysconfig/iptables
-
-
service iptables restart
-
#The company's firewall is closed, so the port is not open here.
-
-
#Modify mysql root password
-
#Modify it to $password based on the final output of the script ('Establish the base library'root password). It needs to be executed interactively.
-
#mysql 5.6.33 default password is empty
-
mysqladmin -u root password $password
-
-
-
#To create a new user for remote access, the password is the same as the local user.
-
$basedir/bin/mysql -u root -p$password -e"grant all privileges on *.* to 'root'@'%' identified by $password2"
2.2.5.2 Configuration file master 1-sample-my.cnf content
# The contents of master 1-sample-my.cnf and master 2-sample-my.cnf configuration files are different in only a few places:
server-id ,relay-log,relay-log-index
Configuration file content:
-
[client]
-
port =3306
-
socket =/tmp/mysql.sock
-
[mysqld]
-
port =3306
-
socket =/tmp/mysql.sock
-
binlog_checksum=none
-
innodb_buffer_pool_size = Set it to the appropriate value G
-
server-id = 1
-
max_connections = 5000
-
max_connect_errors = 300
-
max_allowed_packet = 64M
-
binlog_format=row
-
slow_query_log
-
long_query_time = 2
-
sync_binlog=1
-
innodb_support_xa=1
-
innodb_file_per_table=1
-
replicate-ignore-db = mysql
-
replicate-ignore-db = information_schema
-
relay-log=/data/mysql/master1-relay-bin
-
relay-log-index=/data/mysql/master1-relay-bin.index
-
log-bin=/data/mysql/master1-mysql-bin
-
log_slave_updates
-
[mysqldump]
-
# Do not buffer the whole result set inmemory before writing it to
-
# file. Required for dumping very largetables
-
quick
-
-
max_allowed_packet = 64M
-
-
[mysql]
-
no-auto-rehash
-
-
# Only allow UPDATEs and DELETEs that usekeys.
-
#safe-updates
-
-
[myisamchk]
-
key_buffer_size = 512M
-
sort_buffer_size = 512M
-
read_buffer = 8M
-
write_buffer = 8M
-
-
[mysqlhotcopy]
-
interactive-timeout
-
-
[mysqld_safe]
-
open-files-limit = 8192
2.2.6 Data recovery
Import backup data
mysql -u root -p < all.bak_20161125
2.2.7 Manufacturing Test Data
slightly
2.2.8 Points master 1 to master 2
The idea is the same as "2.1.7 points Master 2 to master 1".
-
change master tomaster_log_file='master2-mysql-bin.000003' ,master_log_pos=489108,master_host='10.192.203.202',master_user='RepUser',master_password='beijing',master_port=3306;
-
mysql> start slave;
-
Query OK, 0 rows affected (0.03 sec)
Finally, check whether the slave libraries on master 1 and master 2 are all normal.
Slve error was found on master 2:
Last_IO_Error: error connecting to master'RepUser@10.192.203.201:3306' - retry-time: 60 retries: 33
I manually rebuilt the duplicate user on master 1, then stop slave;start slave; no further error was reported.
I don't know why I reported this mistake. The backup file clearly shows the insertion record of the replica user.
A new error was reported at the start slave:
Last_IO_Error: Got fatal error 1236 frommaster when reading data from binary log: 'Could not find first log file namein binary log index file'
flush logs on master 1;
show master status;
Respecify the binlog location on Master 2 and start copying.
2.3 Modify parameter binlog_checksum
Initially, when mysql 5.6.33 was installed, binlog_checksum was specifically set to none, for the reasons listed below: http://blog.csdn.net/yabingshi_tech/article/details/53319904
Now Master 1 and Master 2 have become 5.6.33. So now you need to comment out binlog_checksum=none in the configuration file and restart mysql. By the way, vip is switched back to master 1.
master1:
Comment out binlog_checksum=none in the configuration file and restart mysql.
Start heartbeat for master 1;
master2:
Comment out binlog_checksum=none in the configuration file and restart mysql.
Restart Master 2 heartbeat;
Execute the ip addr command on master 1 to verify that vip drift is successful.
Check whether the parameter has been successfully modified:
mysql> show variables like '%checksum%';
+---------------------------+--------+
| Variable_name | Value |
+---------------------------+--------+
| binlog_checksum | CRC32 |
| innodb_checksum_algorithm | innodb |
| innodb_checksums | ON |
| master_verify_checksum | OFF |
| slave_sql_verify_checksum | ON |
+---------------------------+--------+