Database programming (JDBC)
1. Database programming: JDBC
JDBC, namely Java Database Connectivity. Is a Java API for executing SQL statements. It is a database connection specification in Java. This API is composed of some classes and interfaces in java.sql. Javax.sql. Package. It provides a standard API for Java developers to operate databases, and can provide unified access to a variety of relational databases
2. Prerequisites for database programming
- Programming languages, such as Java, C, C + +, Python, etc
- Database, such as Oracle, MySQL, SQL Server, etc
- Database driver package: different database driver packages are provided for different programming languages. For example, MySQL provides the Java driver package MySQL connector Java, which is required to operate MySQL based on Java. Similarly, to operate Oracle database based on Java, you need Oracle's database driver package ojdbc
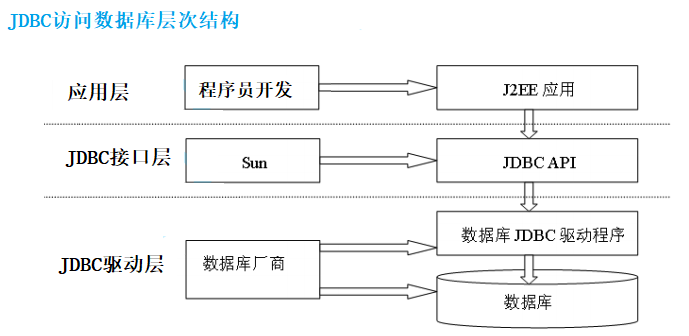
3. Working principle of JDBC
JDBC provides a unified access mode for various relational databases. As a high-level abstraction of database access API of specific manufacturers, it mainly contains some general interface classes
4.JDBC advantages
- The operation of accessing database in Java language is completely oriented to abstract interface programming
- The development of database applications is not limited to the API of specific database manufacturers
- The portability of the program is greatly enhanced
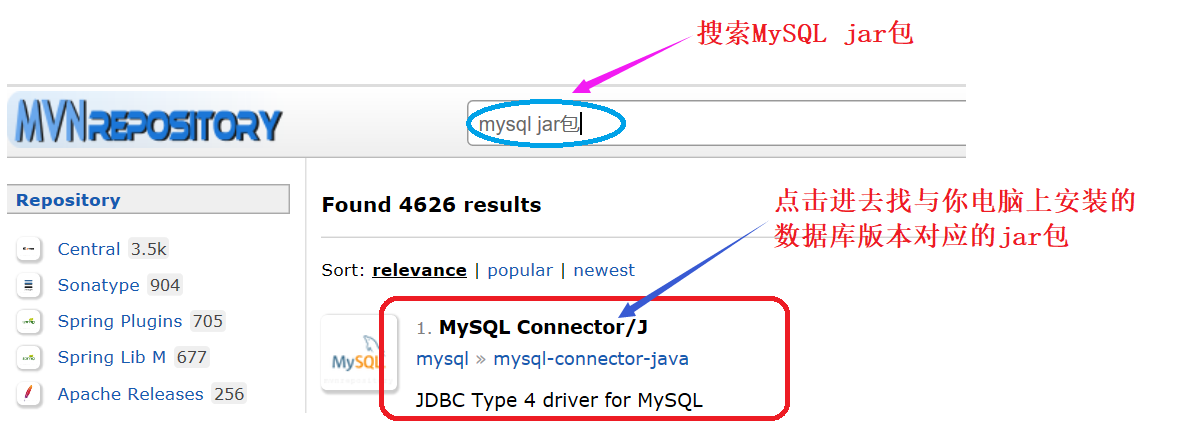
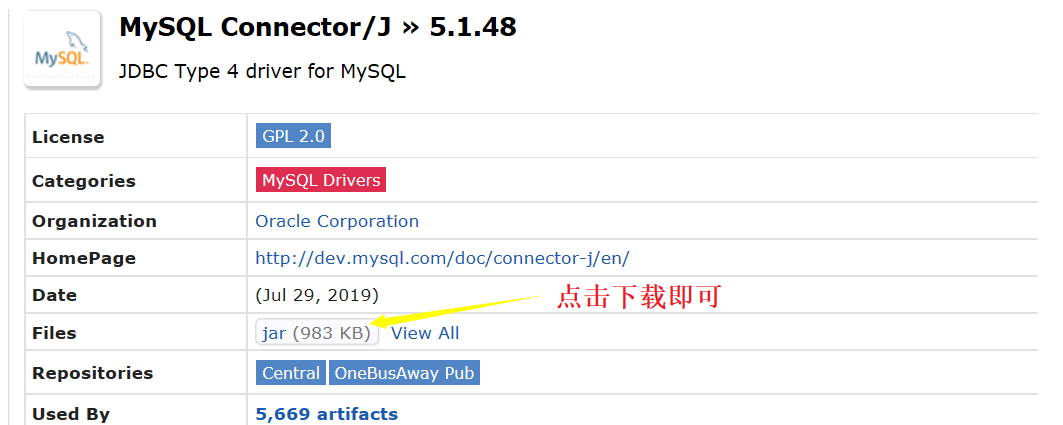
5. How to download the jar package
6. Use of JDBC (import of jar package)
- Prepare the database driver package (jar package) and add it to the dependency of the project: the process is as follows:
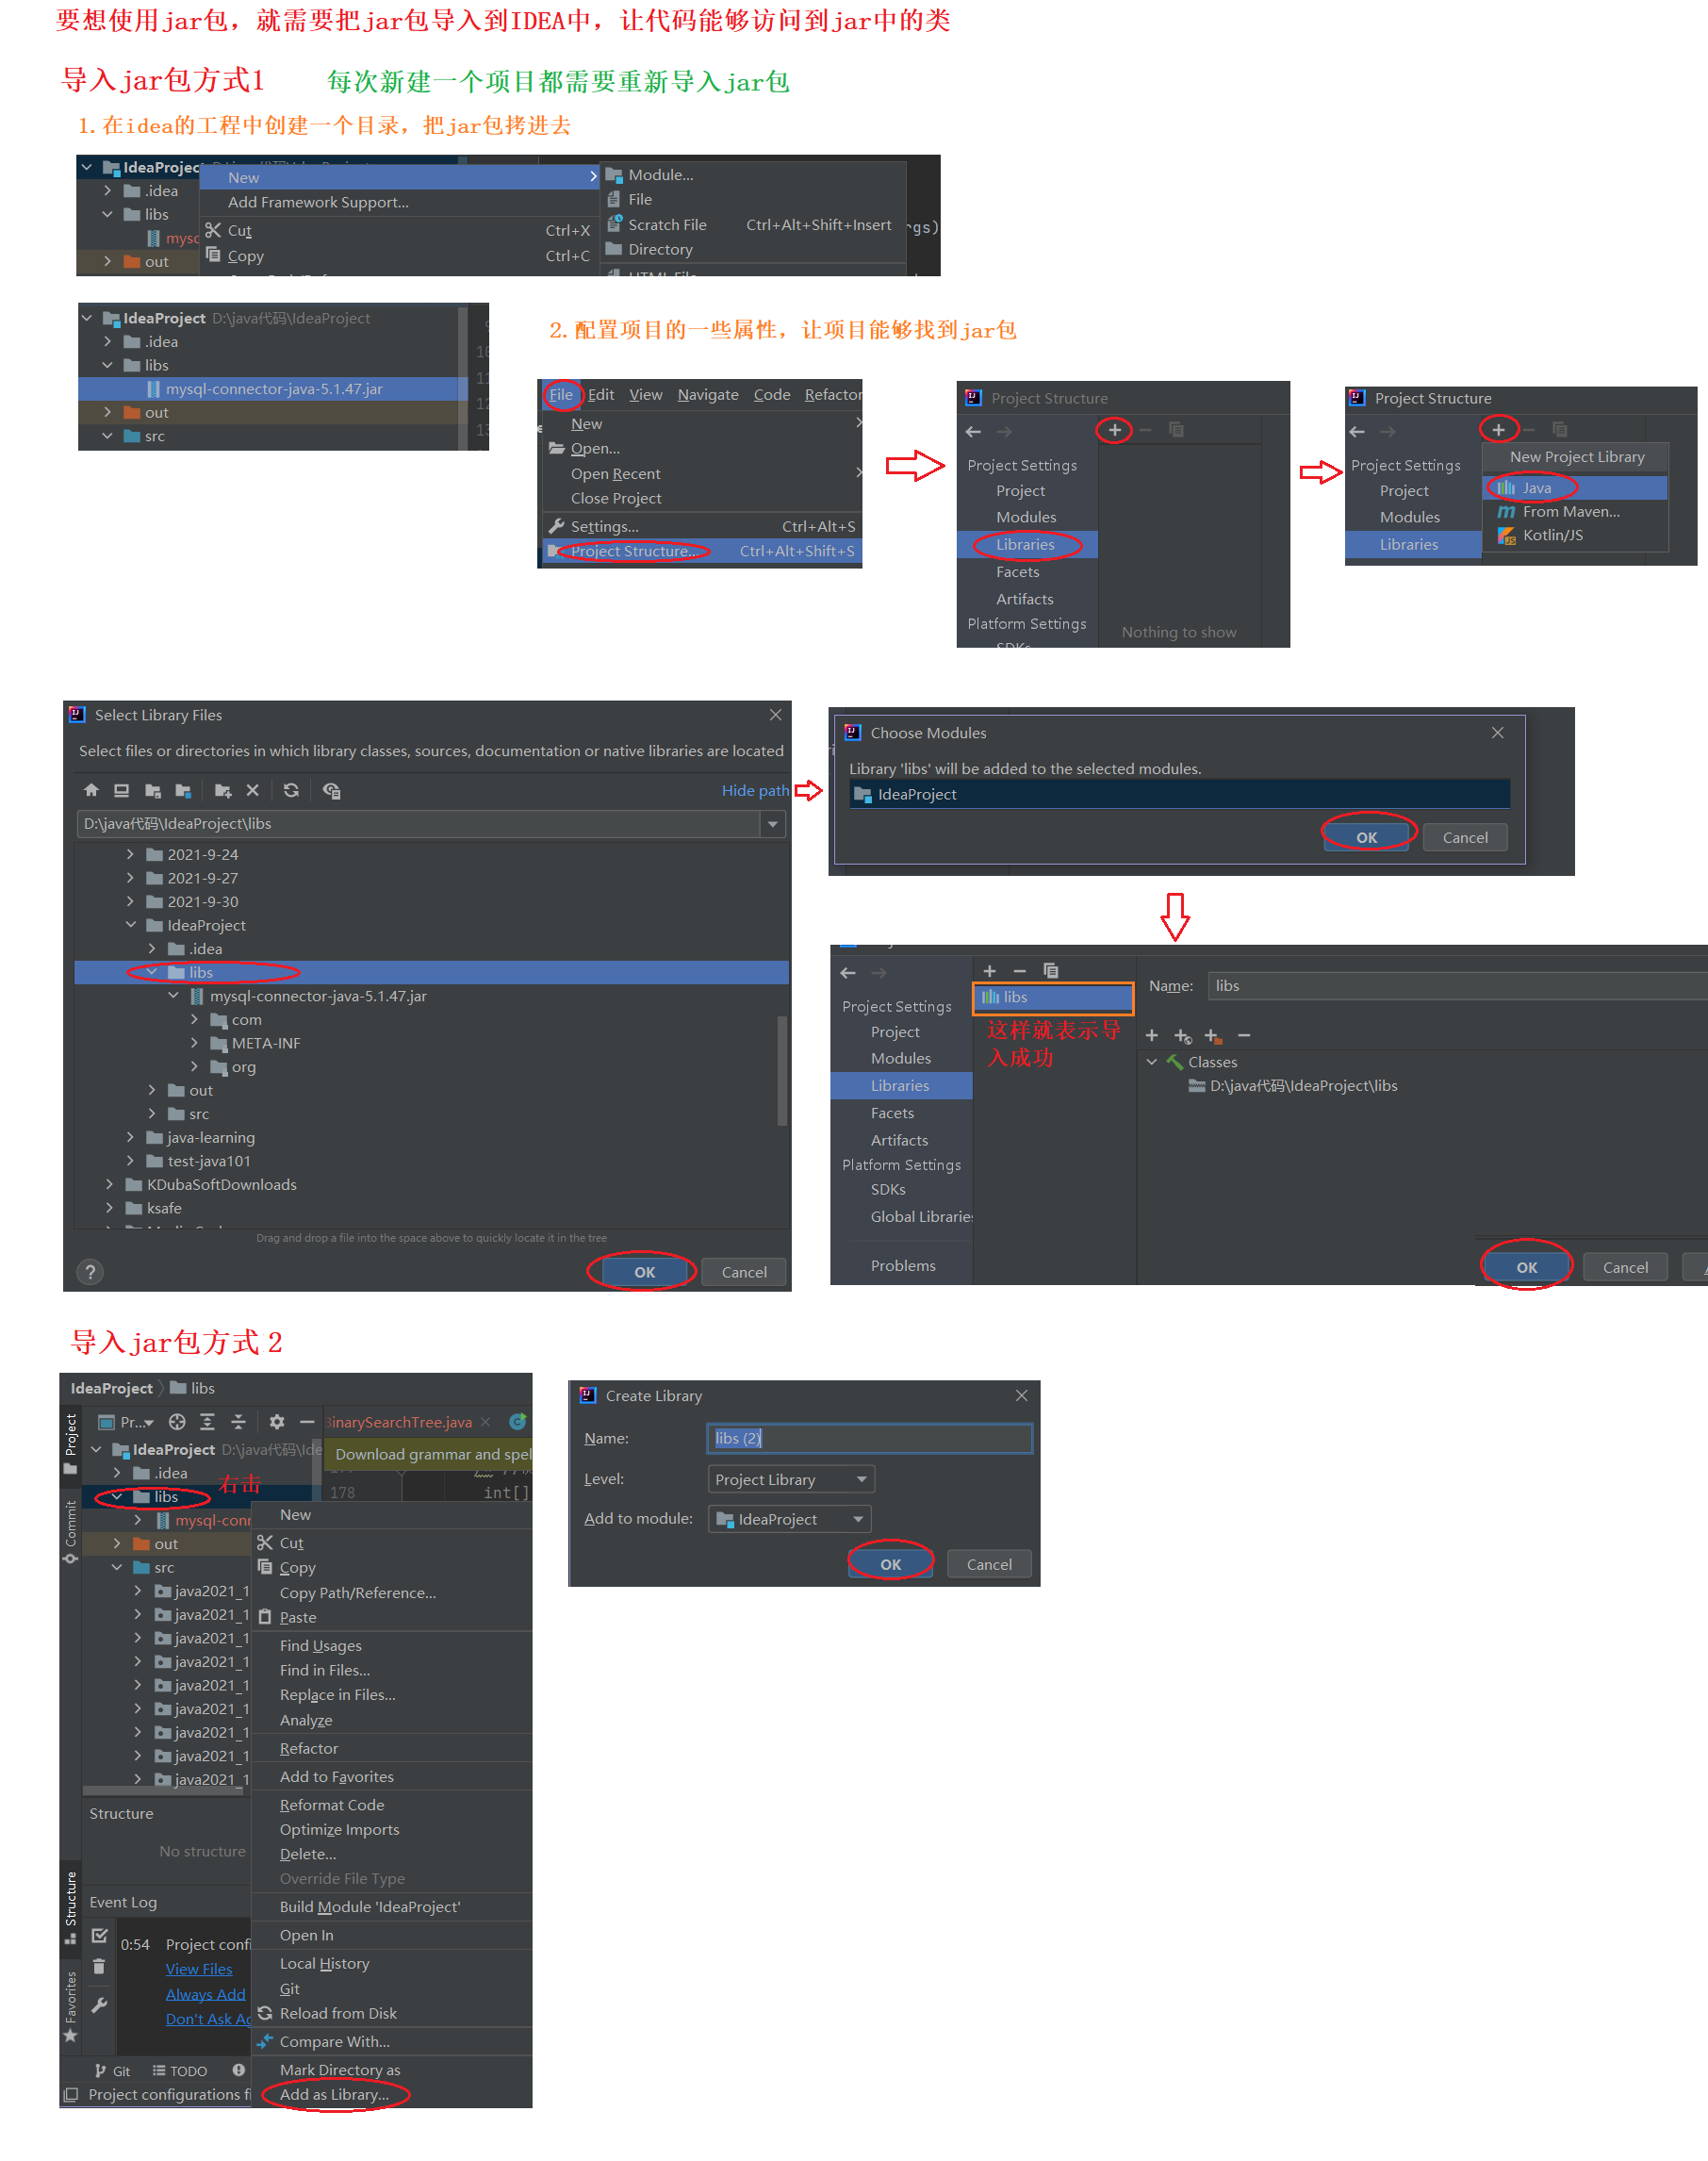
If you can access the classes in the code, the import is successful.
If it is like this, the import is successful

7. JDBC usage steps
JDBC provides two sets of API s, where the DataSource object is used.
1. Create DataSource object (preparatory work);
2. Create a Connection object and establish a Connection with the database based on the DataSource object (this is equivalent to opening the client in the system's own client, entering the password, and the Connection is successful);
3. The preparestatement object assembles specific SQL statements (which is equivalent to the process of entering SQL statements in the client)
4. After assembling the SQL, execute the SQL (this is equivalent to typing enter in the client, and the SQL will be sent to the server)
5. View the results returned by the server (this is equivalent to displaying the results on the client)
6. Close the connection and release resources (this is equivalent to exiting the client)
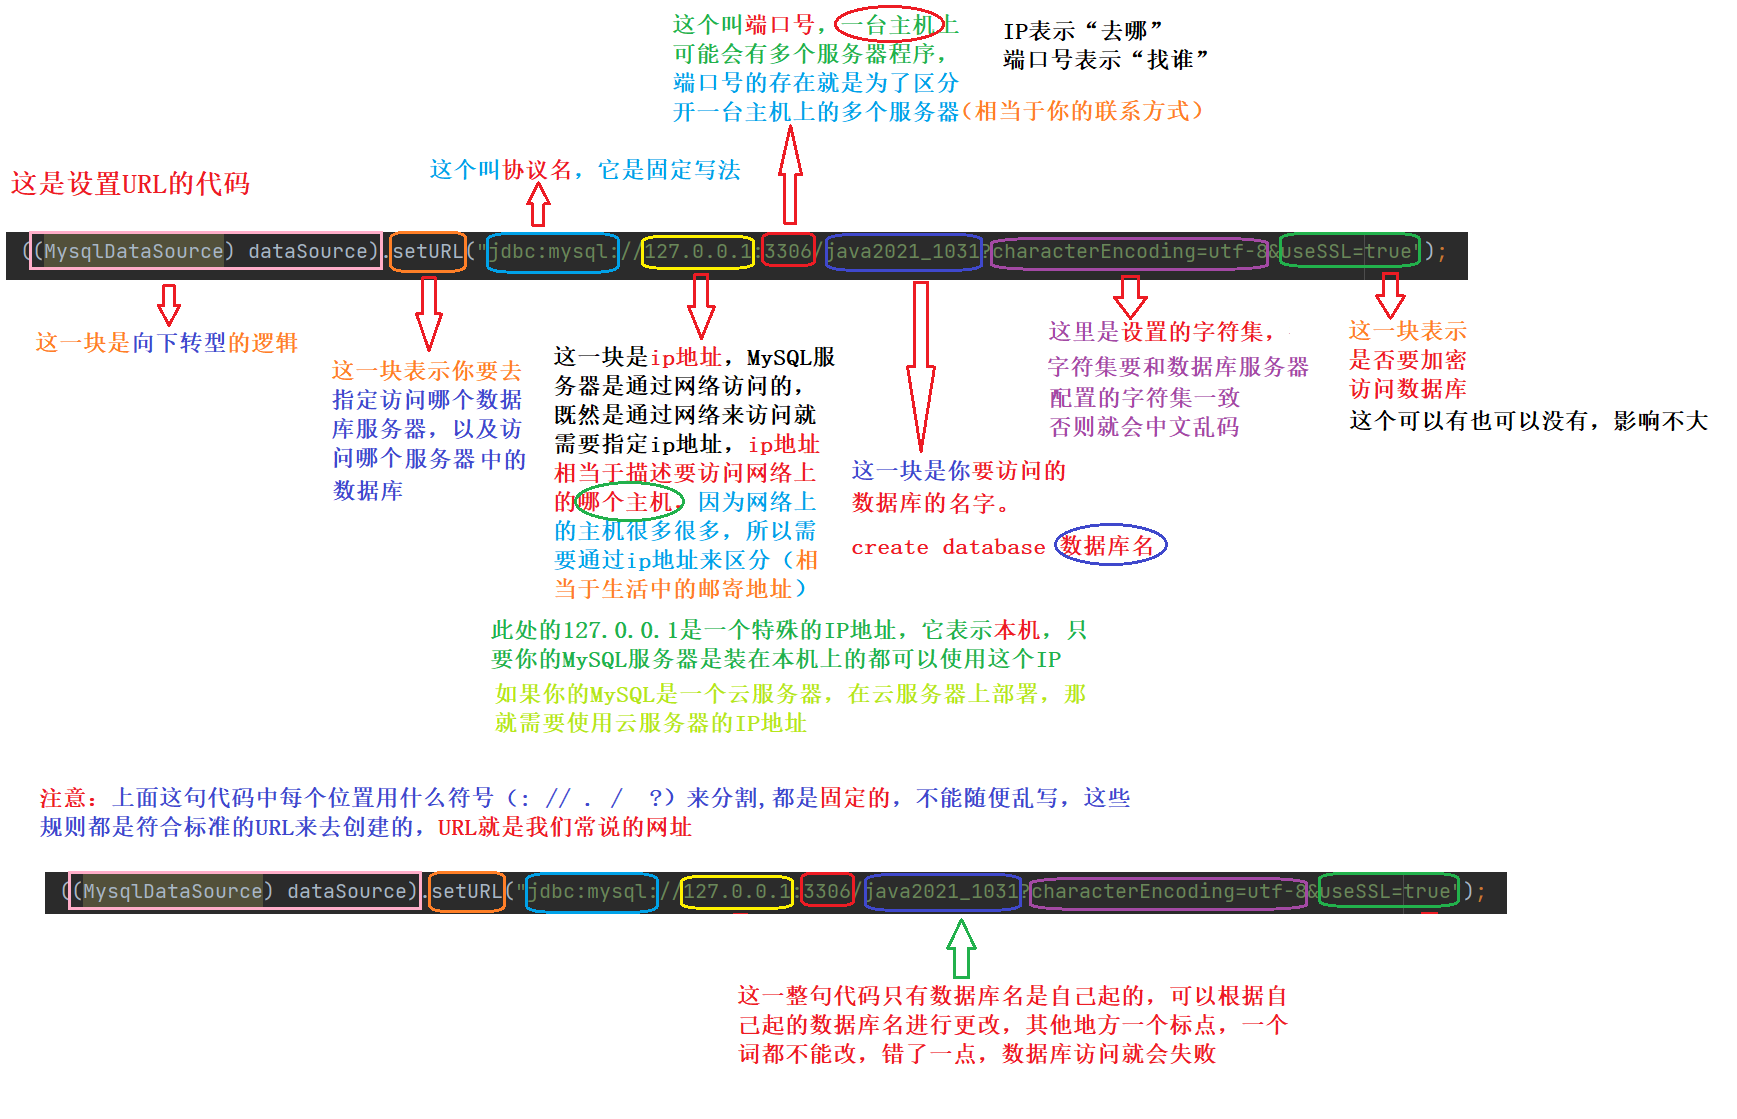
Before looking at the complete code, first understand the code in the figure below. It is related to the success of database access. You don't need to remember. You can copy and paste it when you use it, but you should pay special attention to what you need to pay attention to.
7.1 insert via JDBC
The complete code for inserting data through JDBC is as follows: the details are in the comments, which can be ignored if you understand~~
package java2021_1031;

import com.mysql.jdbc.jdbc2.optional.MysqlDataSource;

import javax.sql.DataSource;
import java.sql.Connection;
import java.sql.PreparedStatement;
import java.sql.SQLException;

/**
 * Created by Sun
 * Description:<JDBC insert: inserting data through JDBC
 */
public class TestJDBCInsert {
    public static void main(String[] args) throws SQLException {
        //1. Create a DataSource object (the life cycle of the DataSource object should follow the whole program, that is, an application only needs to create a DataSource object)
        DataSource dataSource = new MysqlDataSource();
        //Next, you need to configure the dataSource so that you can smoothly access the database server later
        //Basic configuration of database: it mainly configures three aspects of information. URL, User and Password need to be transformed downward
        //Configuration URL: Web address
        ((MysqlDataSource) dataSource).setURL("jdbc:mysql://127.0.0.1:3306/java2021_1031?characterEncoding=utf-8&useSSL=true");
        //Configure User: User name
        ((MysqlDataSource) dataSource).setUser("root");
        //Configure Password: Password
        ((MysqlDataSource) dataSource).setPassword("root");//The password here is consistent with the password in the database
        //2. Establish connection (establish connection with database)
        //After the relevant parameters of the above database are configured, call getConnection() directly to establish a connection with the database
        Connection connection = dataSource.getConnection();//getConnection() will get a Connection object. Select the java.sql package
        //After the connection is established, it will send some requests to the database, and then the database will make some responses, which means that the connection is established. After the connection is established, subsequent data transmission can be carried out.
        //Understanding and establishing a connection: it is equivalent to making a call in life. After you dial, the other party will give you a response and confirm that the signals of both parties are good. Then you can make a normal call, which means that the connection is established successfully.
        //The life cycle of a connection is relatively short, and a new connection can be created for each request
        //Each request means that every time you send a request to the server, for example, you can create a new connection every time you access the database. Of course, you can also use a connection repeatedly.
        //3. To assemble SQL, you need to use the PrepareStatement object
        //First, take the inserted data as an example
        /*String sql = "insert into student values (1,'Paris polyphylla ', 101) ";
        PreparedStatement preparedStatement = connection.prepareStatement(sql);*/
        //The data content to be inserted in the above two sentences of code is written dead. In fact, it can also be obtained by the program at run time and can be spliced dynamically, such as the following code
        int id = 1;
        String name = "Chonglou";
        int classid = 10;
        //? is a placeholder that can replace the value of a specific variable with the position of
        String sql = "insert into student values(?,?,?)";
        PreparedStatement preparedStatement = connection.prepareStatement(sql);//Assemble
        preparedStatement.setInt(1,id);//Subscript substitution
        preparedStatement.setString(2,name);
        preparedStatement.setInt(3,classid);
        //1, 2 and 3 here are equivalent to the subscript of? (the following table starts from 1)
        System.out.println("preparedStatement:"+preparedStatement);//Print the effect after assembly

        //4. After assembly, you can execute SQL
       int ret = preparedStatement.executeUpdate();//When the modification statement is executed, the type of the value returned by executeUpdate() is int. this return value indicates how many rows have been modified when the operation is completed
        //Operations such as insert delete update are performed using the executeUpdate() method
        //If it is select, it is executed with executeQuery
        System.out.println("ret:"+ret);//Print the modified effect
        //5. After implementation, close and release relevant resources
        preparedStatement.close();//Release statement
        connection.close();//Release connection
        //The release order of release statement and release connection can not be wrong. It must be that the later created ones are released first, and the connection created first, so they are released later

        //JDBC code looks troublesome, but after writing too much, you will find that it is a fixed routine. It is this set of code, and the basic code inside is fixed code.
        //Once run, the client will insert once
    }
}
7.2 perform lookup through JDBC
The complete code for finding data through JDBC is as follows:
package java2021_1031;

import com.mysql.jdbc.jdbc2.optional.MysqlDataSource;

import javax.sql.DataSource;
import java.sql.Connection;
import java.sql.PreparedStatement;
import java.sql.ResultSet;
import java.sql.SQLException;

/**
 * Created by Sun
 * Description:<JDBC select: find data through JDBC
 *1.Create DataSource object
 *2.Create a Connection object to establish a Connection with the database
 *3.Assembling SQL statements with prepareStatement
 *4.Execute SQL statement
 *5.Traversal result set: insert has no result, just insert, but the search operation will get a series of result sets,
 * This result set is equivalent to a temporary table. We need to know what data is in this table. We need to get all the data, so we need to traverse the result set.
 *6.Close free resources
 */
public class TestJDBCSelect {
    public static void main(String[] args) throws SQLException {
        // 1. Create DataSource object
        DataSource dataSource = new MysqlDataSource();
        //Downward transformation, setting URL, user name and password
        ((MysqlDataSource) dataSource).setURL("jdbc:mysql://127.0.0.1:3306/java2021_1031?characterEncoding=utf-8&useSSL=true");
        ((MysqlDataSource) dataSource).setUser("root");
        ((MysqlDataSource) dataSource).setPassword("root");
        // 2. Create a Connection object and establish a Connection with the database
        Connection connection = dataSource.getConnection();
        // 3. Assemble SQL statements with prepareStatement
        String sql = "select * from student";//Assemble SQL statements
        PreparedStatement preparedStatement = connection.prepareStatement(sql);//Assemble
        // 4. Execute SQL statement
        ResultSet resultSet = preparedStatement.executeQuery();//When executing a query statement, the type of the value returned by executeQuery() is ResultSet, which represents the result set of the select search result
        //In other words, the results of the select query are all contained in the ResultSet object, through which you can get the result set.
        // 5. Traversal result set
        /*Traversing the result set is a bit like traversing the collection class with an iterator. The result set is equivalent to a table with many rows, each row is a record, and each row contains many columns
        * next()Operation: on the one hand, it determines whether there is a next row. On the other hand, if there is a next row, it obtains the current row
        * You can intuitively imagine the resultSet object as a "cursor". Initially, the cursor of the resultSet does not point to any record. The first call to next will determine whether the current result set is empty
        * If it is empty, next will return false directly. If it is not empty, next will return true and point the cursor to the first line of record.
        * When the subsequent recycling is executed to the next, it is still to determine whether the next line exists. If it does not exist, it will return false, and if it exists, it will return true. At the same time, let the cursor point to the next line of record until it returns false, and the cycle ends*/
        while(resultSet.next()){    //Because you don't know how many rows there are in the result set, you can use the while loop
            //When the cursor of resultSet points to the current row, you can get all the column data in the current row. Pay attention to the type of column data
            int id = resultSet.getInt("id");//The column names written in the parameters here must be exactly the same as those in the database table structure
            String name = resultSet.getString("name");
            int classid = resultSet.getInt("classid");
            System.out.println("id:"+id+" name:"+name+" classid:"+classid);
        }
        // 6. Close and release resources
        resultSet.close();
        preparedStatement.close();
        connection.close();
        //The release order of release statement and release connection can not be wrong. It must be that the later created ones are released first, and the connection created first, so they are released later
    }
}

7.3 delete through JDBC
The complete code for deleting data through JDBC is as follows:
package java2021_1031;

import com.mysql.jdbc.jdbc2.optional.MysqlDataSource;

import javax.sql.DataSource;
import java.sql.Connection;
import java.sql.PreparedStatement;
import java.sql.SQLException;
import java.util.Scanner;

/**
 * Created by Sun
 * Description:<JDBC Delete value: delete data through JDBC
 */
public class TestJDBCDelete {
    public static void main(String[] args) throws SQLException {
        //Enter the name of the student to be deleted through Scanner
        Scanner scanner = new Scanner(System.in);
        System.out.println("Please enter the name of the student to delete:");
        String name = scanner.next();

        //1. Create DataSource object
        DataSource dataSource = new MysqlDataSource();
        ((MysqlDataSource) dataSource).setURL("jdbc:mysql://127.0.0.1:3306/java2021_1031?characterEncoding=utf-8&useSSL=true");
        ((MysqlDataSource) dataSource).setUser("root");
        ((MysqlDataSource) dataSource).setPassword("root");
        //2. Establish connection
        Connection connection = dataSource.getConnection();
        //3. Assemble SQL
        String sql = "delete from student where name = ?";
        PreparedStatement preparedStatement = connection.prepareStatement(sql);
        preparedStatement.setString(1,name);//Subscript replacement, setting content
        //4. Execute SQL
       int ret =  preparedStatement.executeUpdate();
       if(ret == 1){
           System.out.println("Delete succeeded!");
       }else{
           System.out.println("Deletion failed~");
       }
       //5. Close and release resources
        preparedStatement.close();
        connection.close();
    }
}

7.4 modify through JDBC
The complete code for modifying data through JDBC is as follows:
package java2021_1031;

import com.mysql.jdbc.jdbc2.optional.MysqlDataSource;

import javax.sql.DataSource;
import java.sql.Connection;
import java.sql.PreparedStatement;
import java.sql.SQLException;
import java.util.Scanner;

/**
 * Created by Sun
 * Description:<JDBC update: modify data through JDBC
 */
public class TestJDBCUpdate {
    public static void main(String[] args) throws SQLException {
        //Let the user enter the name of the student with id n
        Scanner scanner = new Scanner(System.in);
        System.out.println("Please enter the student to modify id: ");
        int id = scanner.nextInt();
        System.out.println("Please enter the student name to modify:");
        String name = scanner.next();

        //1. Create DataSource object
        DataSource dataSource = new MysqlDataSource();
        ((MysqlDataSource) dataSource).setURL("jdbc:mysql://127.0.0.1:3306/java2021_1031?characterEncoding=utf-8&useSSL=true");
        ((MysqlDataSource) dataSource).setUser("root");
        ((MysqlDataSource) dataSource).setPassword("root");
        //2. Establish connection
        Connection connection = dataSource.getConnection();
        //3. Assemble SQL
        String sql = "update student set  name = ? where id = ? ";
        PreparedStatement preparedStatement = connection.prepareStatement(sql);
        preparedStatement.setString(1,name);//Subscript replacement, setting content
        preparedStatement.setInt(2,id);
        //4. Execute SQL
        int ret = preparedStatement.executeUpdate();
        if(ret == 1){
            System.out.println("Modified successfully");
        }else{
            System.out.println("Modification failed~");
        }
        //5. Close and release resources
        preparedStatement.close();
        connection.close();
    }
}

8. Classes / objects mainly used in JDBC programming
- DataSource: used to configure how to connect to MySQL
- Connection: indicates that a connection has been established (a connection needs to be established before operating the database)
- PrepareStatement: corresponds to an SQL statement
- ResultSet: indicates the result set of the select lookup result
9. Summary of JDBC usage steps
- Create database Connection
- Create action command Statement
- Execute SQL using action commands
- Processing result set ResultSet
- Release resources
1. Create database Connection
- DriverManager create
- DataSource get
2. Create operation command Statement - PreparedStatement
3. Use the operation command to execute SQL
// Query operation
preparedStatement.executeQuery();
// Add, modify and delete
preparedStatement.executeUpdate();
4. Process ResultSet
while (resultSet.next()) {
    int xxx = resultSet.getInt("xxx");
    String yyy= resultSet.getString("yyy");
 ...
}
5. Close and release resources
- The release order of release statement and release connection can not be wrong. It must be released first if the connection is created later, so it can be released later
resultSet.close();
preparedStatement.close();
connection.close();
