preface
In the actual production environment, if the reading and writing of MySQL database are operated in one database service, it can not meet the actual needs in terms of security, high availability, high concurrency and so on. Generally speaking, it is through master-slave replication (master slave) to synchronize data, and then improve the concurrent load capacity of the database through read-write separation
1, MySQL master-slave replication
1. Supported replication types
- Statement based replication: execute sql statements on the server and the same statements on the slave server. mysql adopts statement based replication by default, with high execution efficiency
- Row based replication: copy the changed content instead of executing the command from the server
- Mixed replication: execute sql statements on the server and the same statements on the slave server. mysql adopts statement based replication by default, with high execution efficiency
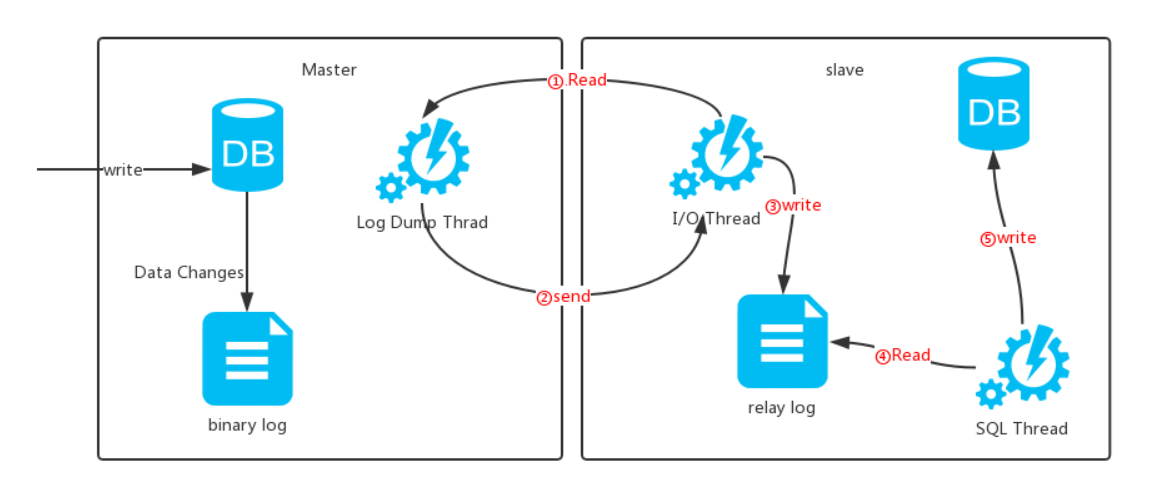
2. The working process of master-slave replication is based on logs
- master binary log
- slave relay log
3. Request method
- I/O thread
- dump thread
- SQL thread
4. Principle of master-slave replication
① The Master node records the data changes into a bin log. When the data on the Master changes, the changes are written into the bin log
② The Slave node will detect whether the binary log of the Master has changed within a certain time interval. If it has changed, it will start an I/O thread to request the binary event of the Master
③ At the same time, the Master node starts a dump thread for each I/O thread, which is used to send binary events to it and save them to the local Relay log of the Slave node
④ The Slave node will start the sql thread to read the binary log from the relay log and replay it locally, that is, parse it into sql statements and execute them one by one to make its data consistent with that of the Master node. Finally, the I/O thread and sql thread will enter the sleep state and wait for the next wake-up
There is a very important limitation in the replication process, that is, the replication is serialized on the Slave, that is, the parallel update operation on the Master cannot be operated in parallel on the Slave
Relay logs are usually located in the OS cache, so the overhead of relay logs is very small
5. What scenarios are MySQL Cluster and master-slave replication suitable for use
Cluster and master-slave replication are designed to cope with high concurrency and large traffic. If the website traffic and concurrency are too large, a small number of database servers cannot handle it, which will cause slow website access, and data writing will cause data tables or records to be locked. Locking means that other access threads can't read and write temporarily, and can't continue until writing is completed, which will affect For other users' reading speed, master-slave replication can enable some servers to read and write specifically, which can solve this problem
6. Why use master-slave copy and read-write separation
The master-slave replication and read-write separation are generally used together for the simple purpose of improving the concurrency performance of the database. You think, suppose it is a single machine, and the reading and writing are completed on one MySQL, the performance is certainly not high. If there are three MySQL, one mate is only responsible for writing and two save are only responsible for reading, the performance can not be greatly improved?
Therefore, the separation of master-slave replication and read-write is to enable the database to support greater concurrency
With the expansion of business volume, if MySQL is deployed on a single machine, the I/O frequency will be too high. Using master-slave replication and separation of read and write can improve the availability of the database
7. Purpose and conditions
mysql master-slave replication purpose:
- Real time disaster recovery for failover
- Read write separation, providing query service
- Backup to avoid service impact
necessary condition:
- Enable binlog log in the main database (set the log bin parameter)
- The master and slave server IDs are different
- The slave database server can connect to the master database
8. Problems in MySQL master-slave replication
After the main library goes down, data may be lost
There is only one SQL Thread in the slave database. The master database has high write pressure, and replication is likely to delay
terms of settlement
Semi synchronous replication -- solving the problem of data loss
Parallel replication -- solve the problem of replication latency from the library
9.MySQL master-slave replication delay
① The master server is highly concurrent, forming a large number of transactions
② Network delay
③ Caused by master-slave hardware devices - cpu master frequency, memory io, hard disk io
④ It is not synchronous replication, but asynchronous replication
- Optimize Mysql parameters from the library. For example, increase innodb_buffer_pool_size to allow more operations to be completed in Mysql memory and reduce disk operations
- Use high-performance hosts from the library, including strong cpu and large memory. Avoid using virtual virtual virtual hosts and use physical hosts, which improves the i/o performance
- Using SSD disks from the library
- Network optimization to avoid synchronization across machine rooms
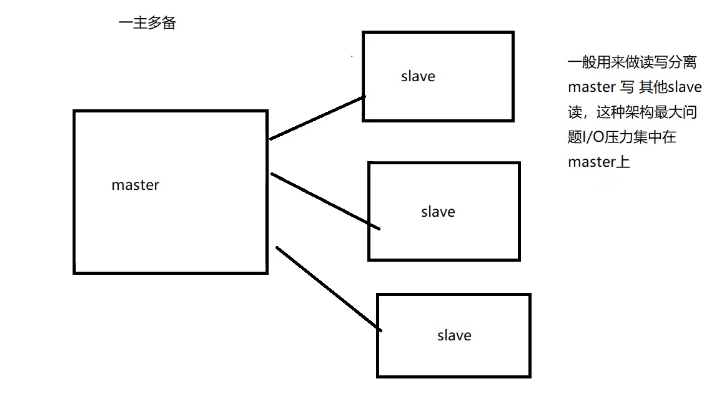
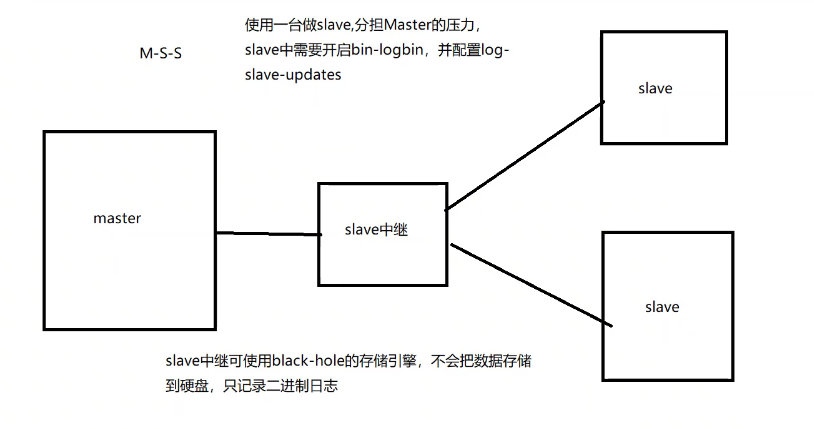
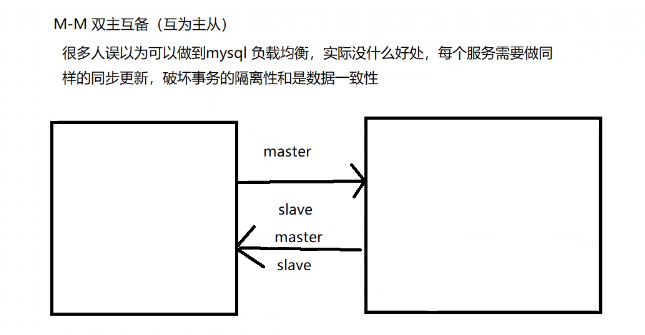
2, Form of master-slave copy
3, Read write separation
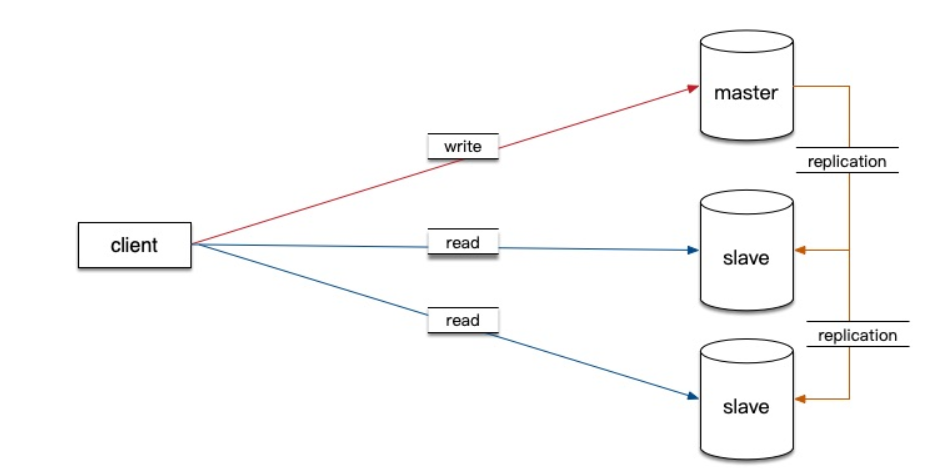
1. Principle
① Write only on the master server and read only on the slave server
② The primary database handles transactional queries and the secondary database handles select queries
③ Database replication is used to synchronize changes caused by transactional queries to slave databases in the cluster
2. Why separate reading and writing?
- Because the "write" (writing 10000 pieces of data may take 3 minutes) operation of the database is time-consuming
- But the "read" of the database (it may take only 5 seconds to read 10000 pieces of data)
- Therefore, the separation of reading and writing solves the problem that the writing of the database affects the efficiency of query
3. When do you want to separate reading and writing?
- The database does not have to be read-write separated. If the program uses more databases, less updates and more queries, it will be considered
- The use of database master-slave synchronization, and then through read-write separation, can share the pressure of the database and improve the performance
4. Master slave replication and read / write separation
- In the actual production environment, the reading and writing of the database are in the same database server, which can not meet the actual needs
5. At present, the common MySQL read-write separation is divided into the following two types
① Internal implementation based on program code
- In the code, routing is classified according to select and insert, which is also the most widely used method in production environment
- The advantage is that the performance is good, because it is implemented in the program code without additional equipment and hardware expenses; the disadvantage is that it needs developers to implement it, and the operation and maintenance personnel have no way to start
- However, not all applications are suitable for realizing read-write separation in program code. For example, some large and complex Java applications, if reading-write separation is realized in program code, the code will be greatly changed
② Implementation based on intermediate agent layer
The proxy is generally located between the client and the server. After receiving the client request, the proxy server forwards it to the back-end database through judgment. There are the following representative programs
(1) MySQL proxy, which is an open source MySQL project, uses its own lua script for SQL judgment.
(2) Atlas is a data middle tier project based on MySQL protocol developed and maintained by the infrastructure team of Qihoo 360's Web Platform Department. It is optimized and added some new features based on MySQL proxy version 0.8.2. The MySQL service run by atlas in 360 carries billions of read and write requests every day. Support things and stored procedures
(3) Amoeba, developed by Chen Siru, the author once worked for Alibaba. The program is developed by the Java language and Alibaba uses it in the production environment. However, it does not support transactions and stored procedures.
- Since a large number of Lua scripts need to be written to use MySQL Proxy, these Luas are not ready-made, but need to be written by themselves, which is very difficult for people who are not familiar with MySQL Proxy built-in variables and MySQL Protocol
- Amoeba is a very easy to use and portable software. Therefore, it is widely used in the agent layer of database in production environment
4, Case implementation
1. Case environment
- In this case, the stage server is used to build the environment. The topology is as follows
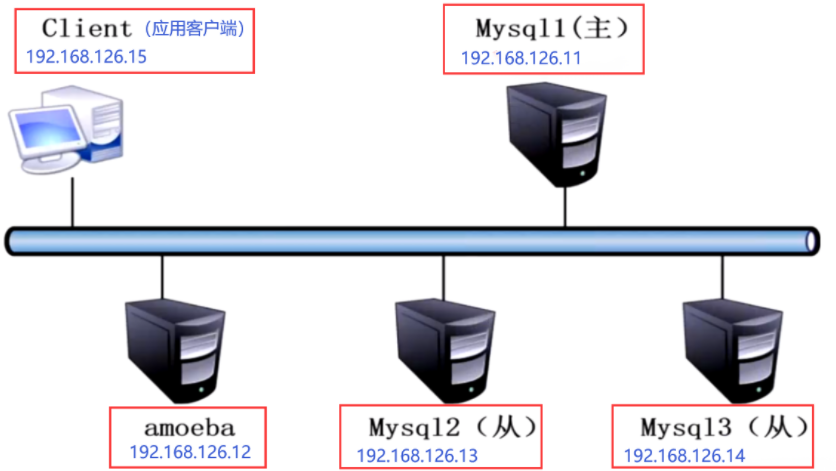
| host name | host | operating system | IP address | Main software |
|---|---|---|---|---|
| CentOS 7-1 | Master | CentOS 7 | 192.168.126.11 | ntp , mysql-boost-5.7.17.tar.gz |
| CentOS 7-2 | Amoeba | CentOS 7 | 192.168.126.12 | jdk-6u14-linux-x64.bin,amoeba-mysql-binary-2.2.0.tar.gz |
| CentOS 7-3 | Slave1 | CentOS 7 | 192.168.126.13 | ntp ,ntpdate , mysql-boost-5.7.20.tar.gz |
| CengOS 7-4 | Slave2 | CentOS 7 | 192.168.126.14 | ntp ,ntpdate ,mysql-boost-5.7.17.tar.gz |
| CentOS 7-5 | client | CentOS 7-5 | 192.168.126.15 | mysql5.7 |
2. Experimental ideas (Solving needs)
- Client access proxy server
- The proxy server writes to the primary server
- The master server overwrites additions and deletions into its own binary log
- The slave server synchronizes the binary log of the master server to its own relay log
- Replay relay logs from server to database
- If the client reads, the proxy server directly accesses the slave server
- Reduce the load and play the role of load balancing
3. Preparation
- In addition to the client, you need to compile the source code and install MySQL first
- Both firewalls and access control mechanisms need to be turned off
systemctl stop firewalld
systemctl disable firewalld
#Turn off the firewall (and turn it on and off)
setenforce 0
#Turn off security access control mechanism
4. Set up MySQL master-slave replication
① Mysql master-slave server time synchronization
- Master server settings
#Install NTP
yum -y install ntp


#Configure NTP
vim /etc/ntp.conf
#Add the following to the last line
server 127.127.126.0
fudge 127.127.126.0 stratum 8

#Set the local clock source. Pay attention to modifying the network segment
#Set the time level to 8 (limited to 15)


#Restart service
service ntpd restart
- From server settings
yum -y install ntp ntpdate
#Installation service, ntpdate for time synchronization

service ntpd start
#Open service


/usr/sbin/ntpdate 192.168.126.11
#Time synchronization, pointing to the Master server IP


crontab -e
#Write scheduled tasks and synchronize time every half an hour
*/30 * * * * /usr/sbin/ntpdate 192.168.126.11
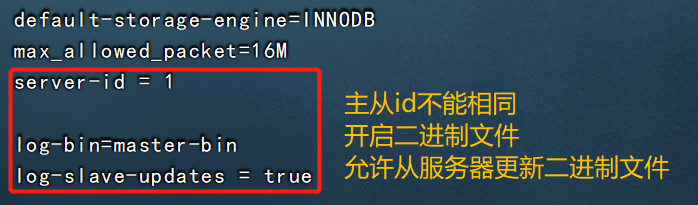
② Configure MySQL Master master server
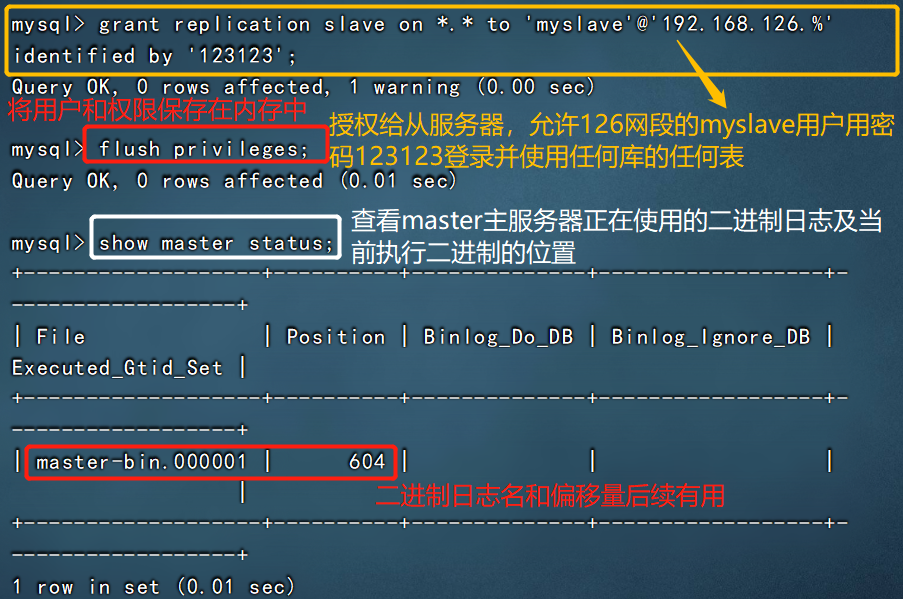
vim /etc/my.cnf
#Configure the following

server-id = 1
log-bin=master-bin
#Add, and the primary server opens the binary log
log-slave-updates=true
#Added to allow binary logs to be updated from the server


systemctl restart mysqld
#Restart the service for the configuration to take effect


mysql -uroot -p123123
#Log in to the database program and authorize the slave server
GRANT REPLICATION SLAVE ON *.* TO 'myslave'@'192.168.126.%' IDENTIFIED BY '123123';
FLUSH PRIVILEGES;

show master status;
quit

#The File column displays the log name and the position column displays the offset
③ Configure slave server
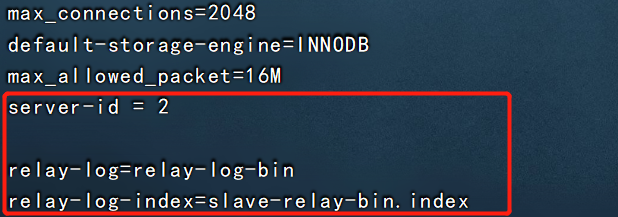
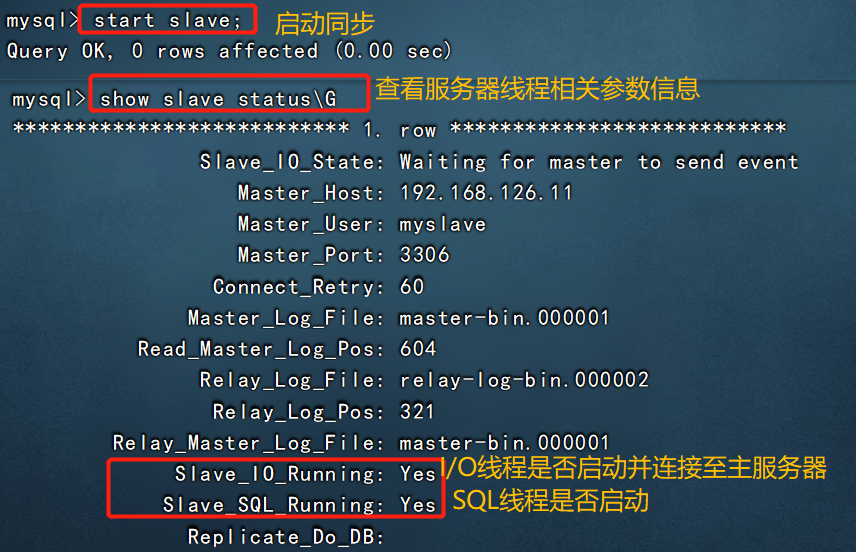
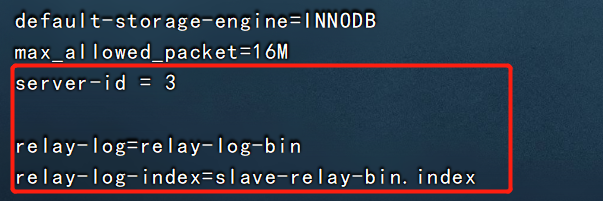
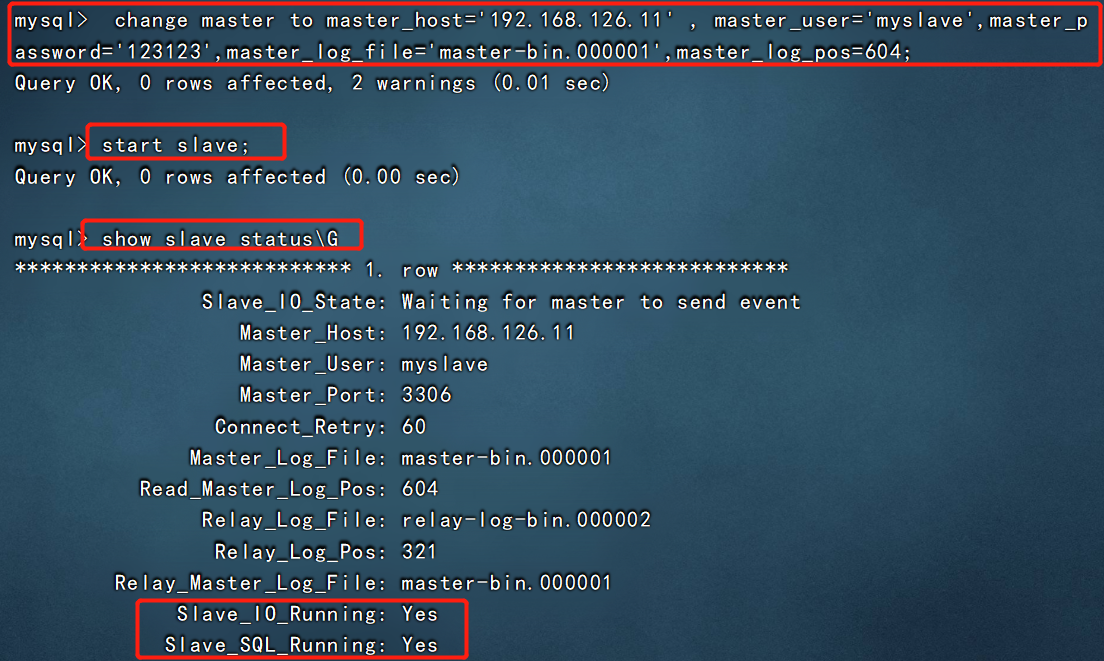
vim /etc/my.cnf
server-id = 2

#Modify. Note that the id is different from that of the Master, and the IDs of the two Slave should also be different
relay-log=relay-log-bin
#Add, enable the relay log, and synchronize the log file records from the primary server to the local server
relay-log-index=slave-relay-bin.index
#Add and define the location and name of the relay log file


systemctl restart mysqld


mysql -uroot -p123123
change master to master_host='192.168.126.11' , master_user='myslave',master_password='123123',master_log_file='master-bin.000001',master_log_pos=604;
#To configure synchronization, pay attention to the master_log_file and Master_ log_ The value of POS should be consistent with that of Master

start slave;
#Start synchronization, and execute reset slave in case of error;
show slave status\G
#View Slave status
//Ensure that both IO and SQL threads are Yes, which means the synchronization is normal


Slave_IO_Running: Yes
#Responsible for io communication with the host
Slave_SQL_Running: Yes
#Be responsible for your own slave mysql process
- slave1:

- slave2: the configuration is the same as slave1, but the id cannot be the same
- General Slave_IO_Running: No, there are several possibilities:
- The network is blocked
- There is a problem with my.cnf configuration
- Incorrect password, file name, pos offset
- The firewall is not turned off
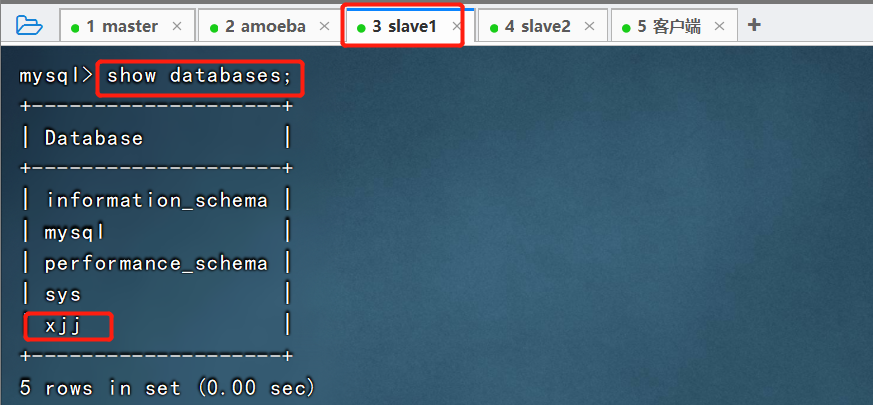
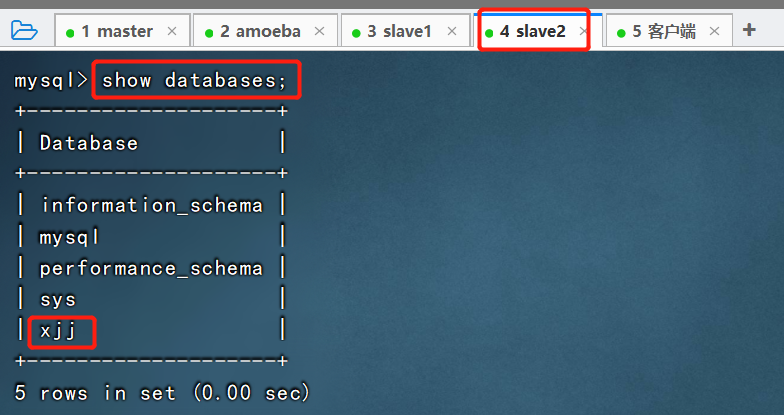
④ Verify master-slave replication effect

5. Build MySQL read-write separation
- This software is dedicated to MySQL's distributed database front-end agent layer. It mainly acts as SQL route for the application layer to access mysql, and has load balancing, high availability, SQL filtering, read-write separation, routability to the target database, and concurrent requests to multiple databases
- Through Amoeba, the functions of high availability, load balancing and data slicing of multiple data sources can be completed
① Install the Java environment on the host Amoeba
- Because Amoeba is developed based on jdk1.5, it is officially recommended to use jdk1.5 or 1.6, and the higher version is not recommended
cd /opt/
#In the final shell, drag the package in
amoeba-mysql-binary-2.2.0.tar.gz
jdk-6u14-linux-x64.bin

cp jdk-6u14-linux-x64.bin /usr/local/

cd /usr/local/
chmod +x jdk-6u14-linux-x64.bin
./jdk-6u14-linux-x64.bin
#Press and hold the Enter key until the bottom. When prompted, enter YES + enter


mv jdk1.6.0_14/ /usr/local/jdk1.6
#Rename

vim /etc/profile
#Edit the global configuration file and add the following configuration on the last line
export JAVA_HOME=/usr/local/jdk1.6
export CLASSPATH=$CLASSPATH:$JAVA_HOME/lib:$JAVA_HOME/jre/lib
export PATH=$JAVA_HOME/lib:$JAVA_HOME/jre/bin/:$PATH:$HOME/bin
export AMOEBA_HOME=/usr/local/amoeba
export PATH=$PATH:$AMOEBA_HOME/bin

#Output defines the working directory of Java
#Output the specified java type
#Add java path environment variable
#Output definition amoeba working directory
#Add path environment variable


source /etc/profile
#Execute the modified global profile
java -version
#Check the java version information to see if the installation was successful
② Install and configure Amoeba
mkdir /usr/local/amoeba
tar zxvf /opt/amoeba-mysql-binary-2.2.0.tar.gz -C /usr/local/amoeba/
chmod -R 755 /usr/local/amoeba/
/usr/local/amoeba/bin/amoeba

#If amoeba start|stop is displayed, the installation is successful

③ Configure Amowba read-write separation and load balancing between two slave reads and writes
- Open permissions to amoeba on mysql of master, slave1 and slave2
grant all on *.* to test@'192.168.126.%' identified by '123.com';


④ Edit the amoeba.xml configuration file in the host amoeba
cd /usr/local/amoeba/conf/
cp amoeba.xml amoeba.xml.bak

vim amoeba.xml
#Modify amoeba configuration file

#Line 30 modification
<property name="user">amoeba</property>
#32 line modification
<property name="password">123123</property>
#Line 115 modification
<property name="defaultPool">master</property>
#117 remove comments
<property name="writePool">master</property>
<property name="readPool">slaves</property>
⑤ Edit the dbServers.xml configuration file
cp dbServers.xml dbServers.xml.bak

vim dbServers.xml
#Modify database configuration file

#Comment out line 23
 Function: default entry test Library in case mysql Not in test An error will be reported when the library is
<!-- <property name="schema">test</property> -->
#Line 26 modification
<property name="user">test</property>
#Lines 28-30 remove comments
<property name="password">123.com</property>
#Line 45 is modified to set the name of the Master server
<dbServer name="master"  parent="abstractServer">
#Line 48 modify to set the address of the master server
<property name="ipAddress">192.168.126.11</property>
#Modify line 52 to set the slave server name slave1
<dbServer name="slave1"  parent="abstractServer">
#Line 55 is modified to set the address of slave server 1
<property name="ipAddress">192.168.126.13</property>
#Copy line 58 and paste the above 6 lines, and set the slave 2 name and address from server 2
<dbServer name="slave2"  parent="abstractServer">
<property name="ipAddress">192.168.184.14</property>
#Line 65 modification
<dbServer name="slaves" virtual="true">
#71 modification
<property name="poolNames">slave1,slave2</property>
⑥ After confirming that the configuration is correct, you can start Amoeba software, and its default port is tcp 8066
/usr/local/amoeba/bin/amoeba start&
#Start Amoeba software and press ctrl+c to return
netstat -anpt | grep java
#Check whether port 8066 is enabled. The default port is TCP 8066
⑦ Testing
- Go to the client to quickly install the MySQL virtual client, and then access MySQL through the agent
yum -y install mysql
#Quick installation of MySQL virtual client with YUM

mysql -u amoeba -p123123 -h 192.168.126.12 -P8066
#Access MySQL through an agent, and the IP address points to amoba
#After connecting to mysql through the client, only the master service will record the data written, and then synchronize it to the slave server
2. Create a table on the Master and synchronize it to two slave servers
use club;
create table puxin (id int(10),name varchar(10),address varchar(20));
3. Then turn off the Slave function of the Slave server, synchronize the table from the master server, and insert the data content manually
stop slave;
#Turn off synchronization

use club;
insert into puxin values('1','wangyi','this_is_slave1');


#slave2
insert into puxin values('2','wanger','this_is_slave2');
4. Go back to the main server and insert other content
insert into pucin values('3','wangwu','this_is_master');
5. Test the read operation and go to the client host to query the results
use club;
select * from puxin;
6. Insert a statement on the client, but it cannot be queried on the client. Finally, the statement can only be viewed on the Master, indicating that the write operation is on the Master server
insert into puxin values('4','liuliu','this_is_client');
7. Execute start slave on two slave servers; You can synchronize the data added on the primary server
summary
- It is verified that MySQL read-write separation has been realized. At present, all write operations are on the Master master server to avoid data synchronization
- All read operations are allocated to the Slave slave server to share the pressure of the database