Source of mmm architecture
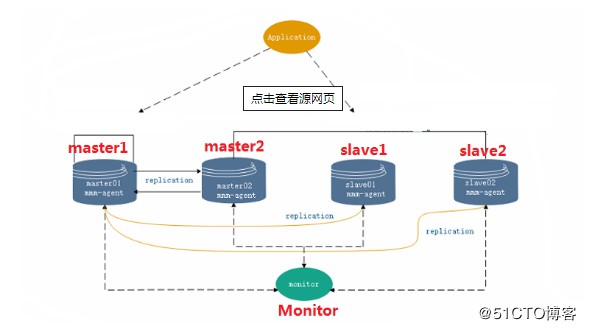
- As we all know, MySQL provides Master-Slave replication, and then it can easily realize Master master two-way replication, and build a Slave library for one of the Master nodes. In this way, the MySQL-MMM architecture is based on two-way replication between Master1 and master2, and Master-Slave replication between Master1 and Slave1.
- In this way, there are two masters in the whole system. Normally, only one master provides external write services. If the external service master fails unexpectedly, MySQL does not have the ability of failover switching. Although there is still a normal master node in the cluster, the application is still unavailable. MySQL MMM was born to solve this problem.
The principle of mmm architecture
- mysql MMM is the abbreviation of master master replication manager for mysql. It is an open source project (Perl script) of Google. It is mainly used to monitor and fail over mysql master replication
- Its principle is to map the IP (RIP) of the real database node to the virtual IP (VIP) set. In this virtual IP set, there is an IP dedicated to write and multiple IPS for read. This VIP for write maps the real IP (RIP) of the two master s in the database cluster, so as to realize the Failover switch. Other read VIPs can be used to balance the read.
Advantages and disadvantages of mmm mechanism
Advantage
- Perl script language development and full open source
- Provides read-write VIP (virtual IP), which makes the change of server role transparent to the front-end application
- MMM provides delay monitoring of slave servers
- MMM provides the resynchronization of the new master from the slave server after the master database fails over
- It is easy to re launch the failed main database
shortcoming
- The new replication function of MySQL (based on GTID) is not supported when it was published earlier
- No read load balancing function
- When switching between master and slave, it is easy to cause data loss
- Single point of failure in MMM monitoring service
mmm architecture schematic diagram
Experimental deployment
Environmental deployment
Master 1ip address: 192.168.144.167
 master2IP address: 192.168.144.151
 slave1IP address: 192.168.144.168
 slave2IP address: 192.168.144.145
 Monitor IP address: 192.168.144.164
Install MYSQL database in master1\master2\slave1\slave2 server
[root@master1 ~]# wget -O /etc/yum.repos.d/CentOS-Base.repo http://mirrors.aliyun.com/repo/Centos-7.repo / / get the source address
[root@master1 ~]# Yum - y install epel release / / install epel source
[root@master1 ~]# Yum clean all & & Yum makecache / / Yum cache clear
[root@master1 ~]# Yum - y install mariadb server mariadb / / install mariadb database
[root@master1 ~]# systemctl stop firewalld.service / / turn off the firewall
[root@master1 ~]# setenforce 0
[root@master1 ~]# systemctl start mariadb.service / / start the database
Modify the master1 database configuration file
[root@master1 ~]# vim /etc/my.cnf / / enter the edit configuration file
[mysqld]
log_error=/var/lib/mysql/mysql.err        //Error log file
log=/var/lib/mysql/mysql_log.log           //Master slave log storage location
log_slow_queries=/var/lib/mysql_slow_queris.log     //man log
binlog-ignore-db=mysql,information_schema         //Binary
character_set_server=utf8        //character set
log_bin=mysql_bin             //Binary log file
server_id=11            //Service id (cannot be the same)
log_slave_updates=true   //Allow updates from server
sync_binlog=1            //Synchronization log
auto_increment_increment=2    //Self adding column
auto_increment_offset=1               //starting point
[root@master1 ~]# systemctl restart mariadb.service / / restart the database
Use scp to copy the database configuration file to other MySQL services, and modify the server ID in other MySQL servers
[root@master1 ~]# scp /etc/my.cnf root@192.168.144.151:/etc/   (server-id=22)
[root@master1 ~]# scp /etc/my.cnf root@192.168.144.168:/etc/   (server-id=33)
[root@master1 ~]# scp /etc/my.cnf root@192.168.144.145:/etc/   (server-id=44)
[root@master1 ~]# netstat -anpt | grep 3306 / / view port 3306
tcp      0   0 0.0.0.0:3306     0.0.0.0:*         LISTEN      4235/mysqld
Configure primary primary replication
master1
[root@master1 ~]# mysql   ##Enter database

MariaDB [(none)]> show master status;   ##View the status information of the primary server
+------------------+----------+--------------+--------------------------+
| File             | Position | Binlog_Do_DB | Binlog_Ignore_DB         |
+------------------+----------+--------------+--------------------------+
| mysql_bin.000001 |      245 |              | mysql,information_schema |
+------------------+----------+--------------+--------------------------+
1 row in set (0.00 sec)

MariaDB [(none)]> grant replication slave on *.* to 'replication'@'192.168.144.%' identified by '123456';     //Authorization to 144 segment replication user name replication password 123456
Query OK, 0 rows affected (0.00 sec)
master2
MariaDB [(none)]> change master to master_host='192.168.144.167',master_user='replication',master_password='123456',master_log_file='mysql_bin.000001',master_log_pos=245;     //Synchronizing the master1 server on master2
Query OK, 0 rows affected (0.00 sec)

MariaDB [(none)]> grant replication slave on *.* to 'replication'@'192.168.144.%' identified by '123456';    //Authorize replication permission on master2
Query OK, 0 rows affected (0.00 sec)

MariaDB [(none)]> show master status;       //View the status information of the master 2 server
+------------------+----------+--------------+--------------------------+
| File             | Position | Binlog_Do_DB | Binlog_Ignore_DB         |
+------------------+----------+--------------+--------------------------+
| mysql_bin.000001 |      410 |              | mysql,information_schema |
+------------------+----------+--------------+--------------------------+
1 row in set (0.00 sec)

MariaDB [(none)]> flush privileges;     //Refresh authority
Query OK, 0 rows affected (0.00 sec)
master1
MariaDB [(none)]> change master to master_host='192.168.144.151',master_user='replication',master_password='123456',master_log_file='mysql_bin.000001',master_log_pos=410;       //Master 1 synchronizes Master 2 server database
Query OK, 0 rows affected (0.03 sec)

MariaDB [(none)]> flush privileges;
Query OK, 0 rows affected (0.00 sec)
Start synchronization on master1 and master2
MariaDB [(none)]> start slave;              //Open synchronization
Query OK, 0 rows affected (0.00 sec)

MariaDB [(none)]> show slave status\G;       //View synchronization status information
                         ...
                         Slave_IO_Running: Yes
                        Slave_SQL_Running: Yes
                        ...
slave1, slave2 is the master-slave synchronization
MariaDB [(none)]> change master to master_host='192.168.144.167',master_user='replication',master_password='123456',master_log_file='mysql_bin.000001',master_log_pos=245;       //Synchronize master 1 master on slave
Query OK, 0 rows affected (0.00 sec)

MariaDB [(none)]> flush privileges;       //Refresh authority
Query OK, 0 rows affected (0.00 sec)

MariaDB [(none)]> start slave;       //Open synchronization
Query OK, 0 rows affected (0.00 sec)

MariaDB [(none)]> show slave status\G;        //View status information for synchronization
                             ...
                             Slave_IO_Running: Yes
                            Slave_SQL_Running: Yes
                            ...
Test the synchronization status of master and slave
Master server master1
MariaDB [(none)]> create database school;   //Create database
Query OK, 1 row affected (0.00 sec)

MariaDB [(none)]> show databases;   //view the database
+--------------------+
| Database           |
+--------------------+
| information_schema |
| mysql              |
| performance_schema |
| school             |
| test               |
+--------------------+
5 rows in set (0.00 sec)
View database on slave server
MariaDB [(none)]> show databases;    //Realize master-slave synchronization
+--------------------+
| Database           |
+--------------------+
| information_schema |
| mysql              |
| performance_schema |
| school             |
| test               |
+--------------------+
5 rows in set (0.00 sec)
Configure the EPEL release source on the monitor server to clear the cache, and then install MMM
wget -O /etc/yum.repos.d/CentOS-Base.repo http://mirrors.aliyun.com/repo/Centos-7.repo

yum -y install epel-release

yum clean all && yum makecache

yum -y install mysql-mmm*
mmm is installed on all MySQL servers
yum -y install mysql-mmm*
mmm is configured on all servers
 [root@master1 ~]# vim /etc/mysql-mmm/mmm_common.conf / / all hosts should be configured, and multiple copies should be copied directly

......
<host default>
        cluster_interface       ens33    //Modify NIC
        ...
        replication_user        replication      //Modify user name
        replication_password    123456         //Password
        agent_user              mmm_agent
        agent_password          123456         //Password

<host db1>
        ip      192.168.144.167   //master1 address
        mode    master
        peer    db2
</host>

<host db2>
        ip      192.168.144.151   //master2 address
        mode    master
        peer    db1
</host>

<host db3>
        ip      192.168.144.168   //slave1 address
        mode    slave
</host>

<host db4>
        ip      192.168.144.145   //slave2 address
        mode    slave
</host>

<role writer>
        hosts   db1, db2      ##Write server virtual ip
        ips     192.168.144.250
        mode    exclusive
</role>

<role reader>
        hosts   db3, db4    ##Read server virtual ip
        ips     192.168.144.251, 192.168.144.252
        mode    balanced
</role>

##Copy to another server
[root@master1 ~]# scp /etc/mysql-mmm/mmm_common.conf root@192.168.144.151:/etc/mysql-mmm/
root@192.168.144.151's password:
mmm_common.conf                               100%  836   267.1KB/s   00:00
[root@master1 ~]# scp /etc/mysql-mmm/mmm_common.conf root@192.168.144.168:/etc/mysql-mmm/
root@192.168.144.168's password:
mmm_common.conf                               100%  836   863.2KB/s   00:00
[root@master1 ~]# scp /etc/mysql-mmm/mmm_common.conf root@192.168.144.145:/etc/mysql-mmm/
root@192.168.144.145's password:
mmm_common.conf                               100%  836   904.7KB/s   00:00
[root@master1 ~]# scp /etc/mysql-mmm/mmm_common.conf root@192.168.144.164:/etc/mysql-mmm/
Configuring on the monitor server
[root@monitor ~]# vim /etc/mysql-mmm/mmm_mon.conf
<host default>
        monitor_user        mmm_monitor
        monitor_password    123456    ##Change the password of monitor
</host>
Authorize MMM agent agent and MMM monitor on all databases
MariaDB [(none)]> grant super, replication client, process on *.* to 'mmm_agent'@'192.168.144.%' identified by '123456';     //Authorized agent
Query OK, 0 rows affected (0.00 sec)

MariaDB [(none)]> grant replication client on *.* to 'mmm_monitor'@'192.168.144.%' identified by '123456';        //Authorization monitoring
Query OK, 0 rows affected (0.00 sec)

MariaDB [(none)]> flush privileges;       //Refresh authority
Query OK, 0 rows affected (0.00 sec)
Modify MMM agent.conf of all databases
[root@master1 ~]# vim /etc/mysql-mmm/mmm_agent.conf
this db1 //Adjust one by one according to the plan
[root@master2 ~]# vim /etc/mysql-mmm/mmm_agent.conf
this db2 //Adjust one by one according to the plan
[root@slave1 ~]# vim /etc/mysql-mmm/mmm_agent.conf
this db3 //Adjust one by one according to the plan
[root@slave2 ~]# vim /etc/mysql-mmm/mmm_agent.conf
this db4 //Adjust one by one according to the plan
##All databases on
[root@master1 ~]systemctl start mysql-mmm-agent.service        //Start agent service
[root@master1 ~]systemctl enable mysql-mmm-agent.service        //Add power on self start
Configuring on monitor
[root@monitor ~]# vim /etc/mysql-mmm/mmm_mon.conf
<monitor>
        ip                  127.0.0.1
        pid_path            /run/mysql-mmm-monitor.pid
        bin_path            /usr/libexec/mysql-mmm
        status_path         /var/lib/mysql-mmm/mmm_mond.status
        ping_ips            192.168.144.167,192.168.144.151,192.168.144.168,192.168.144.145    //All database server addresses
        auto_set_online     10        //Automatic online time
[root@monitor ~]# systemctl stop firewalld.service / / turn off the firewall
[root@monitor ~]# setenforce 0
[root@monitor ~]# systemctl start mysql-mmm-monitor.service / start monitoring service
[root@monitor ~]# Mmm? Control show / / view the master slave's floating address
    db1(192.168.144.167) master/ONLINE. Roles: writer(192.168.144.250)
    db2(192.168.144.151) master/ONLINE. Roles:
    db3(192.168.144.168) slave/ONLINE. Roles: reader(192.168.144.252)
    db4(192.168.144.145) slave/ONLINE. Roles: reader(192.168.144.251)
Test drift address
[root@master1 ~]# systemctl stop mariadb.service / / simulate stopping the master1 server
View on monitor server
[root@monitor ~]# mmm_control show
    db1(192.168.144.167) master/HARD_OFFLINE. Roles:
    db2(192.168.144.151) master/ONLINE. Roles: writer(192.168.144.250)
    db3(192.168.144.168) slave/ONLINE. Roles: reader(192.168.144.252)
    db4(192.168.144.145) slave/ONLINE. Roles: reader(192.168.144.251)
(restart master1 Database service, virtual address will not be preempted master1)
mmm_control checks all //Need all kinds of OK
mmm_control move_role writer db1      //Virtual address can be switched
Install MySQL on monitor as a test machine to log in database with virtual ip
[root@monitor ~]# yum install mysql -y

//Authorize monitor address access on the master1 server//

MariaDB [(none)]> grant all on *.* to 'testdba'@'192.168.144.164' identified by '123456';
##Authorize monitor address access
Query OK, 0 rows affected (0.01 sec)

MariaDB [(none)]> flush privileges;   ##Refresh authority
Query OK, 0 rows affected (0.00 sec)

[root@monitor ~]# mysql -utestdba -p -h 192.168.144.250   ##Use the virtual address to log in to the database
Enter password:

MariaDB [(none)]>