Machine information
| Machine IP | Installation services | Exposed port |
|---|---|---|
| 192.168.177.128 | mycat service | External exposure port 8066 |
| 192.168.177.131 | mysql1 | External exposure port 3306 |
| 192.168.177.132 | mysql2 | External exposure port 3306 |
1. Install mycat
1.1 download the installation package (it is recommended that the version be consistent, and you can try a new version after success)
mycat Download
jdk Download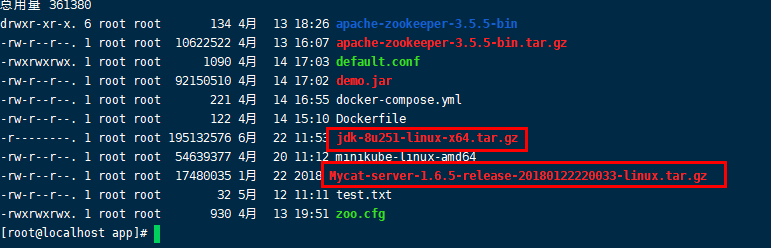
1.2 decompression and installation
#decompression
tar -zxf jdk-8u251-linux-x64.tar.gz
tar -zxf Mycat-server-1.6.5-release-20180122220033-linux.tar.gz
In my side, I've moved all the extracted files to the directory / usr/local. This depends on my habits. If I don't move them, when I configure the jdk and mycat environment variables later, the directory needs to be modified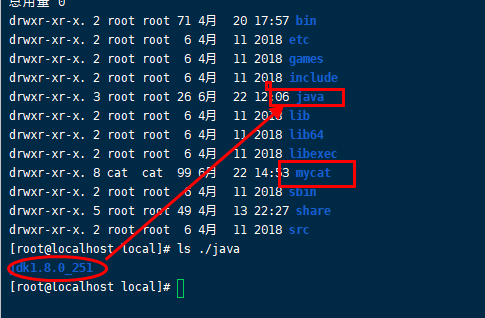
1.3 configure environment variables
Compile the profile file under / etc / directory, and add the environment variable configuration at the end of the file
(if the paths of jdk and mycat are inconsistent, remember to modify them.)
export JAVA_HOME=/usr/local/java/jdk1.8.0_251
export MYCAT_HOME=/usr/local/mycat
export CLASSPATH=.:$JAVA_HOME/jre/lib/rt.jar:$JAVA_HOME/lib/tools.jar:$JAVA_HOME/lib/dt.jar

export PATH=$PATH:$JAVA_HOME/bin:$MYCAT_HOME/bin
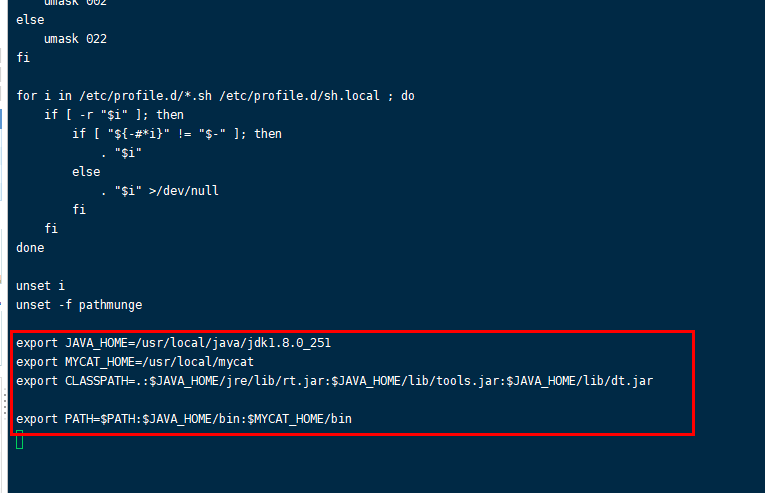
After editing, save to exit, and execute the following command.
#Refresh environment variable configuration
source profile
#Verify that the environment variable configuration is valid
java -version
2. Prepare mysql instance
2.1 prepare two mysql instances
In my side, I directly used docker to build two containers of msyql5.7. During this demonstration, docker is very convenient and quick, and can be done by one line of command.
docker run --name Mymysql -p 3306:3306 -e MYSQL_ROOT_PASSWORD=123456 -d mysql:5.7
be careful:
- The above command needs to install docker first, Refer to previous docker articles for installation methods
- You can start two mysql containers on the same machine, so remember to modify the port mapping. For example, if one is - p 3306:3306 and the other is - p {custom port}: 3306; if you are starting a mysql example for each machine, the above command will be executed separately without any modification (only for demonstration here, without configuring the mount data volume and other mysql configurations)
- Remember to turn on the firewall
2.2 initialize database and table
Each example establishes a user database, as well as a user table, to be used in our later fragmentation experiments.
-- export user Database structure of
CREATE DATABASE IF NOT EXISTS `user` /*!40100 DEFAULT CHARACTER SET utf8mb4 COLLATE utf8mb4_bin */;
USE `user`;

-- Export table user.user structure
CREATE TABLE IF NOT EXISTS `t_user` (
  `id` bigint(20) NOT NULL COMMENT 'id',
  `name` varchar(50) CHARACTER SET utf8 COLLATE utf8_bin DEFAULT NULL COMMENT 'name',
  `age` int(11) DEFAULT NULL COMMENT 'Age',
  `address` varchar(255) CHARACTER SET utf8 COLLATE utf8_bin DEFAULT NULL COMMENT 'address',
  PRIMARY KEY (`id`)
) ENGINE=InnoDB DEFAULT CHARSET=latin1 COMMENT='User table';
3. Configure sharding
mycat has three important configuration files: server.xml , schema.xml , rule.xml , we will not expand here, because each file has a large number of configurations, you can write a whole article, and there are many online related introduction materials, you can consult them by yourself.
3.1 configure fragment rule
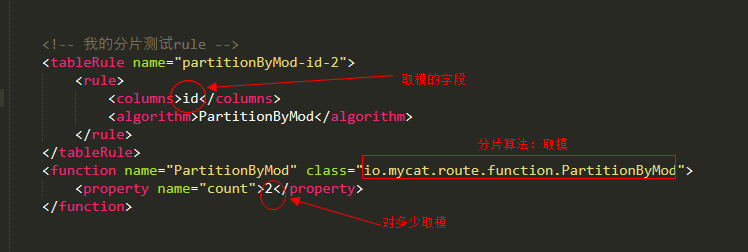
modify rule.xml Configure sharding rules
	<tableRule name="partitionByMod-id-2">
		<rule>
			<columns>id</columns>
			<algorithm>PartitionByMod</algorithm>
		</rule>
	</tableRule>
	<function name="PartitionByMod" class="io.mycat.route.function.PartitionByMod">
		<property name="count">2</property>
	</function>
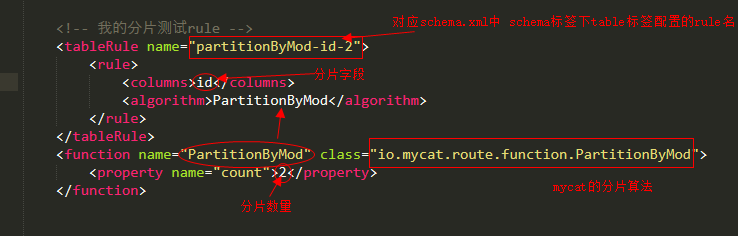
- tableRule - name: the name of the rule we defined. You can choose it by yourself. You'd better see the meaning of the rule. rule.xml File cannot have the same tableRule name
- Columns: fragment that field
- algorithm: just match the function tag name below
- function - class: define fragmentation algorithm, io.mycat.route.function.PartitionByMod,mycat provides many segmentation algorithms
- property name = "count": number of sharded nodes, corresponding to schema.xml The number of dataNode configurations in the table tag
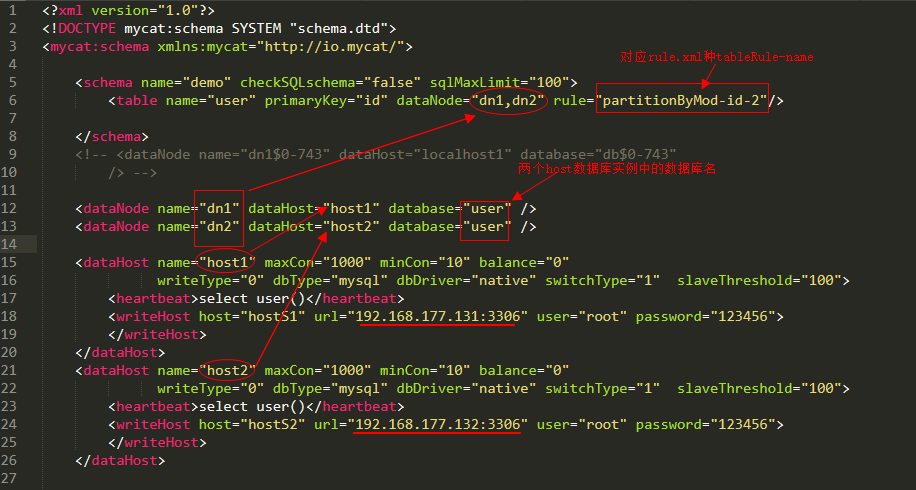
3.2 configuration schema
<!-- schema name Configure the logical library name, which can be defined; table name The configured logical table name is consistent with the prepared two databases -->
<schema name="demo" checkSQLschema="false" sqlMaxLimit="100">
	<table name="t_user" primaryKey="id" dataNode="dn1,dn2" rule="partitionByMod-id-2"/>
</schema>
<!-- Configure two dataNode,database And two mysql Same library name -->
<dataNode name="dn1" dataHost="host1" database="user" />
<dataNode name="dn2" dataHost="host2" database="user" />
<!-- to configure host1 Represents the database instance -->
<dataHost name="host1" maxCon="1000" minCon="10" balance="0"
		  writeType="0" dbType="mysql" dbDriver="native" switchType="1"  slaveThreshold="100">
	<heartbeat>select user()</heartbeat>
	<writeHost host="hostS1" url="192.168.177.131:3306" user="root" password="123456">
	</writeHost>
</dataHost>
<!-- to configure host2 Represents the database instance -->
<dataHost name="host2" maxCon="1000" minCon="10" balance="0"
		  writeType="0" dbType="mysql" dbDriver="native" switchType="1"  slaveThreshold="100">
	<heartbeat>select user()</heartbeat>
	<writeHost host="hostS2" url="192.168.177.132:3306" user="root" password="123456">
	</writeHost>
</dataHost>
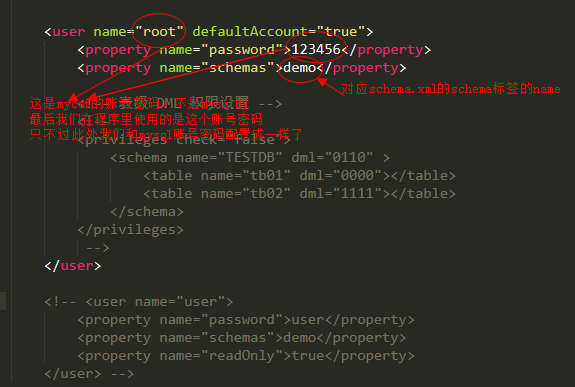
3.3 configuration server.xml
<!-- mycat account number -->
<user name="root" defaultAccount="true">
	<!-- mycat password -->
	<property name="password">123456</property>
	<!-- Logical library name -->
	<property name="schemas">demo</property>
</user>
4. Start mycat test
4.1 start up:
#Or mycat restart
mycat start
4.2 check the log of mycat to see if it is started successfully
tail -f /usr/local/mycat/logs/wrapper.log
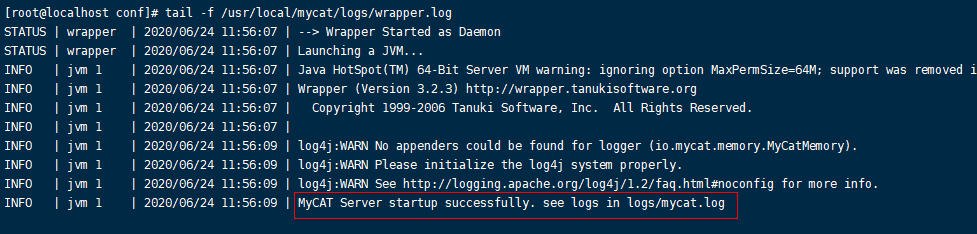
See the log line, and there is no error reported in the front, indicating that the startup is successful.
4.3 testing
I use Python for testing, because the code is simple. (I'm a python rookie QAQ)
import MySQLdb
import random
import string

conn = MySQLdb.connect(host="192.168.177.128",port=8066,user="root",passwd ="123456",db="demo",charset='utf8')
conn.autocommit(1)
# Using the cursor() method to get the operation cursor
cursor = conn.cursor()
for i in range(1,10):
    ran_str = ''.join(random.sample(string.ascii_letters + string.digits, 8))
    sqlStr = "insert into t_user(id,name,age,address)values('{}','{}',18,'Shenzhen, Guangdong Province')".format(i,ran_str)
    cursor.execute(sqlStr)
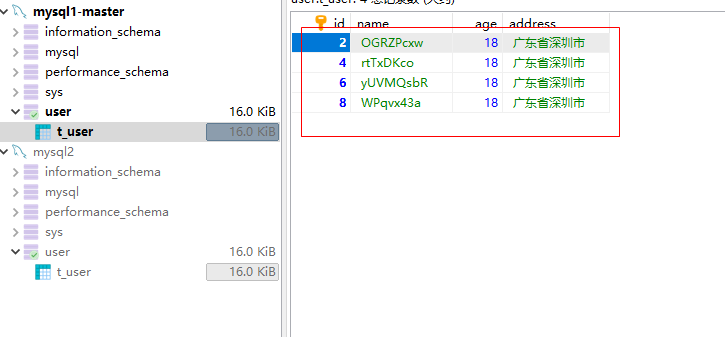
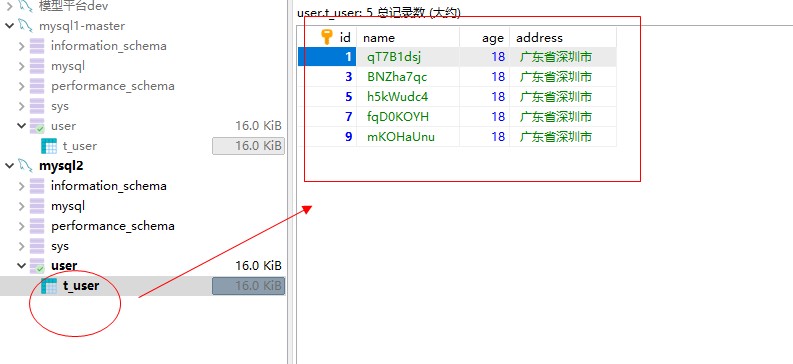
Finally, we can see that the data is divided into two databases according to the module of id pair 2_ In the user table.
Add:
id modulo 2, these are defined in rule.xml In.