Preparation for multi table query: three tables are created. Previously used user table, newly created role table, account table, user_role table. The specific parameters in the table are as follows:
user table (mainly the header, which is filled in by itself):
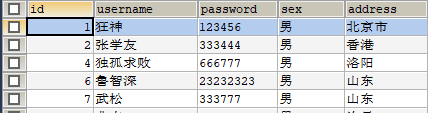
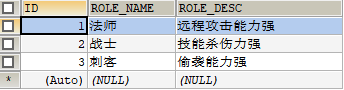
role table:
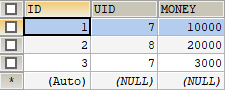
account table:
user_role table:

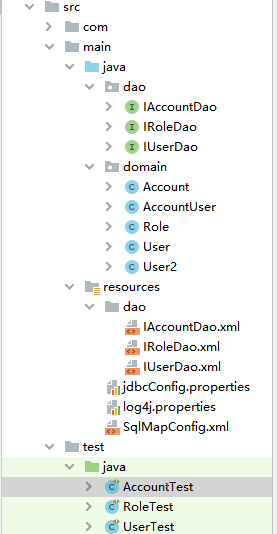
After these classes are created, remember to create their own classes in the domain, override the set, get and toString methods, and then write the interfaces of these three classes in the dao interface. The other steps have been mentioned earlier and will not be repeated here. Show me the directory structure. I have built some files (AccountUser, User2) and will use them later. I will explain when I use them
There are many relationships between tables, including one-to-one, one to many, many to one and many to many.
For example:
- People and ID number ID one to one, one person can only have one ID number, and one ID number can only belong to one person.
- Users and orders are one to many, and orders and users are many to one. A user can place multiple orders, and multiple orders belong to the same user.
- Teachers and students are many to many. A student can be taught by multiple teachers, and a teacher can hand over multiple students
For simplicity, only one-to-one, one to many (just learn one as the principle of many to one and one to many) and many to many functions are realized.
1. One to one (the method introduced here is one-to-one with the method of configuration file. Although one-to-one inheritance class is simple, it is not commonly used, so it is skipped)
Mainly implemented SQL statements:
select a.*,u.* from account a,user u where a.uid=u.id;
First, provide the method in IAccountDao
List <Account> findAccountAndUser();
It's easy to find out. The results are encapsulated here. We encapsulate the results into the Account class, so we need to add the User attribute (private User) in the Account, which is the single table entity class object maintained in the multi table entity class. More importantly, you need to add a configuration file in IAccountDao.xml and configure it in the mapper tag. The main configuration files are as follows:
<mapper namespace="dao.IAccountDao">
    <resultMap id="accountMap" type="account">
<!--        Configure primary key-->
        <id property="id" column="id"/>
        <result property="uid" column="uid"/>
        <result property="money" column="money"/>
        <association property="user" column="uid" javaType="user">
<!--            Configure primary key-->
            <id property="id" column="id"/>
            <result property="username" column="username"/>
            <result property="password" column="password"/>
            <result property="sex" column="sex"/>
            <result property="address" column="address"/>
        </association>
    </resultMap>
The configuration of name and attribute name in our previous configuration table is the same. The difference is that this time we add an association tag, which is mainly associated with user. The meanings of these attributes in association are explained below:
- property = "user" single table entity class object maintained in entity class
- column = "uid" multiple tables are associated with a single table through this uid field
- javaType = "user" query the information through the account and encapsulate it into the user class. The alias has been configured previously, and all information is written directly to user
After configuration, write sql statements directly below. It should be noted that the above "accountMap" should be referenced, otherwise the configuration will be blank
<select id="findAccountAndUser" resultMap="accountMap">
        select a.*,u.* from account a,user u where a.uid=u.id;
</select>
Here, the main work is finished. Finally, write a test file and test it. Well, this is my test file
@Test
    public void testFindAccountAndUser(){
        List<Account> user = dao.findAccountAndUser();
        for (Account account : user) {
            System.out.println(account);
        }
    }
The final result is correct, so we won't demonstrate it here.
2. One to many
Different from one-to-one, when encapsulating one to many results, we need to provide a set in the single table entity class to describe the one to many relationship. The set contains multiple users.
Let's first look at the main query statements:
select u.*,a.id as aid,a.uid,a.money from user u left join account a on a.uid=u.id;
In this statement, if the user wants to display, the corresponding account table will be displayed if any, but not null. Of course, this is to encapsulate the results into the user entity class, but the attributes we added in user this time are a collection, as follows:
private List<Account> accounts;
Remember to complete the get, set and toString methods
The next step is to configure in the mapping file of the single table entity class IUserDao.xml. As before, we also configure in the resultMap tag and add the code first
<resultMap id="userMap" type="user">
        <id property="id" column="id"/>
        <result property="username" column="username"/>
        <result property="password" column="password"/>
        <result property="sex" column="sex"/>
        <result property="address" column="address"/>
        <collection property="accounts" ofType="account">
            <id property="id" column="aid"/>
<!--            In the query, we use a.id as aid,So above column Chinese writing aid-->
            <result property="uid" column="uid"/>
            <result property="money" column="money"/>
        </collection>
    </resultMap>
The difference is that this time we use the collection tag. The following explains the meaning of the two attribute names in collection:
- property = "accounts" the collection maintained in the main table entity class
- ofType = "account" the type encapsulated in the collection
Then, let's write SQL statements below, as follows:
<select id="findAccountAndUser" resultMap="userMap">
        select u.*,a.id as aid,a.uid,a.money from user u left join account a on a.uid=u.id;
    </select>
Remember, be sure to write resultMap. Finally, write a test file to test it. The test code is as follows:
//    One to many test
    @Test
    public void testFindAccountAndUser(){
        List<User> list = dao.findAccountAndUser();
        for (User user : list) {
            System.out.println(user);

        }
}
The result was omitted, and there was nothing wrong with the personal test.
3. Many to many
Take a look at the final SQL statement first:
select r.id as rid,r.role_name,r.role_desc,u.* from role r left outer join user_role ur on r.id=ur.rid left outer join user u on ur.uid=u.id;
For a brief explanation, use three tables, role table, user table and user table_ Role table, user_ The role table is an intermediate table. Its uid is associated with the user table, and the rid is associated with the role table. Finally, the role is associated with the user table. This many to many split is to see which entity class the query results are encapsulated in. I encapsulated them in the role class here. In fact, the principle is the same. Interested partners can try to encapsulate it into the user class.
The attribute has been added to the previous user class. I won't change it here to avoid the failure of the previous test function. Here we create a new user2 class and still want to keep the previous attribute. Since we want to encapsulate the results into the role, we need to add attributes in the role class, as follows:
@Getter
@Setter
@ToString
public class Role implements Serializable {
    private Integer id;
    private String roleName;
    private String roleDesc;
//  The attribute name here is a little different from the field name in the table, so the mapping will be configured later
    private List<User2> user2s;
}
I use the Lombok plug-in here to automatically complete the get, set and toString methods. In addition, roleName and roleDesc are different from the names in the table (role_name and role_desc in the table). It will be configured later.
Then add methods to the IRoleDao interface
//    External connection lookup role and user table
    List<Role> findByRoleAndUser();
Next, configure in the IRoleDao.xml configuration file. The main configurations are as follows:
<resultMap id="roleMap" type="Role">
<!--    Configure primary key-->
        <id property="id" column="id"/>
<!--    Configure remaining properties-->
        <result property="roleName" column="role_name"/>
        <result property="roleDesc" column="role_desc"/>
<!--        In this configuration, the user information corresponding to each role is measured. In other words, the role information is available, and the user information may be incomplete-->
        <collection property="user2s" ofType="user2">
            <id property="id" column="id"></id>
            <result property="username" column="username"></result>
            <result property="password" column="password"></result>
            <result property="sex" column="sex"></result>
            <result property="address" column="address"></result>
        </collection>
    </resultMap>
The tag we use here is collection. Like one to many, the attributes in it are not explained. Just write down the SQL statement
<select id="findByRoleAndUser" resultMap="roleMap" resultType="role">
        select r.id as rid,r.role_name,r.role_desc,u.* from role r left outer join user_role ur on r.id=ur.rid left outer join user u on ur.uid=u.id;
</select>
Then write the test code:
@Test
    public void testFindByRoleAndUser(){
        List<Role> roles = dao.findByRoleAndUser();
        for (Role role : roles) {
            System.out.println(role);
        }
}
Show me the results, or someone will say I'm writing here
