From Rancher Labs
About the author
Wang Hailong, technical manager of Rancher China community, is responsible for the maintenance and operation of Rancher China technology community. With 6 years of experience in the field of cloud computing, it has experienced the technological transformation from OpenStack to Kubernetes. No matter the underlying operating system Linux, virtualization KVM or Docker container technology, it has rich operation and maintenance and practical experience.
Rancher provides two installation methods, single node and high availability. Single node installation allows users to quickly deploy the installation work for the purpose of short-term development test. High availability deployment is obviously more suitable for rancher's long-term use.
In actual use, you may encounter the situation that you need to migrate the Rancher Server to another node or local cluster for management. Although you can use the simplest import cluster mode to manage, the problem is that you can't manage and upgrade the cluster in the future, and the relationship between some namespace and project will disappear. So this article focuses on how to migrate the Rancher Server to other nodes or local clusters.
This article focuses on three scenarios to explain how to migrate Rancher Server:
-
Rancher single node installation migration to other hosts
-
Rancher single node installation migration to highly available installation
-
Rancher high availability installation migrating to other Local clusters

Important notes
-
The following scenarios are not supported in the official documents of Rancher. This document only uses the existing functions of Rancher and RKE to realize migration.
-
If you encounter problems in this process, you should be familiar with Rancher architecture / troubleshooting
-
Migration is very dangerous. You must do a good job of backup just before migration to avoid unexpected unrecoverable
-
You should be familiar with the architectural differences between single node and high availability installations
-
This document is based on Rancher 2.4.x testing, and other versions may operate slightly differently
-
This document mainly describes the migration of Rancher Server, which will not affect the use of business clusters during the migration process
Prepare the cluster direct connection kubeconfig configuration file
By default, the kubeconfig copied on the Rancher UI connects to the kubernetes cluster through the cluster agent agent agent. Changing the Rancher Server will cause the cluster agent to be unable to connect to the Rancher Server, thus kubectl cannot use the copied kubeconfig on the Rancher UI to operate the kubernetes cluster. But it can be used kubectl --context <CLUSTER_NAME>-fqdn Directly connect to kubernetes cluster for operation. So before performing the migration, please prepare the direct connection kubeconfig configuration files for all clusters.
For Rancher v2.2.2 and later, you can download the kubeconfig file directly from the UI.
Before Rancher v2.2.2, please refer to: Restore kubectl configuration file
Scenario 1: single node installation and migration of Rancher to other hosts
For the single node installation and migration of Rancher to other hosts, you only need to pack the / var/lib/rancher directory of the old cluster Rancher Server container, then replace it with the directory corresponding to the new Rancher Server, and finally start the new Rancher Server container and update the agent related configuration.
1. Rancher single node installation
Tip: the following steps create a Rancher single node environment for demonstration migration. If you need to migrate the formal environment, you can skip this step.
Run the single node Rancher Server service by executing the following docker command
docker run -itd -p 80:80 -p 443:443 --restart=unless-stopped rancher/rancher:v2.4.3
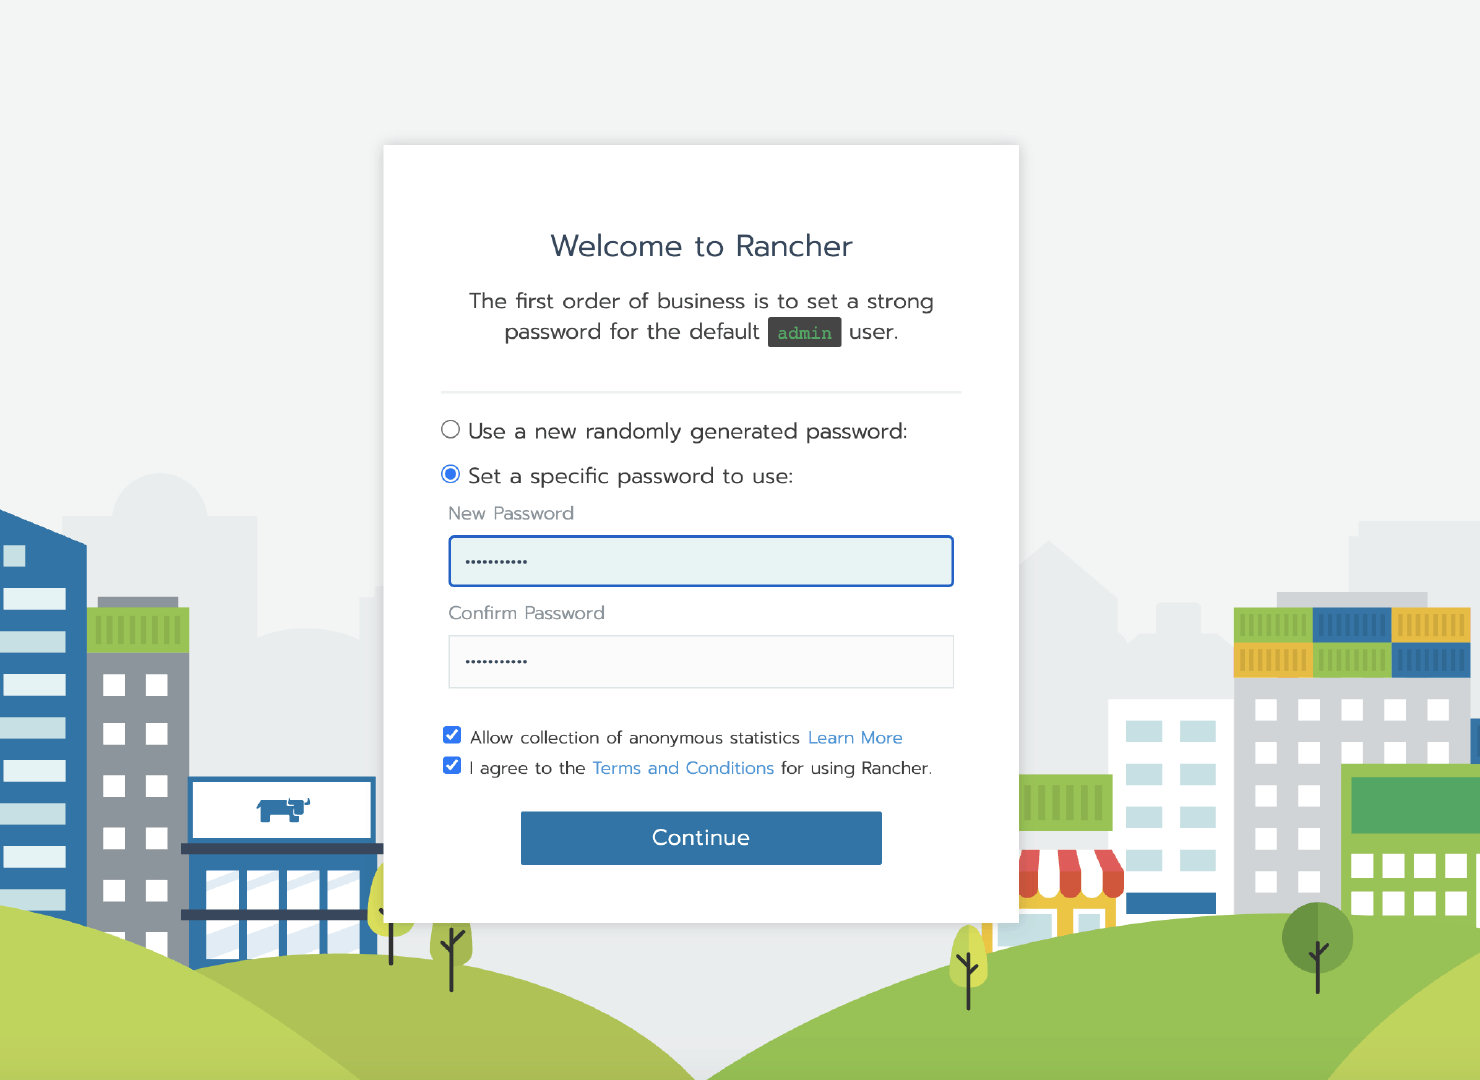
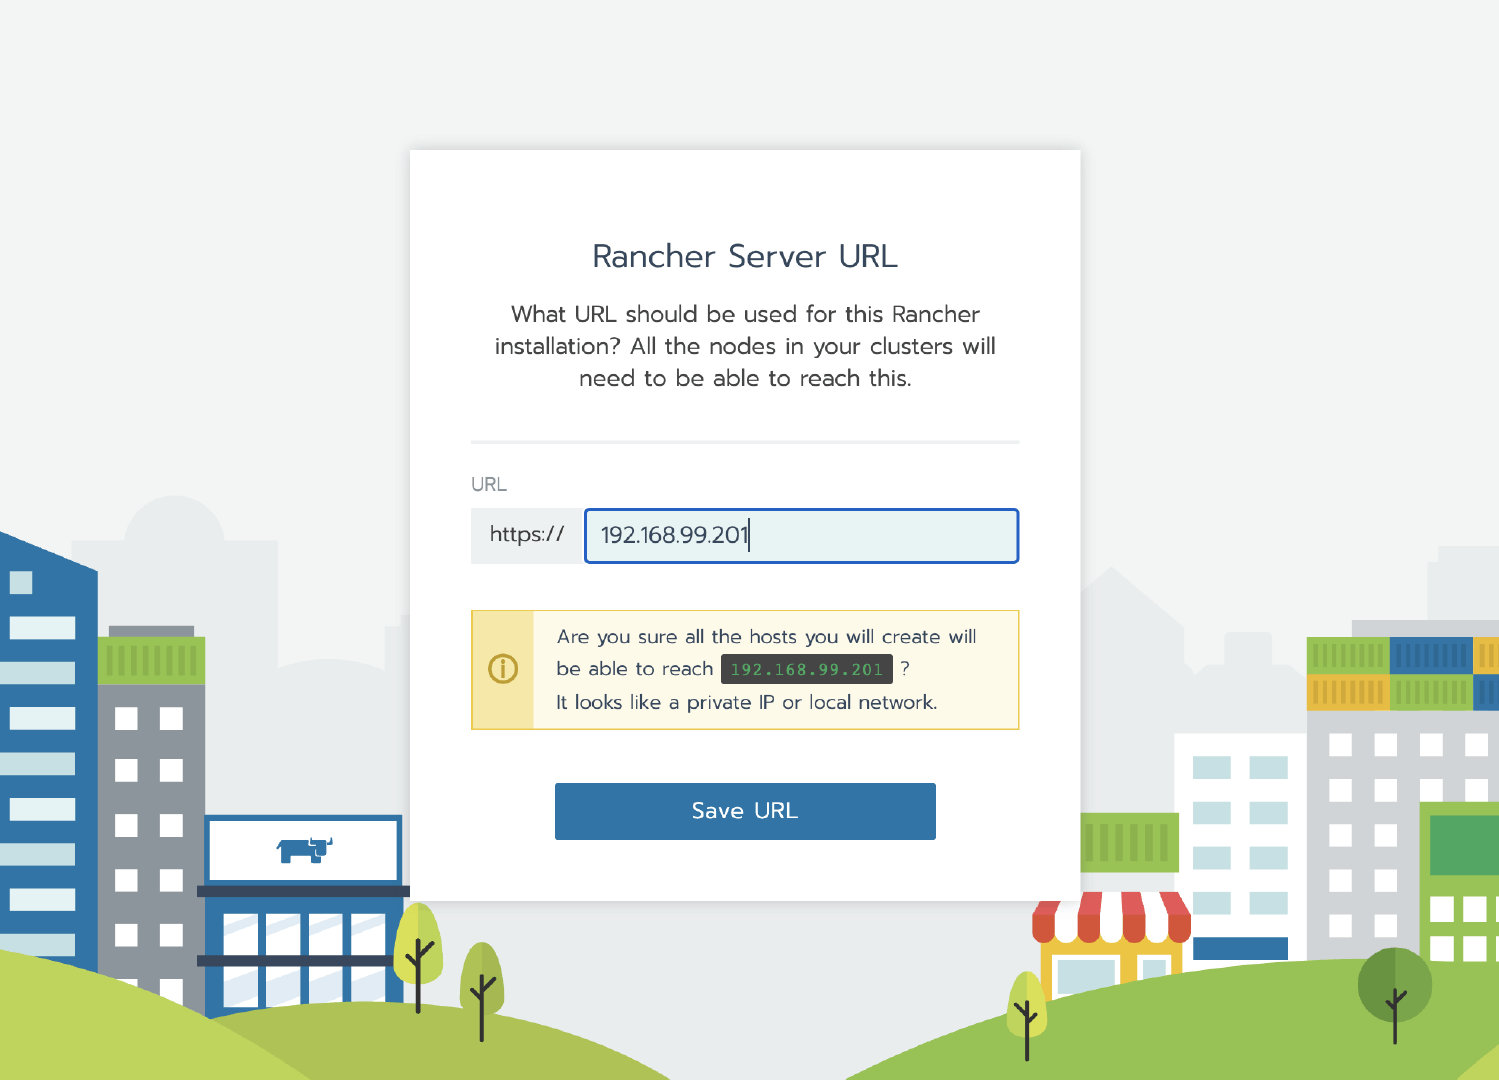
After the initialization of the container, access the Rancher Server UI through the node IP, set the password and log in.


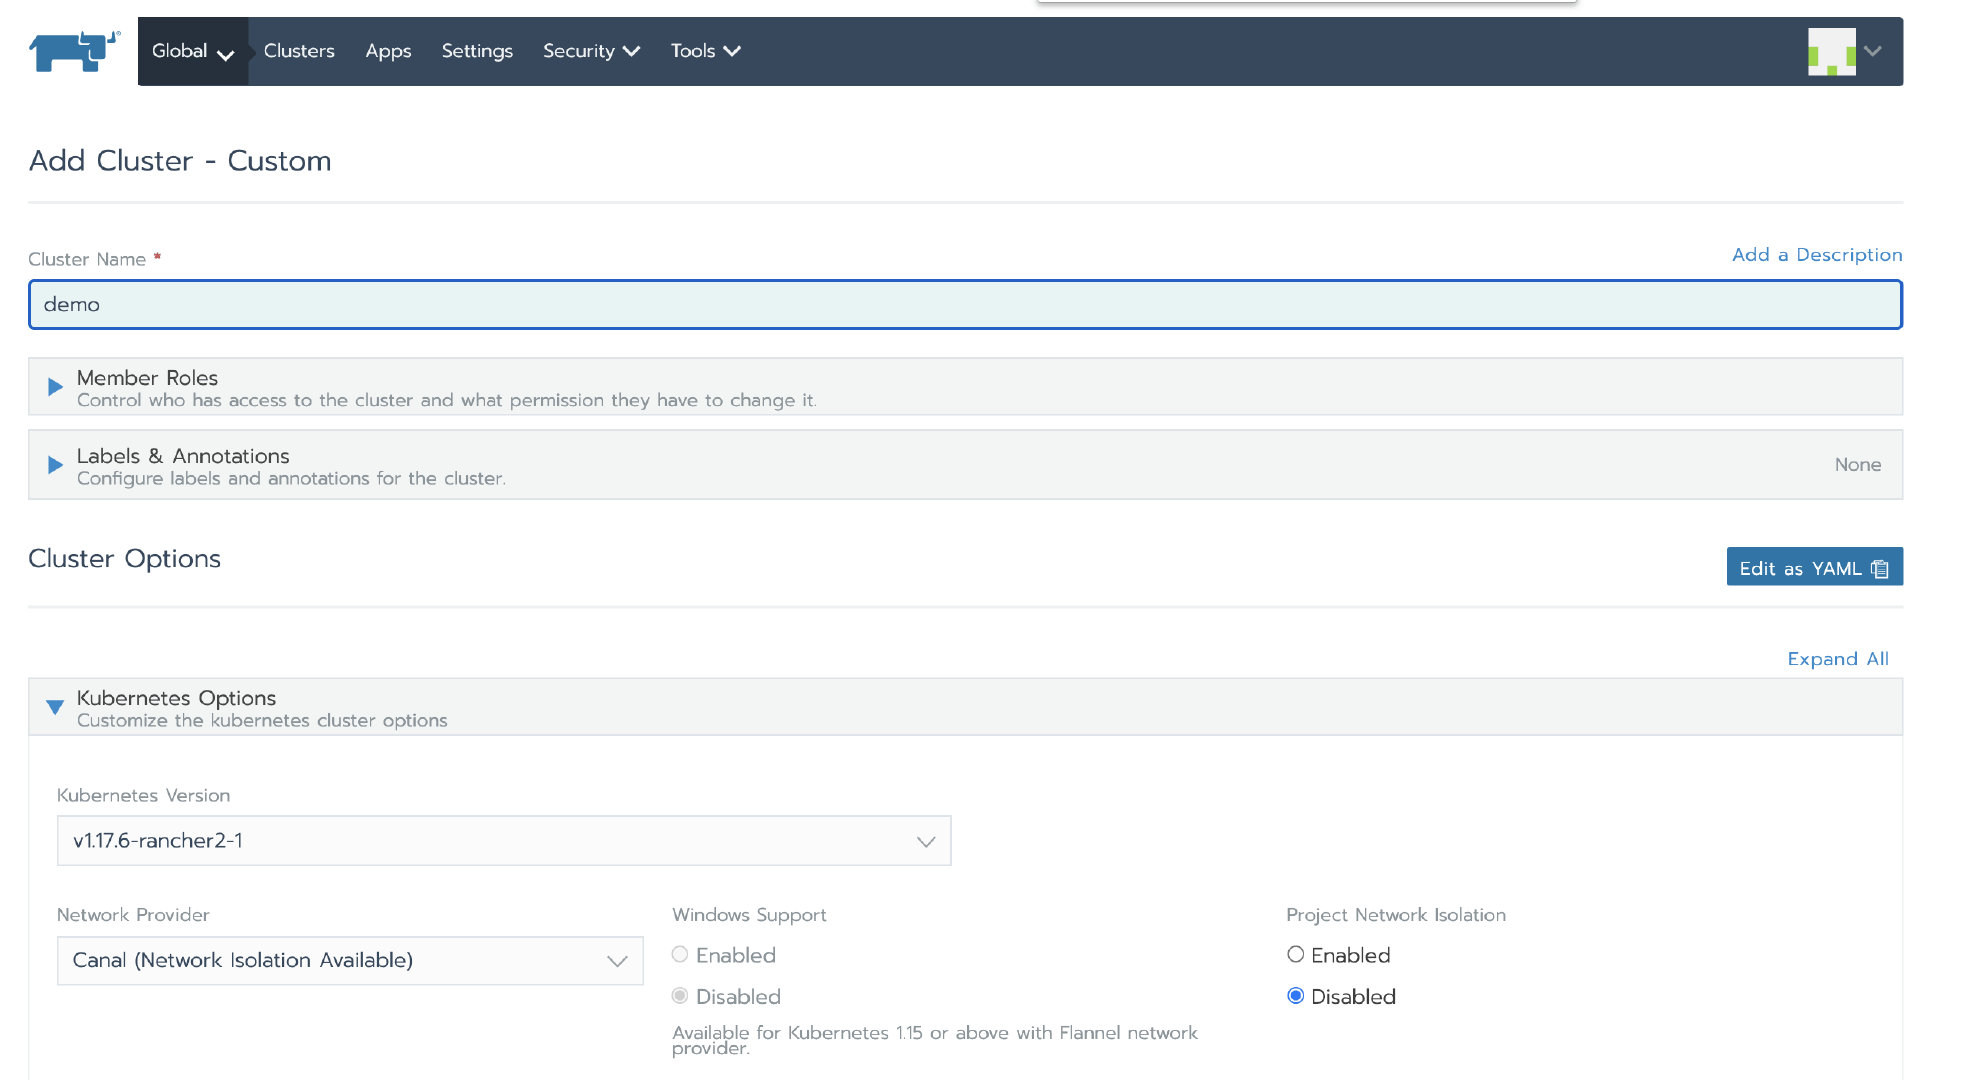
2. Create a custom cluster
Tip: the following steps create a business cluster for demonstration to verify whether the data is lost after the Rancher migration. If you need to migrate the formal environment, you can skip this step.
After logging into the Rancher UI, add a custom cluster
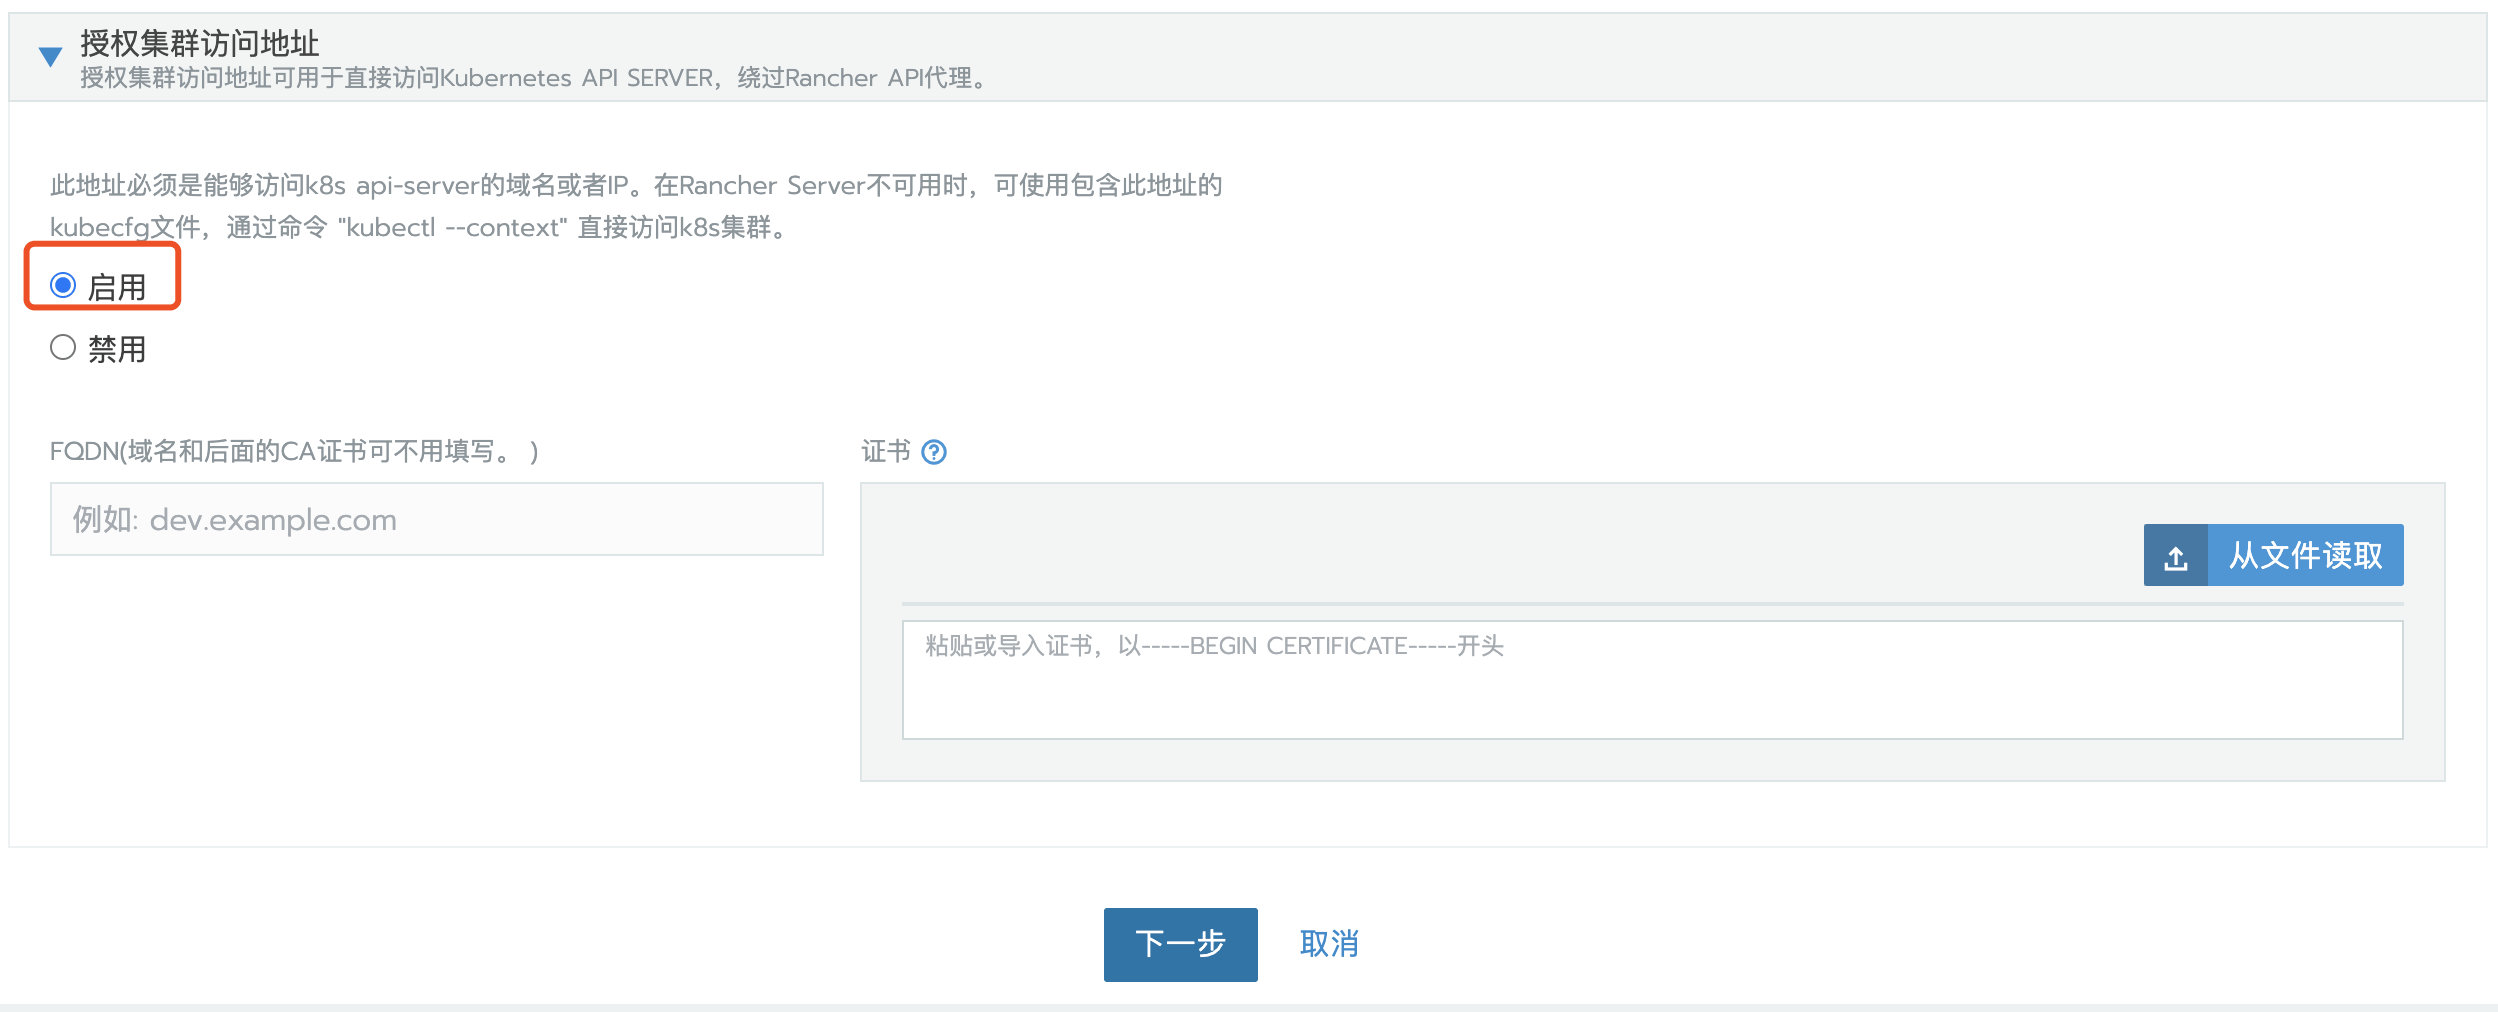
Authorization cluster access address is set to enabled, FQDN and certificate can be left blank.
be careful:
This step is crucial. After the Rancher is migrated, the address or token or certificate changes, which will cause the agent to be unable to connect to the Rancher Server. After migration, you need to edit the configuration file through kubectl to update some agent related parameters. The kubeconfig file on the default UI is connected to Kubernetes through the agent agent agent. If the agent cannot connect to the Rancher Server, the Kubernetes cluster cannot be accessed through the kubeconfig file. Turning on the access address function of authorized cluster will generate multiple contexts clusters, which are directly connected to Kubernetes without agent agent. If the business cluster does not enable this function, you can edit the cluster to enable this function.
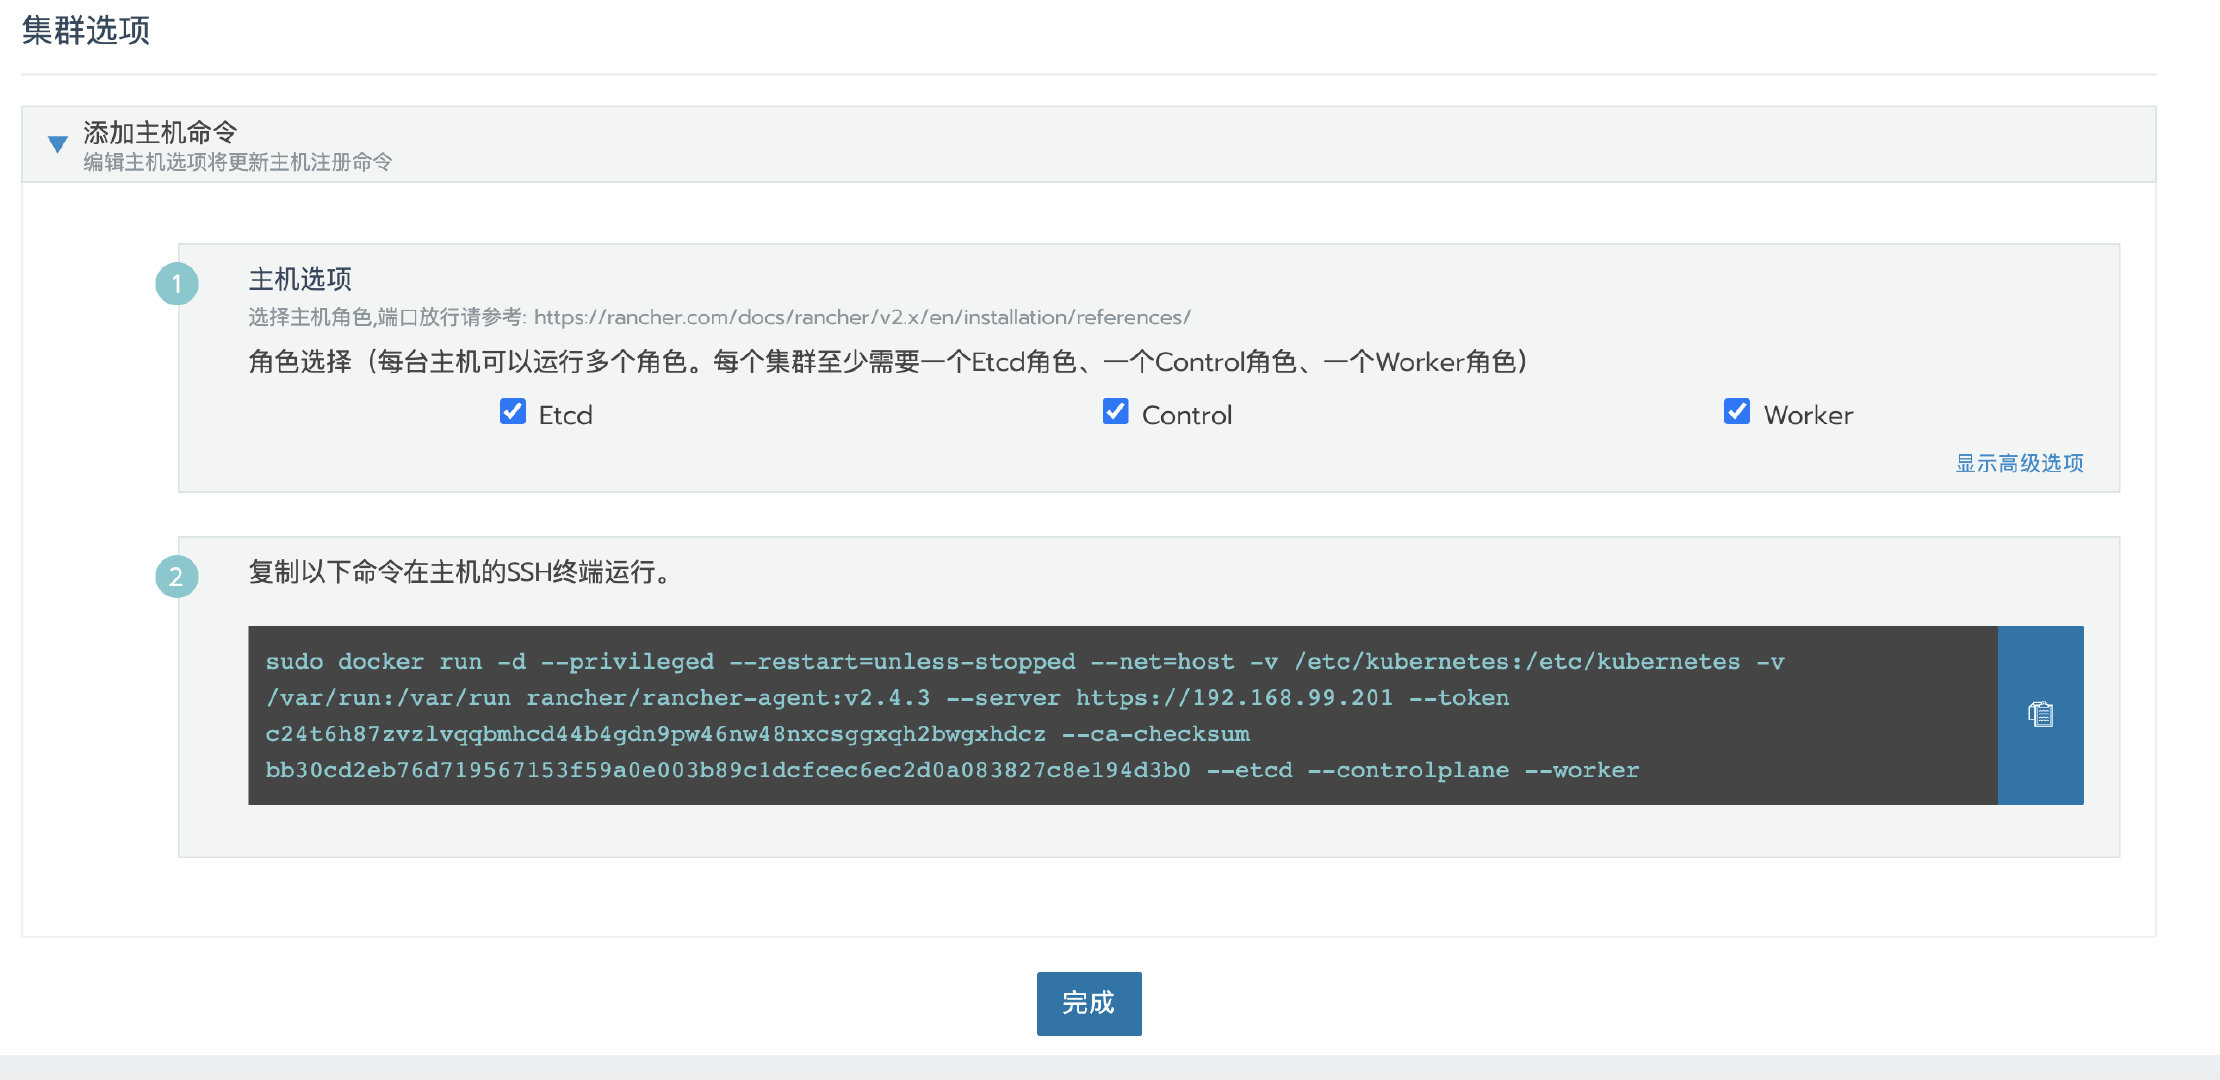
Click next, select the required role according to the pre assigned node role, and then copy the command to the host terminal for execution.
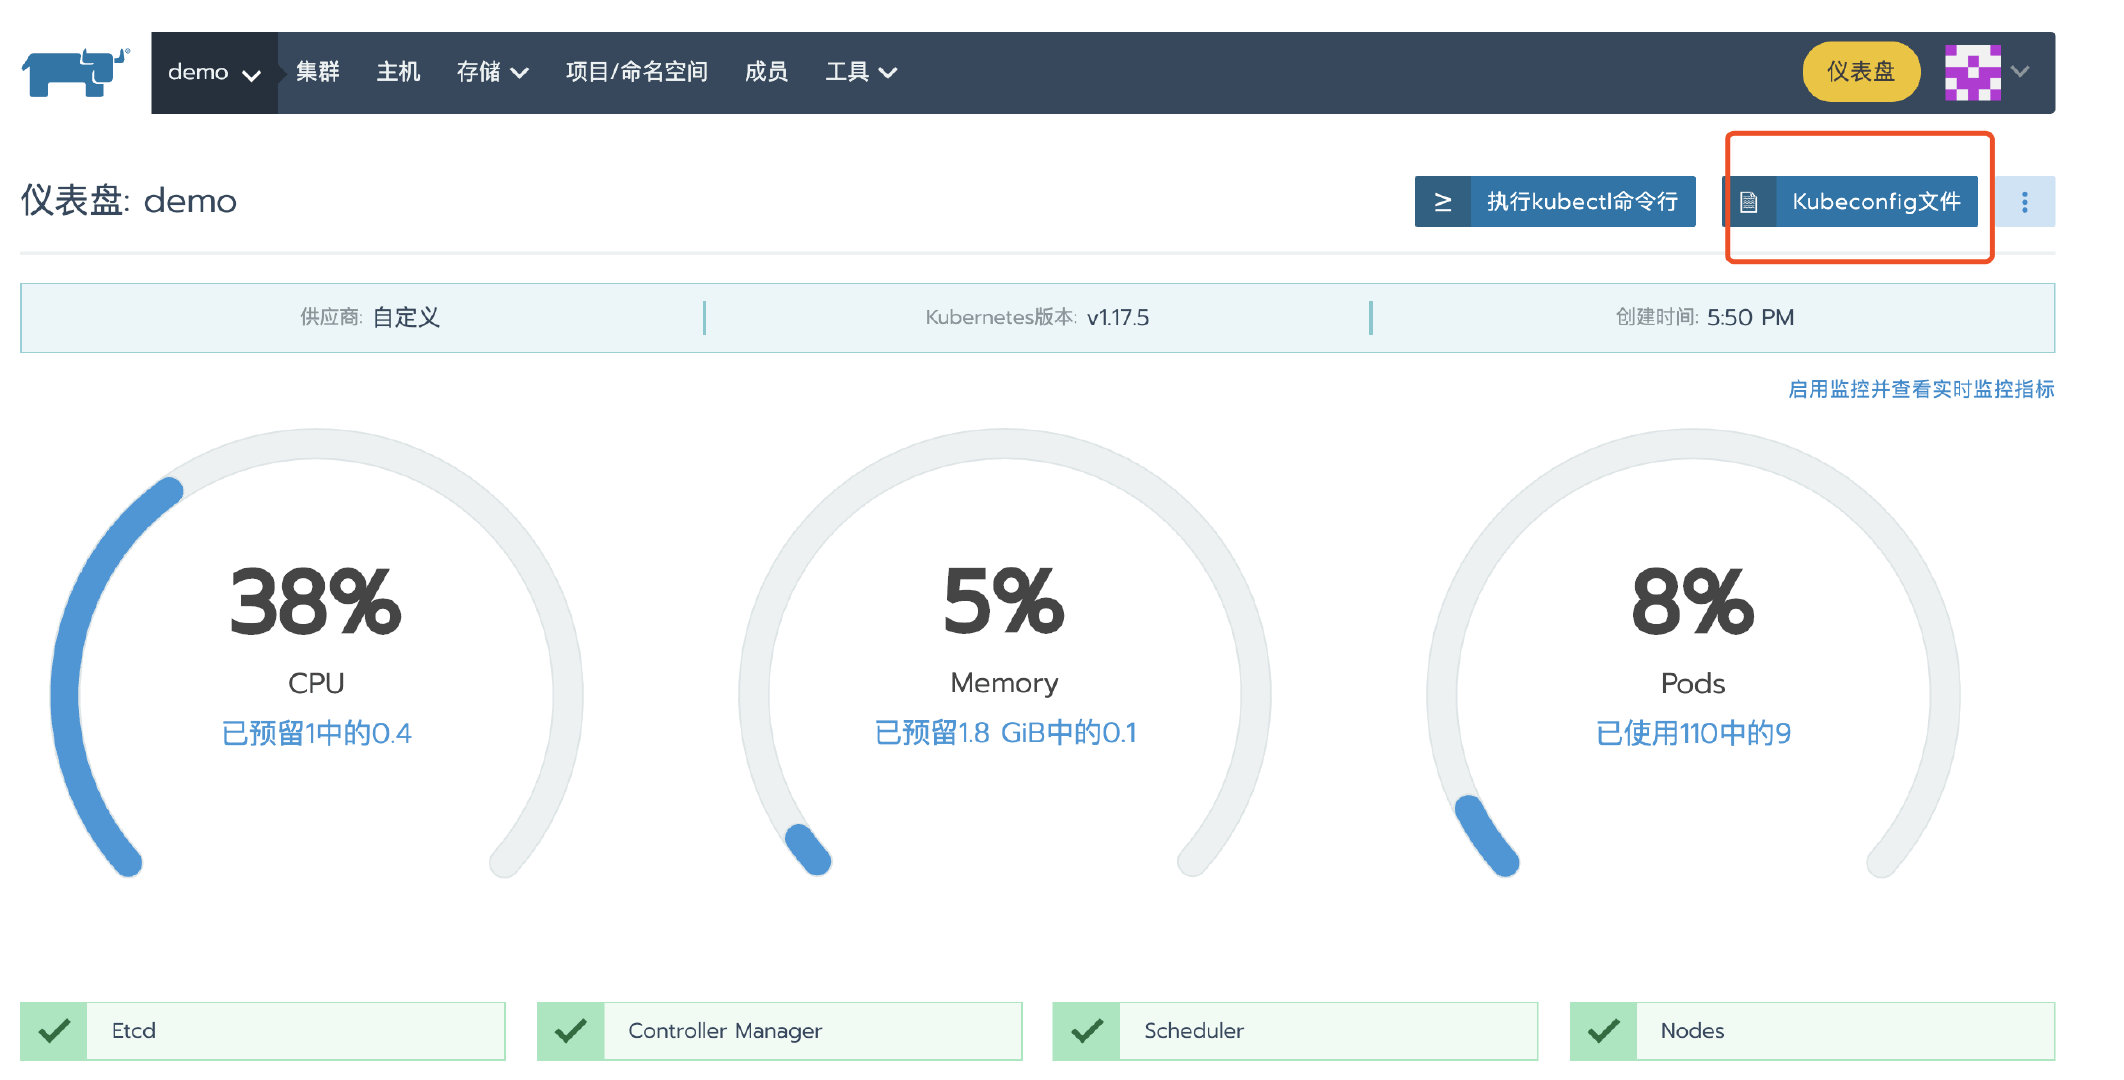
After the cluster deployment, enter the cluster home page and click the kubeconfig file button. In the pop-up page, copy the kubeconfg configuration file for standby.
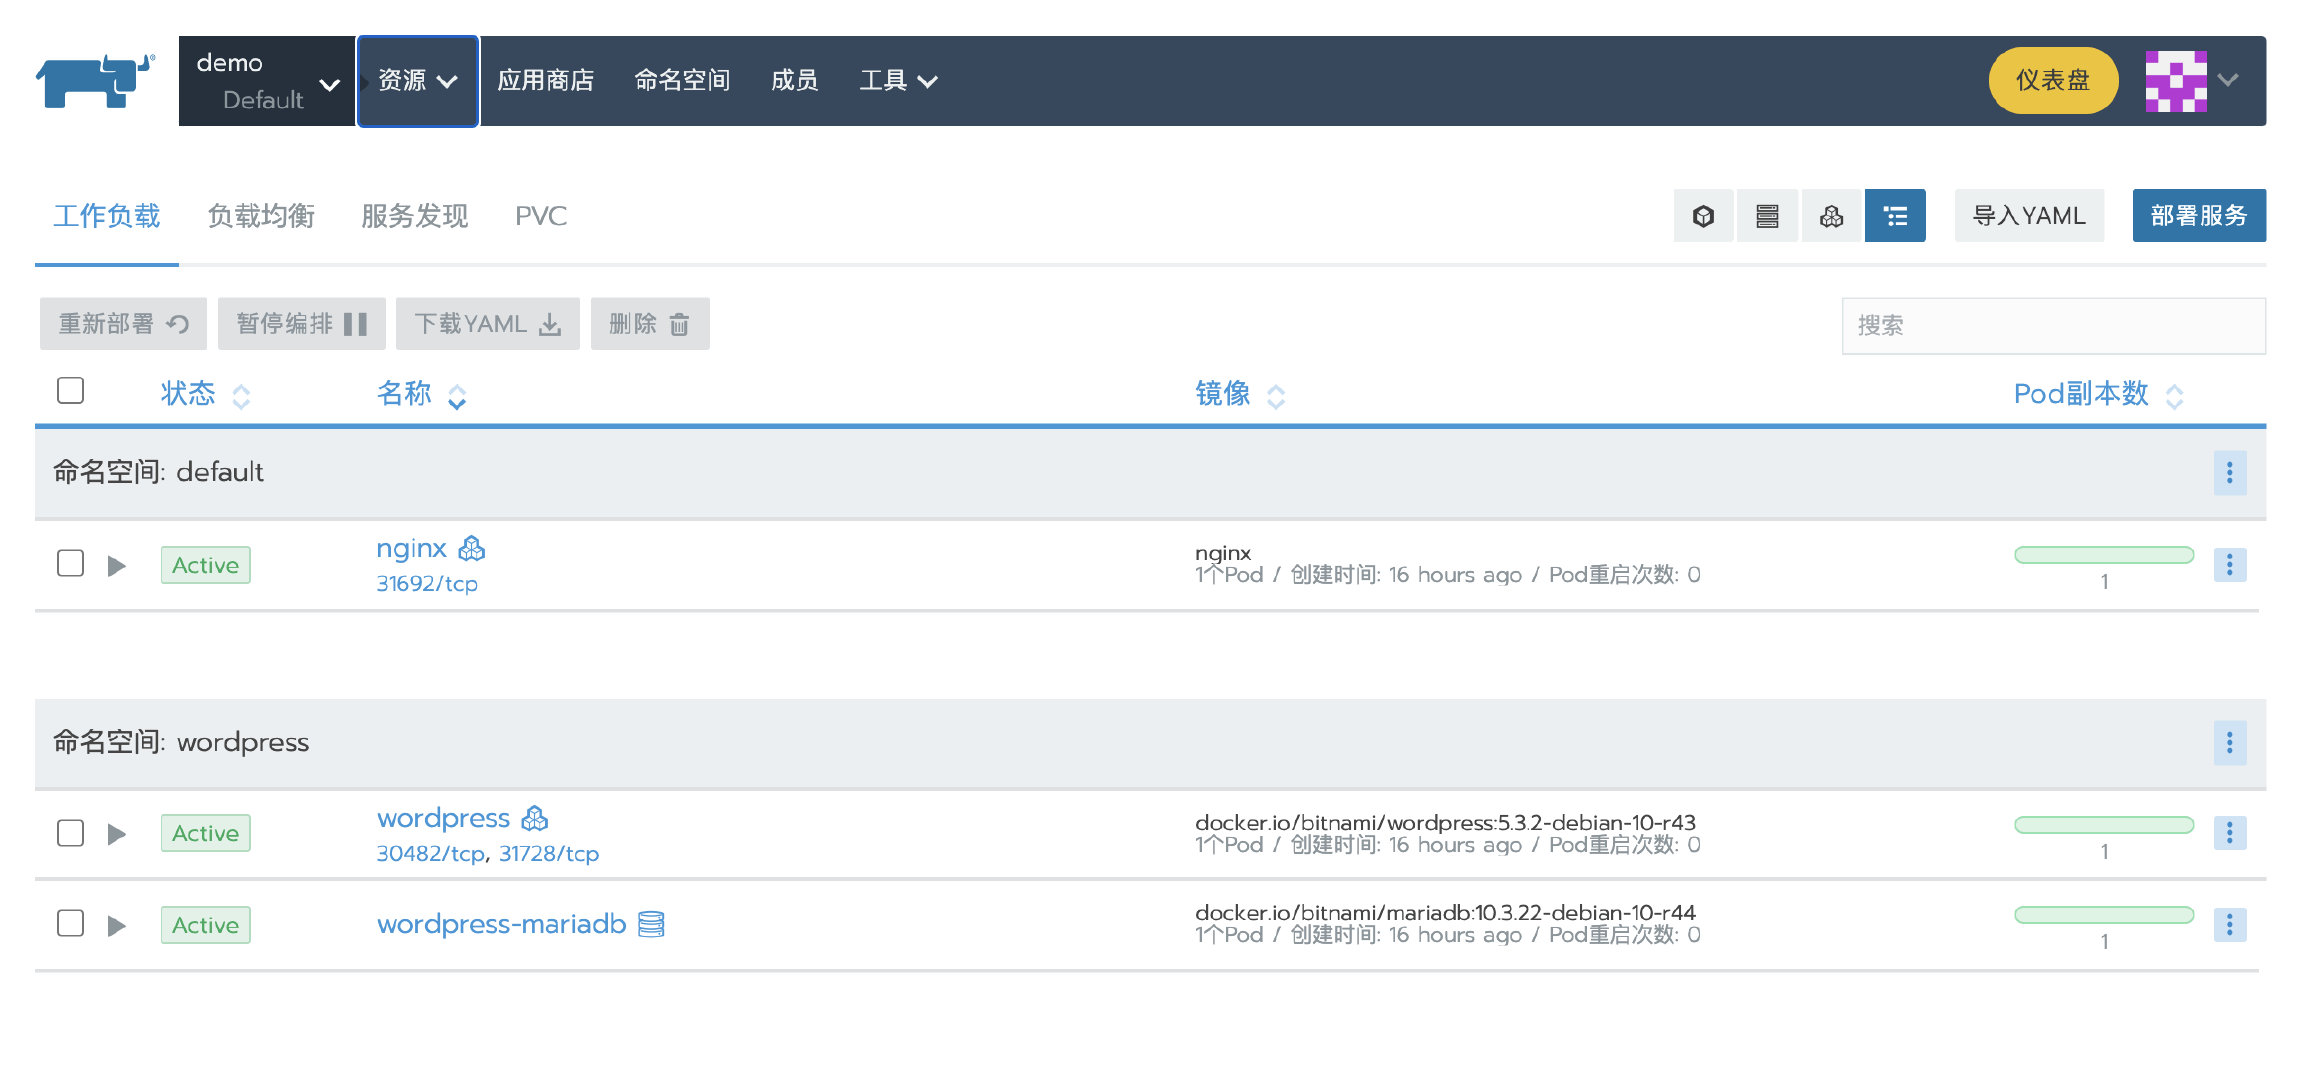
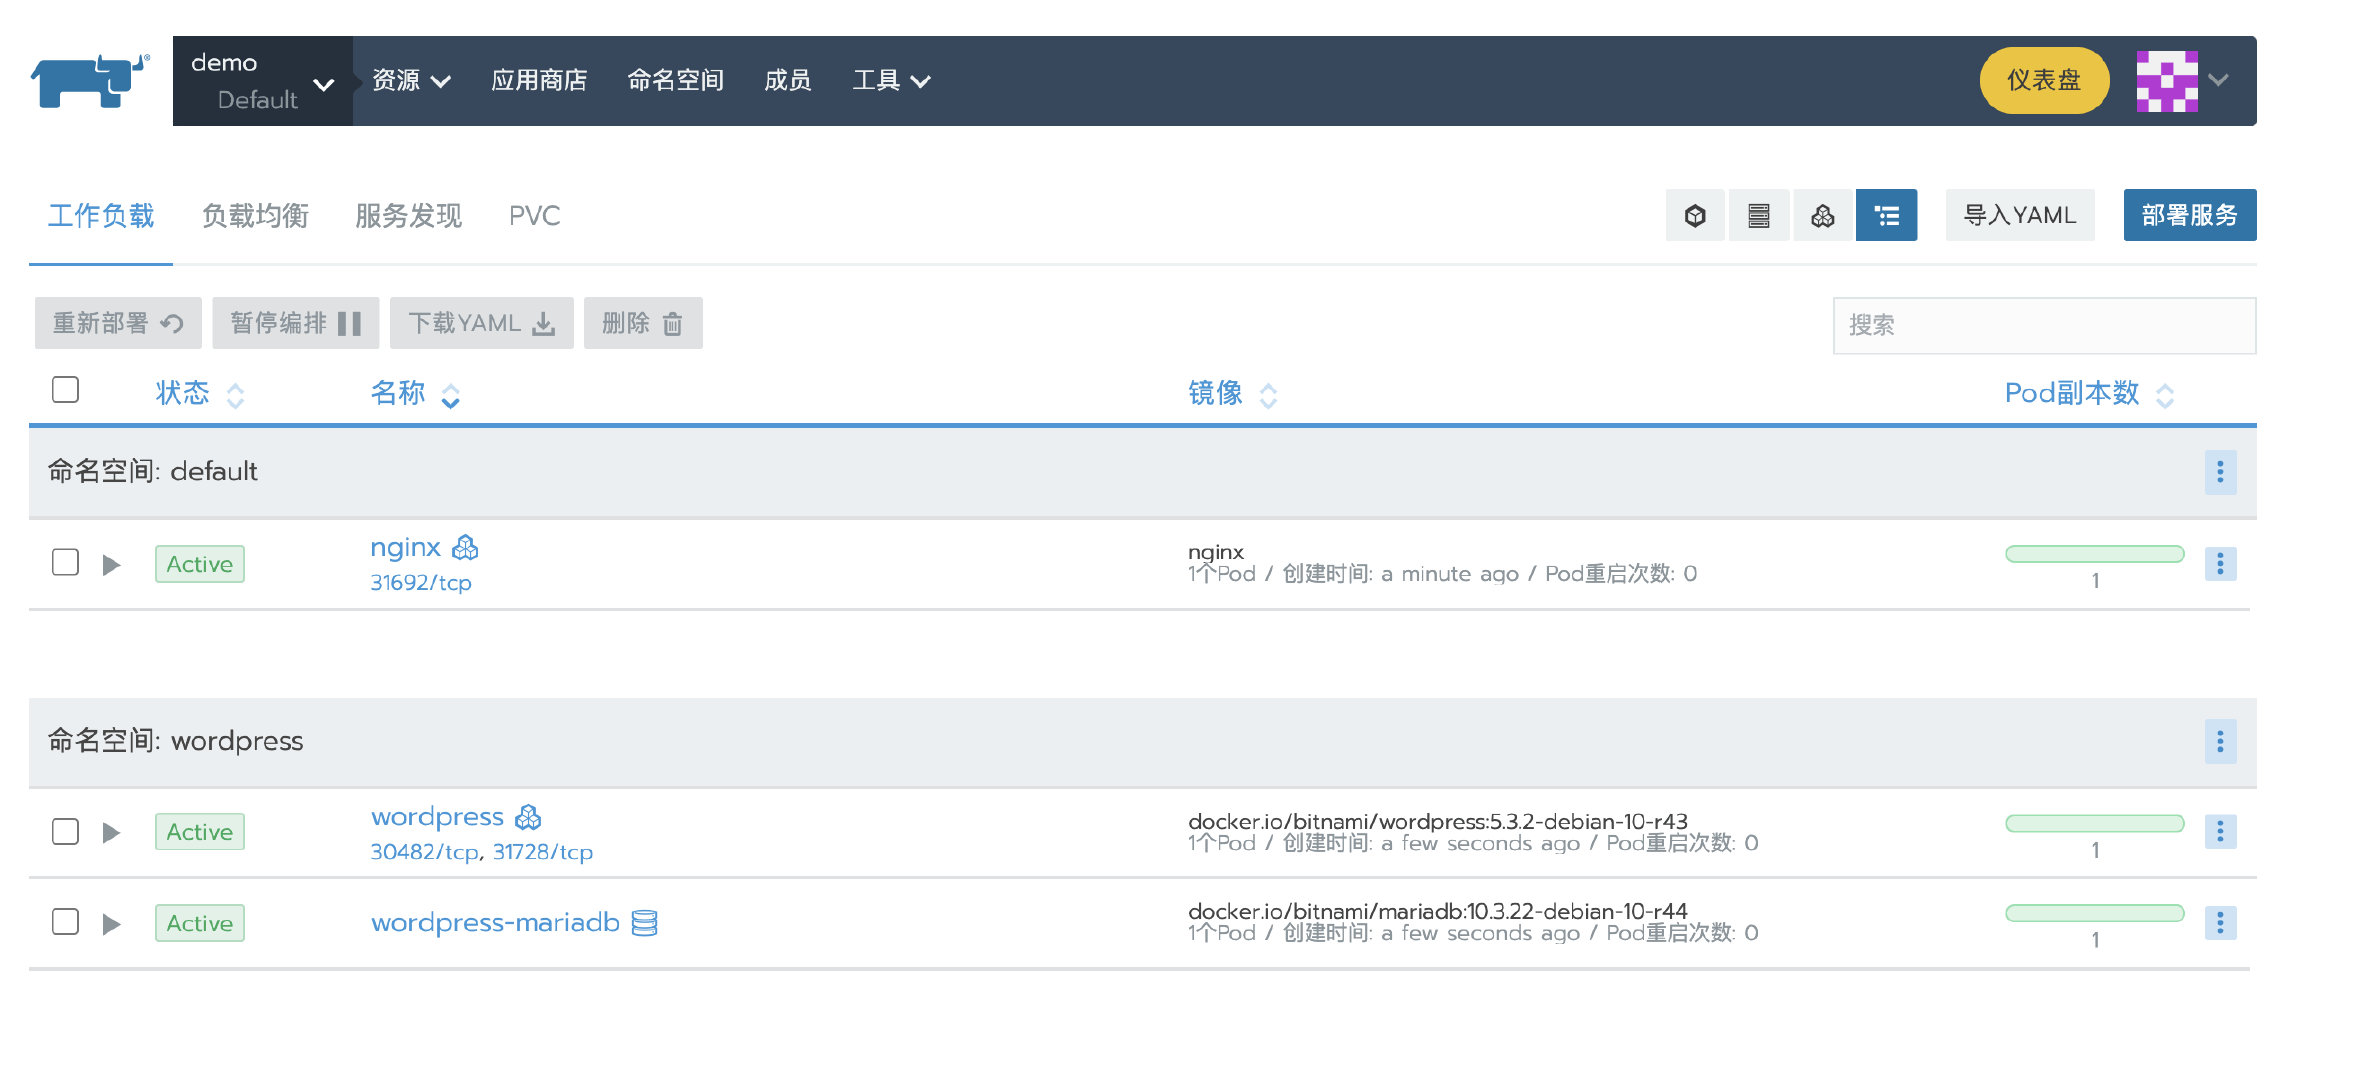
3. Deploy test application
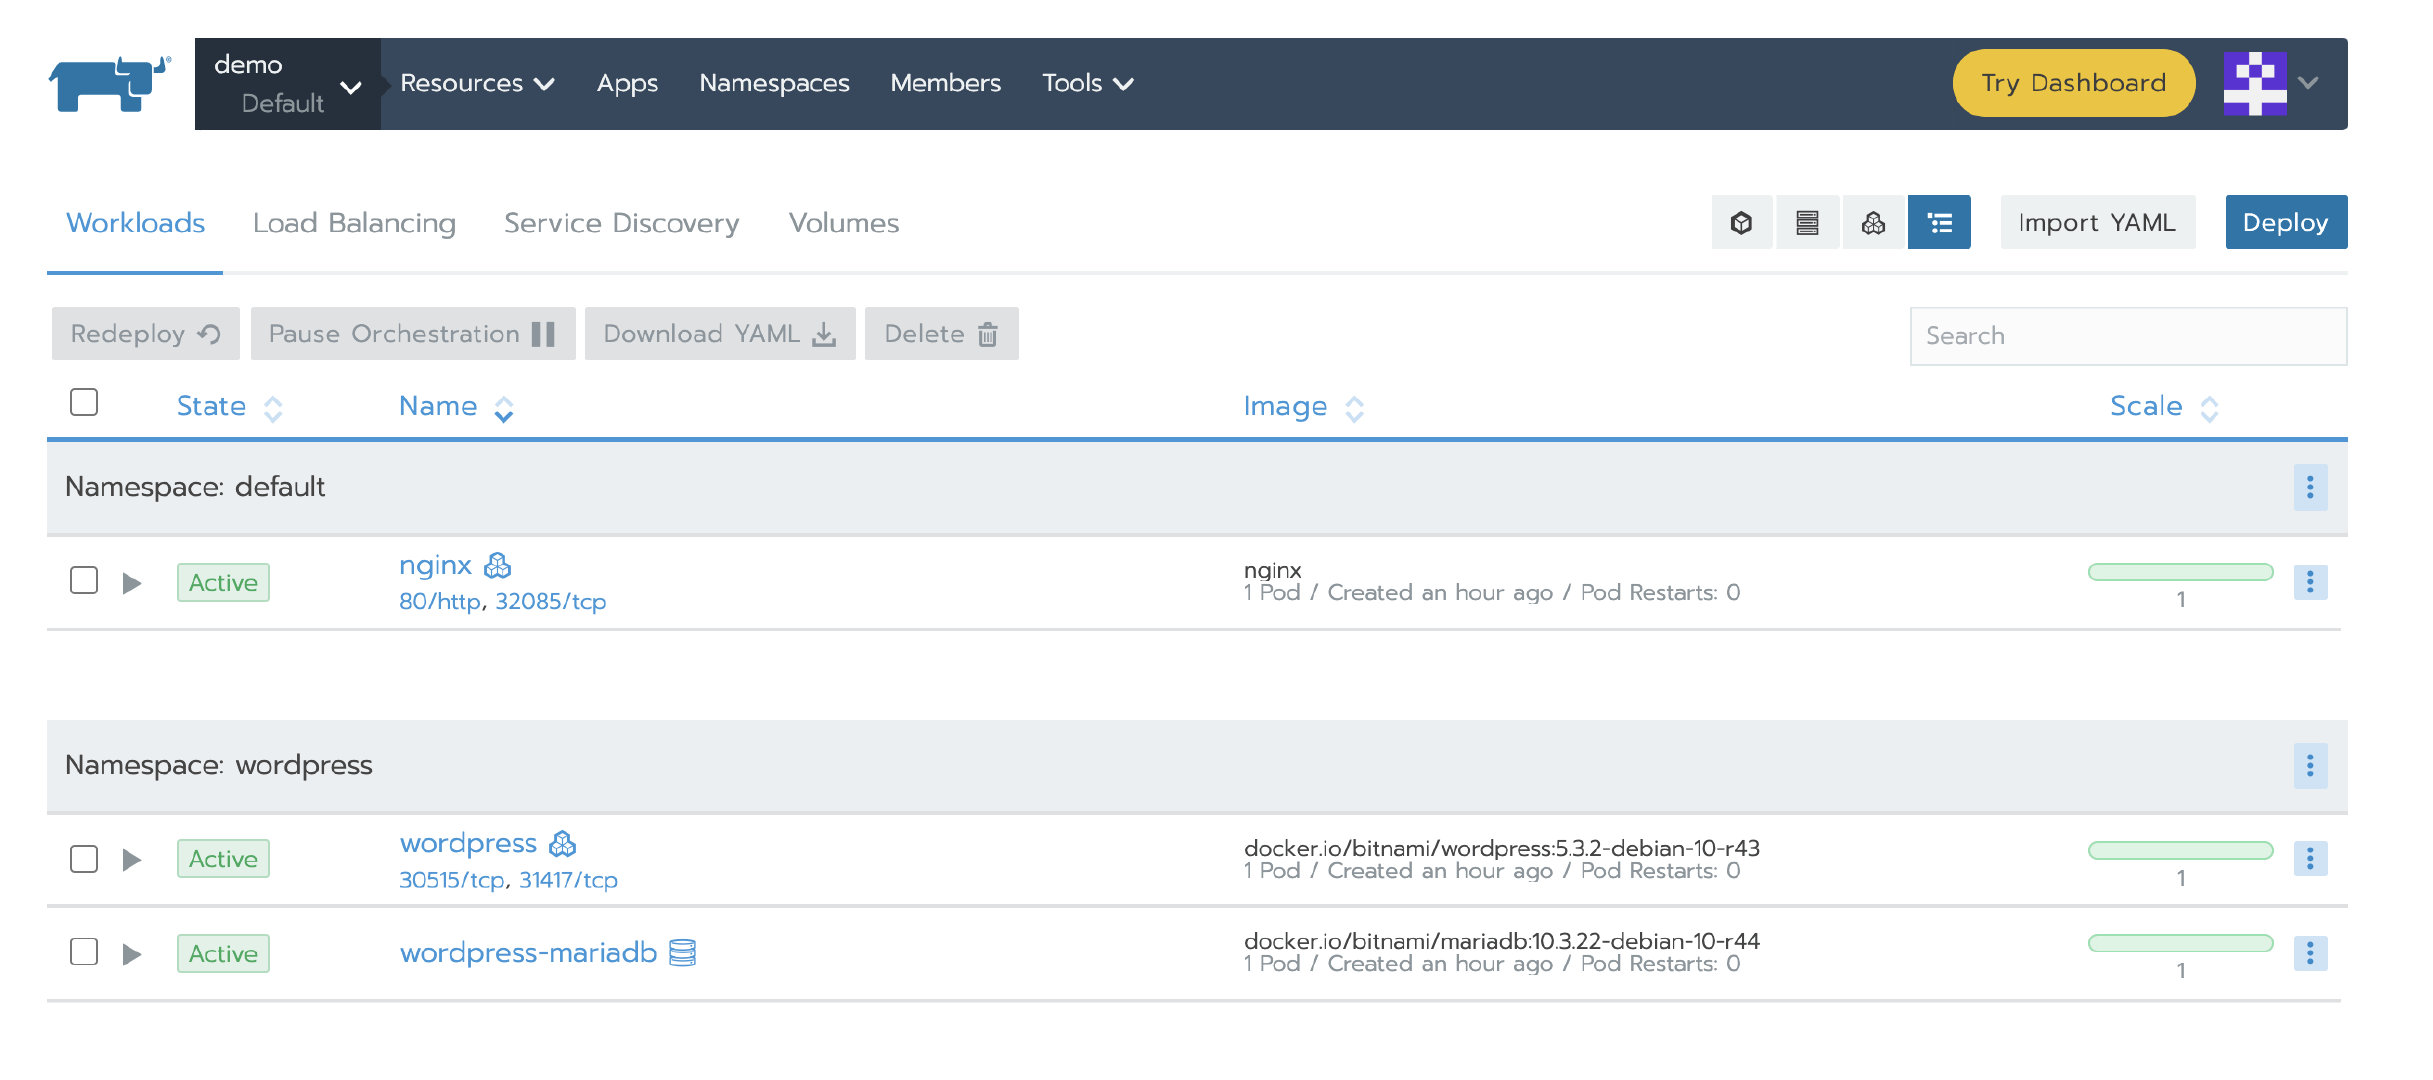
Deploy a nginx workload. Then deploy a test app from the store.

4. Backup single node Rachel server data
docker create --volumes-from <RANCHER_CONTAINER_NAME> --name rancher-data-<DATE> rancher/rancher:<RANCHER_CONTAINER_TAG>

docker run  --volumes-from rancher-data-<DATE> -v $PWD:/backup:z busybox tar pzcvf /backup/rancher-data-backup-<RANCHER_VERSION>-<DATE>.tar.gz -C /var/lib rancher
Please refer to Rancher's Chinese website for details Single node Backup Guide.
5. The generated rancher data backup - < rancher_ VERSION>-<DATE>. tar.gz Copy to new Rancher Server node
scp rancher-data-backup-<RANCHER_VERSION>-<DATE>.tar.gz root@<new_rancher_ip>:/opt/
6. Start the new node Rancher Server with backup data
If the original Rancher Server uses the Existing self signed certificate or installation with existing trusted certificate , during migration, the certificate needs to be copied to the new Rancher Server together, and the Rancher Server needs to be started by using the same startup command to mount the certificate and backup data.
cd /opt && tar -xvz -f rancher-data-backup-<RANCHER_VERSION>-<DATE>.tar.gz

docker run -itd -p 80:80 -p 443:443 -v /opt/rancher:/var/lib/rancher --restart=unless-stopped rancher/rancher:v2.4.3
7. Update the Rancher Server IP or domain name
be careful:
If your environment uses a self signed certificate or Let's Encrypt certificate, and the domain name is configured to access the Rancher Server. After migration, the cluster status is Active. Please skip to step 9 to verify the cluster.
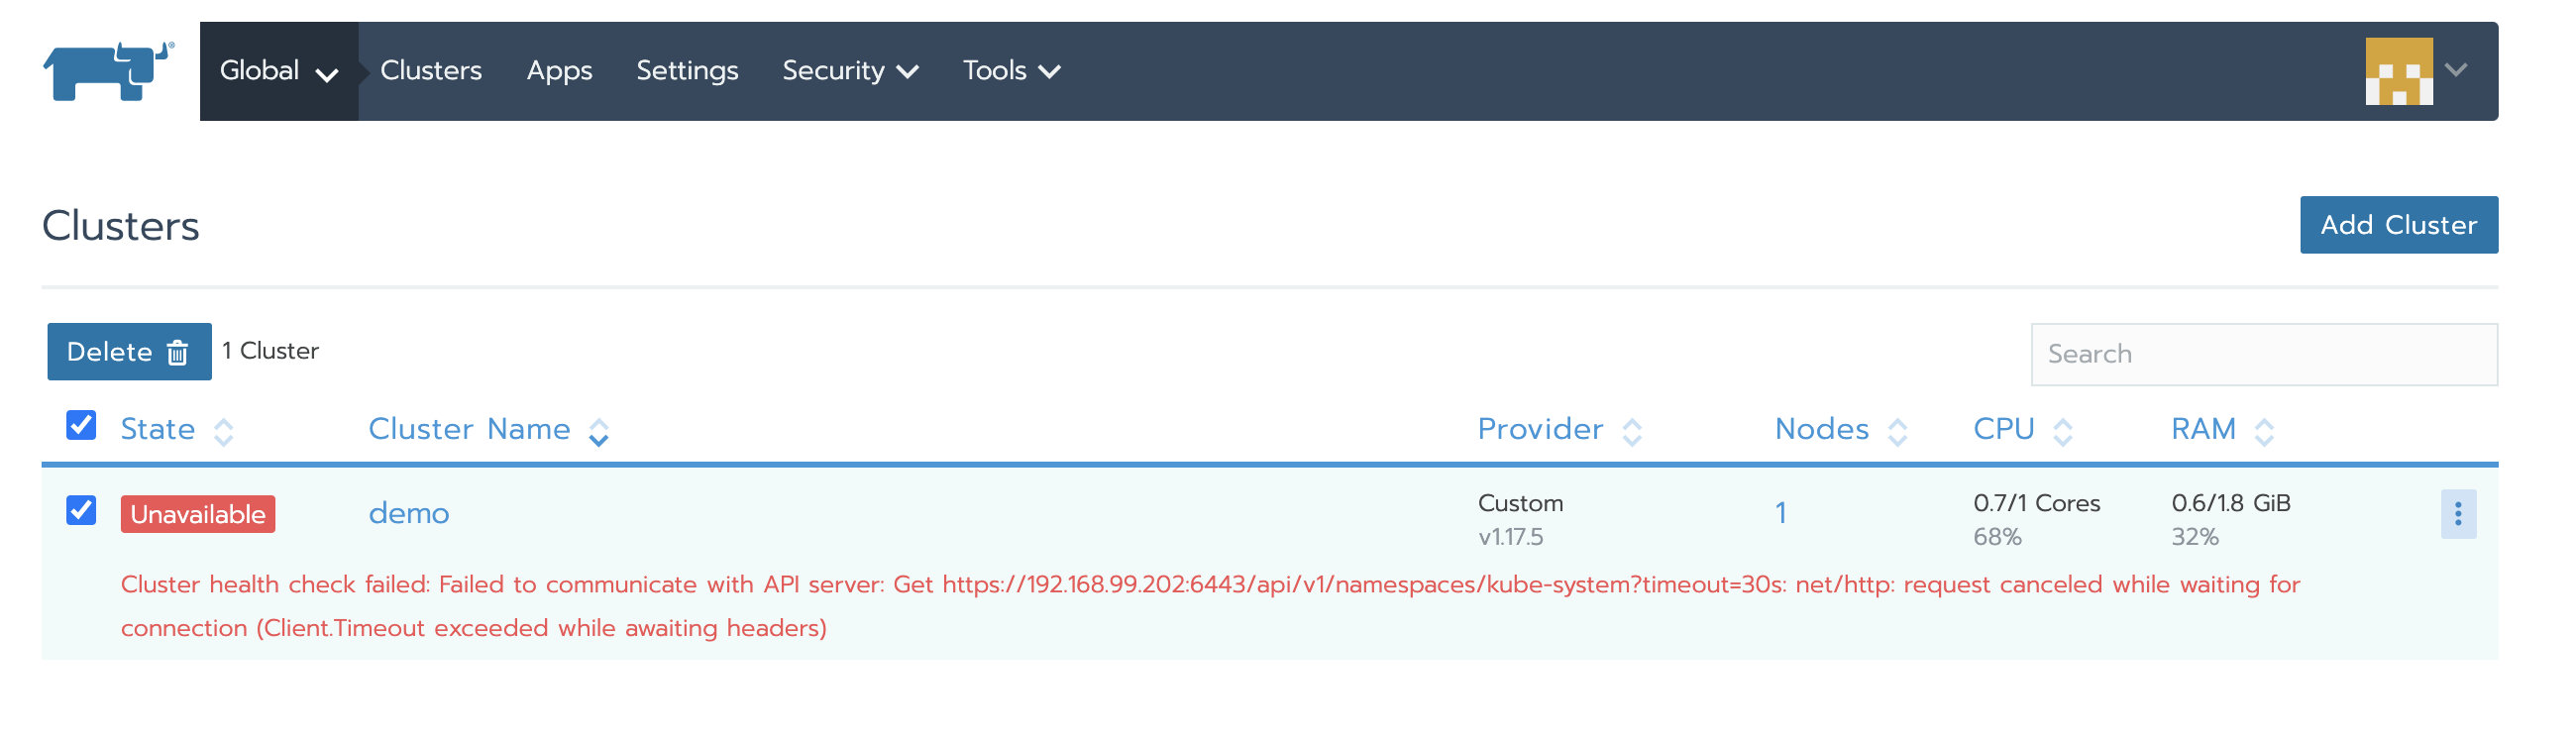
At this time, when you access the new Rancher Server, you can see the managed Kubernetes cluster, but the cluster status is unavailable. Because the agent is still connected to the old Rancher Server, you need to update the agent information.
-
Go to global > system settings, and then scroll down to the server URL file
-
Click the ellipsis menu on the right and choose upgrade
-
Modify the server URL address to the address of the new Rancher Server
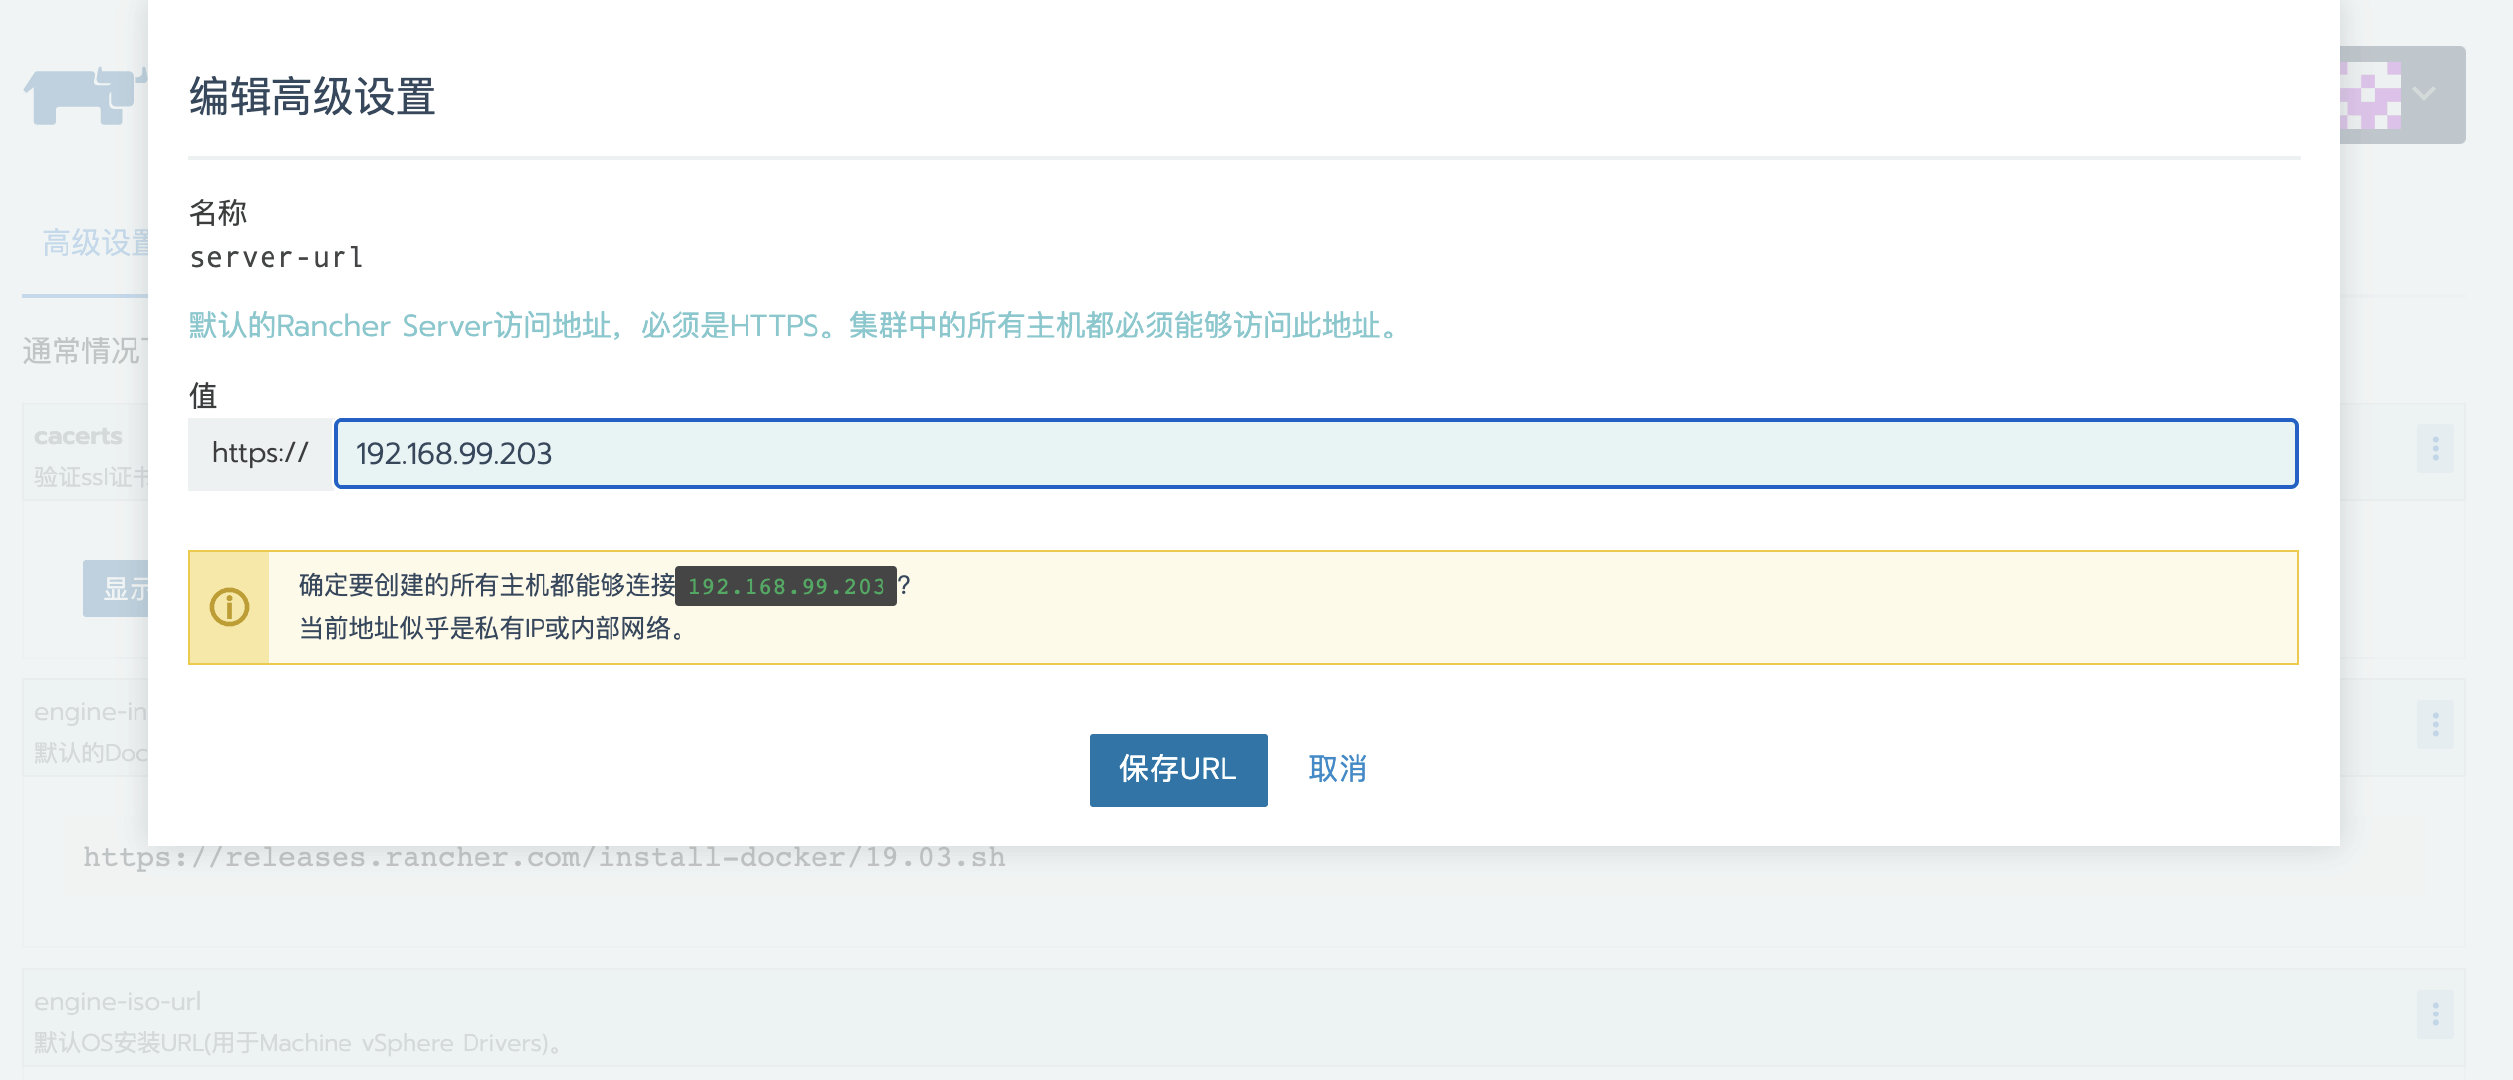
- preservation
8. Update agent configuration
Log in to Rancher Server through new domain name or IP;
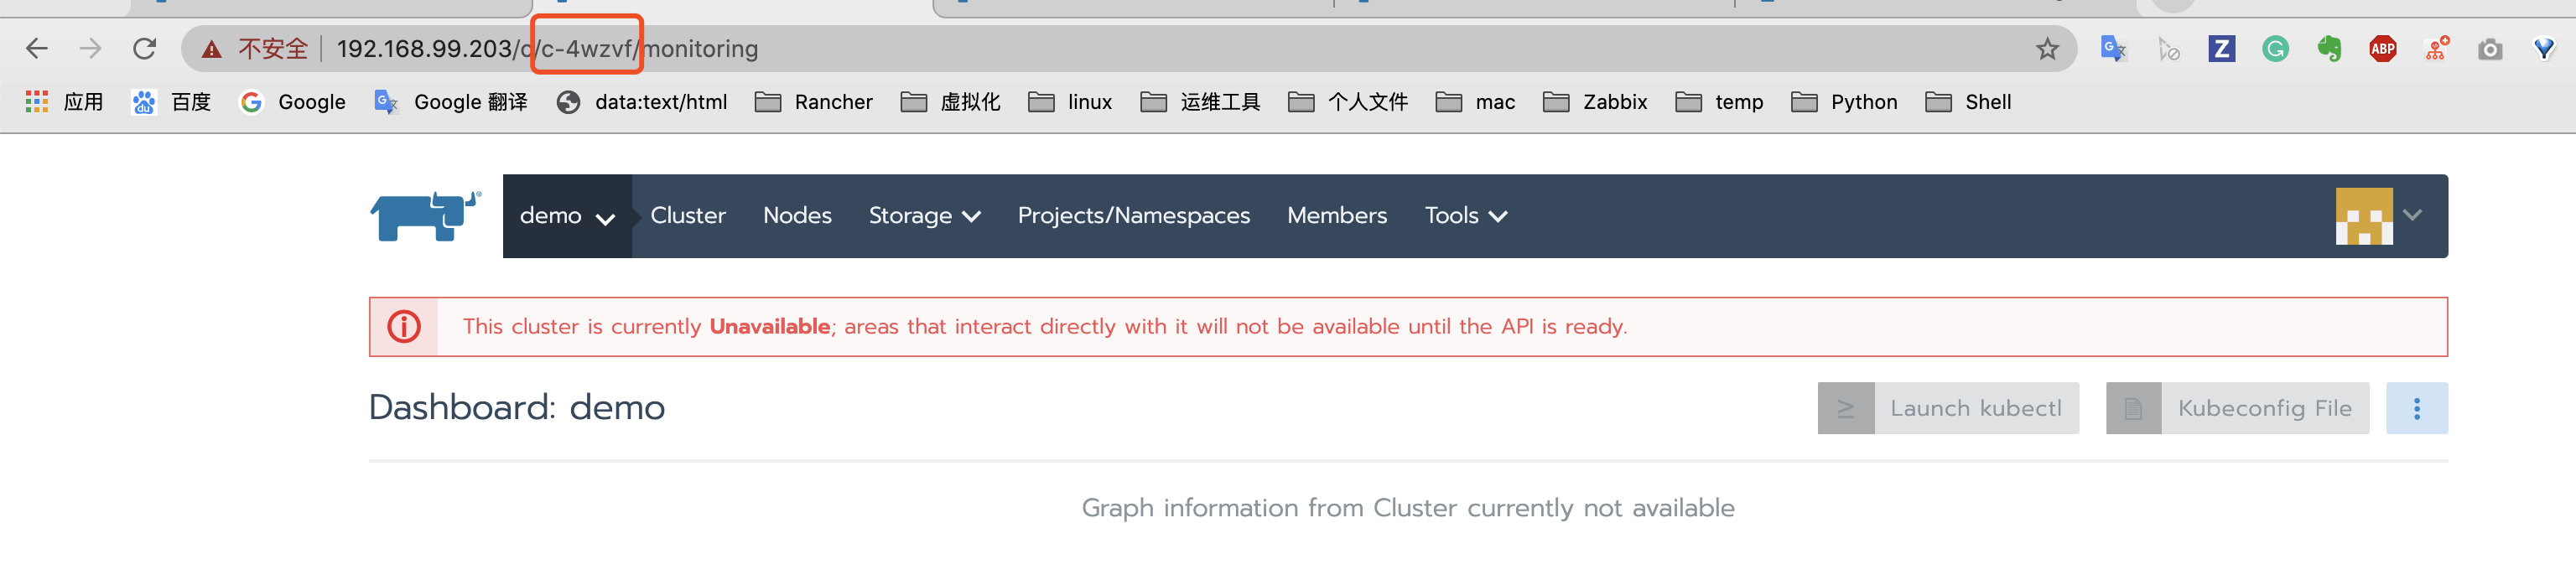
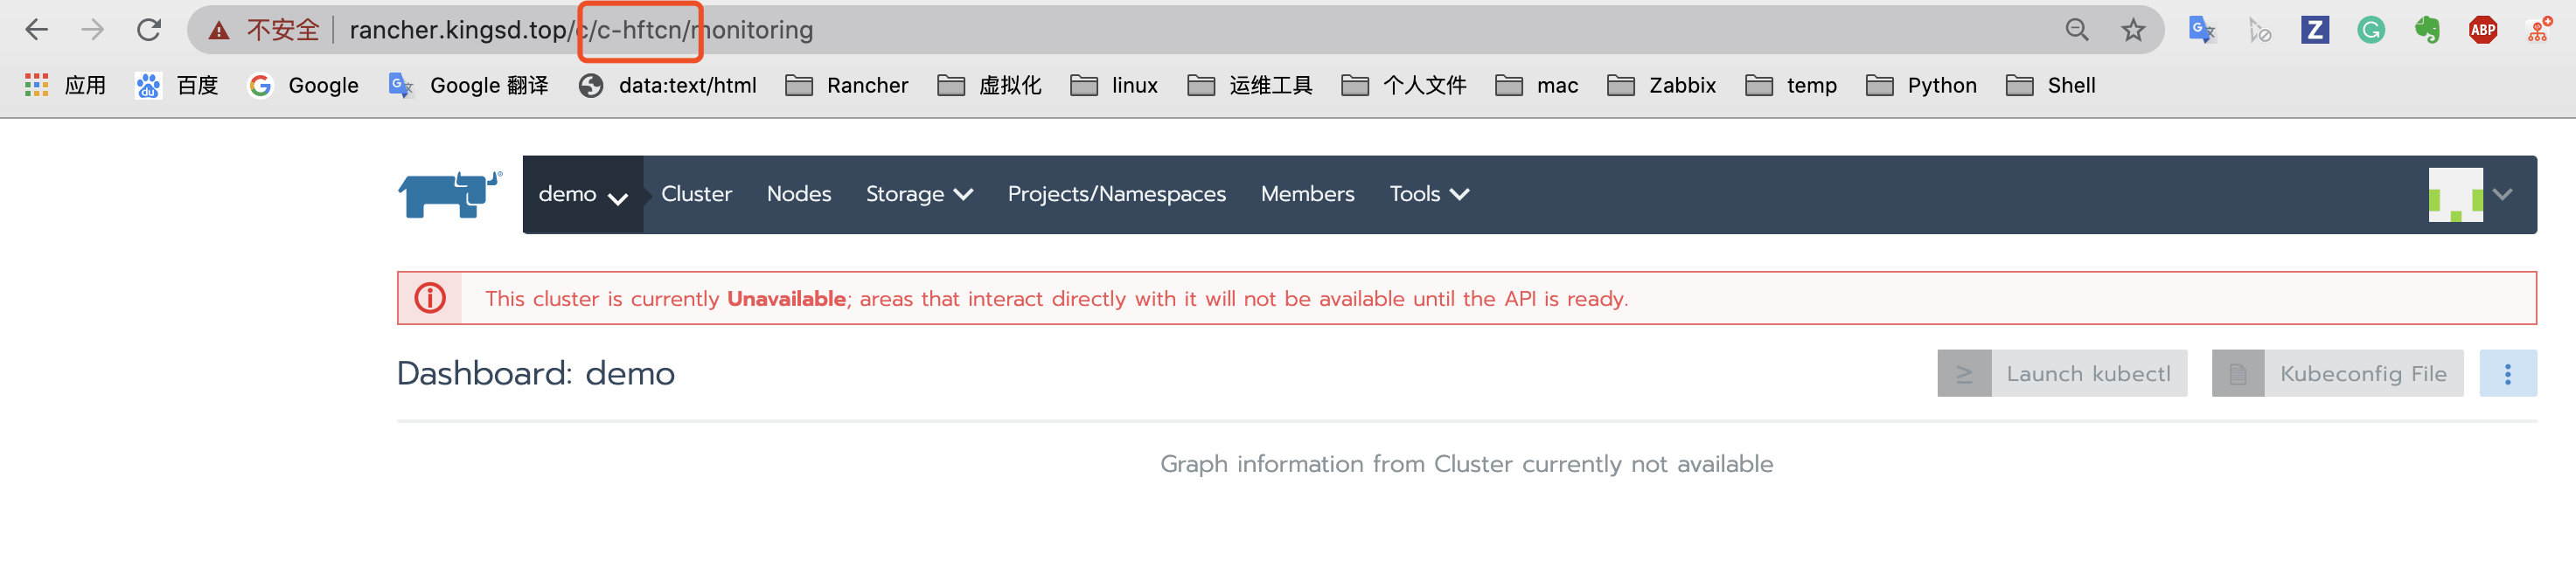
Query the cluster ID through the browser address bar. The field starting with C after C / is the cluster ID. in this case, the cluster ID is c-4wzvf;
-
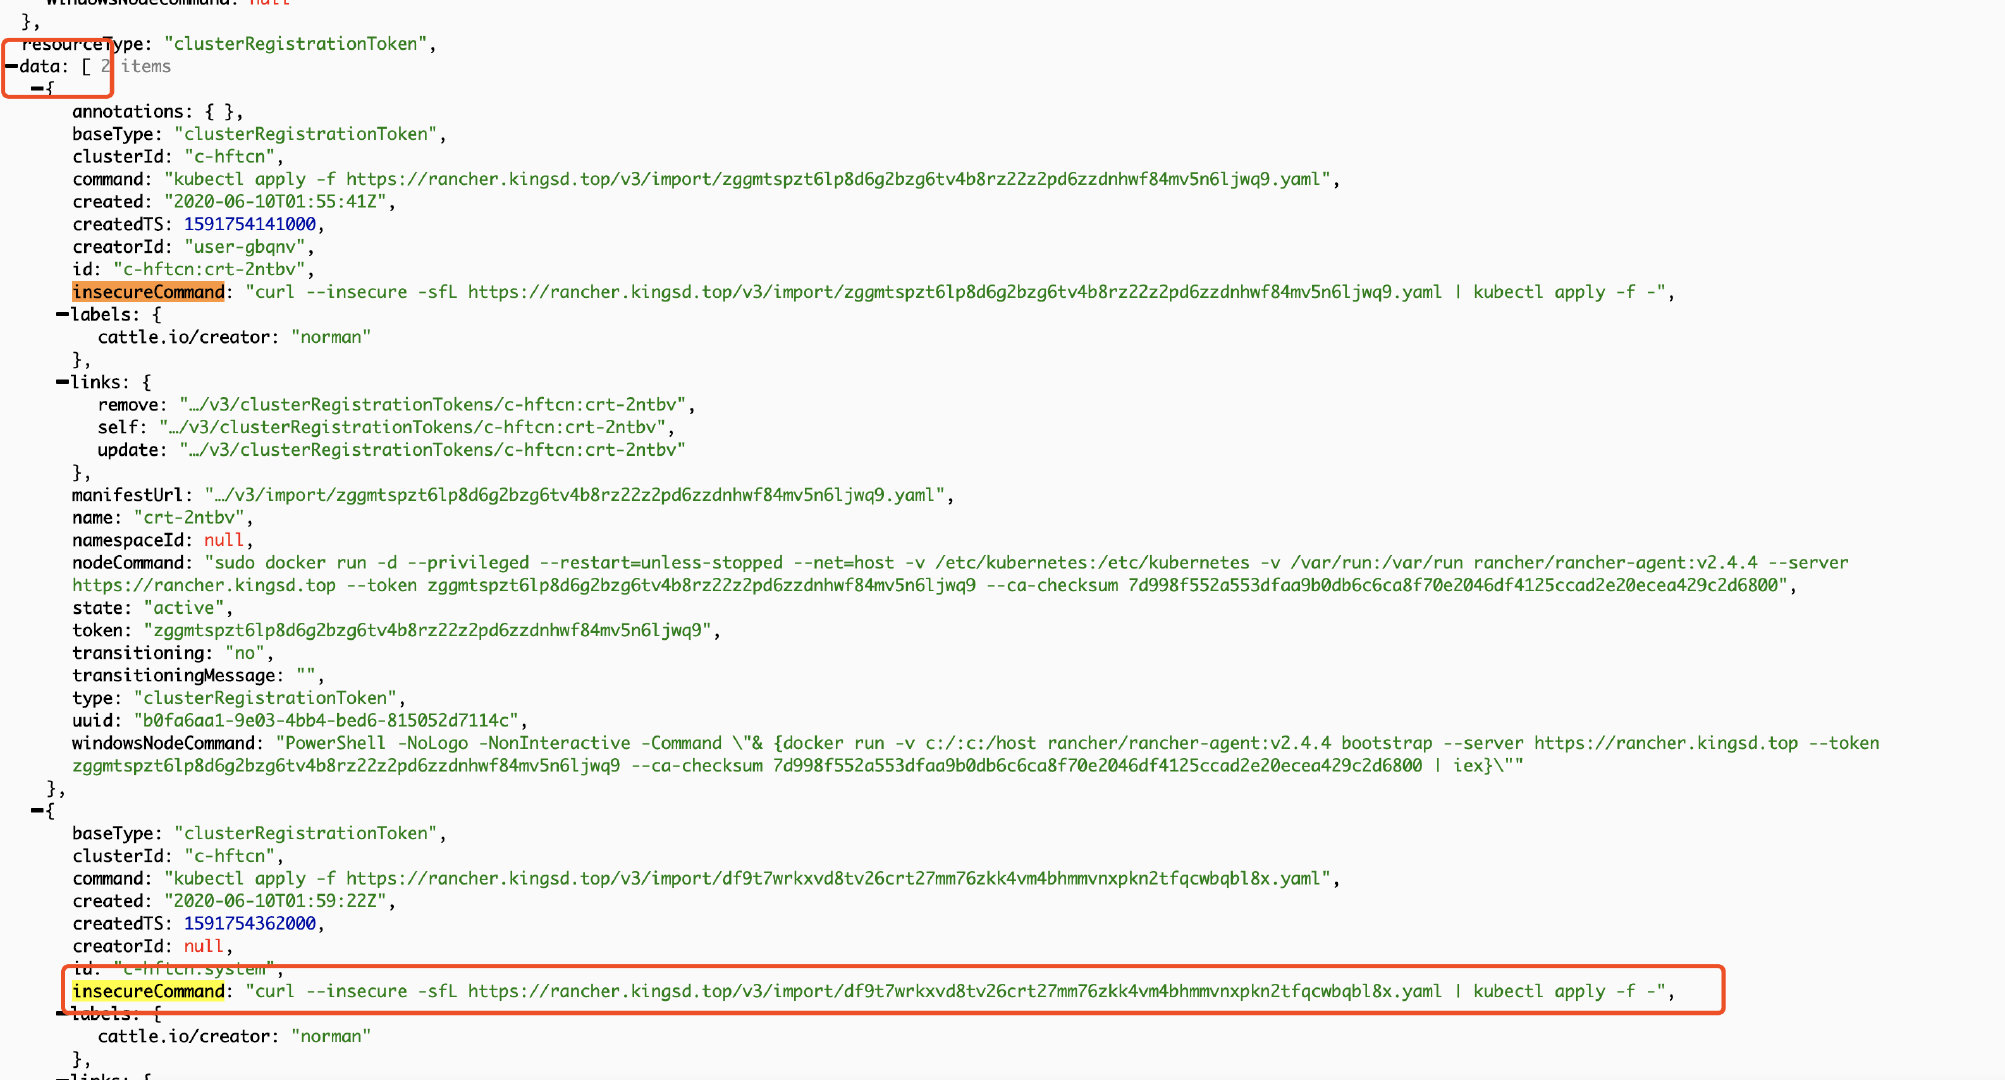
Visit HTTPS: / / < New Server_ URL > / V3 / clusters / < cluster ID > / cluster registration tokens page;
-
After opening the cluster registration tokens page, navigate to the data field, find the insecureCommand field, and copy the YAML connection for standby;
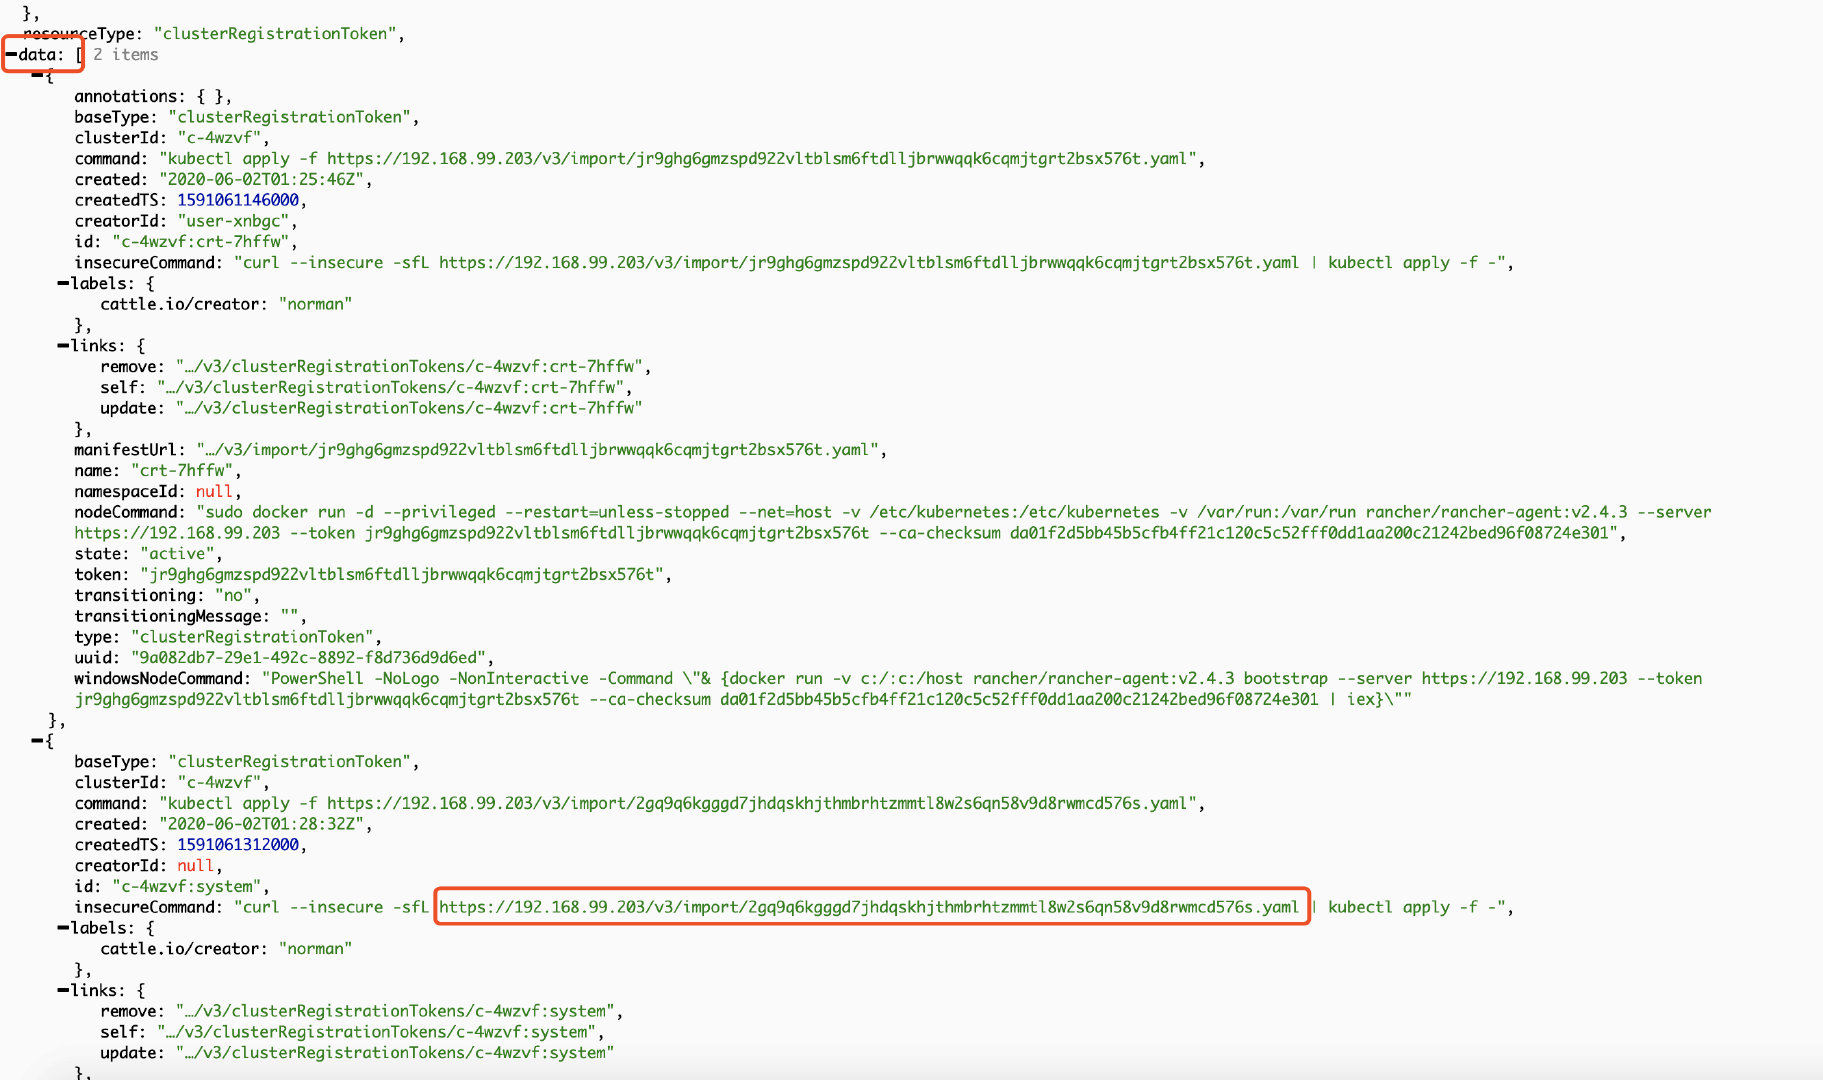
There may be multiple groups of "basetype": "clusteregistrationtoken", as shown in the above figure. In this case, the group with the largest createdTS and the latest time shall prevail, generally the last group.
Using the kubectl tool, through the direct connection kubeconfig configuration file prepared previously and the YAML file obtained in the above steps, execute the following command to update the agent related configuration.
Curl -- secure - SFL < replace with YAML file link obtained in the above steps > | kubectl -- context = XXX apply - F-
For the description of -- context=xxx, please refer to Use downstream cluster for authentication directly.
9. Verification
After a while, the cluster becomes Active, and then verify that the application we deployed before is available.
Scenario 2: Rancher single node installation migrating to highly available installation
The process of migrating from a single node to a high availability installation of Rancher can be summarized as the following steps:
On the Rancher single node instance:
-
Backup Rancher single node container
-
Backup etcd snapshot
-
Stop the old Rancher single node container
On the RKE Local cluster:
-
Using RKE to start the Rancher Local cluster
-
Restore etcd snapshot of single node backup to RKE HA by using RKE etcd snapshot restore
-
Installing Rancher in RKE Local cluster
-
Update the configuration of Local cluster and business cluster so that the agent can connect to the correct Rancher Server
Operating on a single node Rancher Server
1. Rancher single node installation
Tip: the following steps create a Rancher environment to demonstrate migration, and you can skip this step if you need to migrate the formal environment.
Run the single node Rancher Server service by executing the following docker command
docker run -itd -p 80:80 -p 443:443 --restart=unless-stopped rancher/rancher:v2.4.3
After the initialization of the container, access the Rancher Server UI through the node IP, set the password and log in.
2. Create a custom cluster
Tip: the following steps create a business cluster for demonstration to verify whether the data is lost after the Rancher migration. If you need to migrate the formal environment, you can skip this step.
After logging into the Rancher UI, add a custom cluster

Authorization cluster access address is set to enabled, FQDN and certificate can be left blank.

Note: this step is critical. After the Rancher is migrated, the address or token or certificate changes, which will cause the agent to be unable to connect to the Rancher Server. After migration, you need to edit the configuration file through kubectl to update some agent related parameters. The kubeconfig file on the default UI is connected to Kubernetes through the agent agent agent. If the agent cannot connect to the Rancher Server, the Kubernetes cluster cannot be accessed through the kubeconfig file. Turning on the access address function of authorized cluster will generate multiple contexts clusters, which are directly connected to Kubernetes without agent agent. If the business cluster does not enable this function, you can edit the cluster to enable this function.
Click next, select the required role according to the pre assigned node role, and then copy the command to the host terminal for execution.

After the cluster deployment, enter the cluster home page and click the kubeconfig file button. In the pop-up page, copy the kubeconfg configuration file for standby.

3. Deploy test application
Deploy a nginx workload. Then deploy a test app from the store.
4. Create a single node etcd snapshot
docker exec -it <RANCHER_CONTAINER_NAME> bash

root@78efdcbe08a6:/# cd /

root@78efdcbe08a6:/# ETCDCTL_API=3 etcdctl snapshot save single-node-etcd-snapshot

root@78efdcbe08a6:/# exit

docker cp <RANCHER_CONTAINER_NAME>:/single-node-etcd-snapshot .
5. Turn off the single node Rancher Server
docker stop <RANCHER_CONTAINER_NAME>
On the RKE Local cluster
1. RKE deploys Local Kubernetes cluster
according to RKE sample configuration Create RKE profile cluster.yml :
nodes:
- address: 99.79.49.94
    internal_address: 172.31.13.209
    user: ubuntu
    role: [controlplane, worker, etcd]
- address: 35.183.174.120
    internal_address: 172.31.8.28
    user: ubuntu
    role: [controlplane, worker, etcd]
- address: 15.223.49.238
    internal_address: 172.31.0.199
    user: ubuntu
    role: [controlplane, worker, etcd]
Execute the rke command to create a Local Kubernetes cluster
rke up --config cluster.yml
Check the running status of Kubernetes cluster
Use kubectl to check the node status and confirm that the node status is Ready
kubectl get nodes

NAME             STATUS   ROLES                      AGE   VERSION
15.223.49.238    Ready    controlplane,etcd,worker   93s   v1.17.6
35.183.174.120   Ready    controlplane,etcd,worker   92s   v1.17.6
99.79.49.94      Ready    controlplane,etcd,worker   93s   v1.17.6
Check that all required pods and containers are in good condition before proceeding
kubectl get pods --all-namespaces

NAMESPACE       NAME                                      READY   STATUS      RESTARTS   AGE
ingress-nginx   default-http-backend-67cf578fc4-9vjq4     1/1     Running     0          67s
ingress-nginx   nginx-ingress-controller-8g7kq            1/1     Running     0          67s
ingress-nginx   nginx-ingress-controller-8jvsd            1/1     Running     0          67s
ingress-nginx   nginx-ingress-controller-lrt57            1/1     Running     0          67s
kube-system     canal-68j4r                               2/2     Running     0          100s
kube-system     canal-ff4qg                               2/2     Running     0          100s
kube-system     canal-wl9hd                               2/2     Running     0          100s
kube-system     coredns-7c5566588d-bhbmm                  1/1     Running     0          64s
kube-system     coredns-7c5566588d-rhjpv                  1/1     Running     0          87s
kube-system     coredns-autoscaler-65bfc8d47d-tq4gj       1/1     Running     0          86s
kube-system     metrics-server-6b55c64f86-vg7qs           1/1     Running     0          79s
kube-system     rke-coredns-addon-deploy-job-fr2bx        0/1     Completed   0          92s
kube-system     rke-ingress-controller-deploy-job-vksrk   0/1     Completed   0          72s
kube-system     rke-metrics-addon-deploy-job-d9hlv        0/1     Completed   0          82s
kube-system     rke-network-plugin-deploy-job-kf8bn       0/1     Completed   0          103s
2. Transfer the generated single node etcd snapshot from the Rancher single node instance to the RKE Local cluster node
Create a / opt / RKE / etcd snapshots directory on the RKE HA Local node, and copy the single node etcd snapshot file to the directory:
mkdir -p /opt/rke/etcd-snapshots
scp root@<old_rancher_ip>:/root/single-node-etcd-snapshot /opt/rke/etcd-snapshots
3. Use RKE to restore the single node etcd snapshot to the new HA node
rke etcd snapshot-restore --name single-node-etcd-snapshot --config cluster.yml
4. Rancher HA installation
Refer to the installation documentation to install Rancher HA.
5. Configure NGINX load balancing for Rancher HA
Refer to NGINX configuration example for Rancher HA configuring load balancing.
Nginx configuration:
worker_processes 4;
worker_rlimit_nofile 40000;

events {
    worker_connections 8192;
}

stream {
    upstream rancher_servers_http {
        least_conn;
        server 172.31.11.95:80 max_fails=3 fail_timeout=5s;
        server 172.31.0.201:80 max_fails=3 fail_timeout=5s;
        server 172.31.15.236:80 max_fails=3 fail_timeout=5s;
    }
    server {
        listen 80;
        proxy_pass rancher_servers_http;
    }

    upstream rancher_servers_https {
        least_conn;
        server 172.31.11.95:443 max_fails=3 fail_timeout=5s;
        server 172.31.0.201:443 max_fails=3 fail_timeout=5s;
        server 172.31.15.236:443 max_fails=3 fail_timeout=5s;
    }
    server {
        listen     443;
        proxy_pass rancher_servers_https;
    }
}
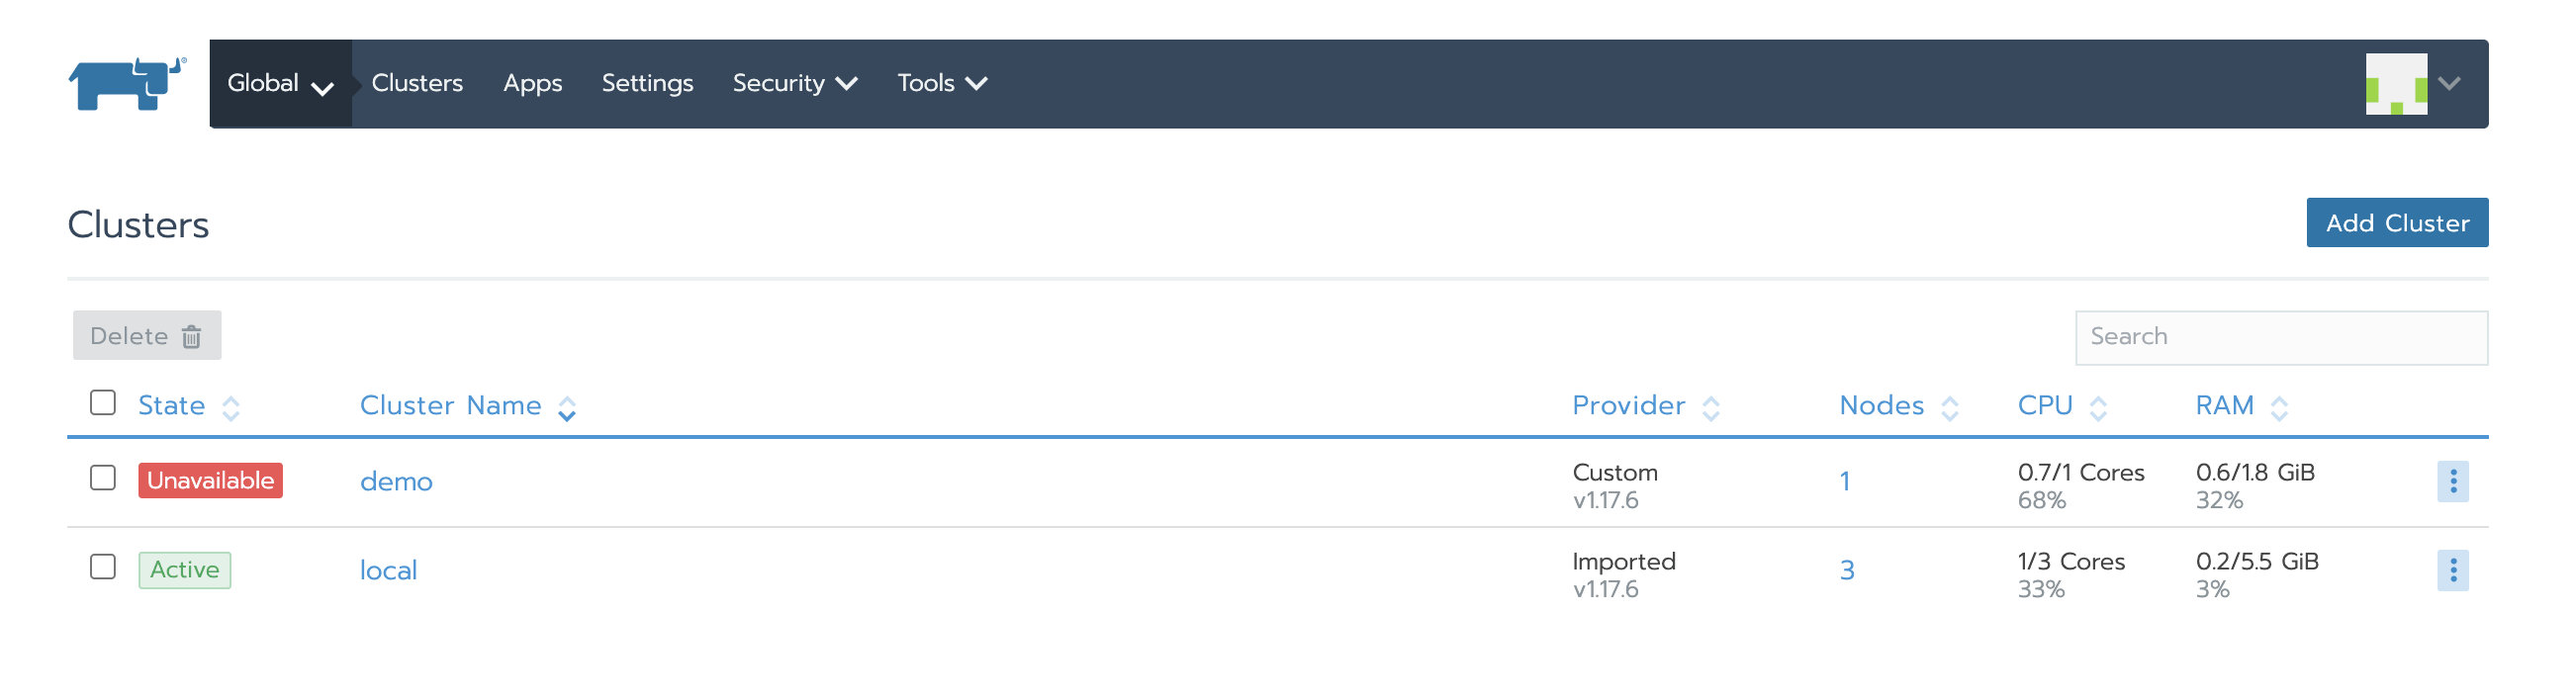
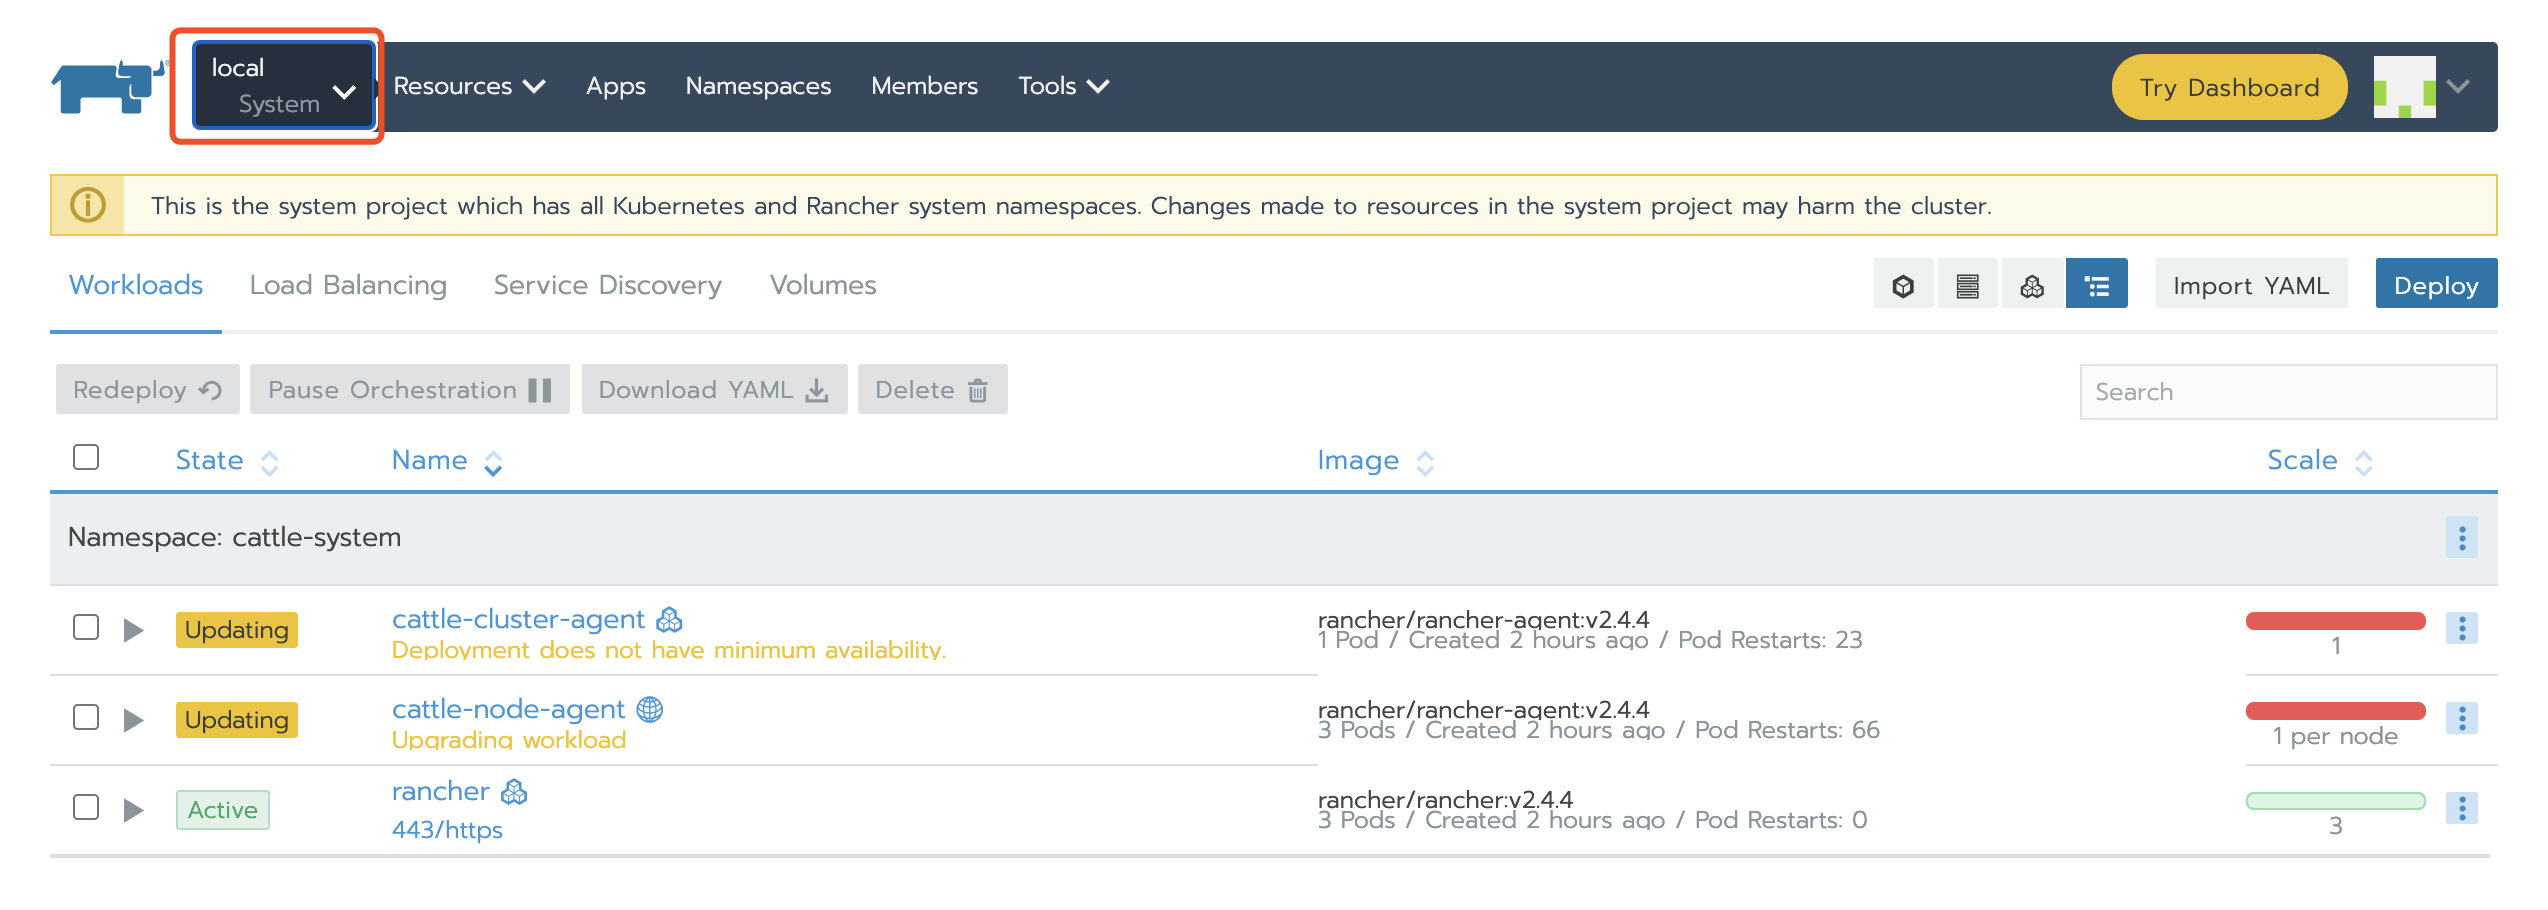
After Nginx is started, we can access the Rancher UI through the configured domain name / IP. It can be seen that the business cluster demo is in Unavailable status. Although the local cluster is Active, both cluster agent and node agent fail to start.
Both cases are due to the old Rancher Server to which the agent is still connected.
6. Update the Rancher Server IP or domain name
-
Go to global > system settings, and then scroll down to the server URL file
-
Click the ellipsis menu on the right and choose upgrade
-
Change the server URL address to the address of the new Rancher server
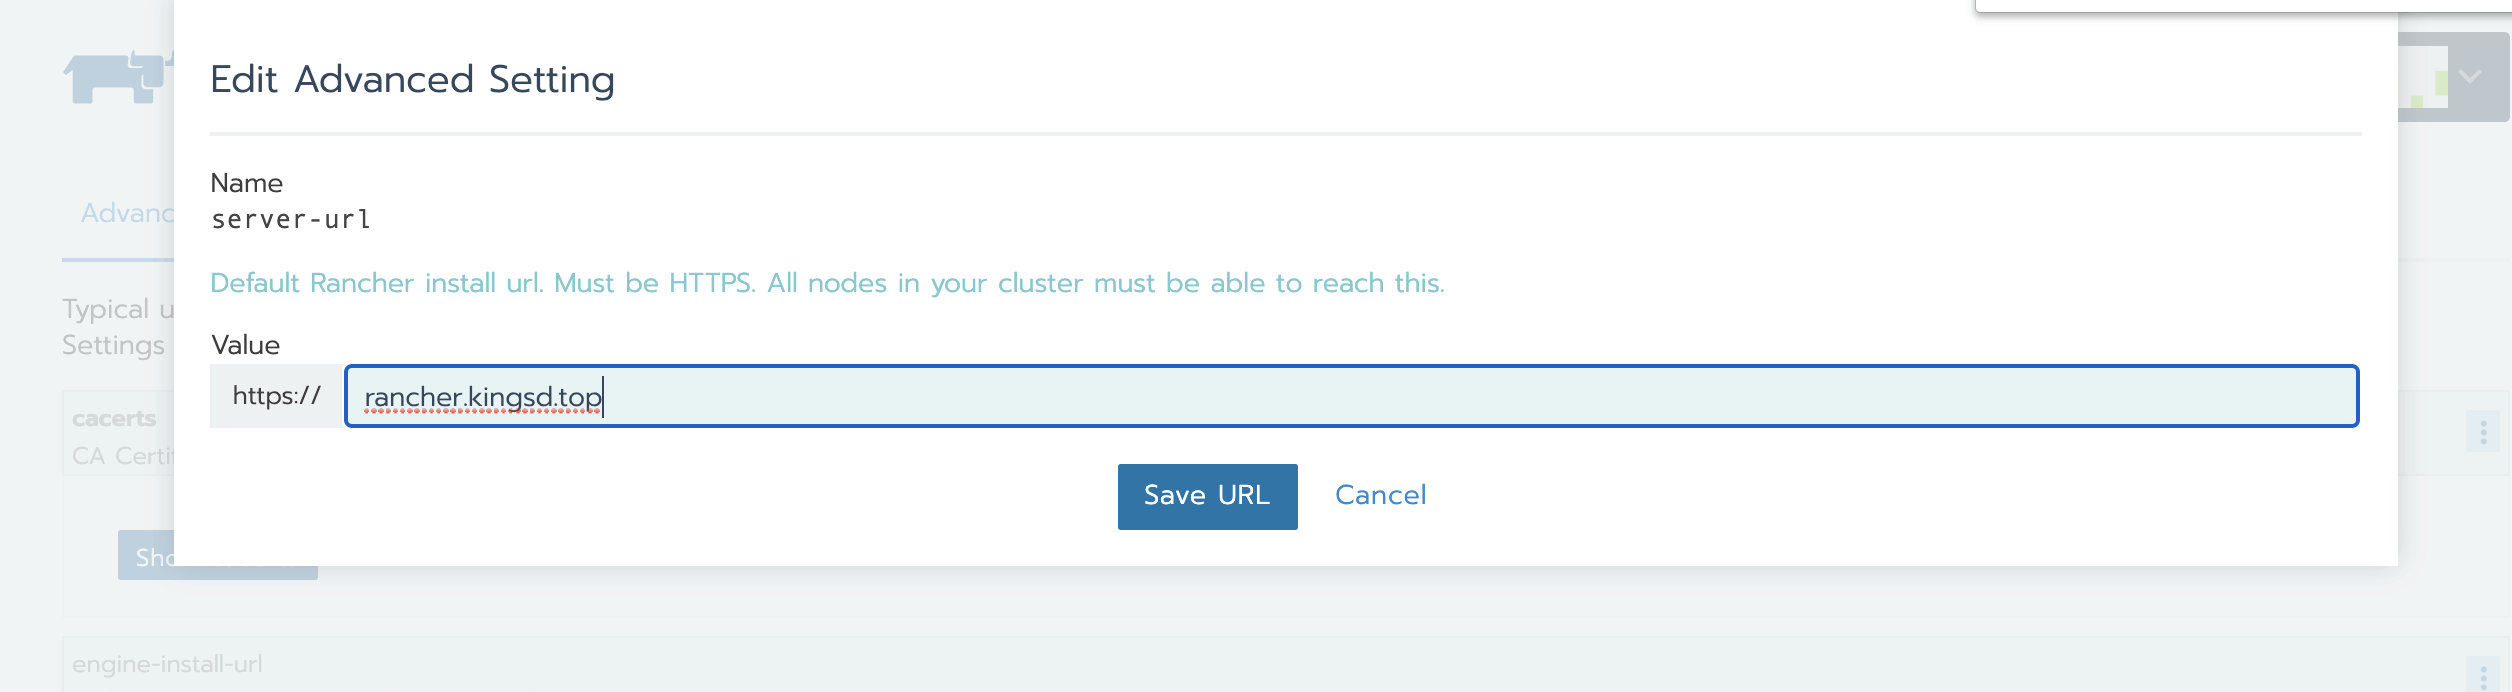
- preservation
7. Update agent configuration of local cluster and business cluster
Log in to Rancher Server through new domain name or IP;
Query the cluster ID through the browser address bar. The field starting with C after C / is the cluster ID. in this case, the cluster ID is c-hftcn;
Visit HTTPS: / / < New Server_ URL > / V3 / clusters / < cluster ID > / cluster registration tokens page;
After opening the cluster registration tokens page, navigate to the data field, find the insecureCommand field, and copy the YAML connection for standby;
There may be multiple groups of "basetype": "clusteregistrationtoken", as shown in the above figure. In this case, the group with the largest createdTS and the latest time shall prevail, generally the last group.
Using the kubectl tool, through the direct connection kubeconfig configuration file prepared previously and the YAML file obtained in the above steps, execute the following command to update the agent related configuration.
be careful:
The kubeconfig used to update local cluster and business cluster is different. Please select the required kubeconfig for different clusters.
For the description of -- context=xxx, please refer to Use downstream cluster for authentication directly.
Curl -- secure - SFL < replace with YAML file link obtained in the above steps > | kubectl -- context = XXX apply - F-
After the business cluster agent is successfully updated, use the same method to update the local cluster agent configuration.
9. Verification
After a while, the local and demo clusters become Active:
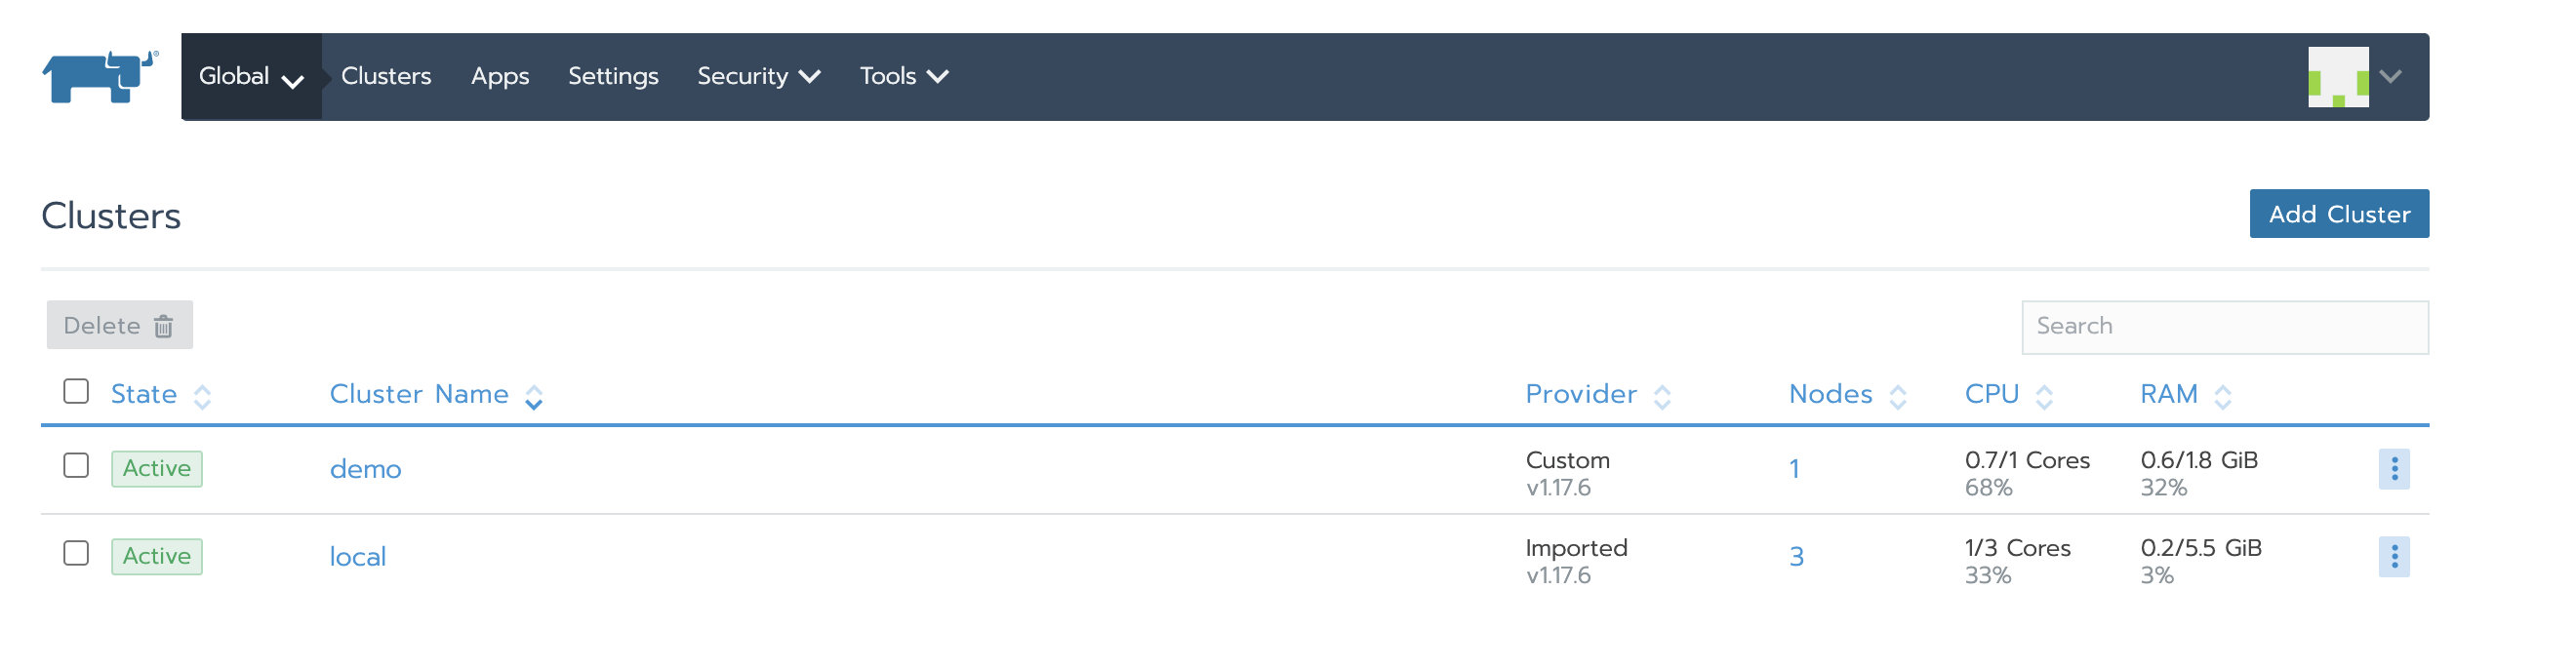
Cluster agent and node agent of Local cluster are started successfully
Cluster agent and node agent of Demo cluster started successfully
Then verify that the application we deployed before is available.

Scenario 3: Rancehr high availability installation migrating to other Local clusters
The highly available installation of Rancehr can be migrated to other Local clusters through Update of rke Function complete. The original 3-node local cluster is expanded to 6 nodes through rke, at this time, etcd data will be automatically synchronized to 6 nodes in the local cluster, and then the original 3 nodes will be removed and updated again using rke. In this way, the Rancher Server can be smoothly migrated to the new Rancher local cluster.
1. RKE deploys Local Kubernetes cluster
according to RKE sample configuration Create RKE profile cluster.yml :
nodes:
- address: 3.96.52.186
    internal_address: 172.31.11.95
    user: ubuntu
    role: [controlplane, worker, etcd]
- address: 35.183.186.213
    internal_address: 172.31.0.201
    user: ubuntu
    role: [controlplane, worker, etcd]
- address: 35.183.130.12
    internal_address: 172.31.15.236
    user: ubuntu
    role: [controlplane, worker, etcd]
Execute the rke command to create a Local Kubernetes cluster
rke up --config cluster.yml
Check the running status of Kubernetes cluster
Use kubectl to check the node status and confirm that the node status is Ready
kubectl get nodes
NAME             STATUS   ROLES                      AGE   VERSION
3.96.52.186      Ready    controlplane,etcd,worker   71s   v1.17.6
35.183.130.12    Ready    controlplane,etcd,worker   72s   v1.17.6
35.183.186.213   Ready    controlplane,etcd,worker   72s   v1.17.6
Check that all required pods and containers are in good condition before proceeding
kubectl get pods --all-namespaces

NAMESPACE       NAME                                      READY   STATUS      RESTARTS   AGE
ingress-nginx   default-http-backend-67cf578fc4-gnt5c     1/1     Running     0          72s
ingress-nginx   nginx-ingress-controller-47p4b            1/1     Running     0          72s
ingress-nginx   nginx-ingress-controller-85284            1/1     Running     0          72s
ingress-nginx   nginx-ingress-controller-9qbdz            1/1     Running     0          72s
kube-system     canal-9bx8k                               2/2     Running     0          97s
kube-system     canal-l2fjb                               2/2     Running     0          97s
kube-system     canal-v7fzs                               2/2     Running     0          97s
kube-system     coredns-7c5566588d-7kv7b                  1/1     Running     0          67s
kube-system     coredns-7c5566588d-t4jfm                  1/1     Running     0          90s
kube-system     coredns-autoscaler-65bfc8d47d-vnrzc       1/1     Running     0          90s
kube-system     metrics-server-6b55c64f86-r4p8w           1/1     Running     0          79s
kube-system     rke-coredns-addon-deploy-job-lx667        0/1     Completed   0          94s
kube-system     rke-ingress-controller-deploy-job-r2nw5   0/1     Completed   0          74s
kube-system     rke-metrics-addon-deploy-job-4bq76        0/1     Completed   0          84s
kube-system     rke-network-plugin-deploy-job-gjpm8       0/1     Completed   0          99s
2. Rancher HA installation
Refer to the installation documentation to install Rancher HA.
3. Configure NGINX load balancing for Rancher HA
Refer to NGINX configuration example for Rancher HA configuring load balancing.
Nginx configuration:
worker_processes 4;
worker_rlimit_nofile 40000;

events {
    worker_connections 8192;
}

stream {
    upstream rancher_servers_http {
        least_conn;
        server 172.31.11.95:80 max_fails=3 fail_timeout=5s;
        server 172.31.0.201:80 max_fails=3 fail_timeout=5s;
        server 172.31.15.236:80 max_fails=3 fail_timeout=5s;
    }
    server {
        listen 80;
        proxy_pass rancher_servers_http;
    }

    upstream rancher_servers_https {
        least_conn;
        server 172.31.11.95:443 max_fails=3 fail_timeout=5s;
        server 172.31.0.201:443 max_fails=3 fail_timeout=5s;
        server 172.31.15.236:443 max_fails=3 fail_timeout=5s;
    }
    server {
        listen     443;
        proxy_pass rancher_servers_https;
    }
}
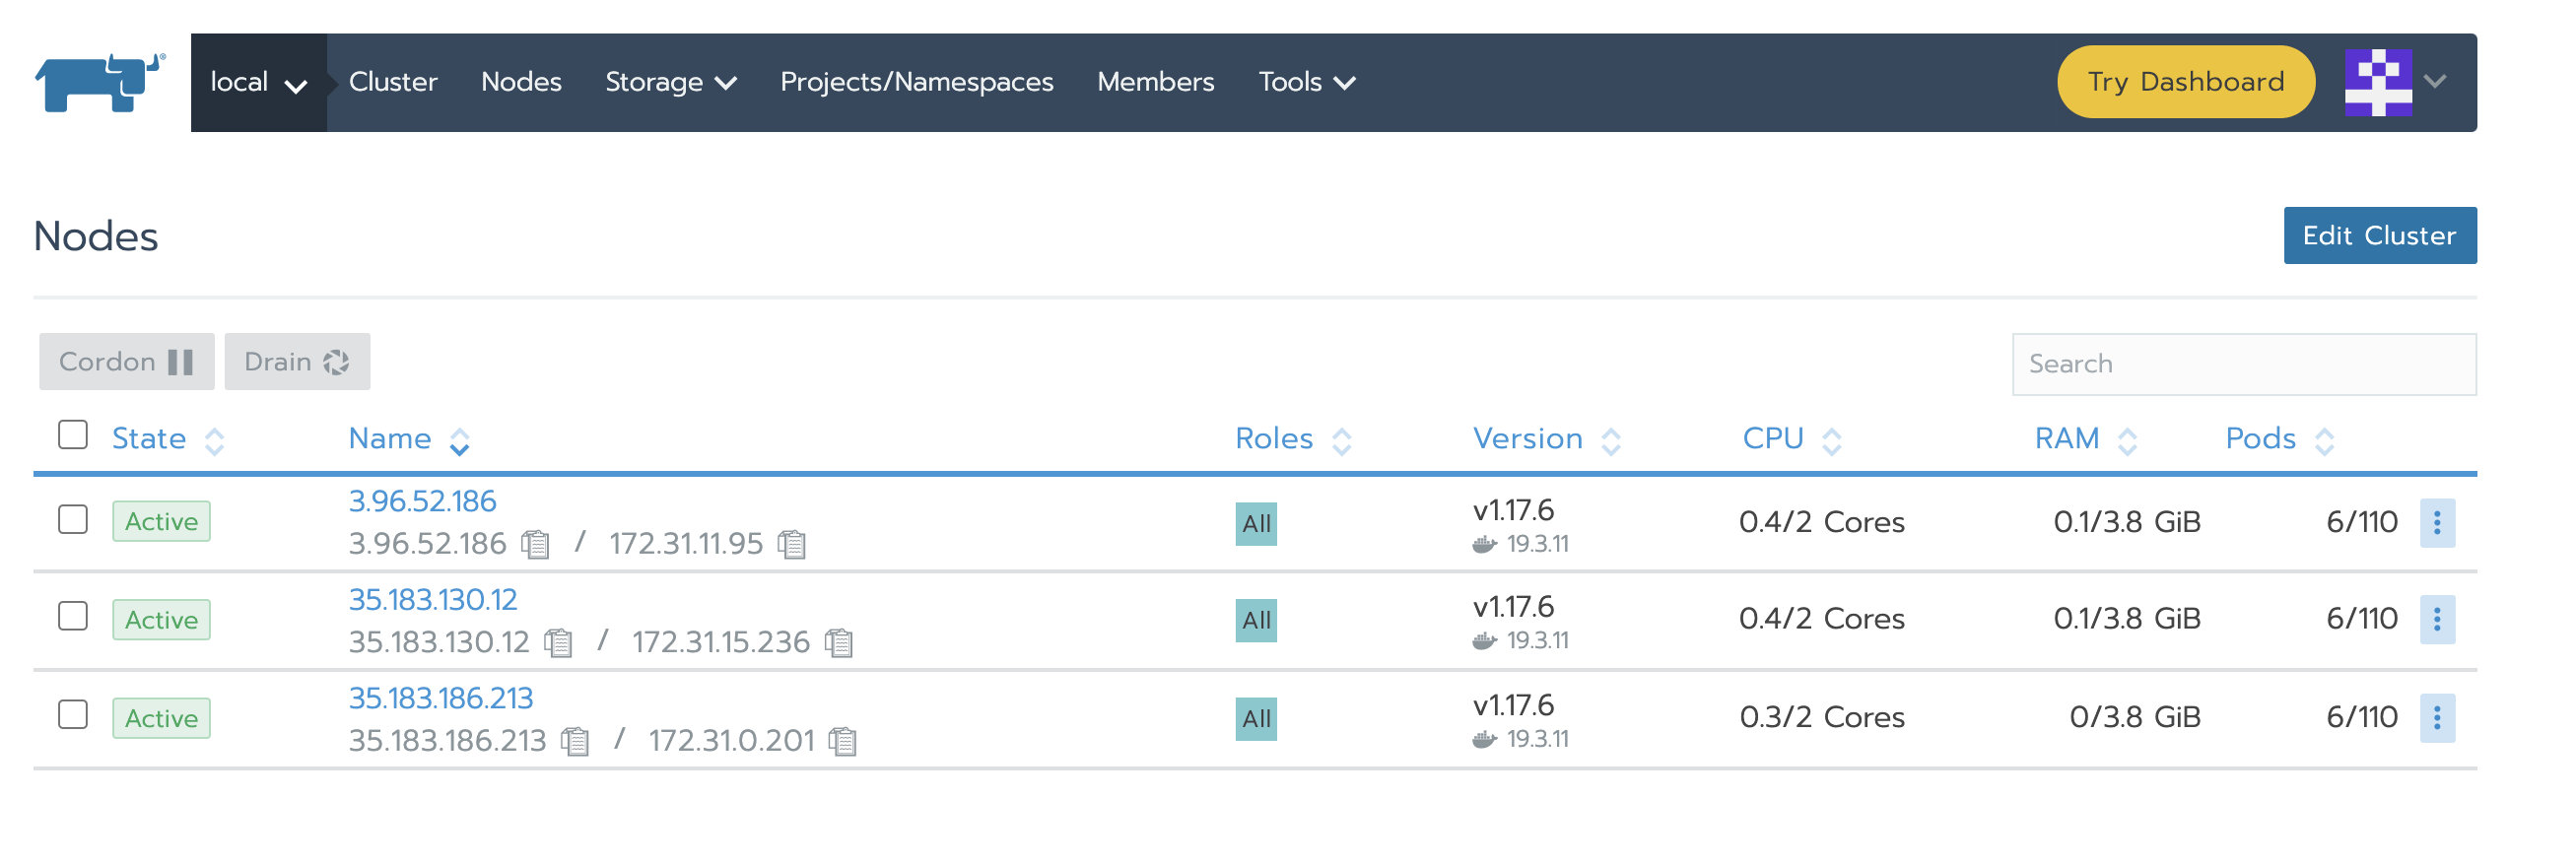
After Nginx is started, we can access the Rancher UI through the configured domain name / IP. You can navigate to local - > nodes to view the status of the three nodes of the local cluster:
4. Deploy test cluster and Application
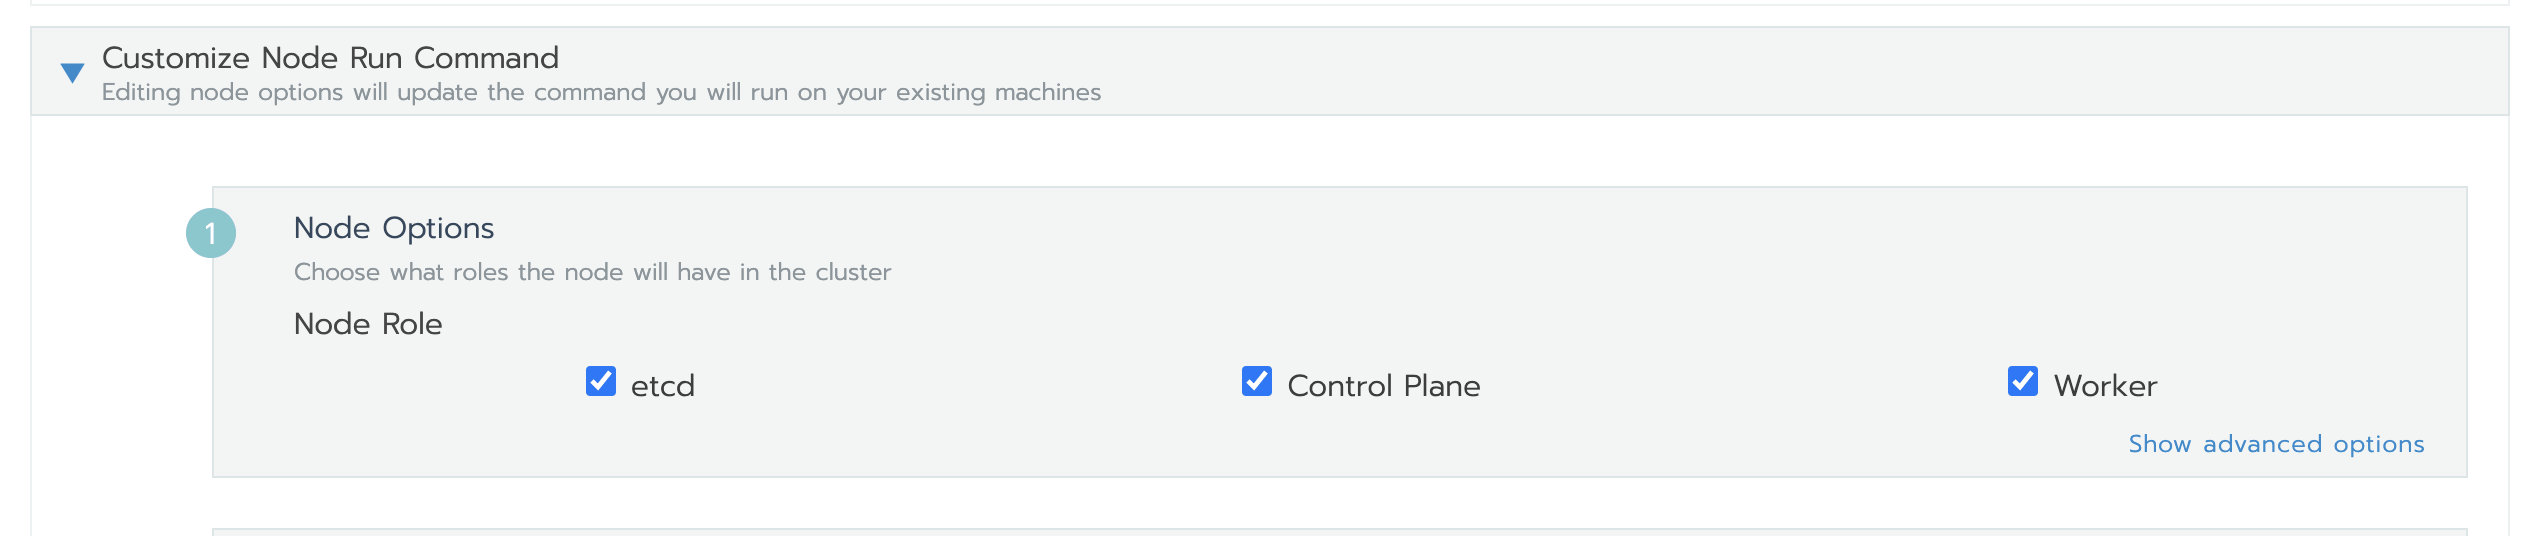
Add a test cluster, and select etcd, Control Plane and Worker at the same time for Node Role
After the test cluster is added successfully, deploy a nginx workload. Then deploy a test app from the store.

5. Add the nodes of the new cluster to the Local cluster
Modify the rke configuration file used to create the local cluster just now, and add the configuration of the new cluster.
cluster.yml:
nodes:
- address: 3.96.52.186
    internal_address: 172.31.11.95
    user: ubuntu
    role: [controlplane, worker, etcd]
- address: 35.183.186.213
    internal_address: 172.31.0.201
    user: ubuntu
    role: [controlplane, worker, etcd]
- address: 35.183.130.12
    internal_address: 172.31.15.236
    user: ubuntu
    role: [controlplane, worker, etcd]

# The following is the configuration of the new node
- address: 52.60.116.56
    internal_address: 172.31.14.146
    user: ubuntu
    role: [controlplane, worker, etcd]
- address: 99.79.9.244
    internal_address: 172.31.15.215
    user: ubuntu
    role: [controlplane, worker, etcd]
- address: 15.223.77.84
    internal_address: 172.31.8.64
    user: ubuntu
    role: [controlplane, worker, etcd]
Update the cluster and expand the local cluster nodes to 6
rke up --cluster.yml
Check the running status of Kubernetes cluster
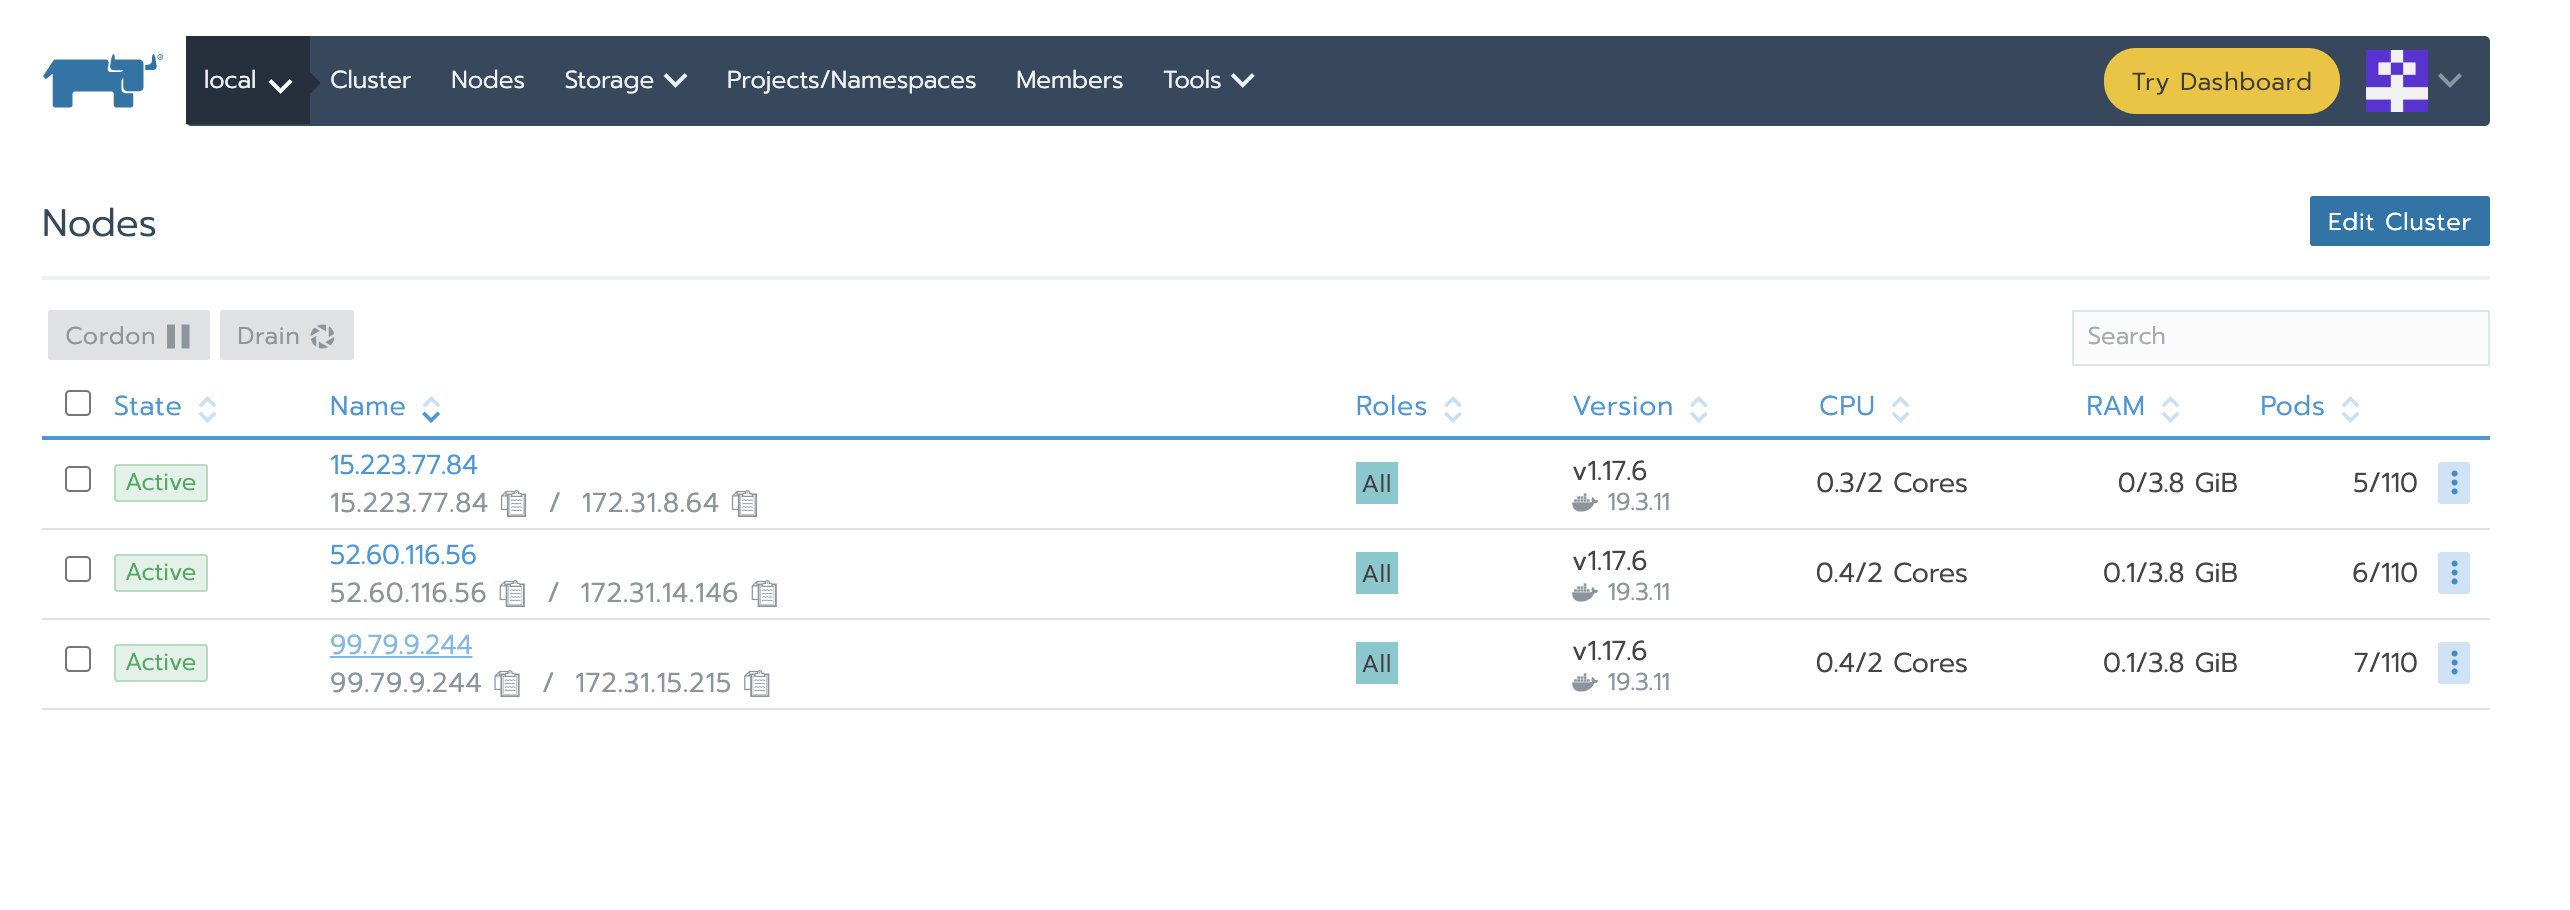
Use kubectl to test your connectivity, and confirm that the original nodes (3.96.52.186, 35.183.186.213, 35.183.130.12) and the new nodes (52.60.116.56, 99.79.9.244, 15.223.77.84) are in Ready state
kubectl get nodes
NAME             STATUS   ROLES                      AGE    VERSION
15.223.77.84     Ready    controlplane,etcd,worker   33s    v1.17.6
3.96.52.186      Ready    controlplane,etcd,worker   88m    v1.17.6
35.183.130.12    Ready    controlplane,etcd,worker   89m    v1.17.6
35.183.186.213   Ready    controlplane,etcd,worker   89m    v1.17.6
52.60.116.56     Ready    controlplane,etcd,worker   101s   v1.17.6
99.79.9.244      Ready    controlplane,etcd,worker   67s    v1.17.6
Check that all required pods and containers are in good condition before proceeding
kubectl get pods --all-namespaces

NAMESPACE       NAME                                      READY   STATUS      RESTARTS   AGE
cattle-system   cattle-cluster-agent-68898b5c4d-lkz5m     1/1     Running     0          46m
cattle-system   cattle-node-agent-9xrbs                   1/1     Running     0          109s
cattle-system   cattle-node-agent-lvdlf                   1/1     Running     0          46m
cattle-system   cattle-node-agent-mnk76                   1/1     Running     0          46m
cattle-system   cattle-node-agent-qfwcm                   1/1     Running     0          75s
cattle-system   cattle-node-agent-tk66h                   1/1     Running     0          2m23s
cattle-system   cattle-node-agent-v2vpf                   1/1     Running     0          46m
cattle-system   rancher-749fd64664-8cg4w                  1/1     Running     1          58m
cattle-system   rancher-749fd64664-fms8x                  1/1     Running     1          58m
cattle-system   rancher-749fd64664-rb5pt                  1/1     Running     1          58m
ingress-nginx   default-http-backend-67cf578fc4-gnt5c     1/1     Running     0          89m
ingress-nginx   nginx-ingress-controller-44c5z            1/1     Running     0          61s
ingress-nginx   nginx-ingress-controller-47p4b            1/1     Running     0          89m
ingress-nginx   nginx-ingress-controller-85284            1/1     Running     0          89m
ingress-nginx   nginx-ingress-controller-9qbdz            1/1     Running     0          89m
ingress-nginx   nginx-ingress-controller-kp7p6            1/1     Running     0          61s
ingress-nginx   nginx-ingress-controller-tfjrw            1/1     Running     0          61s
kube-system     canal-9bx8k                               2/2     Running     0          89m
kube-system     canal-fqrqv                               2/2     Running     0          109s
kube-system     canal-kkj7q                               2/2     Running     0          75s
kube-system     canal-l2fjb                               2/2     Running     0          89m
kube-system     canal-v7fzs                               2/2     Running     0          89m
kube-system     canal-w7t58                               2/2     Running     0          2m23s
kube-system     coredns-7c5566588d-7kv7b                  1/1     Running     0          89m
kube-system     coredns-7c5566588d-t4jfm                  1/1     Running     0          89m
kube-system     coredns-autoscaler-65bfc8d47d-vnrzc       1/1     Running     0          89m
kube-system     metrics-server-6b55c64f86-r4p8w           1/1     Running     0          89m
kube-system     rke-coredns-addon-deploy-job-lx667        0/1     Completed   0          89m
kube-system     rke-ingress-controller-deploy-job-r2nw5   0/1     Completed   0          89m
kube-system     rke-metrics-addon-deploy-job-4bq76        0/1     Completed   0          89m
kube-system     rke-network-plugin-deploy-job-gjpm8       0/1     Completed   0          89m
From the above information, it can be confirmed that the local cluster has been expanded to 6 and all the workload is running normally.
6. Update the cluster again and remove the original Local cluster node
Modify the rke configuration file used by the local cluster again, and comment out the original local cluster node configuration.
cluster.yml:
nodes:
#  - address: 3.96.52.186
#    internal_address: 172.31.11.95
#    user: ubuntu
#    role: [controlplane, worker, etcd]
#  - address: 35.183.186.213
#    internal_address: 172.31.0.201
#    user: ubuntu
#    role: [controlplane, worker, etcd]
#  - address: 35.183.130.12
#    internal_address: 172.31.15.236
#    user: ubuntu
#    role: [controlplane, worker, etcd]
# The following is a new node
- address: 52.60.116.56
    internal_address: 172.31.14.146
    user: ubuntu
    role: [controlplane, worker, etcd]
- address: 99.79.9.244
    internal_address: 172.31.15.215
    user: ubuntu
    role: [controlplane, worker, etcd]
- address: 15.223.77.84
    internal_address: 172.31.8.64
    user: ubuntu
    role: [controlplane, worker, etcd]
Update the cluster and complete the migration.
rke up --cluster.yml
Check the running status of Kubernetes cluster
Using kubectl to check that the node status is Ready, you can see that the nodes of the local cluster have been replaced with the following three:
kubectl get nodes
NAME           STATUS   ROLES                      AGE   VERSION
15.223.77.84   Ready    controlplane,etcd,worker   11m   v1.17.6
52.60.116.56   Ready    controlplane,etcd,worker   13m   v1.17.6
99.79.9.244    Ready    controlplane,etcd,worker   12m   v1.17.6
Check that all required pods and containers are in good condition before proceeding
kubectl get pods --all-namespaces

NAMESPACE       NAME                                    READY   STATUS    RESTARTS   AGE
cattle-system   cattle-cluster-agent-68898b5c4d-tm6db   1/1     Running   3          3m14s
cattle-system   cattle-node-agent-9xrbs                 1/1     Running   0          14m
cattle-system   cattle-node-agent-qfwcm                 1/1     Running   0          14m
cattle-system   cattle-node-agent-tk66h                 1/1     Running   0          15m
cattle-system   rancher-749fd64664-47jw2                1/1     Running   0          3m14s
cattle-system   rancher-749fd64664-jpqdd                1/1     Running   0          3m14s
cattle-system   rancher-749fd64664-xn6js                1/1     Running   0          3m14s
ingress-nginx   default-http-backend-67cf578fc4-4668g   1/1     Running   0          3m14s
ingress-nginx   nginx-ingress-controller-44c5z          1/1     Running   0          13m
ingress-nginx   nginx-ingress-controller-kp7p6          1/1     Running   0          13m
ingress-nginx   nginx-ingress-controller-tfjrw          1/1     Running   0          13m
kube-system     canal-fqrqv                             2/2     Running   0          14m
kube-system     canal-kkj7q                             2/2     Running   0          14m
kube-system     canal-w7t58                             2/2     Running   0          15m
kube-system     coredns-7c5566588d-nmtrn                1/1     Running   0          3m13s
kube-system     coredns-7c5566588d-q6hlb                1/1     Running   0          3m13s
kube-system     coredns-autoscaler-65bfc8d47d-rx7fm     1/1     Running   0          3m14s
kube-system     metrics-server-6b55c64f86-mcx9z         1/1     Running   0          3m14s
From the above information, it can be confirmed that the local cluster has been successfully migrated and all the workload is running normally.
Modify the nginx load balancing configuration to update the information of the new node to the nginx configuration file
worker_processes 4;
worker_rlimit_nofile 40000;

events {
    worker_connections 8192;
}

stream {
    upstream rancher_servers_http {
        least_conn;
        server 172.31.14.146:80 max_fails=3 fail_timeout=5s;
        server 172.31.8.64:80 max_fails=3 fail_timeout=5s;
        server 172.31.15.215:80 max_fails=3 fail_timeout=5s;
    }
    server {
        listen 80;
        proxy_pass rancher_servers_http;
    }

    upstream rancher_servers_https {
        least_conn;
        server 172.31.14.146:443 max_fails=3 fail_timeout=5s;
        server 172.31.8.64:443 max_fails=3 fail_timeout=5s;
        server 172.31.15.215:443 max_fails=3 fail_timeout=5s;
    }
    server {
        listen     443;
        proxy_pass rancher_servers_https;
    }

}
7. Verification
Confirm the status of local cluster and business cluster is Active
Verify that the Local cluster node has been replaced
The IP addresses of the original cluster nodes are 3.96.52.186, 35.183.186.213 and 35.183.130.12 respectively
Then verify that the application we deployed before is available.
Summary
Open source has always been the product concept of Rancher, and we have always attached great importance to the communication with users in the open source community. Therefore, we have created 20 wechat communication groups. The birth of this article stems from many times of communication with community users, and it is found that many Rancher users have similar problems. So I summed up three scenarios and tested them over and over again to finish this tutorial. We also welcome all Rancher users to share their experience in various forms and build a happy open source community together.