First of all, let's introduce what CODING DevOps is. Here's the official website
Relying on the industry-leading agile project management concept and DevOps system methodology, we integrate these excellent concepts and tools into the products, and break through the tool chain islands and cooperation barriers in the R & D process. In CODING platform, you can realize the closed-loop R & D workflow from requirements submission to product iteration, product code management, automated testing, continuous integration, building management, and finally to application continuous deployment, covering the whole life cycle of agile development; Help your team improve R & D efficiency and fully embrace the industry-leading IT concept and culture.
Human talk is to realize the six basic activities of software development process planning, requirements analysis, software design, programming, software testing and operation and maintenance in CODING
Getting started
The official website link is attached. The official documents are written in detail. There is no waste of words here https://help.coding.net/docs/start/new.html
Project collaboration
If you set up the official website here
The road of cloud origin begins with the disassembly and allocation of many matters. The "project" is the smallest unit for practicing CODING DevOps. You can use it as the most basic visual coordination tool for project progress, associate consolidation requests to matters and allocate defects to relevant responsible persons. One project after another is the smallest cell unit of the team organism, but the short and concise project unit contains strong plasticity. Dedicated craftsmen are inseparable from the tools at hand. The team creating great products also needs accurate and efficient assembly line lathes. A handy event management mechanism is the starting point for the team to move towards the road of transformation. The CODING "project collaboration" function module is the scheduling center for coordinating various matters. We provide the team with Scrum agile project management mode and classic project management mode. The team can choose the appropriate mode according to management preferences. CODING enables all collaboration to take place in the cloud, and realizes seamless collaboration through reasonable task allocation and processing mechanism to help the team overcome difficulties, produce efficiently and improve delivery efficiency.
One sentence explanation: as developers, we mainly do coding. Most of the requirements, tasks and iterations here are completed by project managers, team leaders and products. We are willing (forced) to accept them
Code management
CODING supports Git / SVN two common version control tools. Three methods are supported: local warehouse creation, template creation and external warehouse import
- Normal creation: simply create a new code base and push the code locally, which is suitable for new projects
- Template creation: through the example code, you can experience how the code function module is associated with the continuous integration and build product. And the automatic packaging image process has been configured.
- Import external repository: clone the project from the third-party git code repository, use and migrate the code repository from github and gitee
Code scanning
Set of official website description
CODING code scanning capability can timely find hidden code defects, security vulnerabilities and non-standard code by analyzing the source code in the code warehouse; Automatically generate a problem list with modification suggestions to facilitate team members to repair problems and improve the stability of the code; We can also measure the code, count the methods with extremely complex structure and duplicate code for developers to adjust, so as to improve the maintainability of the code and the efficiency of the team.
One sentence summary: find bad smell in the code, find problems in advance, and set trigger rules to trigger execution when pushing the code. For some old projects that are hard to return, incremental scanning is provided to reduce remaining problems
Screenshot of scanning overview attached
Continuous integration
Next is the highlight of our developers 😁, Attached official website quick start document: h ttps://help.coding.net/docs/ci/start.html,
The first step is to create a build plan and select a custom build process

Step 2: select the code warehouse and configure the Jenkinsfile source
This creates a super simple build plan. It will be executed after we push the code to the specified warehouse. After the build, print the custom build process and start
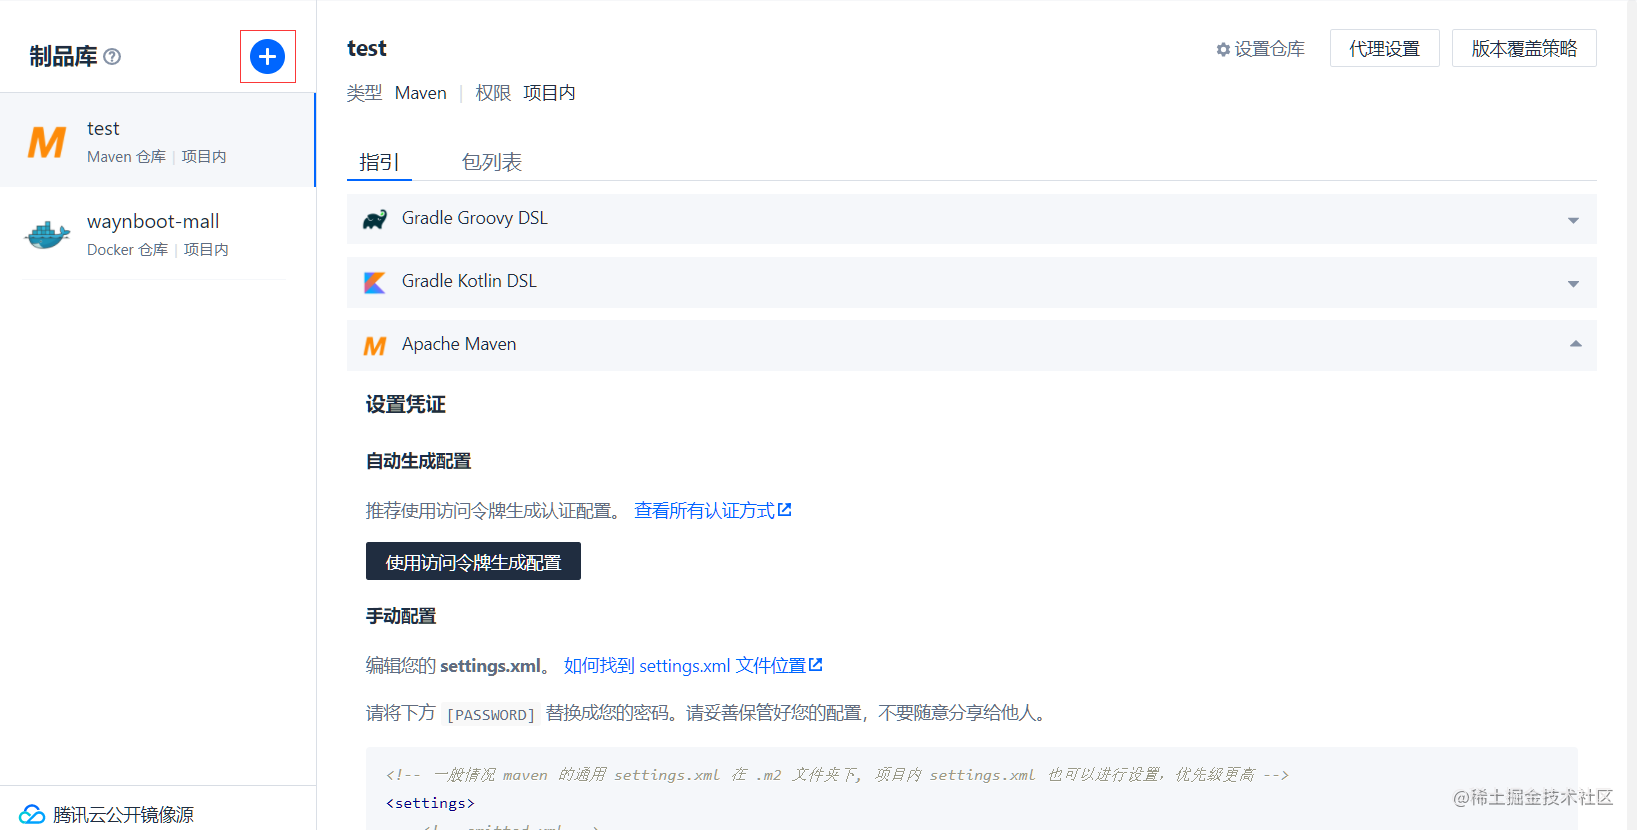
How to configure the actual production application? The following is a construction plan that uses maven to compile and build images with Dockerfile files and push them to CODING docker artifact library
prepare: create a docker product warehouse before writing the construction plan, with the official website description: https://help.coding.net/docs/artifacts/intro.html
Click the plus sign to create a docker product library
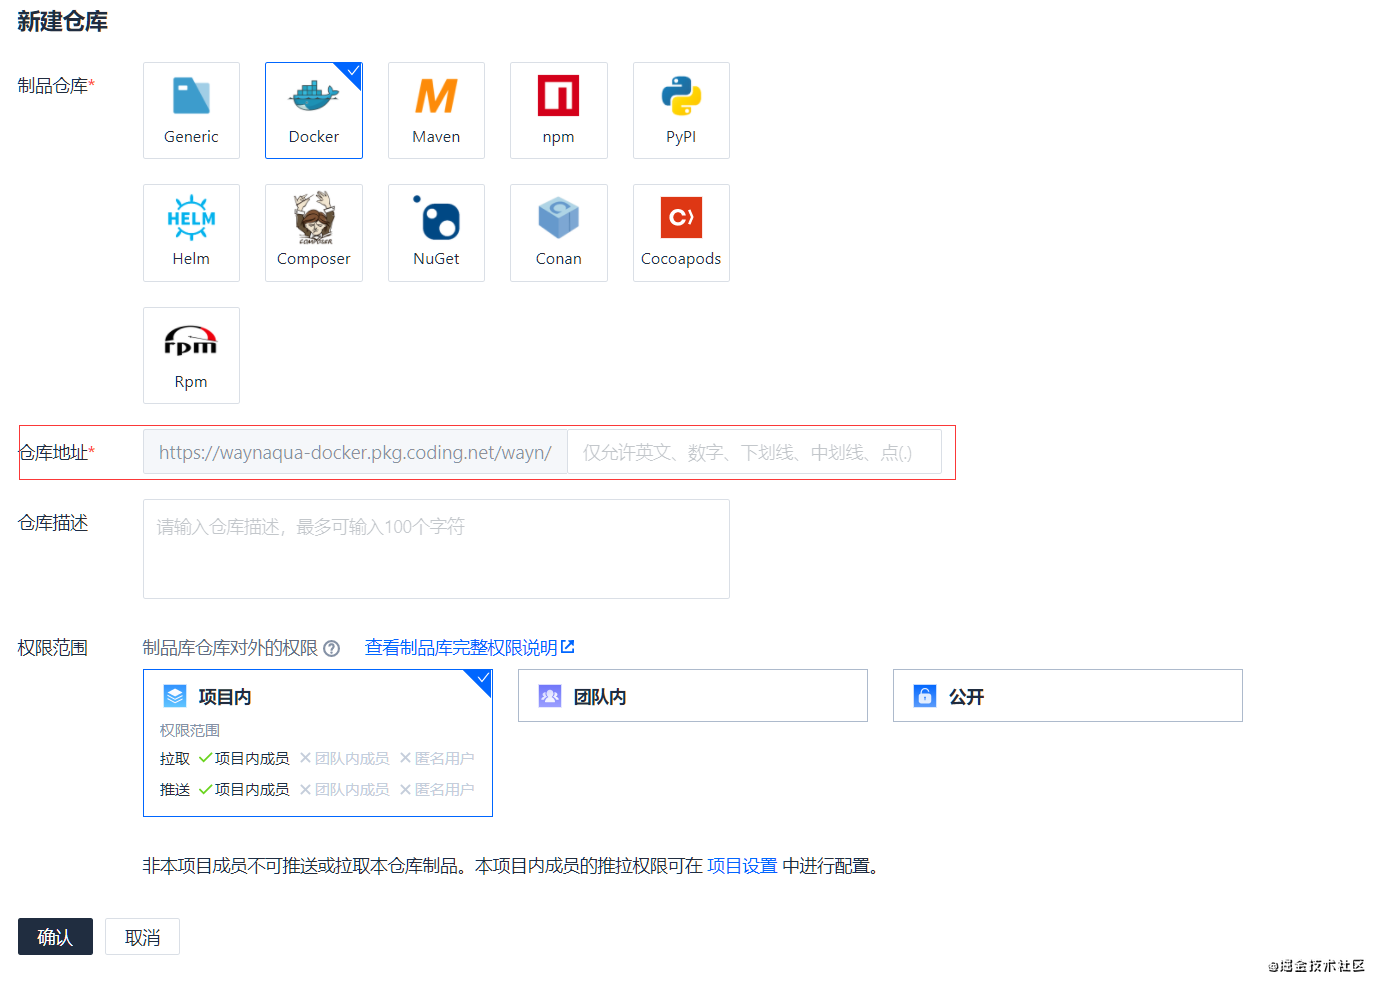
After adding the warehouse address, click OK to create a docker product library
- Basic information configuration
Select the code warehouse in the project
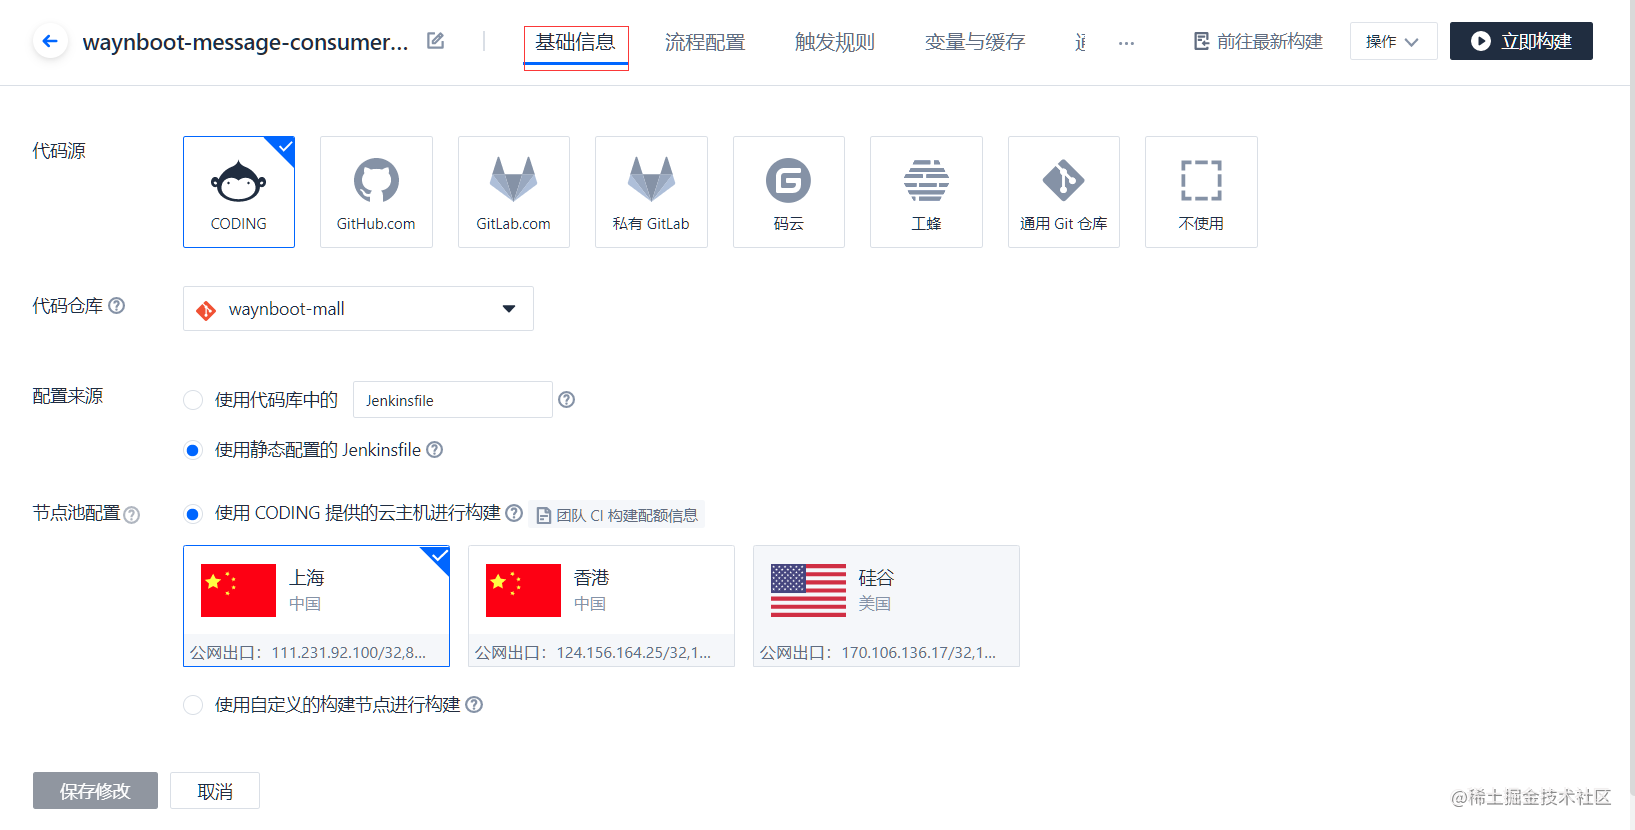
- Automatically build process configuration
adopt Jenkinsfile to configure
pipeline {
  agent any
  stages {
    // Check out code
    stage('detection') {
      steps {
        checkout([$class: 'GitSCM',
        branches: [[name: GIT_BUILD_REF]],
        userRemoteConfigs: [[
          url: GIT_REPO_URL,
          credentialsId: CREDENTIALS_ID
        ]]])
      }
    }
    // java projects are compiled using mave
    stage('compile') {
      // maven is only available in 3.5 and jdk1.8. If you need to use jdk11, you can follow the documentation https://help.coding.net/docs/ci/ways.html operation
      steps {
        sh 'mvn clean package'
      }
    }
    // After compilation, package and upload the jar package to the CODING Docker artifact library through the Dokerfile file in the code
    stage('Build image and push to CODING Docker Product warehouse') {
      steps {
        script {
          docker.withRegistry(
            "${CCI_CURRENT_WEB_PROTOCOL}://${CODING_DOCKER_REG_HOST}",
            "${CODING_ARTIFACTS_CREDENTIALS_ID}"
          ) {
            def dockerImage = docker.build("${CODING_DOCKER_IMAGE_NAME}:${DOCKER_IMAGE_VERSION}", "-f ${DOCKERFILE_PATH} ${DOCKER_BUILD_CONTEXT}")
            dockerImage.push()
          }
        }

      }
    }
    // After uploading to the CODING Docker product library, log in to the server through ssh, and use the command line to download and install the image
    stage('Deploy to remote service') {
      steps {
        script {
          // Define variables
          def remoteConfig = [:]
          remoteConfig.name = "my-remote-server"
          remoteConfig.host = "${REMOTE_HOST}"
          remoteConfig.port = "${REMOTE_SSH_PORT}".toInteger()
          remoteConfig.allowAnyHosts = true

          withCredentials([
            sshUserPrivateKey(
              credentialsId: "${REMOTE_CRED}",
              keyFileVariable: "privateKeyFilePath"
            ),
            usernamePassword(
              credentialsId: "${CODING_ARTIFACTS_CREDENTIALS_ID}",
              usernameVariable: 'CODING_DOCKER_REG_USERNAME',
              passwordVariable: 'CODING_DOCKER_REG_PASSWORD'
            )
          ]) {
            // SSH login user name
            remoteConfig.user = "${REMOTE_USER_NAME}"
            // SSH private key file address
            remoteConfig.identityFile = privateKeyFilePath

            // Please ensure that there is a Docker environment in the remote environment
            sshCommand(
              remote: remoteConfig,
              command: "docker login -u ${CODING_DOCKER_REG_USERNAME} -p ${CODING_DOCKER_REG_PASSWORD} ${CODING_DOCKER_REG_HOST}",
              sudo: true,
            )

            // DOCKER_ IMAGE_ Git is involved in version_ LOCAL_ BRANCH / GIT_ TAG / GIT_ Use of environment variables for commit
            // It needs to be spliced locally and then transferred to the remote server for use
            DOCKER_IMAGE_URL = sh(
              script: "echo ${CODING_DOCKER_REG_HOST}/${CODING_DOCKER_IMAGE_NAME}:${DOCKER_IMAGE_VERSION}",
              returnStdout: true
            )

            sshCommand(
              remote: remoteConfig,
              command: "docker pull ${DOCKER_IMAGE_URL}",
              sudo: true,
            )

            sshCommand(
              remote: remoteConfig,
              command: "docker rm -f ${IMAGE_NAME} | true",
              sudo: true,
            )

            sshCommand(
              remote: remoteConfig,
              command: "docker run -d -p ${PORT}:${PORT} -e TZ=\"Asia/Shanghai\" -v /etc/localtime:/etc/localtime  --name ${IMAGE_NAME} ${DOCKER_IMAGE_URL}",
              sudo: true,
            )

            echo "Deployment succeeded, please go to http://${REMOTE_HOST}:${PORT} preview effect“
          }
        }

      }
    }
  }
  environment {
    CODING_DOCKER_REG_HOST = "${CCI_CURRENT_TEAM}-docker.pkg.${CCI_CURRENT_DOMAIN}"
    CODING_DOCKER_IMAGE_NAME = "${PROJECT_NAME.toLowerCase()}/${DOCKER_REPO_NAME}/${IMAGE_NAME}"
  }
}
Docker configuration is as follows:
# The image needs to rely on the underlying image
FROM adoptopenjdk:8-jre-openj9
WORKDIR /root/workspace
# Copy the jar package in the current directory to the / directory of the docker container
ADD waynboot-admin-api/target/waynboot-admin-api-1.1.0.jar /opt/waynboot-mall/waynboot-admin-api-1.1.0.jar
# Create a mall-tiny-docker-file.jar file during operation
RUN bash -c 'touch /opt/waynboot-mall/waynboot-admin-api-1.1.0.jar'
# The claim service runs on port 81
EXPOSE 81
# Specify the jar package to run when the docker container starts
ENTRYPOINT ["java", "-jar", "-Xms812m", "-Xmx812m", "-Xss512k",  "/opt/waynboot-mall/waynboot-admin-api-1.1.0.jar"]
# Specifies the name of the maintainer
MAINTAINER wayn111
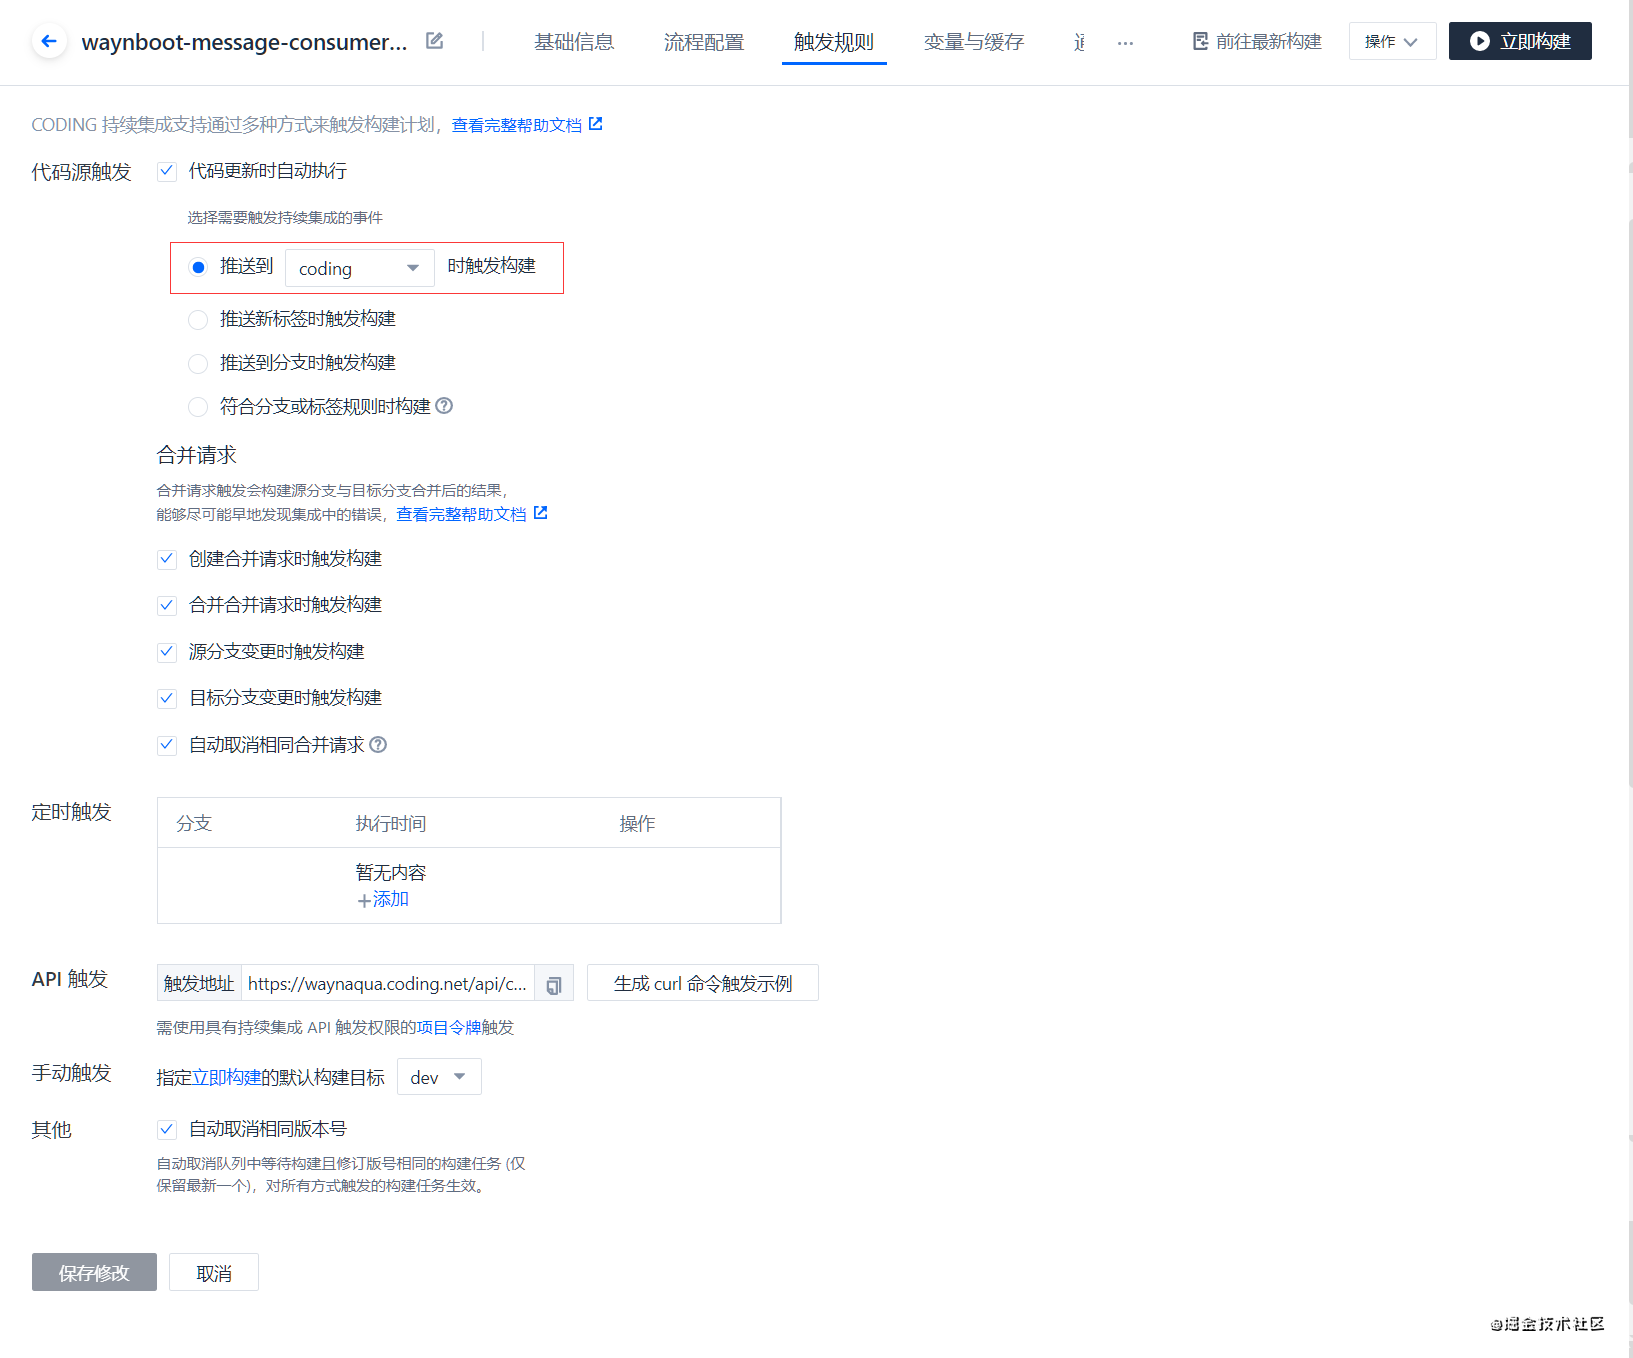
- Trigger rule, which triggers the build when the code is pushed to the specified branch
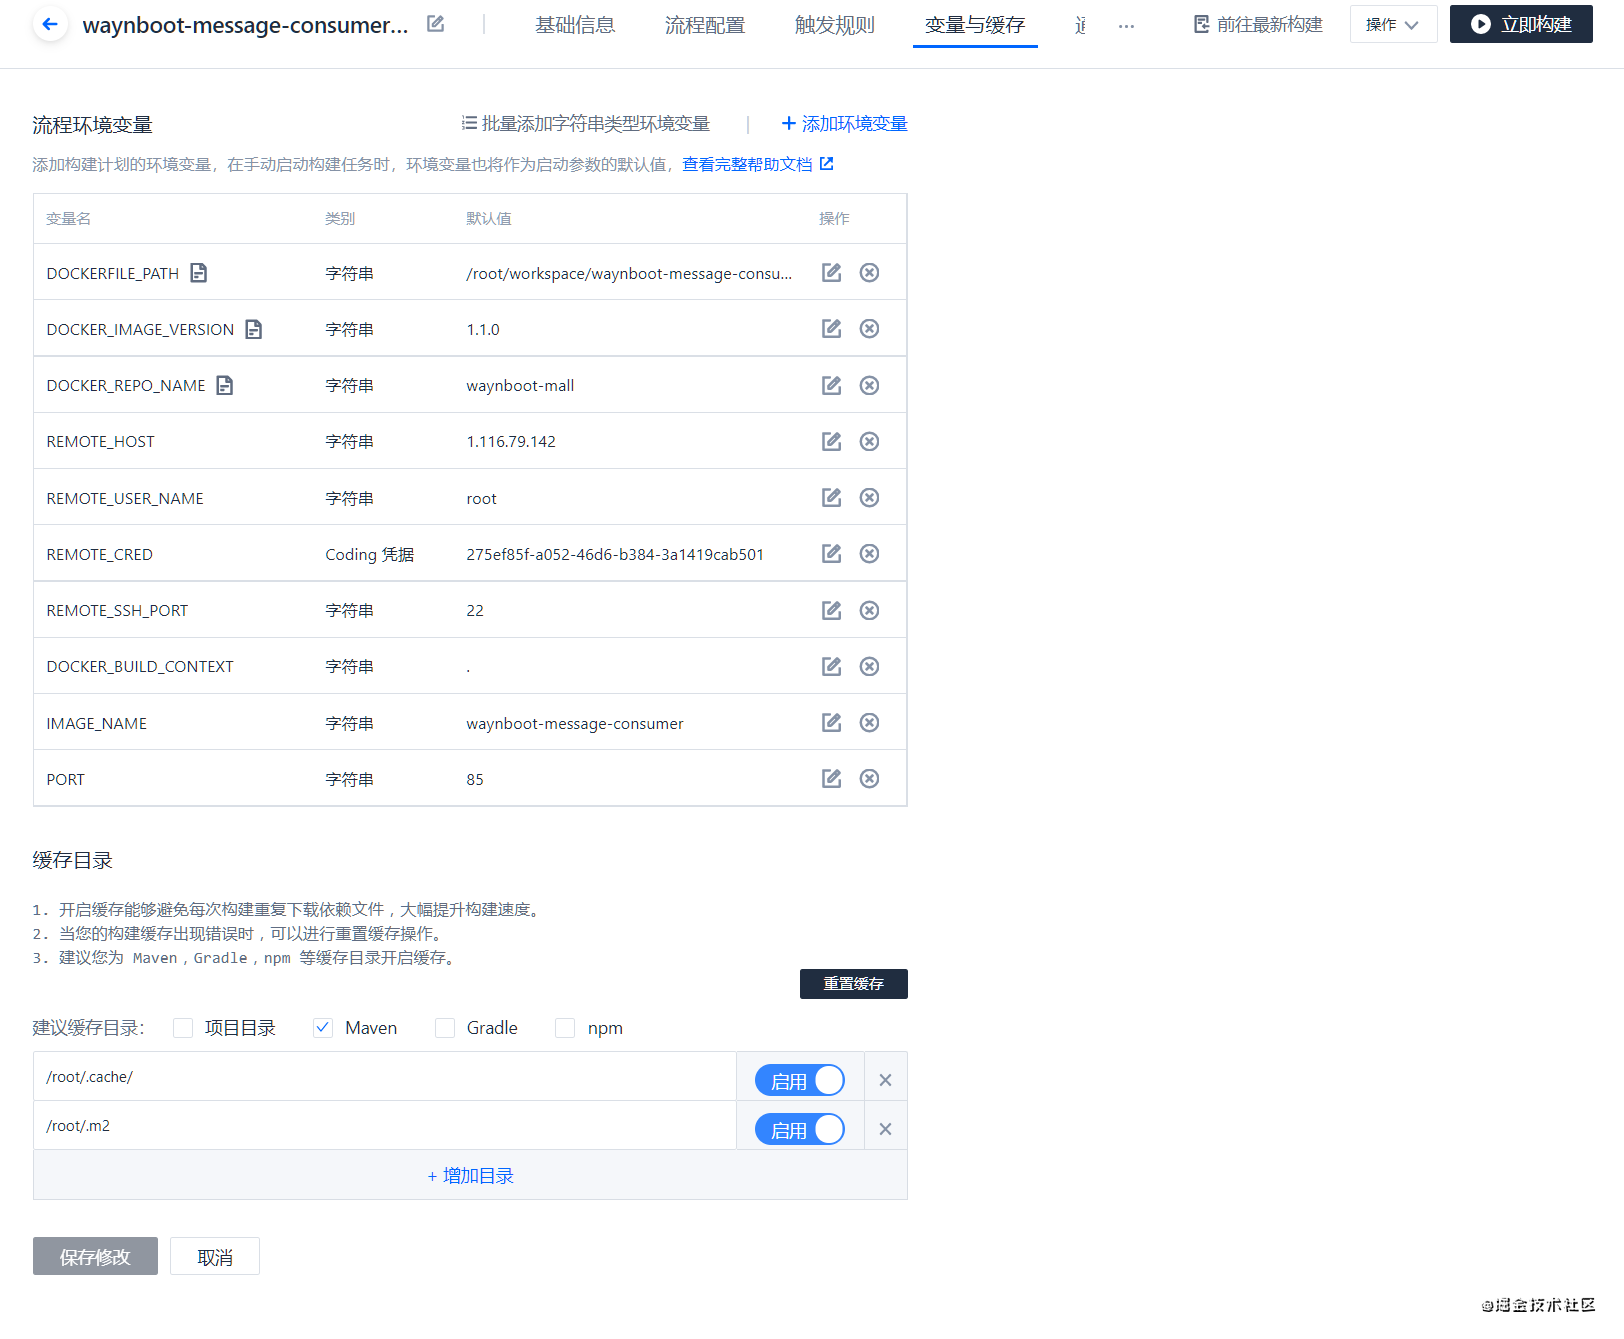
- Variables and cache
Add the environment variable of the construction plan. When manually starting the construction task, the environment variable will also be used as the default value of the startup parameters. Configuring Maven cache in Maven project can greatly improve the construction speed. Instructions on the official website are attached: https://help.coding.net/docs/ci/cache.html
- Notification reminder When continuous integration is completed, a notification reminder can be sent to the specified members
This completes the construction plan of a production level application! 😎 How about it? Is it easy for a developer 😁
Test management
In fact, this step is the work of the tester. I don't understand it very well. I attach the instructions on the official website: https://help.coding.net/docs/test-management/start.html
summary
In fact, CODING's functions are far more powerful than we thought. We have introduced some knowledge here, but we haven't introduced continuous deployment, OPEN API and team management. However, through the above six sections, we have a general understanding of the workflow of CODING DevOps, and use CODING to simplify the problem overview, responsible person implementation, coordination and communication, construction and deployment among team personnel, So far, we have completed the preliminary discussion on the use of CODING DevOps!