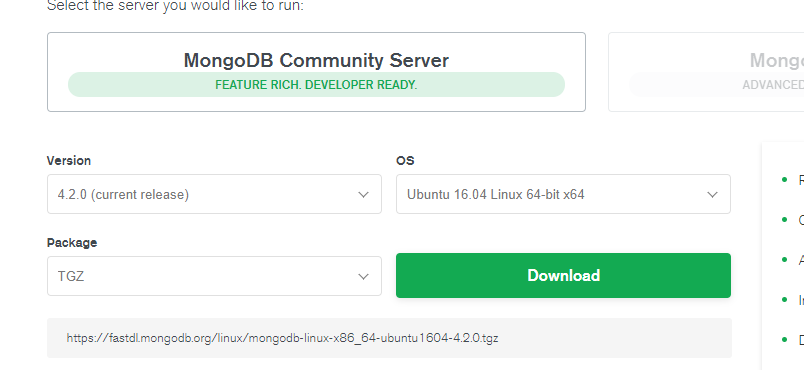
1. Download mongodb
Go to the mongodb website to download the page: https://www.mongodb.com/download-center/community Download the corresponding version, such as the latest version of Linux x64 bit: mongodb-linux-x86_64-ubuntu1604-4.2.0.tgz

1. After downloading, the compressed package is transferred to the server through Xftp. In fact, the installation package address above can also be downloaded directly from the server using the wget command.
Then decompress and view:
#Decompression file
tar -zxvf mongodb-linux-x86_64-ubuntu1604-4.2.0.tgz
#Move files to new files
 mv mongodb-linux-x86_64-ubuntu1604-4.2.0 mongodb-4.2
2. Configure data storage file data and log storage
# Create data and log directories
mkdir data
mkdir logs
cd logs/
touch mongo.log
3. Create configuration file mongo.conf
vim mongo.conf
Write the following configuration in the file: mongodb.conf:
dbpath = /home/nosql/monodb/data             #Data file storage directory
logpath = /home/nosql/monodb/logs/mongo.log   #Log file storage directory
port = 27017                                  #port
fork = true                           # Enabled as a daemon, running in the background
#auth=true #Certification is required. If you let go of comments, you must create MongoDB accounts.
           //Use account and password to access remotely. First installation suggestion comment
bind_ip=0.0.0.0 #To allow remote access, or direct comment, 127.0.0.1 allows only local access.
# Memory limit
storageEngine=wiredTiger wiredTigerCacheSizeGB=3
#KeyFile=/datayes/mongodb/mongodb-keyfile< -- This file is usually used to configure replica.
#ReplSet= bdp-prd< -- If you already have a replica cluster, add nodes to it. This parameter needs to be added
Configure environment variables vim/etc/profile
export MONGODB_HOME=/home/nosql/monodb/mongodb-4.2
export PATH=$PATH:$MONGODB_HOME/bin
Start the mongodb service
mongod -f /home/nosql/monodb/mongodb.conf
Create users:
db.createUser(

{

user:<name_string>,                   #Character string

pwd:<password_string>,                 #Character string

roles:[{role:<role_name>,db:<db_name>}]     #Array + Object

}

)
user Document Field Introduction:
The user field is the name of the new user.
pwd field, user's password;
cusomData field, for any content, such as full name introduction for users;
The roles field, which specifies the user's role, can use an empty array to set the new user's empty role.
In the roles field, you can specify built-in roles and user-defined roles.
Built-In Roles(Built-in role):
1. Database user roles: read, read Write;
2. Role of database management: dbAdmin, dbOwner, userAdmin;
3. Cluster management roles: Cluster Admin, Cluster Manager, Cluster Monitor, Host Manager;
4. Backup and recovery roles: backup, restore;
5. All database roles: readAnyDatabase, readWriteAnyDatabase, userAdminAnyDatabase, dbAdminAnyDatabase
6. Super user role: root
// There are also several roles that indirectly or directly provide system superuser access (dbOwner, userAdmin, userAdmin AnyDatabase)
7. Internal roles: _system
1. Close permission validation (configuration file noauth=true), start MongoDB, and add an administrator to admin (role:root denotes the highest permission):
db.createUser({ user:"admin", pwd:"admin",roles:[{ role:"root", db:"admin" }] })

db.auth("admin", "admin")
Add auth=true to the mongodb.conf file
Login after restarting the authenticated mongodb database
./mongo
use admin

db.auth("admin","admin")

Return 1 to show 1 that the authentication is successful, that is, the switch is successful.

You can also log in directly with your account password:

/ usr/local/mongodb/bin/mongo-uadmin-p123456 landing
2. Delete users:
Db. dropUser (<user_name>) Deletes a user and accepts string parameters
Example: db.dropUser("admin")
Create new databases and users
use macrospider
db.createUser({ user:"dukun0210", pwd:"1qaz2wsx",
     roles:[{ role:"dbAdmin", db:"macrospider" },
      { role:"readWrite", db:"macrospider" }] })

db.auth("dukun0210", "1qaz2wsx")