Modularization related specifications
Modular overview
- Modularization is to encapsulate a single function into a module (file). Modules are isolated from each other, but internal members can be exposed through specific interfaces or rely on other modules
- Benefits of modular development: facilitate code reuse, improve development efficiency, and facilitate later maintenance
Browser side modular specification
AMD
AMD: Require.js
CMD
CMD: Sea.js
Server side modular specification
CommonJS
- CommonJS indicates NodeJS modularization
- Modules are divided into single file modules and packages
- Module member export: module.exports and exports
- Module member import: require('module identifier ')
ES6 modularization
summary
Before the birth of ES6 modular specification, the Javascript community has tried and proposed AMD, CMD, CommonJS and other modular specifications.
However, the modular standards proposed by these communities still have some differences and limitations, and are not the general modular standards for browsers and servers, such as:
- AMD and CMD are suitable for browser side Javascript modularization
- CommonJS is suitable for server-side Javascript modularization
Therefore, the ES6 syntax specification defines the ES6 modular specification at the language level, which is a general modular development specification for browser and server.
Defined in ES6 modular specification:
- Each js file is a separate module
- Import module members use the import keyword
- Expose module members using the export keyword
Using ES6 modularization through babel in Node.js
- babel overview
Babel Chinese document · next generation JavaScript compiler
NodeJs supports common.js in the province, but there is not much support for ES6 modularization. Generally, it is necessary to use babel third-party plug-ins to better support the new feature of ES6 modularization.
babel can be regarded as a conversion tool, which can convert high-level compatible js code into low-level and well compatible js code - Basic use of babel
- Execute the command NPM install -- save dev @ Babel / core @ Babel / cli @ Babel / preset env @ Babel / node in the root directory of the project
- Continue to execute the command npm install --save @babel/polyfill
- Create Babel's configuration file babel.config.js with the project directory. The contents of the file are as follows
const presets = [ [ "@babel/env", { // Adapts to the specified version of the browser targets: { edge: "17", firefox: "60", chrome: "67", safari: "11.1" } } ] ]; module.exports = { presets }; - Execute the specified code through npx babel-node index.js
Note that after using ES6 modularization, if the code is executed through the node command of NodeJS itself, it is likely to report an error
Basic syntax of ES6 modularity
Default export and default import
-
Default export syntax export default is the default exported member
-
Default import syntax import receive name from 'module identifier'
// Import module members
import m1 from './m1.js'
console.log(m1)
// The printout result is:
// { a: 10, c: 20, show: [Function: show] }
// If m1.js does not export members, output {} (empty object) to
// m1.js
// Define private members a and c
let a = 10
let c = 20
// The variable d cannot be accessed by the outside world because it is not exposed
let d = 30
function show() {}
// Expose the private members in this module for use by other modules
export default {
	a,
	c,
	show
}
/* Note: in each module, only one unique export default is allowed, otherwise an error will be reported!
export default {
	d,
}
*/
On demand export and on demand import
-
On demand export syntax export let s1 = 10
-
On demand import syntax import {S1} from 'module identifier'
// m1.js

// Multiple exports can be used in the module to export members on demand
// Export variable s1 outward on demand
export let s1 = 'aaa'
// Export variable s2 outward as needed
export let s2 = 'ccc'
// Export method say out on demand
export function say = function() {}
// Import module members
// Note that the member format of on-demand import is object, and the internal attribute name should be consistent with the variable name during export
// An alias can be given to the exported member through 'as', and the member will be used through the alias for subsequent use
import { s1, s2 as ss2, say } from './m1.js'
console.log(s1) // Printout aaa
console.log(ss2) // Printout ccc
console.log(say) // Printout [Function: say]
- On demand import and export can coexist with default import and export
// m1.js
let a = 10, c = 20, d= 30
function show() {console.log('1111111111111')}
// Default export
export default {
  a,
  c,
  show
}
// Export on demand
export let s1 = 'aaa'
export let s2 = 'ccc'
export function say() {console.log('ooooooooo')}
// m1: default imported members, {...}: members imported on demand. Both can be declared at the same time
import m1,{s1, s2 as ss2, say} from './m1';
console.log(m1) // Output {a: 10, c: 20, show: [Function: show]}
console.log(s1) // Output aaa
console.log(ss2)// Output ccc
console.log(say)// Output [Function: say]
Import and execute module code directly
Usage scenario: you only want to execute the code in a module without getting exposed members in the module. At this time, you can directly import and execute the module code.
// m2.js
// Perform a for loop operation in the current module
for(let i = 0; i < 3; i++) {
	console.log(i)
}
// Import and execute module code directly
import './m2.js'; // Output 0 1 2 in sequence
webpack
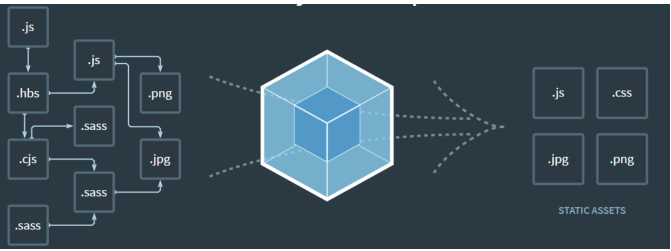
webpack overview
Webpack Chinese document | webpack Chinese website
webpack is a popular front-end project building tool (packaging tool), which can solve the difficulties faced in current web development.
webpack provides friendly modular support, as well as powerful functions such as code compression confusion, handling js compatibility problems and performance optimization, so that programmers can focus on specific function implementation, and improve development efficiency and project maintainability.
At present, most front-end projects in enterprises are packaged and built based on webpack.
webpack basic usage
Installing and configuring webpack in a project
- Run the NPM install webpack webpack cli – D command to install webpack related packages
- In the project root directory, create a webpack configuration file named webpack.config.js
- In the configuration file of webpack, initialize the following basic configuration:
module.exports = { // Mode is used to specify the build mode mode: 'development'; /* There are two build modes: 1. development (Project development mode) 2. production (Project online mode) The development mode compiles faster than the on-line mode, the compiled file volume is large, and the code format is clear (not compressed) */ } - Under the scripts node in the package.json configuration file, add the dev script as follows:
"scripts": { "dev": "webpack" // Scripts under the script node can be executed through npm run } - Run the npm run dev command in the terminal under the project root directory to start the webpack for project packaging.
After the project is packaged, a new dist folder will be created in the project root directory and a new main.js file will be created inside - Import the packaged export file main.js into the project entry file index.html through < script SRC = '.. / dist / main. JS' > and the project can run successfully
Configure the entry and exit of packaging
The default conventions in the 4.x version of webpack are:
- The packaged entry file is src/index.js
- The packaged output file is dist/main.js
If you want to modify the packaged entry and exit, you can add the following configuration information in webpack.config.js:
const path = require('path') // Import modules in node.js that are dedicated to operating paths
module.exports = {
	entry: path.join(__dirname, './src/index.js'), // Absolute path to the package entry file
	output: {
		path: path.join(__dirname, './dist'), // Absolute storage path of output file
		filename: 'bundle.js' // Name of the output file
	}
}
Configure the automatic packaging function of webpack
Every time you modify the project source code, you need to manually start webpack again to package the new output file. The process is cumbersome
Therefore, configure the automatic packaging function of webpack, which monitors the changes of source code in real time, updates the output file in real time and loads it into the running memory (non storage memory)
The specific process is as follows:
- Run the NPM install webpack dev server – D command to install tools that support automatic project packaging
- Configure the command shortcut keys and modify the dev command in package.json - > scripts as follows:
"scripts": { "dev": "webpack-dev-server" // Scripts under the script node can be executed through npm run } - In SRC - > index.html (project entry file), modify the reference path of script script to "/ bundle. JS"
- Run the npm run dev command to repack
- Access in browser http://localhost:8080 Address, view the effect of automatic packaging
be careful:
- Webpack dev server starts a real-time packaged http server
- The output file (bundle. JS) generated by webpack dev Server package is placed in the project root directory by default. It is virtual and invisible. The file is loaded in the running memory and is not really stored in the running memory
Configure HTML webpack plugin to generate preview page
- Run the NPM install HTML webpack plugin – D command to install the plug-in that generates the preview page
- Modify the header area of the webpack.config.js file and add the following configuration information:
// Import the plug-in that generates the preview page and get a constructor const HtmlWebpackPlugin = require('html-webpack-plugin') const htmlPlugin = new HtmlWebpackPlugin({ // Create an instance object of the plug-in template: './src/index.html', // Specify the template file to use filename: 'index.html' // Specifies the name of the generated file. The file exists in the root directory of the project and in running memory. It is not displayed in the directory }) - Modify the exposed configuration objects in the webpack.config.js file and add the following configuration nodes:
module.exports = {
	// The plugins array is a list of plug-ins that will be used during webpack packaging
	plugins: [ htmlPlugin ]
}
Configure parameters related to automatic packaging
- Automatically opens the project in the browser at the specified address and port
// Configuration in package.json
// --open automatically opens the browser page after packaging
// --host configure IP address
// --Port configuration port
"scripts": {
"dev": "webpack-dev-server --open chrome --host 127.0.0.1 --port 8888"
},
Loader in webpack
Packaging non js modules through loader
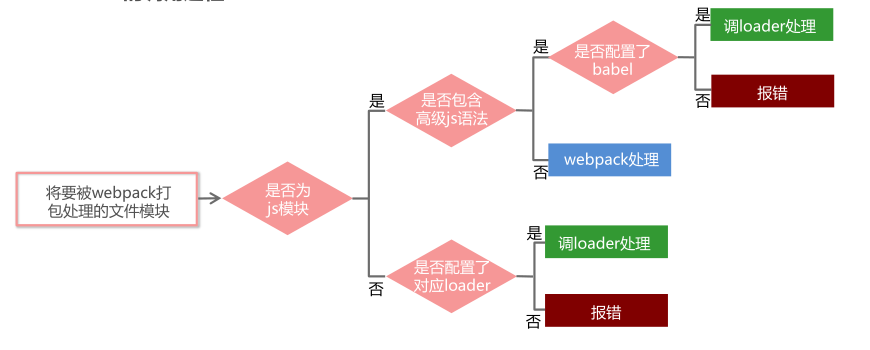
In the actual development process, webpack can only package modules ending in. js suffix by default. Other modules ending in non. js suffix can't be processed by webpack by default. You need to call the loader loader to package normally, otherwise an error will be reported!
The loader loader can help webpack package and process specific file modules. For example, css, less, scss, PostCss, JavaScript, Image/Font, Vue and other files need to be processed by the corresponding loader loader
Calling procedure of loader
Basic usage of loader in webpack
1. Style loader package css files
- Run the NPM I style loader css loader - D command to install the loader that handles css files
- In the module - > rules array of webpack.config.js, add the loader rule as follows:
module.exports = {
	// Matching rules for all third-party file modules
	module: {
		// All loader rule objects are placed inside the rules array
		rules: [
			/*
			test: Represents a matching file type
			use: Indicates the corresponding loader to be called
				use The order of loader s specified in the array is fixed
				The calling sequence of multiple loader is: calling from back to forward.
			*/
			{ test:/\.css$/, use: ['style-loader', 'css-loader']},
		],
	}
}
2. Less loader packages and processes less files
- Run the NPM I less loader less - D command
Note that less loader depends on CSS loader and style loader - In the module - > rules array of webpack.config.js, add the loader rule as follows:
module.exports = {
	module: {
		rules: [
			{ test:/\.less$/, use: ['style-loader', 'css-loader', 'less-loader']},
		],
	}
}
3. Sass loader packages scss files
- Run the NPM I sass loader node sass - D command
Note that sass loader depends on CSS loader and style loader - In the module - > rules array of webpack.config.js, add the loader rule as follows:
module.exports = {
	module: {
		rules: [
			{ test:/\.scss$/, use: ['style-loader', 'css-loader', 'sass-loader']},
		],
	}
}
4. Configure postCSS to automatically add css compatible prefixes
webpack can automatically solve the compatibility problem of css in different browsers through the postcss loader loader. Its principle is to automatically implement the style browser private prefix through the autoprefixer plug-in to deal with the compatibility problem
- Run the NPM I postcss loader autoprefixer - D command
Note that postcss loader depends on CSS loader and style loader - Create the postcss configuration file postcss.config.js in the project root directory, and initialize the following configuration:
const autoprefixer = require('autoprefixer') // Import a plug-in that automatically prefixes module.exports = { plugins: [ autoprefixer ] // Mount plug-in } - In the module - > rules array of webpack.config.js, modify the css loader rule as follows:
module.exports = {
	module: {
		rules: [
			{ test:/\.css$/, use: ['style-loader', 'css-loader', 'postcss-loader'] }
		]
	}
}
5. URL loader packages the image and font files in the style sheet
In the stylesheet, there will be some paths, such as url('...'), such as the introduction of pictures and Font Icon Library. webpack cannot process these paths by default and needs to be handled through the URL loader loader
The basic usage is as follows:
- Run the NPM I URL loader file loader - D command
- In the module - > rules array of webpack.config.js, add the loader rule as follows:
module.exports = {
	module: {
		rules: [
			{
				test: /\.jpg|png|gif|bmp|ttf|eot|svg|woff|woff2$/,
				/*
				When there is only one loader, use can be specified directly instead of an array
				Among them? Then comes the parameter item of loader.
				limit It is used to specify the size of the picture. The unit is byte. Only pictures smaller than the limit size will be converted to base64 pictures
				*/
				use: 'url-loader?limit=16940'
			}
		]
	}
}
6. Babel loader packages the high-level syntax in js files
webpack does not support ES6 advanced syntax and requires Babel loader to handle it
- Install babel converter related packages: NPM I babel loader @ babel / core @ babel / runtime - D
- Install package related to babel syntax plug-in: NPM I @ babel / preset env @ babel / plugin transform runtime @ babel / plugin proposed class properties – D
- In the project root directory, create the Babel configuration file babel.config.js and initialize the basic configuration as follows:
module.exports = { presets: [ '@babel/preset-env' ], plugins: [ '@babel/plugin-transform-runtime', '@babel/plugin-proposal-class-properties' ] } - In the module - > rules array of webpack.config.js, add the loader rule as follows:
// exclude is an exclusion item, indicating that the Babel loader does not need to process node_ js file in modules
{ test: /\.js$/, use: 'babel-loader', exclude: /node_modules/ }
Vue single file component
summary
vue single filegroup is a template whose file name ends with. vue. It solves the following problems:
- Globally defined components must ensure that the component names do not duplicate
- The string template lacks syntax highlighting. When there are multiple lines of HTML, it needs to use ugly\
- Not supporting CSS means that CSS is obviously missing when HTML and JavaScript are componentized
- There are no restrictions on the construction steps. You can only use HTML and ES5 JavaScript, not preprocessors (such as Babel)
Composition structure of vue single file component
It consists of the following three parts:
- Template area of template component
- script business logic area
- style area
//App.vue
<template>
	<!-- Used here to define Vue Template content of component -->
</template>

<script>
	// This is used to define the business logic of Vue components
	export default {
	data: () { return {} }, // Private data
	methods: {} // Processing function
	// ... other business logic
}
</script>

<!--
appoint scoped instructions, Make the current style sheet effective only in the scope of the current single file component, This does not affect other components
-->
<style scoped>
	/* This is used to define the style of the component */
</style>
Configure the loader of vue component in webpack
- In the project root directory, run the NPM I Vue loader Vue template compiler - D command
- In the webpack.config.js configuration file, add the following configuration items for Vue loader:
const VueLoaderPlugin = require('vue-loader/lib/plugin')
module.exports = {
	module: {
		rules: [
			// ... other rules
			{ test: /\.vue$/, loader: 'vue-loader' }
		]
	},
	plugins: [
		// ... other plug-ins
		new VueLoaderPlugin() // Please make sure to introduce this plug-in!
	]
}
Using vue in a webpack project
- In the project directory, run npm i vue – S to install vue
Note that the vue installed here is not a full version, and many castrated versions of API s are missing - In the SRC - > index.js entry file, import vue constructor by importing vue from 'vue'
- Create an instance object of vue in the entry file and specify the el area to control
- In the configuration object of the vue instance, render the App root component through the render function
// 1. Import Vue constructor
import Vue from 'vue'
// 2. Import App root component
import App from './components/App.vue'
const vm = new Vue({
	// 3. Specify the page area to be controlled by the vm instance
	el: '#app',
	// 4. Render the specified component into the el area through the render function
	render: h => h(App)
})
webpack packaging and publishing
Before going online, you need to package the application as a whole through webpack. You can configure the packaging command through the package.json file:
// Configure the webpack packaging command in the package.json file
// This command loads the webpack.config.js configuration file in the root directory of the project by default
"scripts": {
	// Commands for packaging
	"build": "webpack -p",
	// Commands for development debugging
	"dev": "webpack-dev-server --open --host 127.0.0.1 --port 3000",
},
After configuration, run the npm run build command in the project root directory
Vue scaffold
summary
Vue scaffolding is used to quickly generate Vue project infrastructure, Official website address
install
- Install Vue scaffold of version 3.x (2.x or 3.x is recommended): npm install -g @vue/cli
- Use the vue -V command to check whether the vue scaffold is successfully installed and the version number
Create vue project based on scaffold version 3.x
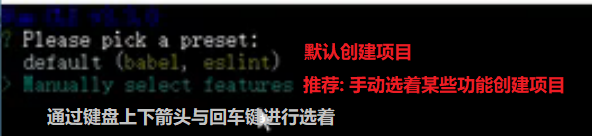
1. Create a new vue project based on the interactive command line
In the project root directory, execute vue create to customize the project name
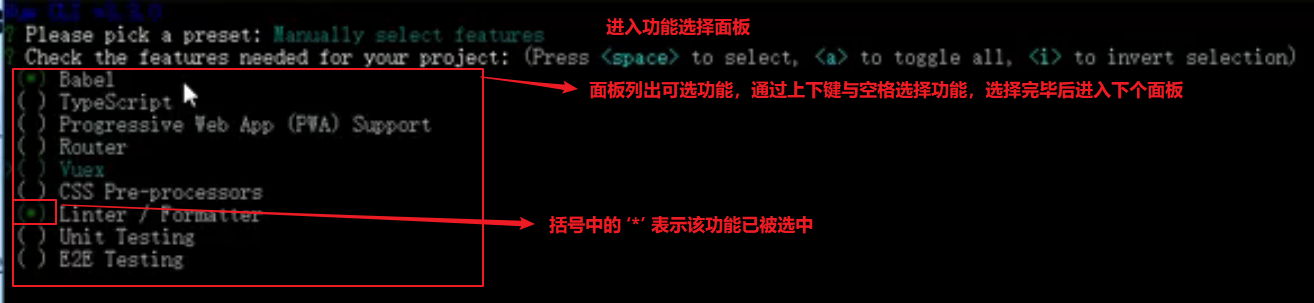
Enter the interactive question and answer panel and select the function by yourself


At this point, the option configuration is completed and the project is initializing
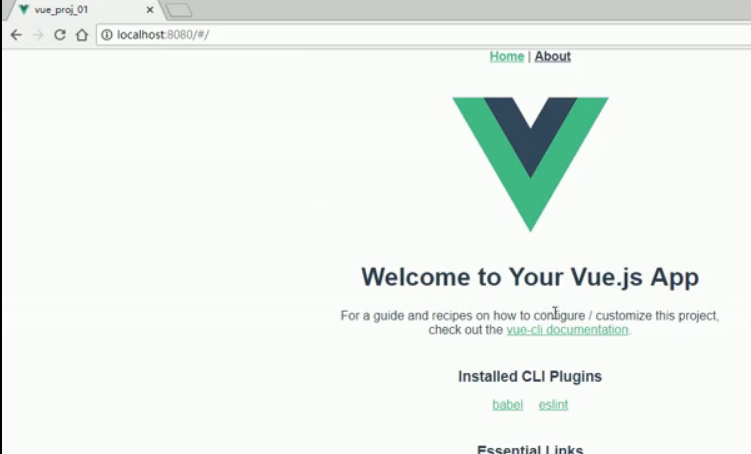
After project initialization
After webpack compilation

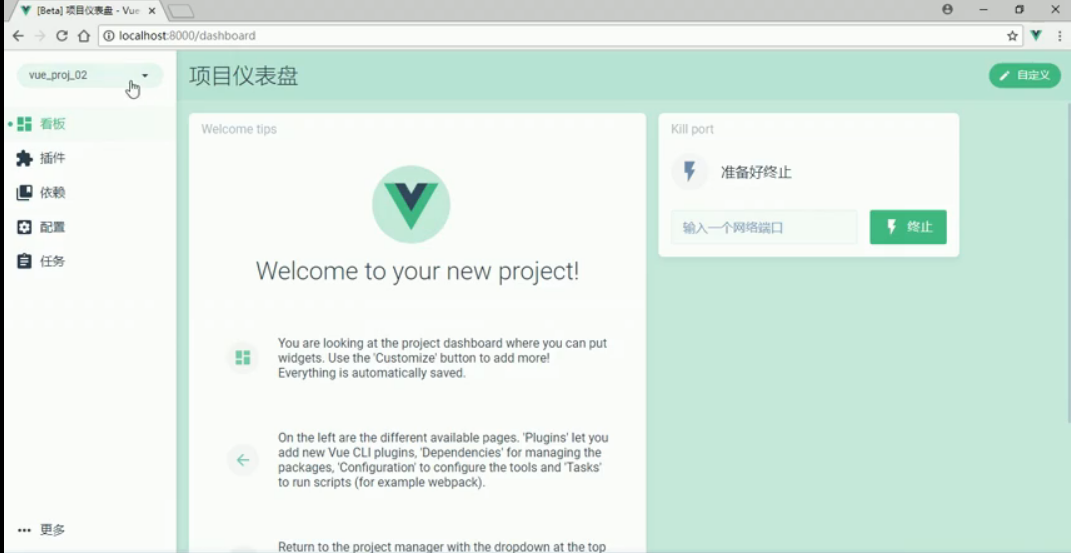
2. Create a new version vue project based on the graphical interface:
Execute vue ui in the root directory
After the command is executed, a graphical interface will be automatically opened in the browser to create vue projects
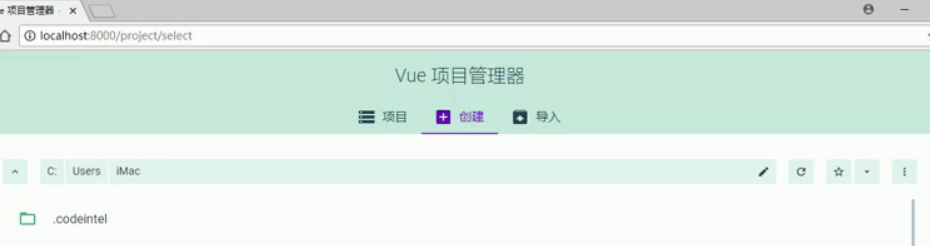
Select the create panel to customize the directory of the created item. Click the create item here button to create and enter a new panel
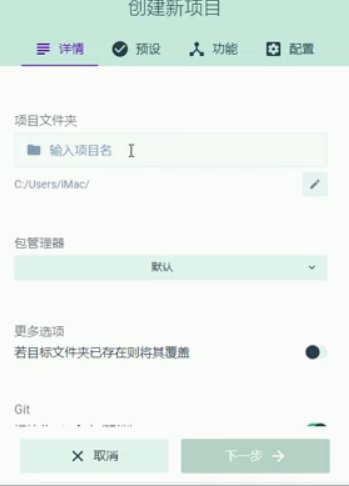
Enter project name - > package manager (default) - > more options (default) - > git (default, custom submission initial information) - > next - > Enter jade panel
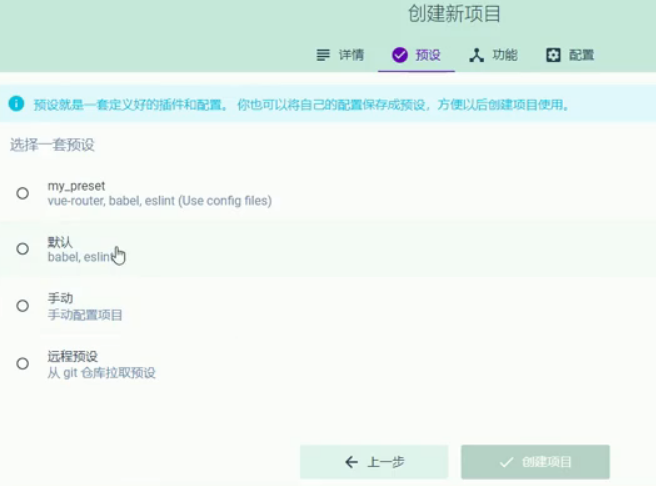
It is recommended to manually set the preset for the first time - > next - > enter the function panel
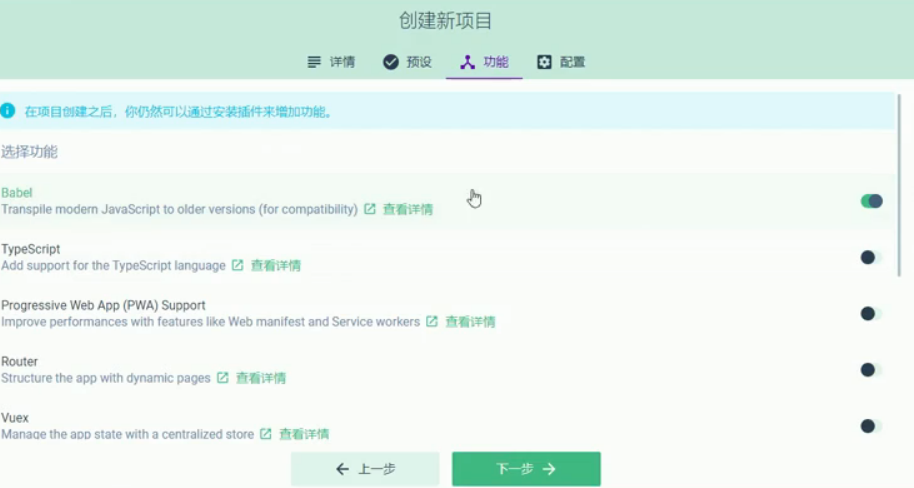
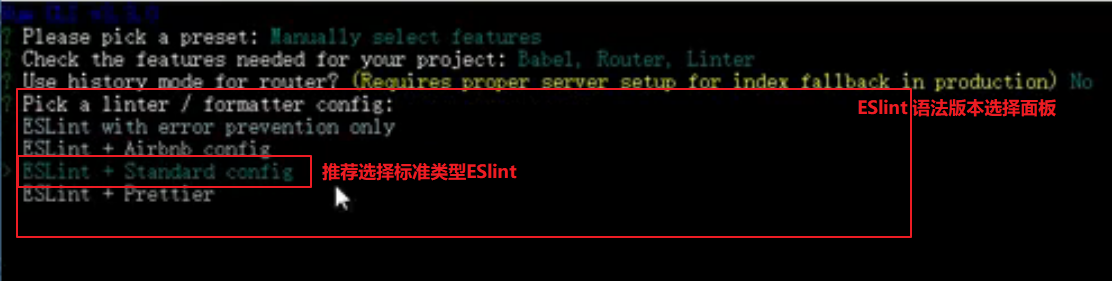
Open basic functions: Babel, Router, Linter / Formatter, use configuration file - > next - > enter the configuration panel
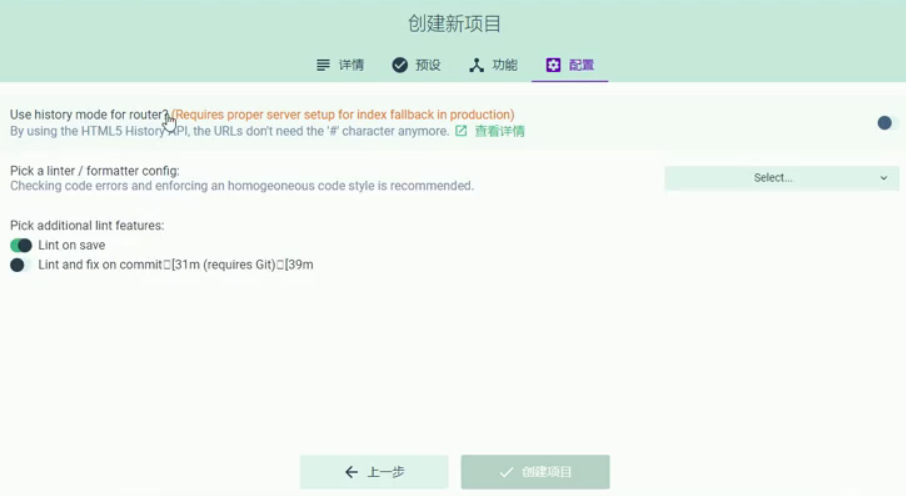
- Use history mode for router...: off by default 👇
- Pick a linter... : ESlint + Standard config 👇
- Pick additional lint...: enabled by default 👇
- Create project 👇
- Save preset
After the project is created successfully, enter the project dashboard
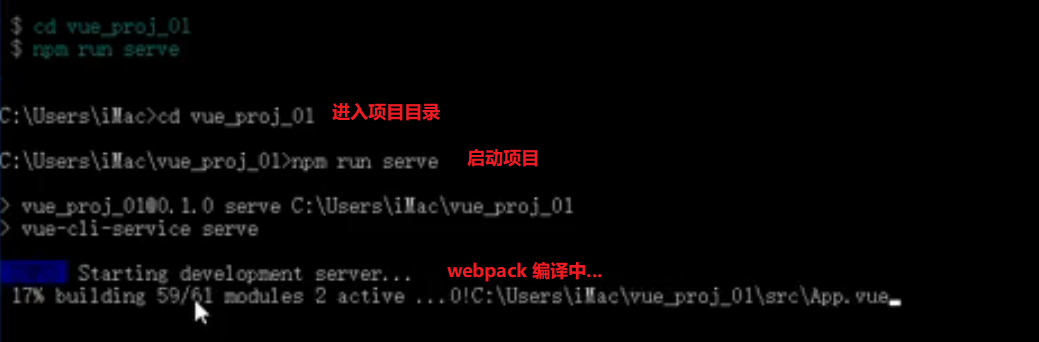
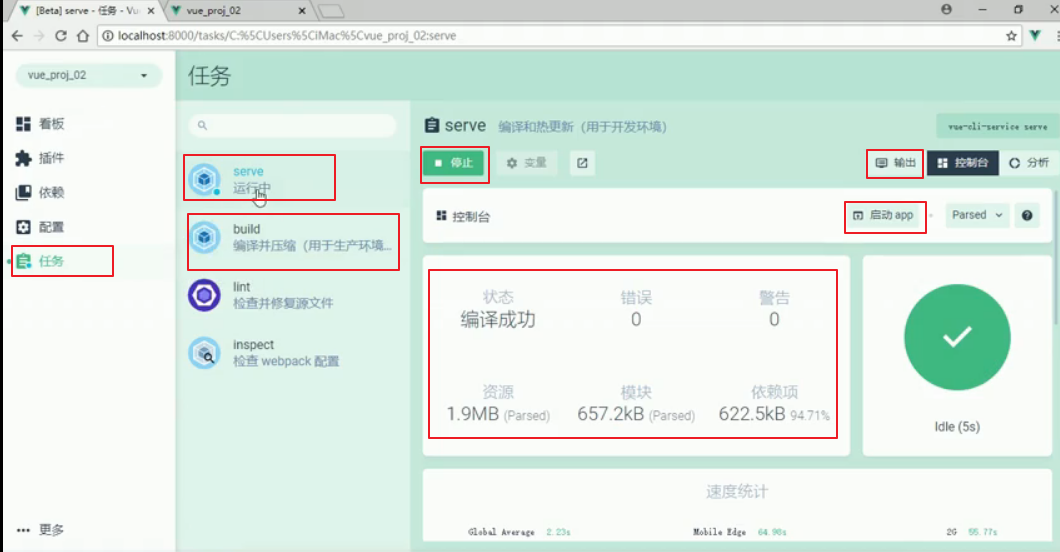
Start project
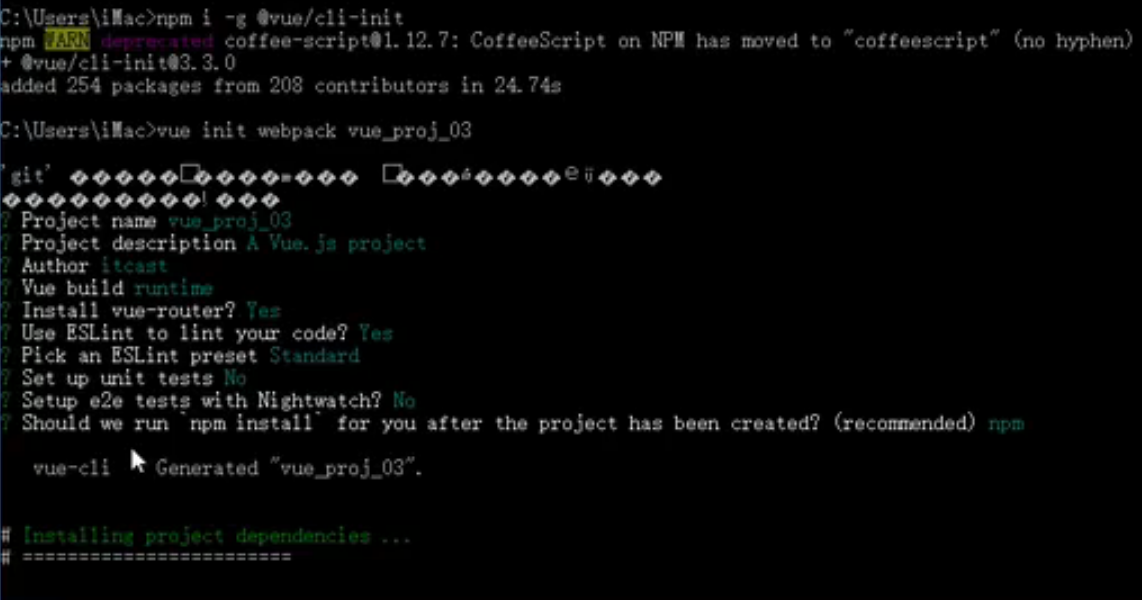
3. Create a legacy vue project based on the legacy 2.x template:
Execute in the project root directory:
npm install -g @vue/cli-init
vue init webpack custom item name
to configure:
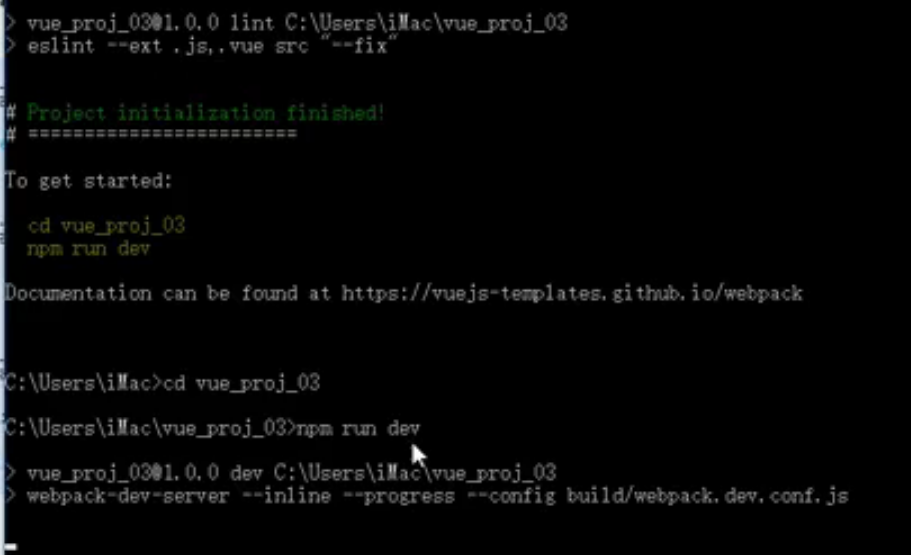
Start project:

Vue scaffold generated project structure analysis
The basic project structure is as follows:
.git
node_ Modules --------- > dependent package directory
Public ---------------------------- static resource directory
SRC --------------------------------------> component source directory
|- assets ------------------ > resource folder
|- components ---------------> component folder
|- views ------------------- > view component folder
|- app. Vue ---------------- > root component
|- main. JS ----------------- > package entry file
|- router. JS ---------------- > routing related configuration
.browserslistrc
.editorconfig
. eslintrc. JS ------------------ > eslint syntax related configuration files
. gitignore ------------------- > git ignore files
Babel. Config. JS ------------------ Babel configuration file
Vue. Config. JS ------------------- > related configurations of Vue scaffold
Package. JSON ------------------- > project package management configuration file
package-lock.json
Postcss. Config. JS --------- > postcss configuration file
README.md
Vue scaffold custom configuration
1. Configure the project through package.json
{
    // Must be canonical json syntax
	"vue": {
        "devServer": {
            "port": "8888",
            "open" : true
        }
	},
}
Note: this configuration is not recommended. Because package.json is mainly used to manage package configuration information; To facilitate maintenance, it is recommended to define the configuration related to Vue scaffold in vue.config.js configuration file separately.
2. Configure items through a separate configuration file
-
Create the file vue.config.js in the following directory of the project
-
Make relevant configuration in this file to overwrite the default configuration
// vue.config.js
module.exports = {
	devServer: {
		port: 8888, // port settings
        open: true  // The browser opens automatically
	}
}
Basic use of element UI
1. Manual installation based on command line mode
-
In the project root directory, install the dependency package NPM I element UI – S
-
Import element UI related resources in the project packaging entry file
// Import component library
import Vue from 'vue'
import ElementUI from 'element-ui';
// Import component related styles
import 'element-ui/lib/theme-chalk/index.css';
// Configuring Vue plug-ins
Vue.use(ElementUI);
2. Automatic installation based on graphical interface
①
Run the vue ui command to open the graphical interface
②
Enter the specific project configuration panel through the Vue project manager
③
Click plug-in - > Add plug-in to enter the plug-in query panel
④
Search for Vue cli plugin element and install it
⑤
Configure plug-ins to realize on-demand import, so as to reduce the volume of packaged projects