Because the project is front-end and back-end separate development, the ionic framework is used on the mobile side and the SpringBoot framework is used on the back-end API interface.Backend implementations of registration and login can refer to my article: Backend development: SpringBoot implements registration and login functions .The ionic framework implements registration and login by calling back-end API interfaces to process data.The mobile side is mainly responsible for interface design and interface invocation.
I. Code Section
1. Create Model Class
Modeling from the fields in the database, create a Typescript file named Users under the model folder.The code is as follows:
export class Users{
    usersid:string;
    pass:string;
    roleid:string;
    username:string;
    cellphone:string;
    nickname:string;
    icon:string;
    sex:string;
}
2. Create a service
Create command: ionic g service/auth
import { Injectable } from '@angular/core';
import {HttpClient} from "@angular/common/http";
import {ConfigService} from "./config.service";
import {Users} from "../model/Users";

@Injectable({
  providedIn: 'root'
})
export class AuthService {

    constructor(private http:HttpClient,private config:ConfigService) { }

    //Adding and modifying user information
    private addOrUpdateUserUrl=this.config.HOST+"/public/saveUser";
    addOrUpdateUser(users:Users){
        return this.http.post(this.addOrUpdateUserUrl,users).toPromise();
    }

    //Sign in
    private loginUrl=this.config.HOST+"/public/login";
    login(username:string,
          password:string){
        let parm={
            "username":username,
            "password":password
        }
        return this.http.post(this.loginUrl,parm).toPromise();
    }


}
3. Create a registration page
Create page command: ionic g page/register
(1) Logical Part Code:Register.page.ts
import { Component, OnInit } from '@angular/core';
import {Users} from '../../model/Users';
import {AuthService} from "../../service/auth.service";
import {ToastService} from "../../service/toast.service";

@Component({
  selector: 'app-regist',
  templateUrl: './regist.page.html',
  styleUrls: ['./regist.page.scss'],
})
export class RegistPage implements OnInit {
    user:Users;
  constructor(private authservice:AuthService
      ,private toastservice:ToastService) {
      this.user=new Users();
  }

  ngOnInit() {
  }

  //Save Method
    save(){
        console.dir(this.user);

        this.authservice.addOrUpdateUser(this.user)
            .then((data:any)=>{
                if(data.msg=='ok'){
                    this.toastservice.showSuccessToast('Save Successfully');
                }
                else{
                    this.toastservice.showErrrorToast('Save failed, please try again');
                }
            })
    }

}
(2) Code for HTML part of registration interface
<ion-header>
<ion-toolbar>
<!--Add back button-->
<ion-buttons slot="start">
<ion-back-button></ion-back-button>
</ion-buttons>
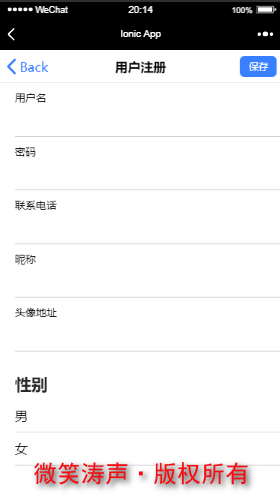
<ion-title>User registration</ion-title>
<!--Add click event for save button-->
<ion-button slot="end" size="small" (click) ="save()">save</ion-button>
</ion-toolbar>
</ion-header>
<ion-content>
<ion-list>
<ion-item>
<ion-label position="stacked">user name</ion-label>
<ion-input [(ngModel)]="user.username"></ion-input>
</ion-item>
<ion-item>
<ion-label position="stacked">password</ion-label>
<ion-input type="password" [(ngModel)]="user.pass"></ion-input>
</ion-item>
<ion-item>
<ion-label position="stacked">Contact phone</ion-label>
<ion-input [(ngModel)]="user.cellphone"></ion-input>
</ion-item>
<ion-item>
<ion-label position="stacked">nickname</ion-label>
<ion-input [(ngModel)]="user.nickname"></ion-input>
</ion-item>
<ion-item>
<ion-label position="stacked">avatar address</ion-label>
<ion-input [(ngModel)]="user.icon"></ion-input>
</ion-item>
<ion-radio-group [(ngModel)]="user.sex">
<ion-list-header>
<ion-label>
Gender
</ion-label>
</ion-list-header>
<ion-item>
<ion-label>man</ion-label>
<ion-radio value="M"></ion-radio>
</ion-item>
<ion-item>
<ion-label>female</ion-label>
<ion-radio value="F"></ion-radio>
</ion-item>
</ion-radio-group>
</ion-list>
</ion-content>
(3) Registration interface effect map
4. Create login module components
Sign in here using component, mainly because the login page will pop up automatically when the software is opened.This can be done through components.
(1) Create login components
Create command: ionic g component/login
(2) Logic code of login interface:login.component.ts
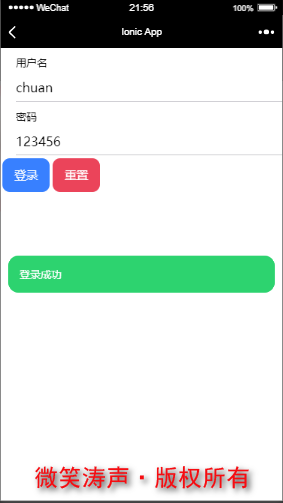
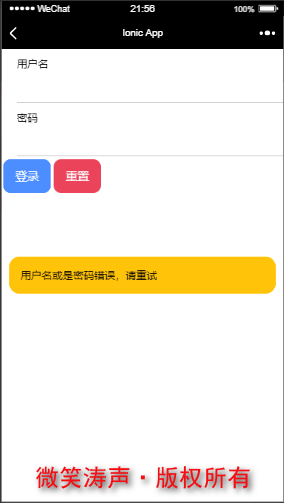
import { Component, OnInit } from '@angular/core';
import {AuthService} from "../../service/auth.service";
import {ToastService} from "../../service/toast.service";

@Component({
    selector: 'app-login',
    templateUrl: './login.component.html',
    styleUrls: ['./login.component.scss'],
})
export class LoginComponent implements OnInit {
    username:string;
    password:string;
    constructor(private authservice:AuthService
        ,private toastservice:ToastService) { }

    ngOnInit() {}

//Event method triggered by clicking logon button
    login(){
        this.authservice.login(this.username,this.password)
            .then((data:any)=>{

                if(data.msg=='ok'){
                    this.toastservice.showSuccessToast('Login Successful');
                }
                else {
                    this.toastservice.showWarningToast('Wrong username or password, please try again');
                    this.username="";
                    this.password="";
                }

            })
    }

}
(3) Login interface HTML code
<ion-list>
  <ion-item>
    <ion-label position="stacked">User name</ion-label>
    <ion-input [(ngModel)]="username"></ion-input>
  </ion-item>

  <ion-item>
    <ion-label position="stacked">Password</ion-label>
    <ion-input [(ngModel)]="password"></ion-input>
  </ion-item>

  <ion-button  (click)="login()">Sign in</ion-button>
  <ion-button color="danger">Reset</ion-button>


</ion-list>
5. InApp.module.tsRegister components in
stayApp.module.tsAdd to imports section of: FormsModule
6. Setting pop-up boxes in tabs
(1)Tabs.page.tsTrigger method for adding pop-up box in
import { Component } from '@angular/core';
import {ModalController} from "@ionic/angular";
import {ModalOptions} from '@ionic/core'
import {LoginComponent} from '../components/login/login.component';


@Component({
  selector: 'app-tabs',
  templateUrl: 'tabs.page.html',
  styleUrls: ['tabs.page.scss']
})
export class TabsPage {

  constructor(public modalController: ModalController) {}

    //When the software starts running, call the presentModal method and pop up the login window
    ngOnInit(){
        this.presentModal();
    }


    //Pop-up login window
    async presentModal() {
        const modal = await this.modalController.create(<ModalOptions>{
            component: LoginComponent
        });
        return await modal.present();
    }

}
At this time, the effect of normal login interface is finished, but I encountered a problem because I used too high version of ionic.Report errors:
Error: No component factory found for LoginComponent. Did you add it to @NgModule.entryComponents?
I'll write a separate article about this problem. If you have similar problems here, don't panic, wait for my next blog.
2. Display of login effect