First, in order to avoid subsequent trouble, try to configure according to the official reference configuration. (Ubuntu18.04+CUDA10.1)
1, Preparatory work
1. View CUDA version command: nvcc -V (this command views the Runtime API. When NVIDIA SMI views the Driver API, it doesn't matter. The two API versions can be different)
My Ubuntu has installed CUDA10.0. Different versions of CUDA can be downloaded and switched under the same system, so I began to download CUDA10.1.
Website links of cuda versions: CUDA Toolkit Archive | NVIDIA Developer
Download to a. Run file and run the file on the terminal:
sudo sh cuda_10.1.243_418.87.00_linux.run
Continue -- > > accept -- > > remove the X -- > > install in front of the Driver. The installation is complete
2.cuda environment configuration
sudo gedit ~/.bashrc add cuda path
export CUDA_HOME=/usr/local/cuda
export PATH=$PATH:$CUDA_HOME/bin
# export LD_LIBRARY_PATH=/usr/local/cuda-10.0/lib64${LD_LIBRARY_PATH:+:${LD_LIBRARY_PATH}}
export LD_LIBRARY_PATH=$LD_LIBRARY_PATH:/usr/local/cuda/lib64
There is no version number to facilitate switching between different versions of CUDA, and then source ~ /. Bashrc is activated
3. Download the corresponding version of cudnn
Website links of cudnn versions: cuDNN Archive | NVIDIA Developer
Unzip cudnn-10.2-linux-x64-v7.6.5.32.solidairetheme8 into a cuda folder, and then copy some of the files:
sudo cp lib64/* /usr/local/cuda/lib64/
sudo cp include/* /usr/local/cuda/include/
sudo chmod a+r /usr/local/cuda/include/cudnn.h /usr/local/cuda/lib64/libcudnn*
4. CUDA switching of different versions
The process of switching cuda-1.0 to cuda-10.1 is as follows:
First, check which CUDA version the current CUDA soft connection points to:
wsm@wsm-System-Product-Name:~$ cd /usr/local
wsm@wsm-System-Product-Name:/usr/local$ ls
bin   cuda-10.0  etc    include  man   share
cuda  cuda-10.1  games  lib      sbin  src
wsm@wsm-System-Product-Name:/usr/local$ stat cuda
  File: cuda -> /usr/local/cuda-10.1
  Size: 20        	Block: 0          IO Blocks: 4096 symbolic links
 Equipment: 806 h/2054d	Inode: 4206363     Hard link: 1
 jurisdiction:(0777/lrwxrwxrwx)  Uid: (    0/    root)   Gid: (    0/    root)
Recent visit: 2021-10-12 19:27:59.319508098 +0800
 Recent changes: 2021-10-11 19:10:39.749341572 +0800
 Recent changes: 2021-10-11 19:10:39.749341572 +0800
 Created on:-
Then, the terminal inputs the following commands to switch versions:
(1) sudo rm -rf /usr/local/cuda # delete previously generated soft links
(2) sudo ln -s /usr/local/cuda-10.1 /usr/local/cuda # generate new soft links
nvcc-V check whether the switch is successful
2, MMdetection installation
File download: mmdetection source code: https://github.com/open-mmlab/mmdetection
cocoAPI source code: https://github.com/cocodataset/cocoapi
1. First create a virtual environment python3.7 -- > > and install pytorch1.5.0
After downloading, open the get_started.md document in the mmdetection master folder and docs_zh CN folder and install it according to the document. The virtual environment I created is Python 3.7, and the corresponding Python version of cuda10.1 is 1.5.0
Go to Previous PyTorch Versions | PyTorch
# CUDA 10.1
pip install torch==1.5.0+cu101 torchvision==0.6.0+cu101 -f https://download.pytorch.org/whl/torch_stable.html
2. Install mmcv full -- > > install dependency package -- > > install MMdetection
To install mmcv full instead of mmcv, the command:
pip install mmcv-full -f https://download.openmmlab.com/mmcv/dist/{cu_version}/{torch_version}/index.htmlCorresponding specific version:
pip install mmcv-full -f https://download.openmmlab.com/mmcv/dist/cu101/torch1.5.0/index.html
Install the dependent package, open the terminal in the directory where requirements.txt is located, and enter pip install -r requirements.txt to start installing the dependent package. Problems during the installation process are mostly network VPN problems. Solution: disconnect VPN -- > > replace Network -- > > connection hotspot and try.
Open the extracted cocoapi master folder, enter the python API, open the terminal in the setup.py directory, and enter: pip install -v -e. after the installation is successful, there will be pycocotools2.0 in the pip list
Enter the mmdetection master, install - V - E. after the installation is successful, there will be mmdet packages in the pip list
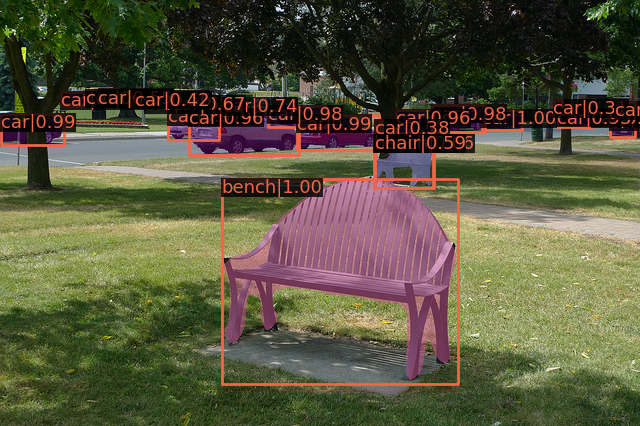
3, Verify that the installation was successful
Create a checkpoints folder under the mmdetection folder to store the pre training model.
Download the corresponding model, and the terminal inputs the following commands for testing:
(openmmlab) wsm@wsm-System-Product-Name:~/mmdetection/mmdetection-master$ python demo/image_demo.py demo/demo.jpg configs/mask_rcnn/mask_rcnn_r50_fpn_2x_coco.py checkpoints/mask_rcnn_r50_fpn_2x_coco_bbox_mAP-0.392__segm_mAP-0.354_20200505_003907-3e542a40.pth
Note: ubuntu terminal has automatic completion function