preface
I haven't written much recently. It's been a long time. It has been more than one year and nearly two years since I started learning. Compared with the beginning, my self feeling has not changed much, but
 The motivation for learning seems to be absent from time to time.

It's like having no goal. I don't know what I should learn and where to improve myself. Is it for work or for the career of programmer.

If you indulge in it for a period of time, you really have a state of lying flat. Today, I don't know what happened. I suddenly remembered that I hadn't written a blog for a long time. While thinking about what I wanted to write, I found my previous github project,
By chance, I saw a small box pushing game I had written for others, so I wrote this article.
thinking
In the box pushing game we usually play, it is generally composed of people, boxes, the end point, boxes at the end point, open space and walls. Players control people's up, down, left and right movement to push boxes. As long as all boxes are pushed to the end point, the game ends. Of course, after completing the basic game functions, we can expand our imagination and add some interesting elements to our writing.
rule
After determining the basic elements, the next step is to determine the rules of the game. Here, I just completed the most basic rules, and I can add the rules I want appropriately:
1. The person displays the person on the open space, the box displays the box on the open space, and the end point displays the end point on the open space;
2. People can only push the box. If there are obstacles (walls, boxes, etc.) in front of the box, they can't push it;
3. People, boxes and terminals shall not leave the wall;

These are the rules we can think of at present. They are not very detailed, but it doesn't matter. Anyway, we are familiar with this game.
Realization idea
1. The first is the material, which is not difficult to find. Baidu can find a set of materials to basically complete the game, which may need to be cut by itself.
2. People's movement is easy to realize. We can decide what keys to press and what kind of operation corresponds to, and we only need to monitor the action of pressing the keyboard.
3. Next is the only difficulty in the game, how to move around. For example, if a person passes through an open space, it will be displayed as a person. If a person leaves, it will be displayed as an open space. For the box, the end point is the same.
Object movement
Here, I set each element to a value. The first is to set the most basic element to a value, such as 1 for the box. The following code is a simple configuration of elements in different states:
mapElementName: {
    0: {
      name: 'Open space in wall',
      icon: require('@/assets/image/Open space in wall.png'),
      type: 'move' // Movable type, indicating that it can be moved under any circumstances
    },
    1: {
      name: 'case',
      icon: require('@/assets/image/case.png'),
      type: 'MF' // Move & & fix, indicating uncertain type, movable or immovable
    },
    2: {
      name: 'End',
      icon: require('@/assets/image/End.png'),
      type: 'move'
    },
    3: {
      name: 'case&&End',
      icon: require('@/assets/image/case&&End.png'),
      type: 'MF'
    },
    10: {
      name: 'people',
      icon: require('@/assets/image/people.png'),
      type: 'fix'
    },
    12: {
      name: 'people',
      icon: require('@/assets/image/people.png'),
      type: 'fix'
    },
    109: {
      name: 'people',
      icon: require('@/assets/image/people.png'),
      type: 'fix'
    },
    98: {
      name: 'wall',
      icon: require('@/assets/image/wall.png'),
      type: 'fix'
    },
    99: {
      name: 'Open space outside the wall',
      icon: require('@/assets/image/Open space outside the wall.png'),
      type: 'move'
    }
  },
The simple explanation is: 2 represents the end point, 10 represents the person, and when the person moves to the end point, it is 10 + 2 = 12. Then when the person moves to the end point, once the person leaves, it will be 12-10 = 2, and 2 represents the end point

After understanding the above ideas, you can write code next.
code implementation
Monitor keyboard scroll up and down
// Loop to determine the current person's position
      this.mapArray.forEach((item, index) => {
        item.forEach((array, temp) => {
          if (this.mapElementName[array].name === 'people') {
            this.manPosition = [index, temp]
          }
        })
      })
      //  Determine which keyboard to click
      // Parameters passed: the location of the person, the relevant element information of the location to which the person is to move, and the next information
      const man = this.manPosition
      const array = this.mapArray
      const name = this.mapElementName

      switch (e.keyCode) {
        case 38:
          this.toTop(name[array[man[0] - 1][man[1]]], man[0] - 2 < 0 ? false : name[array[man[0] - 2][man[1]]])
          break
        case 40:
          this.toBottom(
            name[array[man[0] + 1][man[1]]],
            man[0] + 3 > this.maxRow ? false : name[array[man[0] + 2][man[1]]]
          )
          break
        case 37:
          this.toLeft(name[array[man[0]][man[1] - 1]], man[1] - 2 < 0 ? false : name[array[man[0]][man[1] - 2]])
          break
        case 39:
          this.toRight(
            name[array[man[0]][man[1] + 1]],
            man[1] + 3 > this.maxColumn ? false : name[array[man[0]][man[1] + 2]]
          )
      }
When the keyboard hits, because we control people, we first cycle to judge the current person's position, and then move. It is obvious from this code that every time you hit the keyboard, you have to cycle to find out the person's position. This is unreasonable. We can
 Define a variable to store the current person's location. (for the previous code, I don't want to change it. Just explain: cloud_face:: cloud_face:)

Then click different keys to perform different operations. The following is the code for downward operation (other operation types):
      //  1. The wall is below the person
      if (next.type === 'fix') {
        return
      }
      //  2. Below the person is the box, and below the box is the box or the box && end or the wall
      if (next.type === 'MF' && doubleNext) {
        if (doubleNext.type === 'MF' || doubleNext.type === 'fix') {
          return
        }
        //  Start moving
        //  The person's position minus 10, the lower position minus the box plus person, and the lower position plus the box
        this.mapArray[this.manPosition[0]][this.manPosition[1]] -= 10
        this.mapArray[this.manPosition[0] + 1][this.manPosition[1]] -= 1
        this.mapArray[this.manPosition[0] + 1][this.manPosition[1]] += 10
        this.mapArray[this.manPosition[0] + 2][this.manPosition[1]] += 1
      }
      //  3. Below the person is the open space or the end point
      if (next.type === 'move') {
        //  Subtract 10 from the person's position and add 10 to the lower position
        this.mapArray[this.manPosition[0]][this.manPosition[1]] -= 10
        this.mapArray[this.manPosition[0] + 1][this.manPosition[1]] += 10
      }
      //  Refresh page
      this.$forceUpdate()
Well, there are several situations, but when I saw this.$forceUpdate(), I couldn't help shaking my head
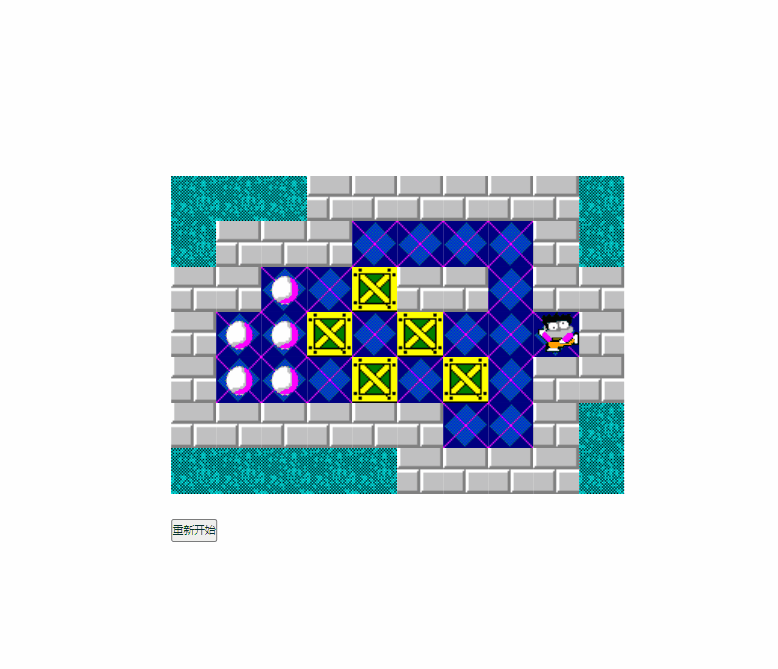
Basically, a basic push box game is completed. On the whole, it is not difficult and suitable for hand practice. Final effect:
expand
Because I was suffering from the map collection of push boxes (it took too much time, and different people may have their own levels), and in order to increase the flexibility of the game, I added it myself at that time
Own diy mode, providing players with their own design maps. The implementation idea is roughly divided into the following steps:
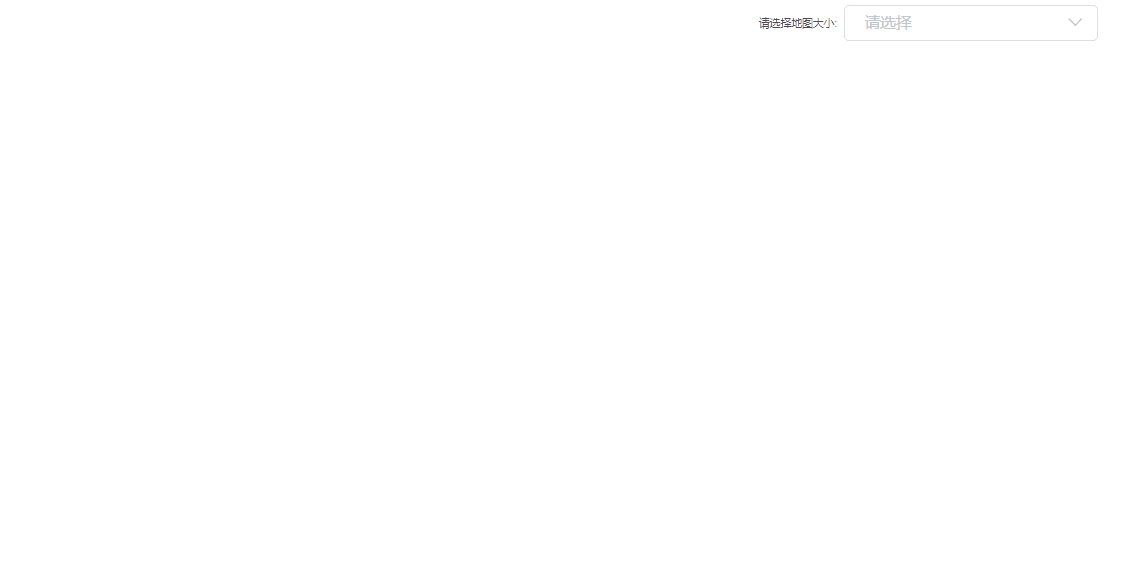
1. Provide options to select the size of the map by yourself;
2. Generate map squares of corresponding size according to the map size selected by the player. Each square is the open space in the wall by default. The player can click the square, and an option that can be set as an element of the map will appear to design freely.
Each square can set different elements to ensure that the map designed by the player can be played. Of course, the code can be changed freely, and the generated map can be changed freely.
Effect achieved:
last
From the overall implementation point of view, the logic of pushing boxes is not complex. Of course, it varies from person to person, and you can also design it very complex. Present my [project address]( https://github.com/ZhangXL-WaHaHa/vue-game)